2017 FORD EXPEDITION EL lock
[x] Cancel search: lockPage 167 of 500
4. Apply the brake pedal. Using ascrewdriver (or similar tool), press andhold the brake shift interlock leverwhile pulling the gearshift lever out ofpark (P) and into neutral (N).
5. Install the trim panel.
6.Apply the brake pedal, start the vehicle,and release the parking brake.
See your authorized dealer as soon as thisprocedure is used.
If Your Vehicle Gets Stuck In Mudor Snow
Note:Do not rock your vehicle if the engineis not at normal operating temperature ordamage to the transmission may occur.
Note:Do not rock your vehicle for morethan a minute or damage to thetransmission and tires may occur, or theengine may overheat.
If your vehicle gets stuck in mud or snow,you may rock it out by shifting betweenforward and reverse gears, stoppingbetween shifts in a steady pattern. Presslightly on the accelerator in each gear.
164
Expedition (TB7) Canada/United States of America, enUSA, Edition date: 03/2016, First Printing
Transmission
Page 169 of 500
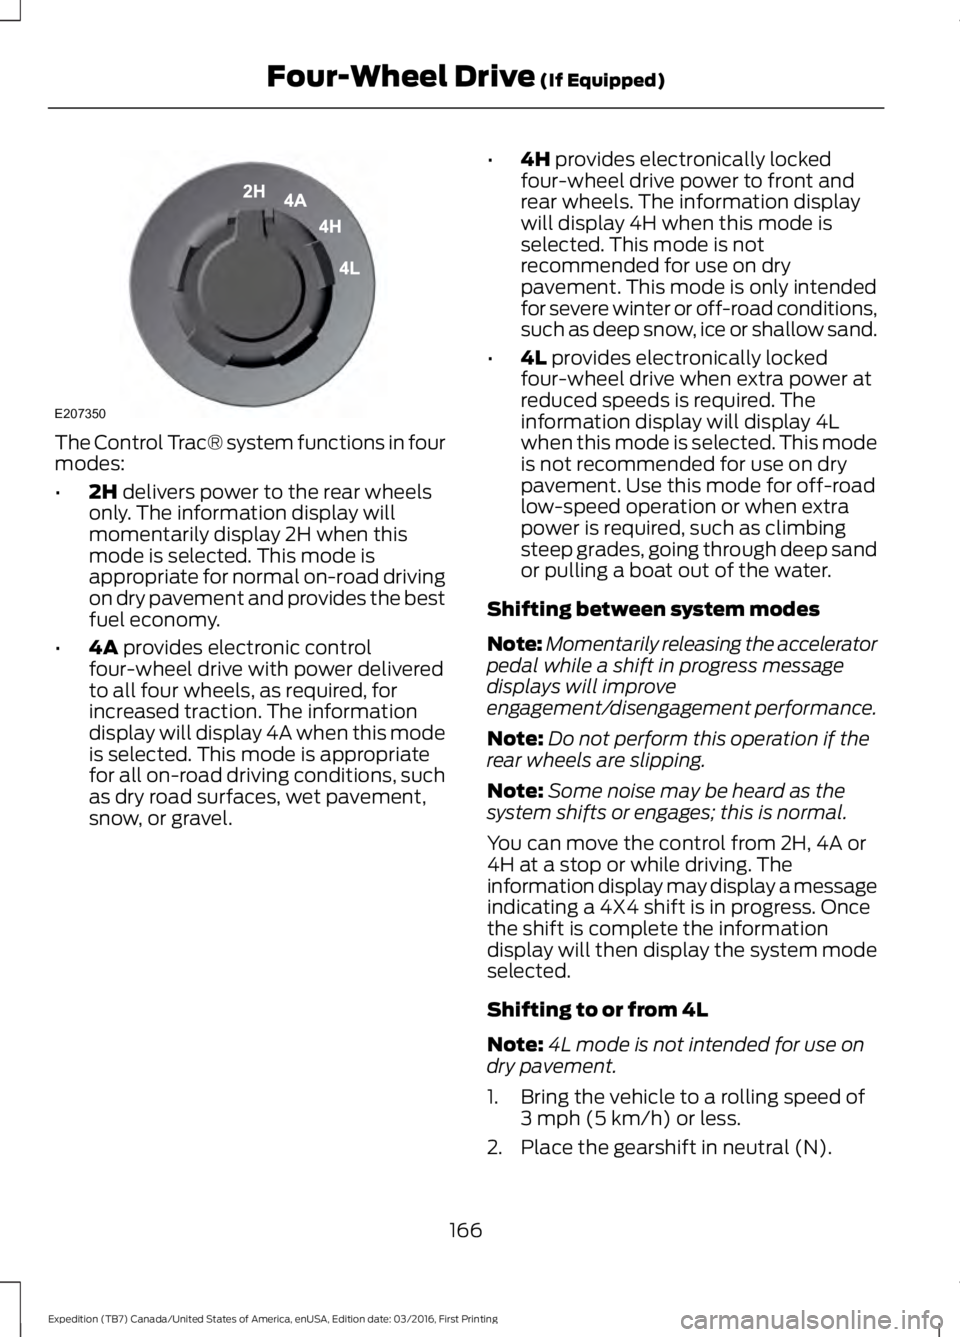
The Control Trac® system functions in fourmodes:
•2H delivers power to the rear wheelsonly. The information display willmomentarily display 2H when thismode is selected. This mode isappropriate for normal on-road drivingon dry pavement and provides the bestfuel economy.
•4A provides electronic controlfour-wheel drive with power deliveredto all four wheels, as required, forincreased traction. The informationdisplay will display 4A when this modeis selected. This mode is appropriatefor all on-road driving conditions, suchas dry road surfaces, wet pavement,snow, or gravel.
•4H provides electronically lockedfour-wheel drive power to front andrear wheels. The information displaywill display 4H when this mode isselected. This mode is notrecommended for use on drypavement. This mode is only intendedfor severe winter or off-road conditions,such as deep snow, ice or shallow sand.
•4L provides electronically lockedfour-wheel drive when extra power atreduced speeds is required. Theinformation display will display 4Lwhen this mode is selected. This modeis not recommended for use on drypavement. Use this mode for off-roadlow-speed operation or when extrapower is required, such as climbingsteep grades, going through deep sandor pulling a boat out of the water.
Shifting between system modes
Note:Momentarily releasing the acceleratorpedal while a shift in progress messagedisplays will improveengagement/disengagement performance.
Note:Do not perform this operation if therear wheels are slipping.
Note:Some noise may be heard as thesystem shifts or engages; this is normal.
You can move the control from 2H, 4A or4H at a stop or while driving. Theinformation display may display a messageindicating a 4X4 shift is in progress. Oncethe shift is complete the informationdisplay will then display the system modeselected.
Shifting to or from 4L
Note:4L mode is not intended for use ondry pavement.
1. Bring the vehicle to a rolling speed of3 mph (5 km/h) or less.
2. Place the gearshift in neutral (N).
166
Expedition (TB7) Canada/United States of America, enUSA, Edition date: 03/2016, First Printing
Four-Wheel Drive (If Equipped)E207350
Page 170 of 500
3. Move the 4WD switch to the desiredmode.
The information display will display amessage indicating a 4X4 shift is inprogress. The information display will thendisplay the system mode selected.
If any of the above shift conditions are notmet, the shift will not occur and theinformation display will display informationguiding the driver through the proper rangeof shifting procedures.
If SHIFT DELAYED PULL FORWARD isdisplayed in the information display,transfer case gear tooth blockage ispresent. To alleviate this condition, placethe transmission in a forward gear, movethe vehicle forward approximately 5 ft(2 m), and shift the transmission back toneutral (N) to allow the transfer case tocomplete the range shift.
How Your Vehicle Differs FromOther Vehicles
WARNING
Vehicles with a higher center ofgravity such as utility and four-wheeldrive vehicles handle differently thanvehicles with a lower center of gravity.Utility and four-wheel drive vehicles arenot designed for cornering at speeds ashigh as passenger cars any more thanlow-slung sports cars are designed toperform satisfactorily under off-roadconditions. Avoid sharp turns, excessivespeed and abrupt maneuvers in thesevehicles. Failure to drive cautiously couldresult in an increased risk of loss of vehiclecontrol, vehicle rollover, personal injury anddeath.
Truck and utility vehicles can differ fromsome other vehicles. Your vehicle may behigher to allow it to travel over roughterrain without getting hung up ordamaging underbody components.
The differences that make your vehicle soversatile also make it handle differentlythan an ordinary passenger car.
Maintain steering wheel control at alltimes, especially in rough terrain. Sincesudden changes in terrain can result inabrupt steering wheel motion, make sureyou grip the steering wheel from theoutside. Do not grip the spokes.
Drive cautiously to avoid vehicle damagefrom concealed objects such as rocks andstumps.
You should either know the terrain orexamine maps of the area before driving.Map out your route before driving in thearea. To maintain steering and brakingcontrol of your vehicle, you must have allfour wheels on the ground and they mustbe rolling, not sliding or spinning.
Driving Off-Road With Truck andUtility Vehicles
Note:On some models, the initial shift fromtwo-wheel drive to four-wheel drive whileyour vehicle is moving can cause somemomentary clunk and ratcheting sounds.This is the front drivetrain coming up tospeed and the automatic locking hubsengaging and is not cause for concern.
Note:Your vehicle may be equipped witha front air dam that can become damaged(due to reduced ground clearance) whentaking your vehicle off-road. You mayremove this air dam by removing eight bolts.
Four-wheel drive vehicles are speciallyequipped for driving on sand, snow, mudand rough terrain and have operatingcharacteristics that are somewhatdifferent from conventional vehicles, bothon and off the road.
167
Expedition (TB7) Canada/United States of America, enUSA, Edition date: 03/2016, First Printing
Four-Wheel Drive (If Equipped)
Page 173 of 500

Note:Avoid turning on steep slopes or hills.A danger lies in losing traction, slippingsideways and possible vehicle roll over.Whenever driving on a hill, determinebeforehand the route you will use. Do notdrive over the crest of a hill without seeingwhat conditions are on the other side. Donot drive in reverse over a hill without theaid of an observer.
Although natural obstacles may make itnecessary to travel diagonally up or downa hill or steep incline, you should alwaystry to drive straight up or straight down.
When climbing a steep slope or hill, startin a lower gear rather than downshifting toa lower gear from a higher gear once theascent has started. This reduces strain onthe engine and the possibility of stalling.
If your vehicle stalls, do not try to turnaround because this could cause vehicleroll over. It is better to reverse back to asafe location.
Apply just enough power to the wheels toclimb the hill. Too much power will causethe tires to slip, spin or lose traction,resulting in loss of vehicle control.
Descend a hill in the same gear you woulduse to climb up the hill to avoid excessivebrake application and brake overheating.Do not descend in neutral. Disengageoverdrive or move the transmissionselector lever to a lower gear. Whendescending a steep hill, avoid sudden hardbraking as you could lose control. The frontwheels have to be turning in order to steeryour vehicle.
If your vehicle has anti-lock brakes, applythe brakes steadily. Do not pump thebrakes.
Driving on Snow and Ice
WARNING
If you are driving in slipperyconditions that require tire chains orcables, then it is critical that you drivecautiously. Keep speeds down, allow forlonger stopping distances and avoidaggressive steering to reduce the chancesof a loss of vehicle control which can leadto serious injury or death. If the rear end ofyour vehicle slides while cornering, steer inthe direction of the slide until you regaincontrol of your vehicle.
Four-wheel drive vehicles have advantagesover two-wheel drive vehicles in snow andice but can skid like any other vehicle.Should you start to slide while driving onsnowy or icy roads, turn the steering wheelin the direction of the slide until you regaincontrol.
Avoid sudden applications of power andquick changes of direction on snow andice. Apply the accelerator slowly andsteadily when starting from a full stop.
170
Expedition (TB7) Canada/United States of America, enUSA, Edition date: 03/2016, First Printing
Four-Wheel Drive (If Equipped)E143949
Page 174 of 500
Avoid sudden braking. Although afour-wheel drive vehicle may acceleratebetter than a two-wheel drive vehicle insnow and ice, it will not stop any faster asbraking occurs at all four wheels. Do notbecome overconfident in any roadcondition.
Make sure you allow sufficient distancebetween you and other vehicles forstopping. Drive slower than usual andconsider using one of the lower gears. Inemergency stopping situations, apply thebrake steadily. Do not pump the brakepedal. See Hints on Driving WithAnti-Lock Brakes (page 173).
Maintenance and Modifications
The suspension and steering systems onyour vehicle have been designed andtested to provide predictable performancewhether loaded or empty. For this reason,we strongly recommend that you do notmake modifications such as adding orremoving parts (for example, lift kits orstabilizer bars) or by using replacementparts not equivalent to the original factoryequipment.
We recommend that you use caution whenyour vehicle has either a high load or device(such as ladders or luggage racks). Anymodifications to your vehicle that raise thecenter of gravity may cause your vehicleto roll over when there is a loss of vehiclecontrol.
Failure to maintain your vehicle correctlymay void the warranty, increase your repaircost, reduce vehicle performance andoperational capabilities and adverselyaffect you and your passenger's safety. Werecommend you frequently inspect yourvehicle's chassis components when yourvehicle is subject to off road usage.
171
Expedition (TB7) Canada/United States of America, enUSA, Edition date: 03/2016, First Printing
Four-Wheel Drive (If Equipped)
Page 176 of 500
GENERAL INFORMATION
Note:Occasional brake noise is normal. Ifa metal-to-metal, continuous grinding orcontinuous squeal sound is present, thebrake linings may be worn-out and anauthorized dealer should check them. If thevehicle has continuous vibration or shudderin the steering wheel while braking, anauthorized dealer should check your vehicle.
Note:Brake dust may accumulate on thewheels, even under normal drivingconditions. Some dust is inevitable as thebrakes wear and does not contribute tobrake noise. See Cleaning the AlloyWheels (page 270).
See Warning Lamps andIndicators (page 87).
Wet brakes result in reduced brakingefficiency. Gently press the brake pedal afew times when driving from a car wash orstanding water to dry the brakes.
Brake Over Accelerator
In the event the accelerator pedalbecomes stuck or entrapped, apply steadyand firm pressure to the brake pedal toslow the vehicle and reduce engine power.If you experience this condition, apply thebrakes and bring your vehicle to a safestop. Switch the engine off, move thetransmission to park (P) and apply theparking brake. Inspect the acceleratorpedal and the area around it for any itemsor debris that may be obstructing itsmovement. If none are found and thecondition persists, have your vehicle towedto the nearest authorized dealer.
Emergency Brake Assist
Emergency brake assist detects when youbrake heavily by measuring the rate atwhich you press the brake pedal. Itprovides maximum braking efficiency aslong as you press the pedal. Emergencybrake assist can reduce stopping distancesin critical situations.
Anti-lock Brake System
This system helps you maintain steeringcontrol during emergency stops by keepingthe brakes from locking.
This lamp momentarilyilluminates when you switch theignition on. If the light does notilluminate during start up, remains on orflashes, the anti-lock braking system maybe disabled. Have the system checked byan authorized dealer. If the anti-lock brakesystem is disabled, normal braking is stilleffective.
If the brake warning lampilluminates with the parkingbrake released, have your brakesystem serviced immediately.
HINTS ON DRIVING WITH
ANTI-LOCK BRAKES
Note:When the system is operating, thebrake pedal may pulse and may travelfurther. Maintain pressure on the brakepedal. You may also hear a noise from thesystem. This is normal.
The anti-lock braking system will noteliminate the risks when:
•You drive too closely to the vehicle infront of you.
•Your vehicle is hydroplaning.
•You take corners too fast.
•The road surface is poor.
173
Expedition (TB7) Canada/United States of America, enUSA, Edition date: 03/2016, First Printing
BrakesE138644 E138644
Page 177 of 500

PARKING BRAKE
WARNING
Always set the parking brake fullyand make sure the transmission isplaced in park (P). Failure to set theparking brake and engage park could resultin vehicle roll-away, property damage orbodily injury. Turn the ignition to the lockposition and remove the key whenever youleave your vehicle.
Apply the parking brake whenever yourvehicle is parked. Press the pedaldownward to set the parking brake. Thebrake warning lamp in the instrumentcluster will illuminate and remainsilluminated until the parking brake isreleased.
To release, pull the brake release leverlocated at the lower left side of theinstrument panel.
If you are parking your vehicle on a gradeor with a trailer, press and hold the brakepedal down, then set the parking brake.There may be a little vehicle movement asthe parking brake sets to hold the vehicle'sweight. This is normal and should be noreason for concern. If needed, press andhold the service brake pedal down, thentry reapplying the parking brake. Chock thewheels if required. If the parking brakecannot hold the weight of the vehicle, theparking brake may need to be serviced orthe vehicle may be overloaded.
HILL START ASSIST
WARNINGS
The system does not replace theparking brake. When you leave yourvehicle, always apply the parkingbrake and shift the transmission into park(P) (automatic transmission) or first gear(1) (manual transmission).
WARNINGS
You must remain in your vehicle onceyou have activated the system.
During all times, you are responsiblefor controlling your vehicle,supervising the system andintervening, if required.
If the engine is revved excessively, orif a malfunction is detected, thesystem will be deactivated.
The system makes it easier to pull awaywhen your vehicle is on a slope without theneed to use the parking brake.
When the system is active, your vehicle willremain stationary on the slope for two tothree seconds after you release the brakepedal. This allows you time to move yourfoot from the brake to the acceleratorpedal. The brakes release automaticallywhen the engine has sufficient torque toprevent your vehicle from rolling down thegrade. This is an advantage when pullingaway on a slope, for example from a carpark ramp, traffic lights or when reversinguphill into a parking space.
The system will activate automatically onany slope that will cause significant vehiclerollback. For vehicles with a manualtransmission, you can switch this featureoff using the information display. SeeInformation Displays (page 91). Thesystem will remain on or off depending onhow it was last set.
Note:There is no warning lamp to indicatethe system is either on or off.
Note:If your vehicle is equipped with AutoHold, Hill Start Assist will not be availablewhile Auto Hold is active.
174
Expedition (TB7) Canada/United States of America, enUSA, Edition date: 03/2016, First Printing
Brakes
Page 185 of 500

PRINCIPLE OF OPERATION
WARNINGS
To help avoid personal injury, pleaseread and understand the limitationsof the system as contained in thissection. Sensing is only an aid for some(generally large and fixed) objects whenmoving on a flat surface at parking speeds.Certain objects with surfaces that absorbultrasonic waves, surrounding vehicle'sparking aid systems, traffic controlsystems, fluorescent lamps, inclementweather, air brakes, and external motorsand fans may also affect the function ofthe sensing system; this may includereduced performance or a false activation.
To help avoid personal injury, alwaysuse caution when in reverse (R) andwhen using the sensing system.
This system is not designed toprevent contact with small or movingobjects. The system is designed toprovide a warning to assist the driver indetecting large stationary objects to avoiddamaging your vehicle. The system maynot detect smaller objects, particularlythose close to the ground.
Certain add-on devices such as largetrailer hitches, bike or surfboard racksand any device that may block thenormal detection zone of the system, maycreate false beeps.
Note:Keep the sensors, located on thebumper or fascia, free from snow, ice andlarge accumulations of dirt. If the sensorsare covered, the system’s accuracy can beaffected. Do not clean the sensors withsharp objects.
Note:If your vehicle sustains damage tothe bumper or fascia, leaving it misalignedor bent, the sensing zone may be alteredcausing inaccurate measurement ofobstacles or false alarms.
Note:The sensing system cannot be turnedoff when a MyKey is present. See Principleof Operation (page 47).
Note:If you attach certain add-on devicessuch as a trailer or bike rack, the rear sensingsystem may detect that add-on device andtherefore provide warnings. It is suggestedthat you disable the rear sensing systemwhen you attach an add-on device to yourvehicle to prevent these warnings.
The sensing system warns the driver ofobstacles within a certain range of yourvehicle. The system turns on automaticallywhenever you switch the ignition on.
You can turn the system on oroff by pressing the parking aidbutton. If your vehicle does nothave a parking aid button, the system canbe switched off through the informationdisplay menu or from the pop-up messagethat appears once you shift thetransmission into reverse (R). See GeneralInformation (page 91).
If a fault is present in the system, a warningmessage appears in the informationdisplay. See Information Messages(page 102).
REAR PARKING AID (If Equipped)
The rear sensors are only active when thetransmission is in reverse (R). As yourvehicle moves closer to the obstacle, therate of the audible warning increases.When the obstacle is less than 12 in(30 cm) away, the warning soundscontinuously. If the system detects astationary or receding object farther than12 in (30 cm) from the corners of thebumper, the tone sounds for only threeseconds. Once the system detects anobject approaching, the warning soundsagain.
182
Expedition (TB7) Canada/United States of America, enUSA, Edition date: 03/2016, First Printing
Parking AidsE139213