2017 FORD EXPEDITION EL lock
[x] Cancel search: lockPage 239 of 500
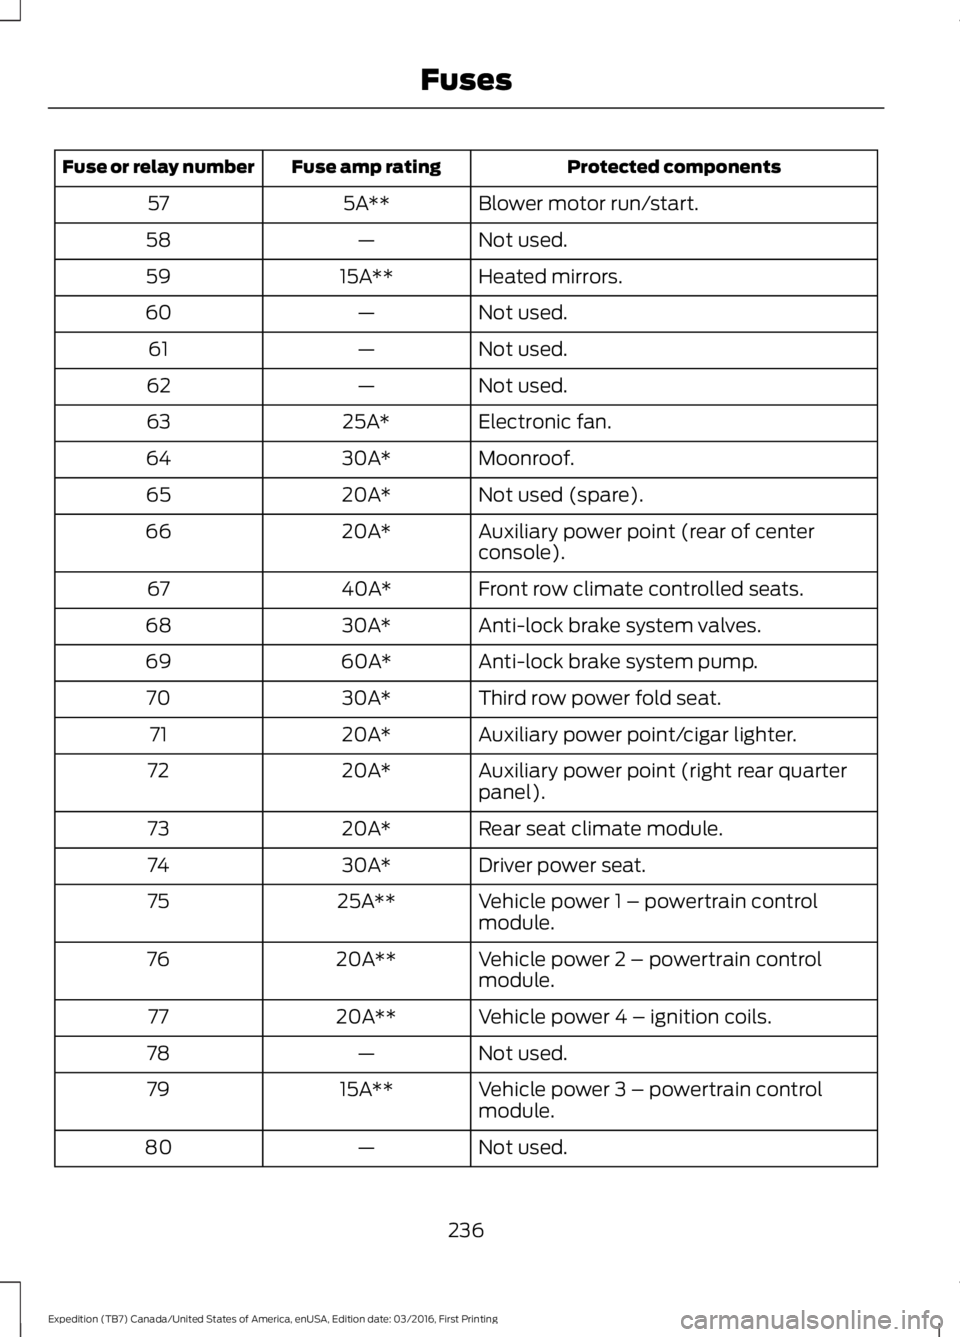
Protected componentsFuse amp ratingFuse or relay number
Blower motor run/start.5A**57
Not used.—58
Heated mirrors.15A**59
Not used.—60
Not used.—61
Not used.—62
Electronic fan.25A*63
Moonroof.30A*64
Not used (spare).20A*65
Auxiliary power point (rear of centerconsole).20A*66
Front row climate controlled seats.40A*67
Anti-lock brake system valves.30A*68
Anti-lock brake system pump.60A*69
Third row power fold seat.30A*70
Auxiliary power point/cigar lighter.20A*71
Auxiliary power point (right rear quarterpanel).20A*72
Rear seat climate module.20A*73
Driver power seat.30A*74
Vehicle power 1 – powertrain controlmodule.25A**75
Vehicle power 2 – powertrain controlmodule.20A**76
Vehicle power 4 – ignition coils.20A**77
Not used.—78
Vehicle power 3 – powertrain controlmodule.15A**79
Not used.—80
236
Expedition (TB7) Canada/United States of America, enUSA, Edition date: 03/2016, First Printing
Fuses
Page 242 of 500
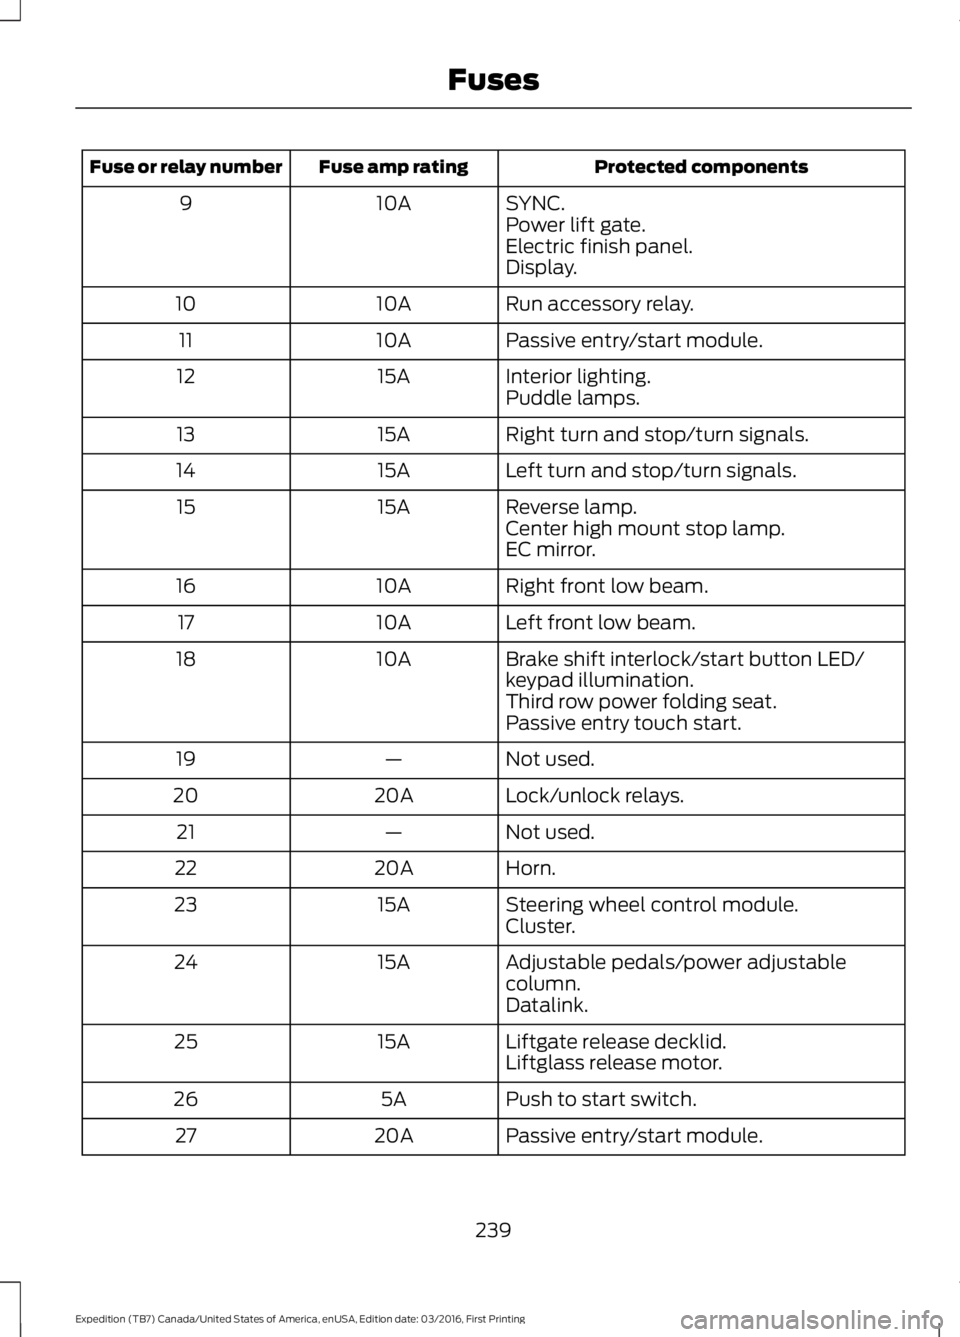
Protected componentsFuse amp ratingFuse or relay number
SYNC.10A9Power lift gate.Electric finish panel.Display.
Run accessory relay.10A10
Passive entry/start module.10A11
Interior lighting.15A12Puddle lamps.
Right turn and stop/turn signals.15A13
Left turn and stop/turn signals.15A14
Reverse lamp.15A15Center high mount stop lamp.EC mirror.
Right front low beam.10A16
Left front low beam.10A17
Brake shift interlock/start button LED/keypad illumination.10A18
Third row power folding seat.Passive entry touch start.
Not used.—19
Lock/unlock relays.20A20
Not used.—21
Horn.20A22
Steering wheel control module.15A23Cluster.
Adjustable pedals/power adjustablecolumn.15A24
Datalink.
Liftgate release decklid.15A25Liftglass release motor.
Push to start switch.5A26
Passive entry/start module.20A27
239
Expedition (TB7) Canada/United States of America, enUSA, Edition date: 03/2016, First Printing
Fuses
Page 246 of 500
GENERAL INFORMATION
Have your vehicle serviced regularly to helpmaintain its roadworthiness and resalevalue. There is a large network ofauthorized dealers that are there to helpyou with their professional servicingexpertise. We believe that their speciallytrained technicians are best qualified toservice your vehicle properly and expertly.They are supported by a wide range ofhighly specialized tools developedspecifically for servicing your vehicle.
If your vehicle requires professional service,an authorized dealer can provide thenecessary parts and service. Check yourwarranty information to find out whichparts and services are covered.
Use only recommended fuels, lubricants,fluids and service parts conforming tospecifications. Motorcraft® parts aredesigned and built to provide the bestperformance in your vehicle.
Precautions
•Do not work on a hot engine.
•Make sure that nothing gets caught inmoving parts.
•Do not work on a vehicle with theengine running in an enclosed space,unless you are sure you have enoughventilation.
•Keep all open flames and other burningmaterial (such as cigarettes) awayfrom the battery and all fuel relatedparts.
Working with the Engine Off
1.Set the parking brake and shift to park(P).
2. Switch off the engine.
3. Block the wheels.
Working with the Engine On
WARNING
To reduce the risk of vehicle damageand/or personal burn injuries, do notstart your engine with the air cleanerremoved and do not remove it while theengine is running.
1.Set the parking brake and shift to park(P).
2. Block the wheels.
OPENING AND CLOSING THE
HOOD
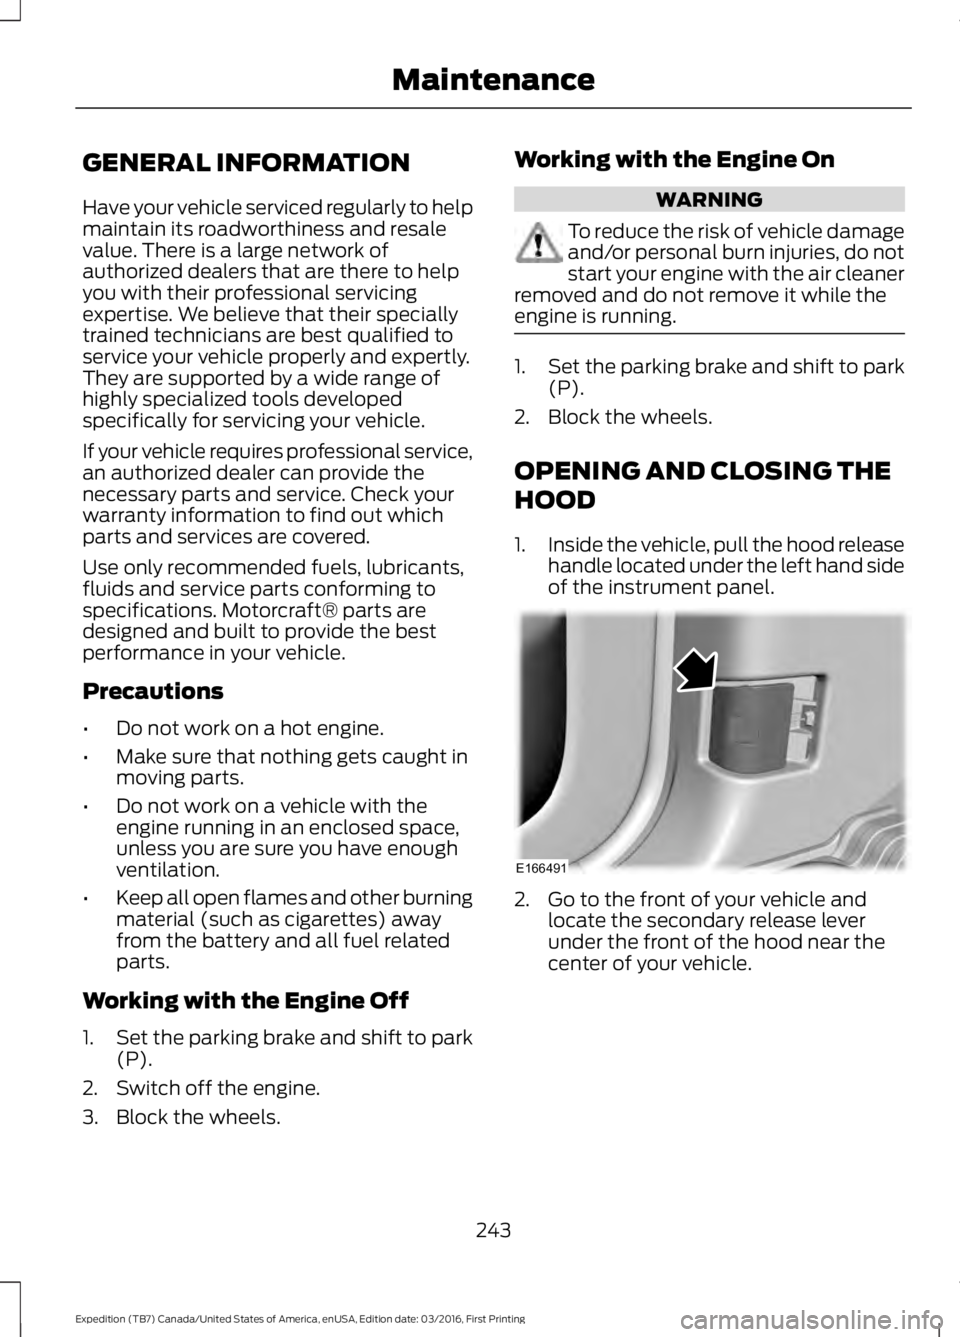
1.Inside the vehicle, pull the hood releasehandle located under the left hand sideof the instrument panel.
2. Go to the front of your vehicle andlocate the secondary release leverunder the front of the hood near thecenter of your vehicle.
243
Expedition (TB7) Canada/United States of America, enUSA, Edition date: 03/2016, First Printing
MaintenanceE166491
Page 249 of 500
Do not use supplemental engine oiladditives because they are unnecessaryand could lead to engine damage that maynot be covered by the vehicle Warranty.
Only use oils certified for gasoline enginesby the American Petroleum Institute (API).An oil with this trademark symbolconforms to the current engine andemission system protection standards andfuel economy requirements of theInternational Lubricants SpecificationAdvisory Committee (ILSAC).
To top up the engine oil level do thefollowing:
1. Clean the area surrounding the engineoil filler cap before you remove it.
2. Remove the engine oil filler cap. SeeUnder Hood Overview (page 244).Turn it counterclockwise and removeit.
3. Add engine oil that meets Fordspecifications. See Capacities andSpecifications (page 308). You mayhave to use a funnel to pour the engineoil into the opening.
4. Recheck the oil level.
5. If the oil level is correct, replace thedipstick and make sure it is fully seated.
6. Replace the engine oil filler cap. Turnit clockwise until you feel a strongresistance.
Note: Do not add oil further than themaximum mark. Oil levels above themaximum mark may cause engine damage.
Note:Make sure you install the oil filler capcorrectly.
Note:Soak up any spillage with anabsorbent cloth immediately.
OIL CHANGE INDICATOR
RESET
Use the information display controls onthe steering wheel to reset the oil changeindicator.
From the main menu scroll to:
Action and descriptionMessage
Press the right arrow button,then from this menu scrollto the following message.
Settings
Press the right arrow button,then from this menu scrollto the following message.
Vehicle
Press the right arrow button,then from this menu scrollto the following message.
Oil Life
Press and hold the OKbutton until the instrumentcluster displays thefollowing message.
Hold OK toReset
Reset Successful
When the oil change indic-ator resets the instrumentcluster displays 100%.
Remaining Life
{00}%
246
Expedition (TB7) Canada/United States of America, enUSA, Edition date: 03/2016, First Printing
MaintenanceE142732
Page 251 of 500
Note:Coolants marketed for all makes andmodels may not be approved to Fordspecifications and may cause damage tothe cooling system. Resulting componentdamage may not be covered by the vehicleWarranty.
If the coolant level is at or below theminimum mark, add prediluted coolantimmediately.
To top up the coolant level do thefollowing:
1. Unscrew the cap slowly. Any pressureescapes as you unscrew the cap.
2. Add prediluted coolant approved tothe correct specification. SeeCapacities and Specifications (page304).
3. Add enough prediluted coolant toreach the correct level.
4.Replace the coolant reservoir cap, turnit clockwise until you feel a strongresistance.
5. Check the coolant level in the coolantreservoir the next few times you driveyour vehicle. If necessary, add enoughprediluted engine coolant to bring thecoolant level to the correct level.
If you have to add more than 1.1 qt (1 L) ofengine coolant per month, have yourvehicle checked as soon as possible.Operating an engine with a low level ofcoolant can result in engine overheatingand possible engine damage.
Note:During normal vehicle operation, thecoolant may change color from orange topink or light red. As long as the coolant isclear and uncontaminated, this color changedoes not indicate the coolant has degradednor does it require the coolant to be drained,the system to be flushed, or the coolant tobe replaced.
Note:In case of emergency, you can add alarge amount of water without coolant inorder to reach a vehicle service location.Water alone, without coolant, can causeengine damage from corrosion, overheatingor freezing. When you reach a servicelocation, you must have the cooling systemdrained and refilled with prediluted coolantapproved to the correct specification. SeeCapacities and Specifications (page 304).
Do not use the following as a coolantsubstitute:
•Alcohol.
•Methanol.
•Brine.
•Any coolant mixed with alcohol ormethanol antifreeze.
Alcohol and other liquids can cause enginedamage from overheating or freezing.
Do not add extra inhibitors or additives tothe coolant. These can be harmful andcompromise the corrosion protection ofthe coolant.
Recycled Coolant
We do not recommend the use of recycledcoolant as an approved recycling processis not yet available.
Dispose of used engine coolant in anappropriate manner. Follow yourcommunity's regulations and standardsfor recycling and disposing of automotivefluids.
248
Expedition (TB7) Canada/United States of America, enUSA, Edition date: 03/2016, First Printing
Maintenance
Page 257 of 500
If you see any corrosion on the battery orterminals, remove the cables from theterminals and clean with a wire brush. Youcan neutralize the acid with a solution ofbaking soda and water.
Because your vehicle’s engine iselectronically controlled by a computer,some control conditions are maintainedby power from the battery. When thebattery is disconnected or a new batteryis installed, the engine must relearn its idleand fuel trim strategy for optimumdriveability and performance. Flexible fuelvehicles (FFV) must also relearn theethanol content of the fuel for optimumdriveability and performance.
To restore the settings, do the following:
1. Apply the parking brake.
2. Shift into park (P) or neutral (N).
3. Switch off all accessories.
4. Press the brake pedal and start yourvehicle.
5. Run the engine until it reaches normaloperating temperature. While theengine is warming up, complete thefollowing: Reset the clock. See AudioSystem (page 313). Reset the powerwindows bounce-back feature. SeeWindows and Mirrors (page 79).Reset the radio station presets. SeeAudio System (page 313).
6.Allow the engine to idle for at least oneminute.
7.Drive the vehicle at least 10 mi (16 km)to completely relearn the idle trim andfuel trim strategy.
Note:If you do not allow the engine torelearn the idle and fuel trim strategy, theidle quality of your vehicle may be adverselyaffected until the engine computereventually relearns the idle trim and fueltrim strategy.
Note:For flexible fuel vehicles, if you areoperating on E85, you may experience poorstarts or an inability to start the engine anddriveability problems until the fuel trim andethanol content have been relearned.
Make sure that you dispose of old batteriesin an environmentally friendly way. Seekadvice from your local authority aboutrecycling old batteries.
If storing your vehicle for more than 30days without recharging the battery, werecommend that you disconnect thebattery cables to maintain battery chargefor quick starting.
Battery Management System (If
Equipped)
The battery management system monitorsbattery conditions and takes actions toextend battery life. If excessive batterydrain is detected, the system temporarilydisables some electrical systems toprotect the battery.
Systems included are:
•Heated rear window.
•Heated seats.
•Climate control.
•Heated steering wheel.
•Audio unit.
•Navigation system.
A message may appear in the informationdisplays to alert you that batteryprotection actions are active. Thesemessages are only for notification that anaction is taking place, and not intended toindicate an electrical problem or that thebattery requires replacement.
254
Expedition (TB7) Canada/United States of America, enUSA, Edition date: 03/2016, First Printing
Maintenance
Page 258 of 500
After battery replacement, or in somecases after charging the battery with anexternal charger, the battery managementsystem requires eight hours of vehicle sleeptime to relearn the battery state of charge.During this time your vehicle must remainfully locked with the ignition switched off.
Note:Prior to relearning the battery stateof charge, the battery management systemmay temporarily disable some electricalsystems.
Electrical Accessory Installation
To make sure the battery managementsystem works correctly, do not connect anelectrical device ground connectiondirectly to the battery negative post. Thiscan cause inaccurate measurements ofthe battery condition and potentialincorrect system operation.
Note:If you add electrical accessories orcomponents to the vehicle, it may adverselyaffect battery performance and durability.This may also affect the performance ofother electrical systems in the vehicle.
CHECKING THE WIPER
BLADES
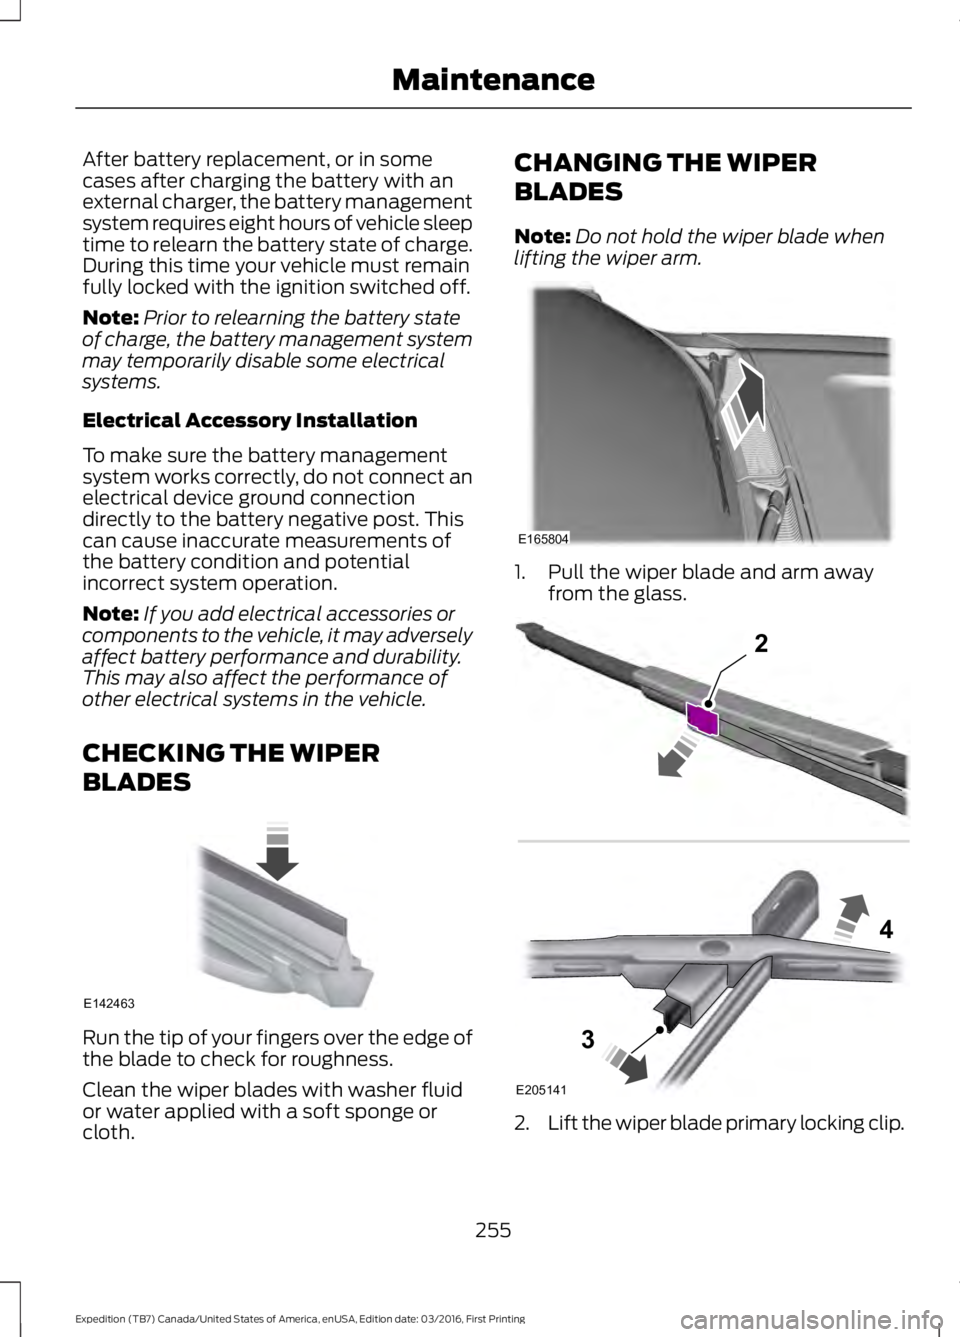
Run the tip of your fingers over the edge ofthe blade to check for roughness.
Clean the wiper blades with washer fluidor water applied with a soft sponge orcloth.
CHANGING THE WIPER
BLADES
Note:Do not hold the wiper blade whenlifting the wiper arm.
1. Pull the wiper blade and arm awayfrom the glass.
2.Lift the wiper blade primary locking clip.
255
Expedition (TB7) Canada/United States of America, enUSA, Edition date: 03/2016, First Printing
MaintenanceE142463 E165804 E205141
2
3
4
Page 259 of 500
3. Press the wiper blade secondarylocking clip.
4. Remove the wiper blade.
Note:Make sure that the wiper arm doesnot spring back against the glass when thewiper blade is not attached.
5. Install in the reverse order.
Note:Make sure that the wiper blade locksinto place.
ADJUSTING THE HEADLAMPS
Vertical Aim Adjustment
The headlamps on your vehicle areproperly aimed at the assembly plant. Ifyour vehicle has been in an accident,contact an authorized dealer to check andrealign your headlamps.
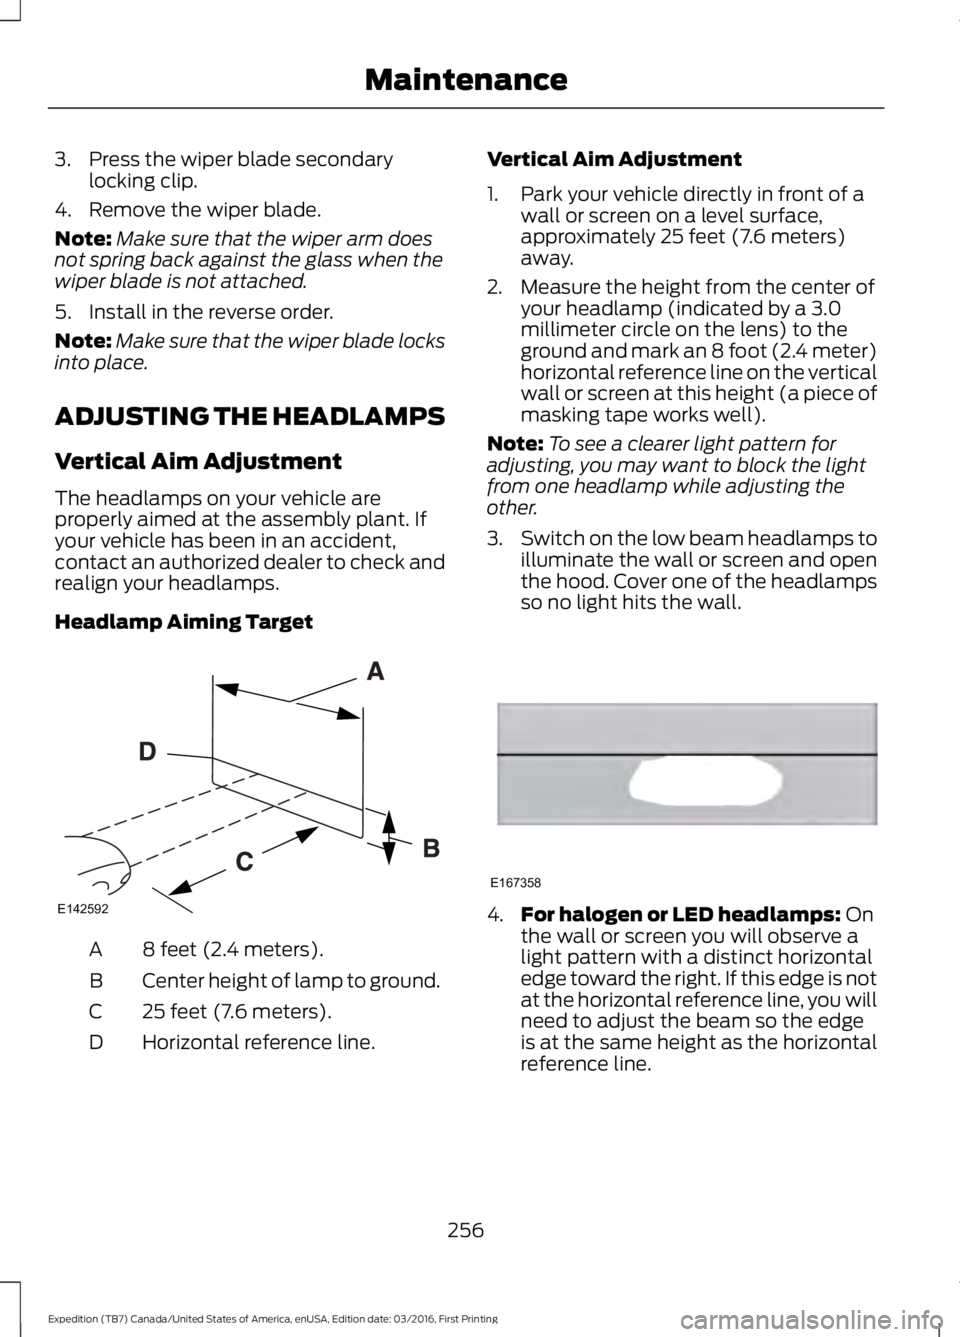
Headlamp Aiming Target
8 feet (2.4 meters).A
Center height of lamp to ground.B
25 feet (7.6 meters).C
Horizontal reference line.D
Vertical Aim Adjustment
1. Park your vehicle directly in front of awall or screen on a level surface,approximately 25 feet (7.6 meters)away.
2. Measure the height from the center ofyour headlamp (indicated by a 3.0millimeter circle on the lens) to theground and mark an 8 foot (2.4 meter)horizontal reference line on the verticalwall or screen at this height (a piece ofmasking tape works well).
Note:To see a clearer light pattern foradjusting, you may want to block the lightfrom one headlamp while adjusting theother.
3.Switch on the low beam headlamps toilluminate the wall or screen and openthe hood. Cover one of the headlampsso no light hits the wall.
4.For halogen or LED headlamps: Onthe wall or screen you will observe alight pattern with a distinct horizontaledge toward the right. If this edge is notat the horizontal reference line, you willneed to adjust the beam so the edgeis at the same height as the horizontalreference line.
256
Expedition (TB7) Canada/United States of America, enUSA, Edition date: 03/2016, First Printing
MaintenanceE142592 E167358