2017 FORD EXPEDITION EL lock
[x] Cancel search: lockPage 63 of 500

Displaying the Factory Set Code
Note:You need to have two programmedkeys for this procedure.
To display the factory-set code in theinformation display:
1.Insert a key into the ignition and switchthe ignition on for a few seconds.
2.Switch the ignition off and remove thekey.
3. Insert the second key into the ignitionand switch the ignition on.
The factory-set code will display for a fewseconds.
Note:The code may not display until afterany other warning messages first display.
Unlocking and Locking the Doors
Vehicles Without Intelligent Access
To Unlock the Driver Door
Enter the factory-set 5-digit code or yourpersonal code. You must press eachnumber within five seconds of each other.The interior lamps will illuminate.
Note:All doors will unlock if you disablethe two-stage unlocking mode. SeeLocking and Unlocking (page 52).
To Unlock All Doors
Enter the factory-set code or your personalcode, then press 3·4 within five seconds.
To Lock All Doors
Press and hold 7·8 and 9·0 at the sametime (with the driver door closed). You donot need to enter the keypad code first.
Vehicles With Intelligent Access
Press any button on keyless entry keypadonce to unlock all doors.
Note:You must have an intelligent accesskey within 3 ft (1 m) of your vehicle.
60
Expedition (TB7) Canada/United States of America, enUSA, Edition date: 03/2016, First Printing
Doors and Locks
Page 64 of 500
PASSIVE ANTI-THEFT
SYSTEM
Note:The system is not compatible withnon-Ford aftermarket remote start systems.Use of these systems may result in vehiclestarting problems and a loss of securityprotection.
Note:Metallic objects, electronic devicesor a second coded key on the same keychain may cause vehicle starting problemsif they are too close to the key when startingthe engine. Prevent these objects fromtouching the coded key while starting theengine. Switch the ignition off, move allobjects on the key chain away from thecoded key and restart the engine if aproblem occurs.
Note:Do not leave a duplicate coded keyin the vehicle. Always take your keys andlock all doors when leaving the vehicle.
SecuriLock®
The system is an engine immobilizationsystem. It is designed to help prevent theengine from being started unless a codedkey programmed to your vehicle is used.Using the wrong key may prevent theengine from starting. A message mayappear in the information display.
If you are unable to start the engine with acorrectly coded key, a malfunction hashappened and a message may appear inthe information display.
Automatic Arming
The vehicle arms immediately after youswitch the ignition off.
Automatic Disarming
Switching the ignition on with a coded keydisarms the vehicle.
Replacement Keys
Note:Your vehicle comes equipped withtwo integrated keyhead transmitters or twointelligent access keys.
The integrated keyhead transmitterfunctions as a programmed ignition keythat operates all the locks and starts thevehicle, as well as a remote control.
The intelligent access key functions as aprogrammed key that operates the driverdoor lock and activates the intelligentaccess with push button start system, aswell as a remote control.
If your programmed transmitters orstandard SecuriLock coded keys(integrated keyhead transmitters only) arelost or stolen and you do not have an extracoded key, you will need to have yourvehicle towed to an authorized dealer. Youneed to erase the key codes from yourvehicle and program new coded keys.
Store an extra programmed key away fromthe vehicle in a safe place to help preventany inconveniences. See your authorizeddealer to purchase additional spare orreplacement keys.
Programming a Spare IntegratedKeyhead Transmitter
Note:You can program a maximum of eightcoded keys to your vehicle. All eight can beintegrated keyhead transmitters.
You can program your own integratedkeyhead transmitter or standardSecuriLock coded keys to your vehicle. Thisprocedure will program both the engineimmobilizer keycode and the remote entryportion of the remote control to yourvehicle
Only use integrated keyhead transmittersor standard SecuriLock keys.
61
Expedition (TB7) Canada/United States of America, enUSA, Edition date: 03/2016, First Printing
Security
Page 65 of 500

You must have two previouslyprogrammed coded keys and the newunprogrammed key readily accessible. Seeyour authorized dealer to have the sparekey programmed if two previouslyprogrammed coded keys are not available.
Read and understand the entire procedurebefore you begin.
1.Insert the first previously programmedcoded key into the ignition.
2.Switch the ignition from off to on. Keepthe ignition on for at least threeseconds, but no more than 10 seconds.
3.Switch the ignition off and remove thefirst coded key from the ignition.
4. After three seconds but within 10seconds of switching the ignition off,insert the second previously coded keyinto the ignition.
5.Switch the ignition from off to on. Keepthe ignition on for at least threeseconds, but no more than 10 seconds.
6.Switch the ignition off and remove thesecond previously programmed codedkey from the ignition.
7. After three seconds but within 10seconds of switching the ignition offand removing the previouslyprogrammed coded key, insert the newunprogrammed key into the ignition.
8.Switch the ignition from off to on. Keepthe ignition on for at least six seconds.
9.Remove the newly programmed codedkey from the ignition.
If the key has been successfullyprogrammed it will start the engine andoperate the remote entry system (if thenew key is an integrated keyheadtransmitter).
If programming was not successful, wait10 seconds and repeat Steps 1 through 8.If you are still unsuccessful, take yourvehicle to your authorized dealer.
Programming a Spare IntelligentAccess Key
See your authorized dealer to haveadditional keys programmed to yourvehicle.
ANTI-THEFT ALARM
The system will warn you of anunauthorized entry to your vehicle. It willbe triggered if any door, the luggagecompartment or the hood is openedwithout using the key, remote control orkeyless entry keypad.
The direction indicators will flash and thehorn will sound if unauthorized entry isattempted while the alarm is armed.
Take all remote controls to an authorizeddealer if there is any potential alarmproblem with your vehicle.
Arming the Alarm
The alarm is ready to arm when there isnot a key in your vehicle. Electronically lockyour vehicle to arm the alarm.
Disarming the Alarm
Disarm the alarm by any of the followingactions:
•Unlock the doors or luggagecompartment with the remote controlor keyless entry keypad.
•Switch your vehicle on or start yourvehicle.
•Use a key in the driver door to unlockyour vehicle, then switch your vehicleon within 12 seconds.
Note:Pressing the panic button on theremote control will stop the horn and signalindicators, but will not disarm the system.
62
Expedition (TB7) Canada/United States of America, enUSA, Edition date: 03/2016, First Printing
Security
Page 66 of 500

USING POWER RUNNING
BOARDS
WARNINGS
In extreme climates, excessive icebuildup may occur, causing therunning boards not to deploy. Makesure that the running boards havedeployed, and have finished moving beforeattempting to step on them. The runningboards will resume normal function oncethe blockage is cleared.
Turn off the running boards beforejacking or placing any object underyour vehicle. Never place your handbetween the extended running board andyour vehicle. A moving running board maycause injury.
Note:Do not use the running boards, frontand rear hinge assemblies, running boardmotors, or the running board underbodymounts to lift your vehicle when jacking.Always use proper jacking points.
Note:The running boards may operatemore slowly in cool temperatures.
Note:The running board mechanism maytrap debris such as mud, dirt, snow, ice andsalt. This may cause unwanted noise. If thishappens, manually set the running boardsto the deployed position. Then, wash thesystem, in particular the front and rear hingearms, with a high-pressure car wash wand.
Automatic Power Deploy
The running boards automatically extenddown and out when you open the door.This can help you enter and exit yourvehicle.
Automatic Power Stow
When you close the doors, the runningboards return to the stowed position aftera two-second delay.
Manual Power Deploy
You can manually operate the runningboards in the information display. SeeGeneral Information (page 91).
Set the running boards in the deployedposition to access the roof.
The running boards return to the stowedposition and enter automatic mode whenthe vehicle speed exceeds 5 mph (8 km/h).
Enabling and Disabling
You can enable and disable the powerrunning board feature in the informationdisplay. See General Information (page91).
63
Expedition (TB7) Canada/United States of America, enUSA, Edition date: 03/2016, First Printing
Power Running Boards (If Equipped)E166682
Page 68 of 500
ADJUSTING THE STEERING
WHEEL - VEHICLES WITH:
COLUMN SHIFT/MANUAL
ADJUSTABLE STEERING
COLUMN
WARNING
Do not adjust the steering wheelwhen your vehicle is moving.
Note:Make sure that you are sitting in thecorrect position. See Sitting in the CorrectPosition (page 121).
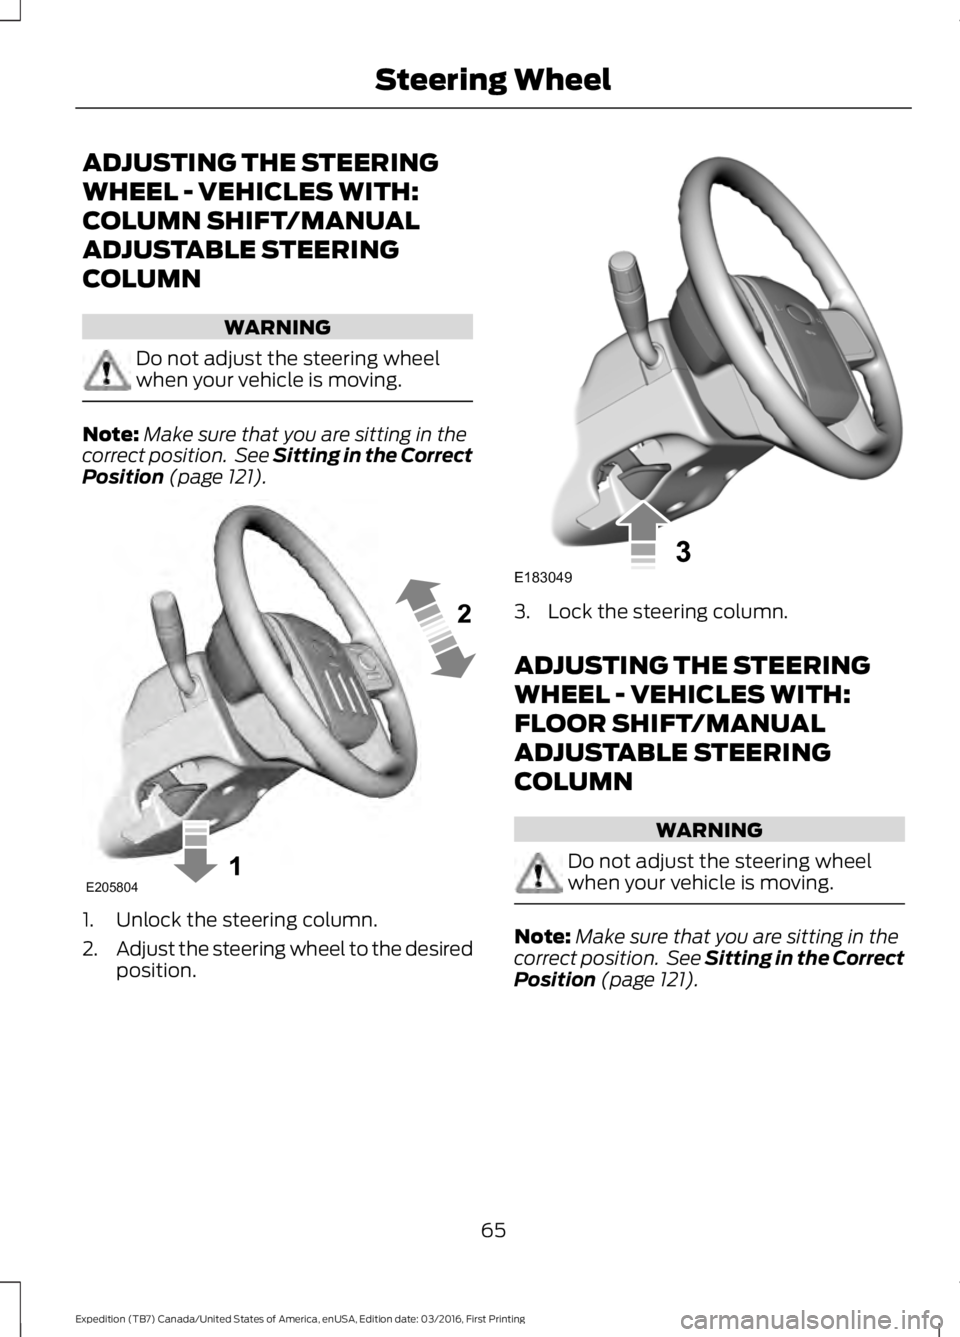
1. Unlock the steering column.
2.Adjust the steering wheel to the desiredposition.
3. Lock the steering column.
ADJUSTING THE STEERING
WHEEL - VEHICLES WITH:
FLOOR SHIFT/MANUAL
ADJUSTABLE STEERING
COLUMN
WARNING
Do not adjust the steering wheelwhen your vehicle is moving.
Note:Make sure that you are sitting in thecorrect position. See Sitting in the CorrectPosition (page 121).
65
Expedition (TB7) Canada/United States of America, enUSA, Edition date: 03/2016, First Printing
Steering WheelE205804 E183049
Page 69 of 500
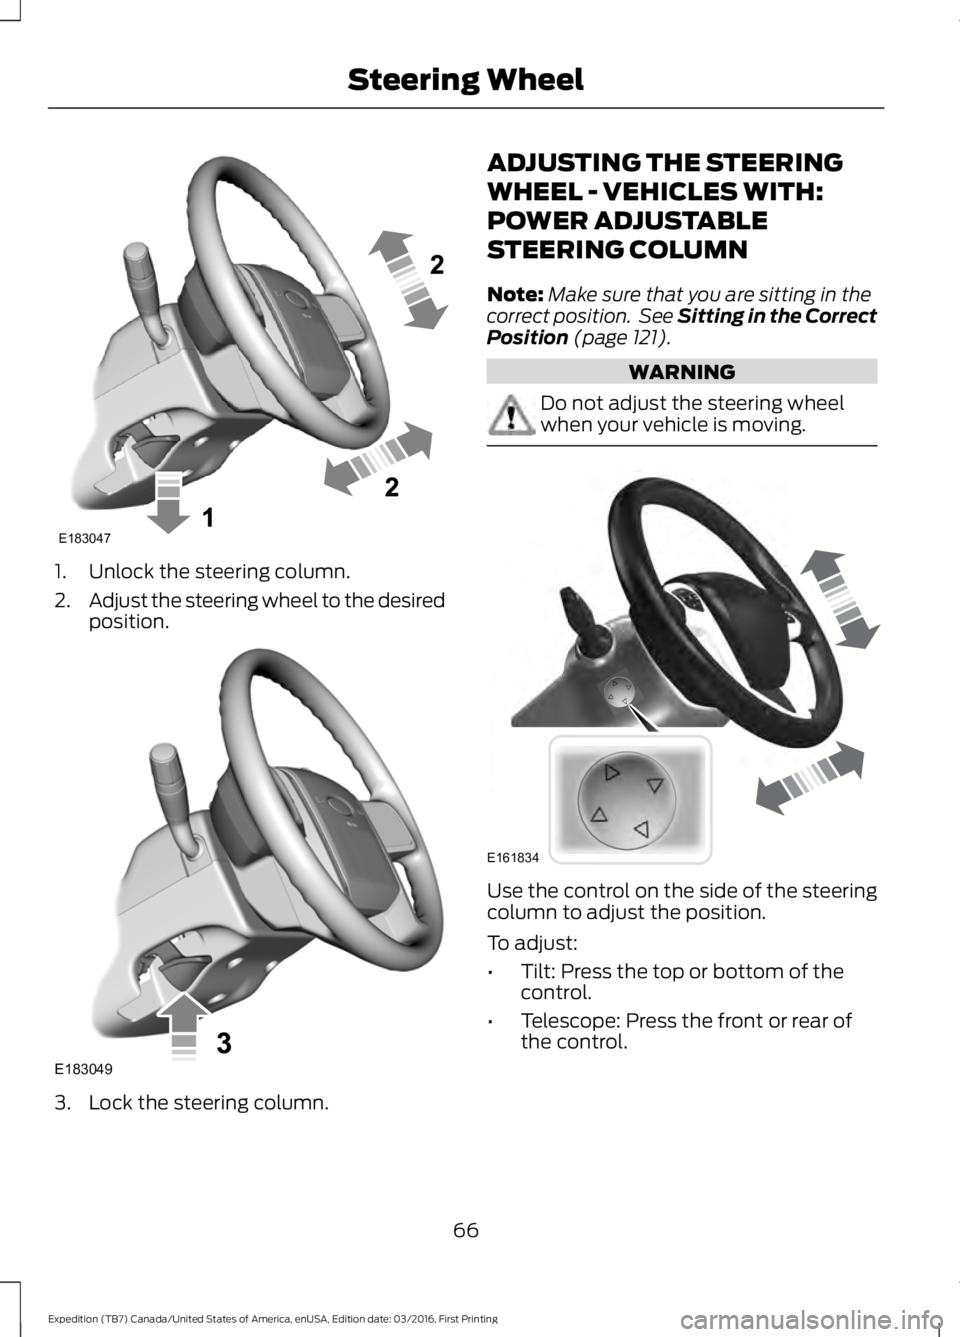
1. Unlock the steering column.
2.Adjust the steering wheel to the desiredposition.
3. Lock the steering column.
ADJUSTING THE STEERING
WHEEL - VEHICLES WITH:
POWER ADJUSTABLE
STEERING COLUMN
Note:Make sure that you are sitting in thecorrect position. See Sitting in the CorrectPosition (page 121).
WARNING
Do not adjust the steering wheelwhen your vehicle is moving.
Use the control on the side of the steeringcolumn to adjust the position.
To adjust:
•Tilt: Press the top or bottom of thecontrol.
•Telescope: Press the front or rear ofthe control.
66
Expedition (TB7) Canada/United States of America, enUSA, Edition date: 03/2016, First Printing
Steering WheelE183047 E183049 E161834
Page 82 of 500
POWER WINDOWS
WARNINGS
Do not leave children unattended inyour vehicle and do not let them playwith the power windows. They mayseriously injure themselves.
When closing the power windows,you should verify they are free ofobstructions and make sure thatchildren and pets are not in the proximityof the window openings.
Note:You may hear a pulsing noise whenjust one of the windows is open. Lower theopposite window slightly to reduce thisnoise.
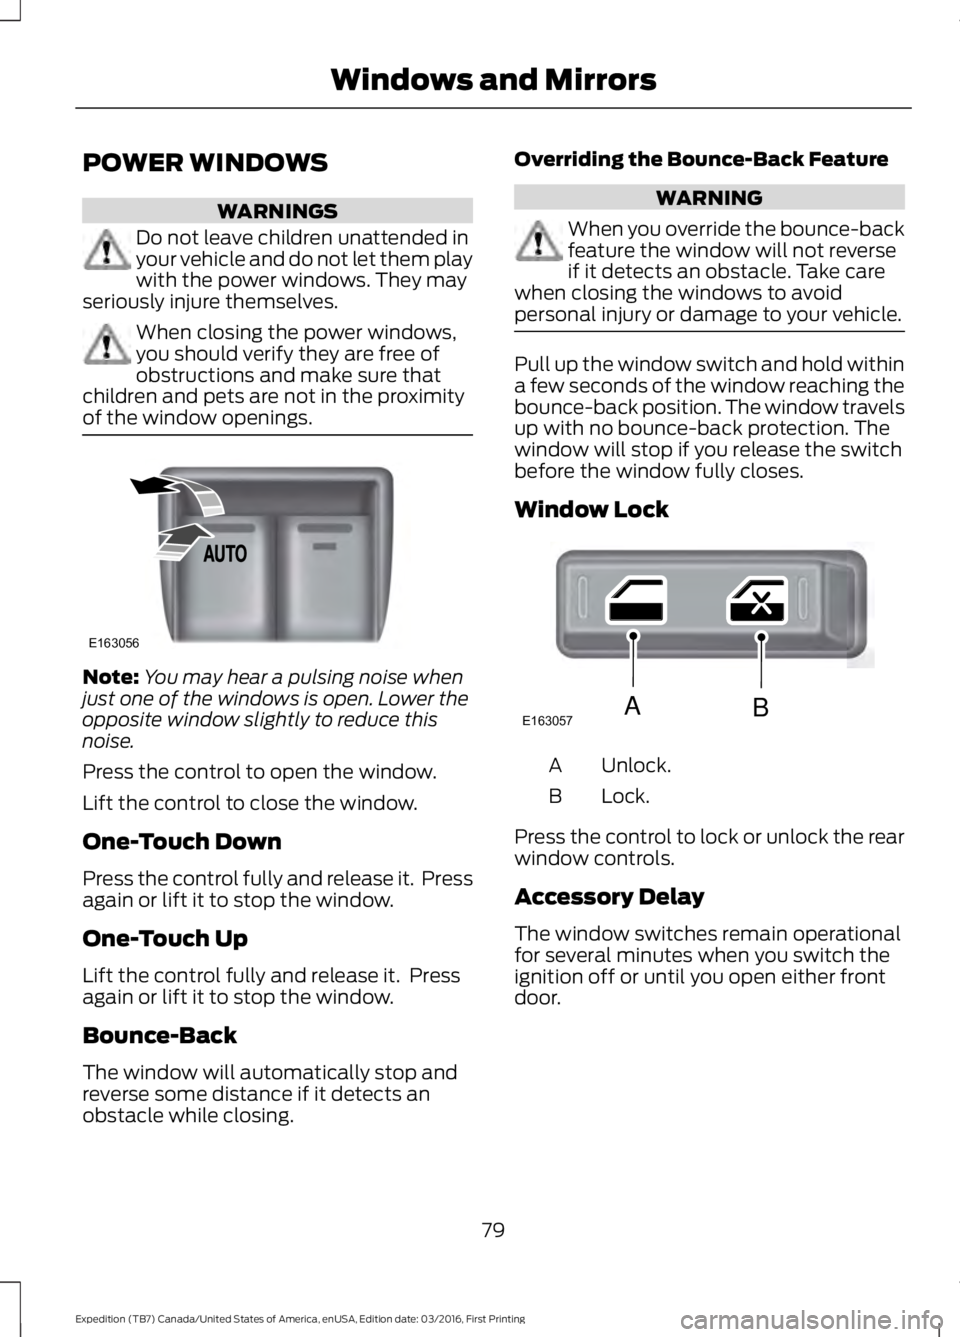
Press the control to open the window.
Lift the control to close the window.
One-Touch Down
Press the control fully and release it. Pressagain or lift it to stop the window.
One-Touch Up
Lift the control fully and release it. Pressagain or lift it to stop the window.
Bounce-Back
The window will automatically stop andreverse some distance if it detects anobstacle while closing.
Overriding the Bounce-Back Feature
WARNING
When you override the bounce-backfeature the window will not reverseif it detects an obstacle. Take carewhen closing the windows to avoidpersonal injury or damage to your vehicle.
Pull up the window switch and hold withina few seconds of the window reaching thebounce-back position. The window travelsup with no bounce-back protection. Thewindow will stop if you release the switchbefore the window fully closes.
Window Lock
Unlock.A
Lock.B
Press the control to lock or unlock the rearwindow controls.
Accessory Delay
The window switches remain operationalfor several minutes when you switch theignition off or until you open either frontdoor.
79
Expedition (TB7) Canada/United States of America, enUSA, Edition date: 03/2016, First Printing
Windows and MirrorsE163056 E163057AB
Page 83 of 500
EXTERIOR MIRRORS
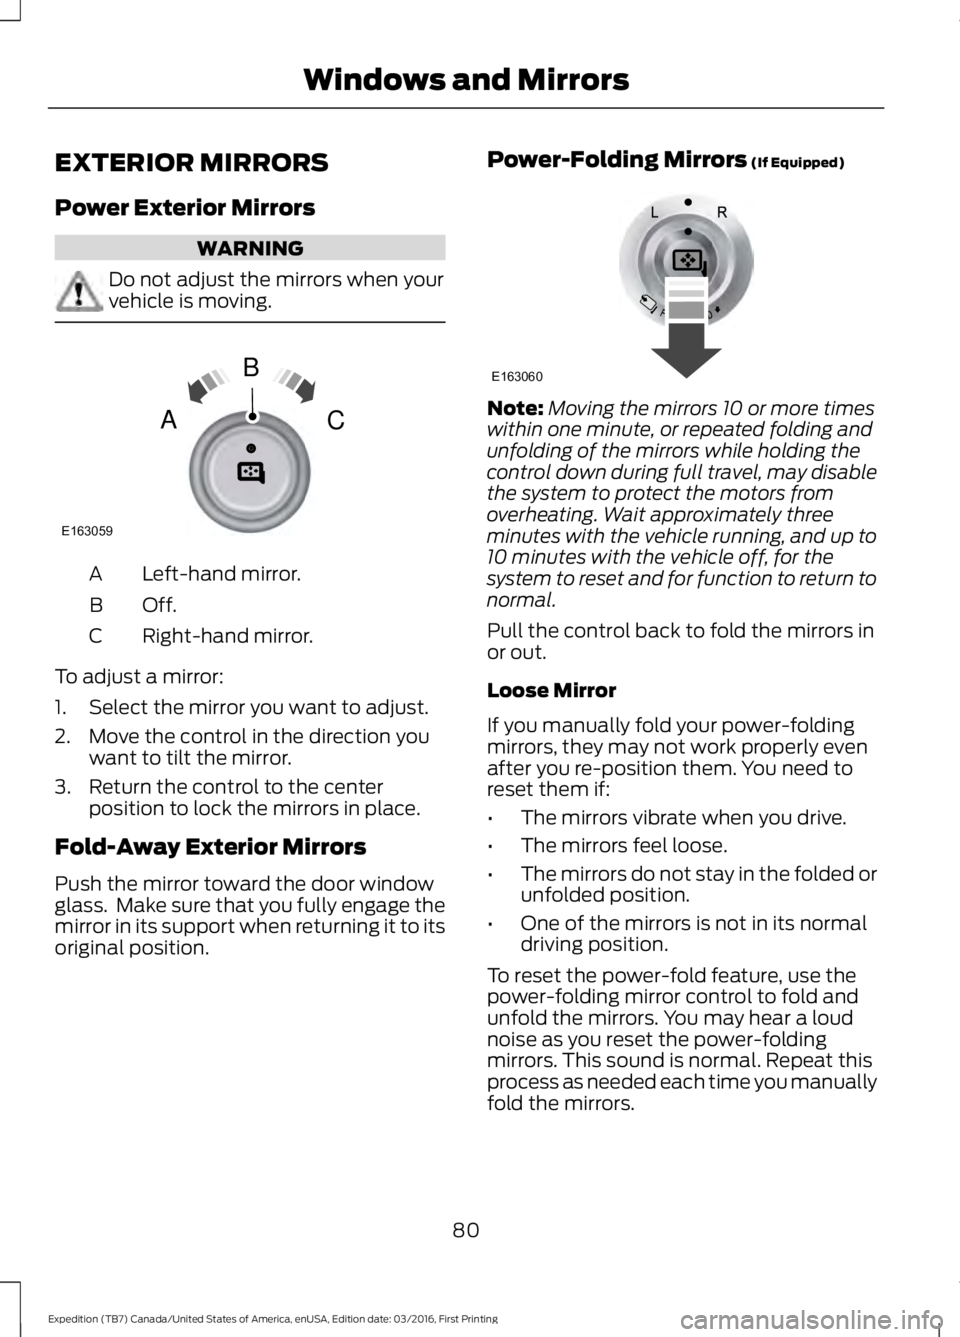
Power Exterior Mirrors
WARNING
Do not adjust the mirrors when yourvehicle is moving.
Left-hand mirror.A
Off.B
Right-hand mirror.C
To adjust a mirror:
1. Select the mirror you want to adjust.
2. Move the control in the direction youwant to tilt the mirror.
3. Return the control to the centerposition to lock the mirrors in place.
Fold-Away Exterior Mirrors
Push the mirror toward the door windowglass. Make sure that you fully engage themirror in its support when returning it to itsoriginal position.
Power-Folding Mirrors (If Equipped)
Note:Moving the mirrors 10 or more timeswithin one minute, or repeated folding andunfolding of the mirrors while holding thecontrol down during full travel, may disablethe system to protect the motors fromoverheating. Wait approximately threeminutes with the vehicle running, and up to10 minutes with the vehicle off, for thesystem to reset and for function to return tonormal.
Pull the control back to fold the mirrors inor out.
Loose Mirror
If you manually fold your power-foldingmirrors, they may not work properly evenafter you re-position them. You need toreset them if:
•The mirrors vibrate when you drive.
•The mirrors feel loose.
•The mirrors do not stay in the folded orunfolded position.
•One of the mirrors is not in its normaldriving position.
To reset the power-fold feature, use thepower-folding mirror control to fold andunfold the mirrors. You may hear a loudnoise as you reset the power-foldingmirrors. This sound is normal. Repeat thisprocess as needed each time you manuallyfold the mirrors.
80
Expedition (TB7) Canada/United States of America, enUSA, Edition date: 03/2016, First Printing
Windows and MirrorsE163059
B
AC E163060