2017 AUDI TT ROADSTER display
[x] Cancel search: displayPage 155 of 314
CD
CD
.... N
" N ...... 0 r--. V, co
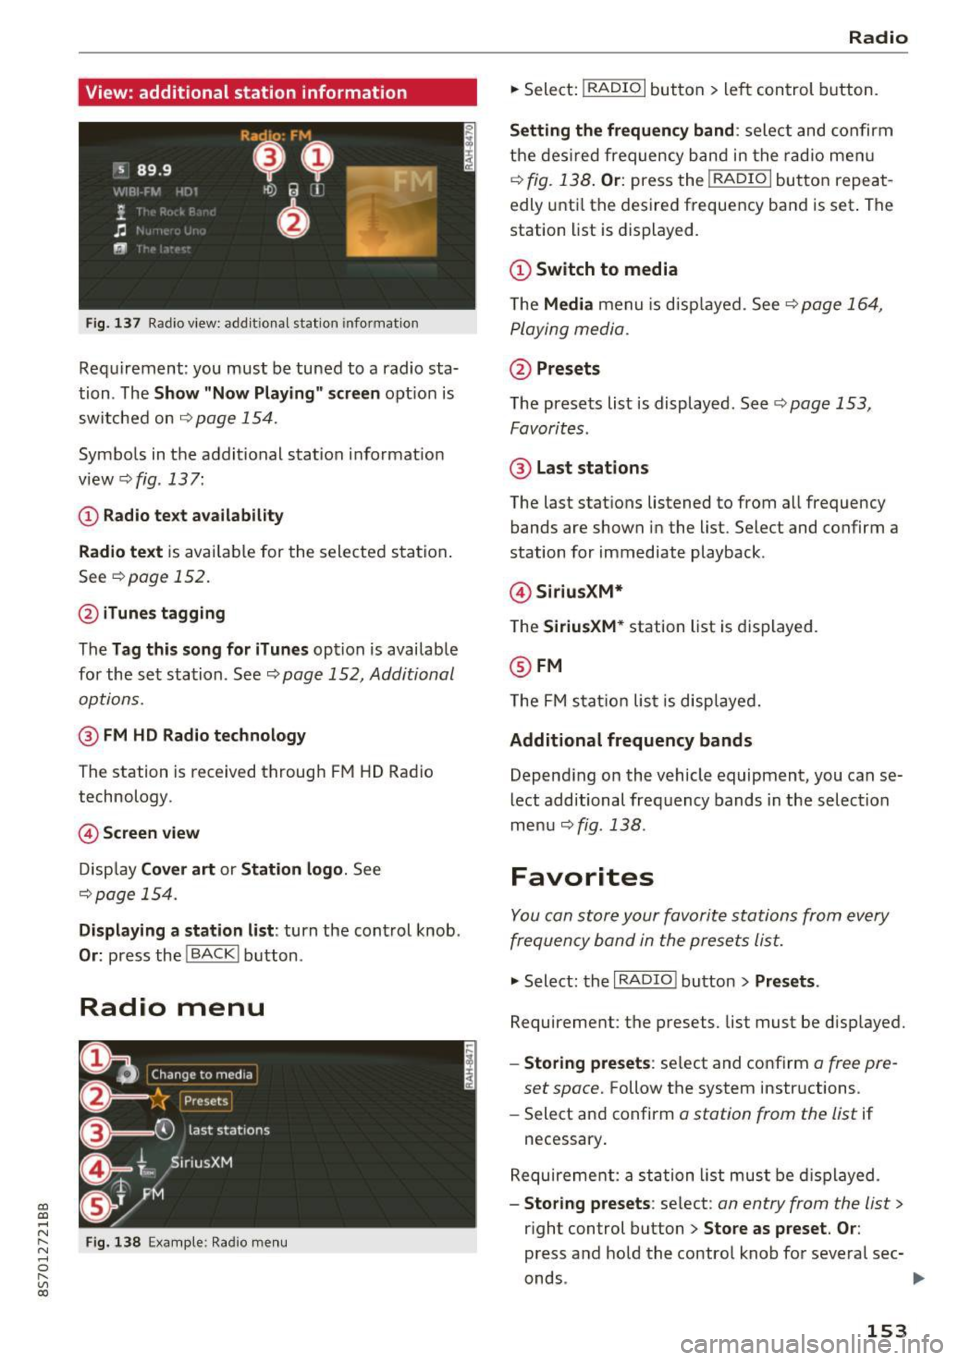
View: additional station information
Fig. 137 Radio view: add it ional stat ion information
Requirement: you must be tuned to a radio sta
tion . The
Show "Now Playing" screen opt ion is
switched on
Q page 154.
Symbols in the additional station informat ion
view ¢fig .137:
(D Radio text availability
Radio text
is available for the selected station .
See
Q page 152.
@iTunes tagging
The Tag this song for iTunes option is available
for the set station . See ¢
page 152, Additional
options.
@ FM HD Radio technology
The station is received through FM HD Radio
technology.
@ Screen view
Display Cover art or Station logo. See
¢page 154.
Displaying a station list: turn the control knob .
Or: press the I BACK ! button .
Radio menu
Fig. 138 Example: Radio menu
Radio
.,. Select: I RADIO I button > left control button.
Setting the frequency band : select and confirm
the desired frequency band in the radio menu
¢
fig. 138 . Or: press the I RADIO I button repeat
edly until the desired frequency band is set . The
station list is displayed.
(D Switch to media
The Media menu is disp layed. See Q page 164,
Playing media.
@Presets
The presets list is displayed. See ¢ page 153,
Favorites .
@ Last stations
The last stations listened to from all frequency
bands are shown in the list. Select and confirm a
station for immediate playback .
@SiriusXM*
The SiriusXM* station list is displayed.
@FM
The FM sta tion list is displayed.
Additional frequency bands
Depend ing on the vehicle equipment, you can se
lect additional frequency bands in the selection
menu ¢
fig. 138 .
Favorites
You can store your favorite stations from every
frequency band in the presets list.
.,. Select: the I RADIO I button > Presets .
Requirement: the presets. list must be disp layed.
- Storing presets : select and confirm a free pre-
set space.
Follow the system instructions .
- Select and confirm
a station from the list if
necessary .
Requirement: a station list must be displayed.
-Storing presets : select : an entry from the list>
right control button > Store as preset. Or :
press and hold the contro l knob for several sec-
onds .
~
153
Page 156 of 314
Radio
-Displaying the presets list: select: I RADIO I but-
ton
> Presets.
Req uirement: the favorites list m ust be dis
p la yed.
- Listening to presets : select and confirm a pre
set from the list.
- Move preset : select a favorite from the list >
right control button > Move preset. Or: press
and hold the control knob for several seconds.
Select and confirm the location of the selected
favorite.
- Deleting presets : select a preset from the list>
right control button > Delete preset > Delete
this preset or Delete all presets.
Additional settings
Radio settings
~ Select : I RADIO I button > right control button >
Rad io settings .
The following settings can be selected, depend
ing on the band that is se lected:
FM/AM HD Radio*
You can switch HD Radio recept ion on or off.
Station sorting (SiriusXM*}
You can set the station sorting for SiriusXM sta
tion lists* by:
-Channel number: the stations are sorted in as
cending order according to their station num
ber.
- Channel name: the stations are listed in alpha
betical order.
- First category, then channel number : the sta
tions are sorted by their category and then by
their channe l numbers .
-First the category, then the channel name : the
stations are sorted by their category and then
by the ir channel names .
Category filter (SiriusXM*}
The stations shown in the station list can be fi l
tered by your personal preferences and by pro -
154 gram
type. The program categories that you can
se lect depend on what is offered by your provid
er. Se lect the
All categories option to deactivate
all filter options and display all available stations
i n the satellite stat ion list.
Additional station information
When the function is switched on~ and station
or presets lists are open, the display will switch
after approximate ly five seconds to the
Show
" Now Playing" screen
view c::> page 153. Depend
i ng on ava ilability, information about the set sta
tion (such as stat io n name, artist, slide show,
station logo) is displayed in this view .
Preferred picture view
You can set your preferred picture view for the
Show "Now Playing" screen display c:> page 153.
-Station logo: the station logo is displayed, de-
pending on availability .
-Cover art: the album cover or genre cover is dis-
played, depending on availability.
Gracenote online database*
Requirement: the MMI must be connected to the
Internet. The
Cover art option must be selected
c:> page 154, Preferred picture view.
When the funct io n is switched on~, the albu m
cover or genre cover for the song that is pla yin g
is loaded from the Gracenote online database,
depending on availability.
Subscription status (SiriusXM}*
This opt ion is available when your subscr ipt ion is
about to expire or has already expired. The expi
rat ion date for you r license is displayed.
Call to SiriusXM *: the contact information for
your sate llite radio provider is displayed. To call
your sate llite radio provider using the MMI, press
Call to SiriusXM *.
Page 157 of 314
co
co
.... N
" N .... 0
" "' c:o
Troubleshooting
Problem
A station with poor reception is no longer displayed in the station list once you
switch to a d ifferent station. Radio
Solution
Store the station as a favorite in advance. Access the fa-
vor ite through the favor ites list
c>page 153.
155
Page 158 of 314
Media
Media
Introduction
There are various media drives and connections
available in the MMI. You can play , for example,
audio/video files from the Jukebox* or connect
your mobile device to the Audi music interface*
and operate it through the MMI.
Notes
General information
Media and format restrictions:
the MMI (includ
ing the SD card reader and the USB storage de
vice connection*) was tested with a variety of products and media on the market. However,
there may be cases where individual devices or media and audio/video* files may not be recog
nized, may play only with restrictions or may not
play at all.
Digital Rights Management: please note that
t he audio/video files are subject to copyright pro
tection .
The media drives do not play files that are pro
tected by ORM and that are identified with the
symbol
!'.TI.
Data security: never store important data on SD
cards, the Jukebox*, CDs/DVDs or mobile devices.
Audi AG is not responsible for damaged or lost
files and media .
Loading times: the more files/folders/playlists
that are on a storage medium, the longer it will
take to load the audio/video files* . Audi recom
mends using storage media tha t only contain au
dio/video files* . To decrease the time it takes to
load audio/video files*, create subfolders (for ex
ample , for the artist or album). The loading time
will also increase when importing files.
Additional information: when playing, audio
files are automatically displayed with any addi
tional information that is stored (such as the ar
tist, track and album cover).
If this information is
not available on the storage medium, the MMI
will check the Grace note metadata database.
156
However, in some cases, the additional informa
tion may not be displayed.
Restricted functionality: reset the Media set
tings
to the factory default settings if functional
ity is restricted
¢ page 176.
Reset the Jukebox* to the factory default set
tings if functionality is restricted
¢page 176.
For information about the properties of support
ed media and file formats, see
¢ page 169 .
((D} Note
You are responsible for all precautions taken
for data protection, anti-virus protection and
protection against loss of data on mobile de
vices that are used to access the Internet
through the Wi-Fi hotspot.
CD/DVD operation
CD/DVD and format restrictions:
the functionali
ty of individual storage media may be limited due
to the variety of blank CDs/DVDs available and
the various capacities . Aud io CDs or video DVDs
with copy protection, CDs/DVDs that do not con
form to the standard and multisession CDs may
have limited playback or may not play at all. Audi
recommends finalizing the recording process
when creating multisession CDs . Multisession is
not supported for DVDs .
Using CDs/DVDs, the CD drive or the DVD drive:
to ensure correct, high-quality playback and to
prevent damage to the drive or disc reading er
rors, always store CDs/DVDs in a protective
sleeve and do not expose them to direct sunlight.
Do
not use:
- Damaged, dirty or scratched CDs/DVDs
- Single CDs/DVDs (3 inch/8 cm diameter)
- CD/DVDs that are not round
- CDs/DVDs with labels
- Protective rings
- Cleaning CDs
Thermal protection switch : CD/DVD playback
may be temporarily unavailable if outside tem
peratures are extremely hot or cold. A thermal
Page 160 of 314
Media
CD drive
Applies to: vehicles with a CD drive
Fig. 141 CD drive
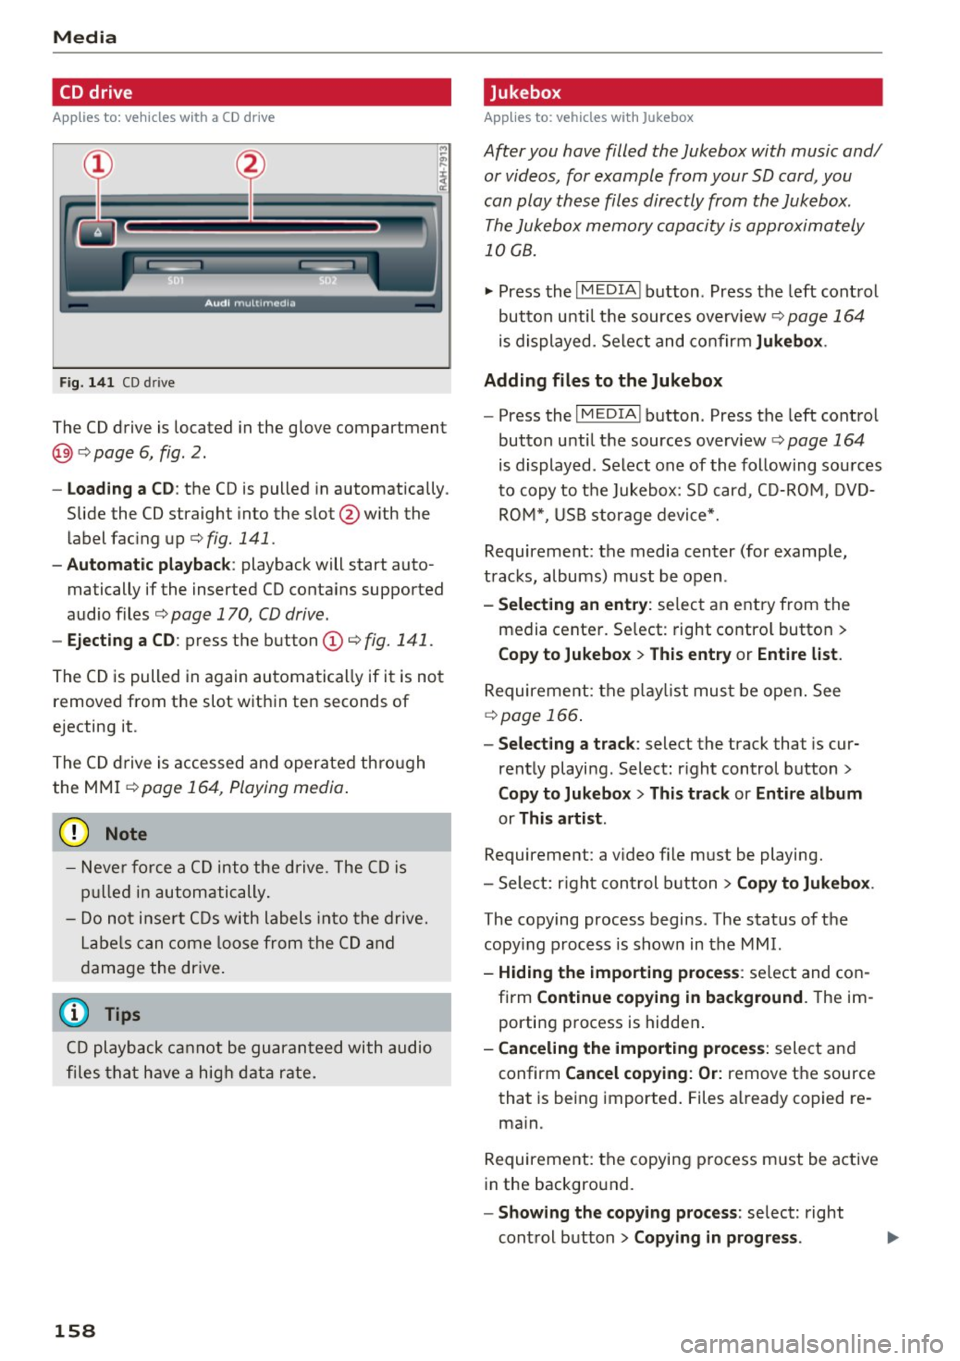
The CD drive is located in the glove compartment
@ r=>page 6, fig. 2.
- Loading a CD : the CD is pulled in automatically .
Slide the CD straight into the s lot @ with the
label fac ing up
r=> fig. 141 .
-Automatic playbac k: playback will start auto
matically if the inserted CD conta ins supported
audio files
r=> page 170, CD drive .
-Ejecting a CD : press the button (Dr=> fig. 141 .
The CD is pulled in again automatically if it is not
removed from the slot w ith in ten seconds of
ejecting it.
The CD d rive is accessed and operated thro ugh
the MMI
r=> page 164 , Playing media .
(D Note
- Never force a CD into the drive . The CD is
p ull ed in automatically .
- Do not i nse rt CDs with labels into the drive.
L abe ls can come loose from the CD and
damage the dr ive.
@ Tips
CD playback ca nnot be guaranteed with audio
files that h ave a hig h data r ate.
158
· Jukebox
Applies to: vehicles with Jukebox
After you have filled the Jukebox with music and/
or videos, for example from your SD card , you
can play these files directly from the Jukebox .
The Jukebox memory capacity is approximately
10 GB .
.,. Press the I M EDIA ! button . Press the left cont rol
button unti l the sources overv iew
r=> page 164
is displayed. Select and co nfirm Jukebo x.
Adding files to the Jukebox
- Press the IM EDIA ! button . Press the left control
button until the sources overv iew
r=> page 164
is displayed . Select one of the following sou rces
to copy to the Jukebox: SD card, C D-RO M, D VD
RO M*, USB storage device*.
Requirement: the media center (for example,
tracks, albums) must be open .
-Selecting an entr y: select an entry from the
media cente r. Se lect : right contro l button >
Copy to Jukebox > Th is entry or Entire list .
Requirement: the p layli st mus t be ope n. See
r=> page 166 .
-Selec ting a track : select the track that is cur
rent ly playing . Select : right control button>
Copy to Jukebo x> This trac k or Entire album
or This artist.
Requirement: a v ideo f ile must be playing.
- Sele ct: r ight cont rol b utton>
Copy to Jukebo x.
The copying process begins. The status of the
copy ing p rocess is shown in the MMI.
- Hiding the importing pro ces s: se lect and con
firm
Continue cop ying in background . The im
porting p rocess is hidden .
-Canceling the impo rt ing process : select and
confirm
Can cel cop ying : O r: remove the source
that is being imported . Files already copied re
ma in.
Requirement: the copying p rocess m ust be active
in the background.
- Showing the copying proces s: select: right
cont rol button >
Copying in progre ss.
Page 161 of 314

co
co
.... N
" N .... 0
" "' c:o
When importing, the audio files a re automatical
l y sorted into the media center categor ies based
on the stored addit ional info rmation
c:> page 165. The copied video files are stored in
the media ce nter under the
Videos category.
Playing the Ju kebo x
Req uirement: the J ukebox must contain audio/
vi deo fi les
c:> page 158, Adding files to the Juke
box.
The Jukebox is a ccesse d and ope rated thr ou gh
the MMI
(D c:> page 164, fig . 144.
Displaying Jukebox memory capacity
Select: r igh t control button > Jukebox memory
capacity .
Inform ation abou t the J ukebox memory
c a pacity an d the numbe r of store d tra cks is dis
p layed .
Deleting tracks from the Jukebox1
)
Req uirement: the Ju kebox must contain audio/
video fi les.
- Deleting an entry : select an entry from the
Jukebox media center. Select: rig ht cont ro l but
ton
> Delete from Jukebox > This entry or En
tire list .
- The s tatus of the de leti ng p rocess is shown in
the MMI. Jukebox playback stops d uring the de
l eting process a nd starts again au tomatically
on ce the dele tio n i s comp lete.
(D Note
D o not import au dio/video files when the en
g in e is t urned off because this will d rain the
ve hicl e battery.
(D Tips
-Tracks fro m aud io C Ds cannot be impo rted
t o the Jukebox for leg al re as ons.
- Files that have al rea dy been import ed are
a utomat ica lly r ecogn ized and ca n not be
cop ied to the Juk eb ox again.
- It is no t possib le to play audio/v ideo* files
i n the C D/D V D* drive while import ing the m.
l) Not in th e Playba ck view .
Media
-The Jukebox does not provi de a n export
function d ue to legal reasons .
- F iles o r trac ks w ithout store d ad di tional in
formatio n are listed as
Unknown . Audi rec
ommends adding a dditio nal info rmation
(such as ID3 tags) to a udio f iles.
- Reset the J ukebox to t he factory default set
tings when selling your vehicle
c:> page 176 .
Bluetooth audio player
Applies to: vehicles with Bluetooth
With the Bluetooth audio player, you con ploy
music wirelessly from your Bluetooth-capable
device (such as a cell phone) through the MMI.
Requirement: the vehicle must be stationa ry and
the Bluetooth function on your Bl uetooth device
and the
Bluetooth audio player c:> page 177 in
t h e MMI m ust both be switched on .
-Connecting a Bluetooth de vice : press the
! MEDI Ai button. Press the left control button
until t he source overv iew is d isp layed. Select
and confirm
Bluetooth audio player @
Gpoge 164, fig. 145.
-If necessa ry, select and co nfirm, Not connected
> Connect Bluetooth audio player . The Blue
t ooth dev ice searc h starts . Fo llow the inst ruc
tions in the M MI.
- Select and confirm the des ired Bluetooth de
vice from the list. The M MI generates a PIN fo r
t he co nne ction.
- Select and confirm
Yes .
-Enter the PIN for connect ing on your Bl uetooth
dev ice.
Or : if the PIN is already displayed on
your Bl uetoo th device, confi rm it in the Blue
t ooth device and in the MMI. The t ime a llowed
for e ntering the P IN is lim ite d t o ap prox ima tely
3 0 seconds.
T he media is s tarted and operated thro ugh the
mobile device o r the MMI, de pending on t he de
vice be ing used.
@ Tips
- Check fo r any connection reques ts on you r
B lu etoo th devi ce .
159
Page 163 of 314
co
co
.... N
" N .... 0
" "' c:o
-The loading times for the audio data depend
on the media player used and the number of
files that it contains.
- A maximum of 2,000 entries per directory
are displayed in the MMI.
- Songs downloaded for offline use using mu
sic streaming services are stored on your mobile device (such as a smartphone) and
may be DRM protected. The Wi-Fi audio
player will not play DRM protected files.
- Contact your authorized Audi dealer or au
thorized Audi Service Facility for additional
information on the Wi-Fi audio player.
Online media and
Internet radio
Applies to: vehicles with Audi connect
You can playback and operate various online me
dia services and Internet radio using the MMI.
• Press the I MEDIAi button. Press the left control
button until the sources overview<>
page 164,
fig. 145
is displayed .
Applies to: using online media and Internet radio
Requirement:
- The
Audi MMI connect app must be installed
and open on your mobile device.
- You must be logged into your my Audi account
in the
Audi MMI connect app and you must
have selected your vehicle.
- The Wi-Fi function on the mobile device and on
the MMI must be switched on.
- If necessary, check in the connection manager
<=> page 176 if the mobile device you connected
is selected under the
MMI connect app (~).
-The MMI must be connected to the network.
- The symbol for the
Online media* source @
<=> page 164, fig . 145 is shown in the MMI.
Applies to: using online media
Additional requirement:
- A supported online media service must be avail
able in your country.
- You must have an account with a supported on
line media service.
- Depending on the online media service, you
must install and open an app on your mobile
device .
Media
Starting Online media
- Press the I MEDIA i button. Press the left control
button until the sources overview
c:> page 164
is displayed.
- Select and confirm an online media service.
Starting Internet radio
- Press the I MEDIA ! button. Press the left control
button until the sources overview
c:> page 164
is displayed.
- Select and confirm
Internet radio . The Internet
radio browser or the last station that was play
ing is shown.
- Selecting the station : if necessary, select and
confirm a category in the Internet radio
Brows
er
> a station.
Online media and Internet radio: additional op
tions
- Press the right control button.
The following options may be available, depend
ing on the information shown (such as the sta
tion/track that is currently playing):
-Sound settings: see<> page 179.
-Wi-Fi settings: see <> page 131, Wi-Fi hotspot.
-Connection manager : see<> page 176.
-Additional options may be available, depending
on the active online media service or Internet
radio.
A WARNING
- It is only safe to use tablets, laptops, mo
bile devices and other similar devices when
the vehicle is stationary because, like all loose objects, they could be thrown around
the inside of the vehicle in a crash and cause
serious injuries . Store these types of devices
securely while driving.
- Do not use any Wi-Fi devices within range of
the airbags while driving . Also read the
warnings in the chapter <>
page 196.
Q) Note
Please note that there generally are addition
al costs when using an online media service
account, especially when it is used interna
tionally.
-
161
Page 166 of 314
Media
Playing media
Accessing media
You can start and operate various media
through the MMI control panel.
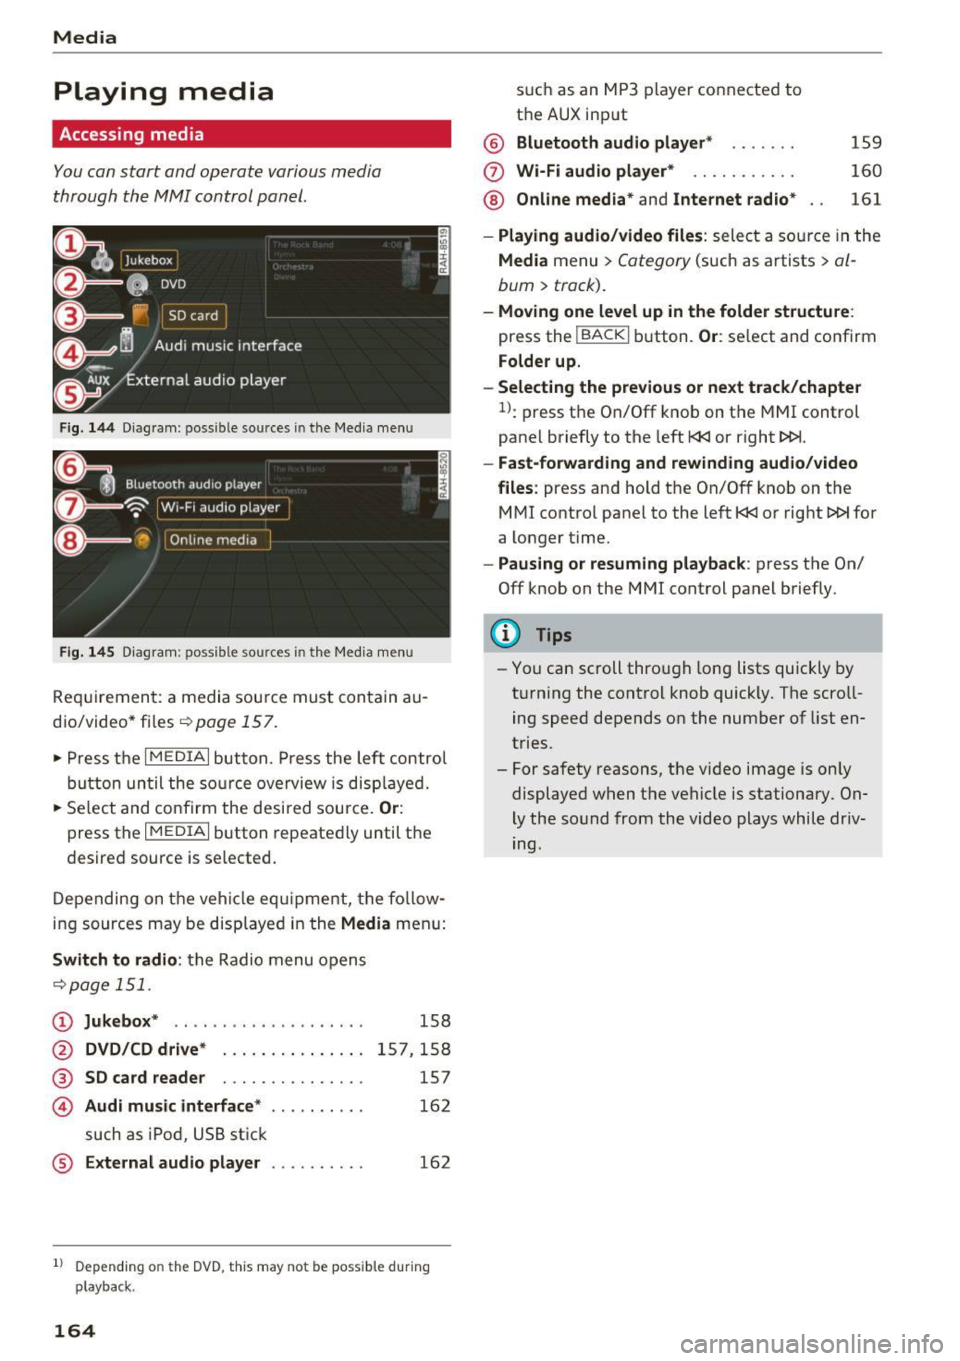
Fig . 14 4 Dia gr am : possible sources in the Media m enu
F ig. 145 D iag ra m : possible sources in t he Me dia me nu
Re qu ir emen t: a media sou rce must contain a u
dio/video* files-=>
page 157.
• Press t he I M EDIAi bu tton. Press the left co ntro l
button until the so urce ove rview is disp laye d.
• Se lect and confirm the desi red sou rce.
Or :
press the I MEDIAi button repeated ly until the
desired source is selected .
D epending on the ve hicle eq uipme nt, t he fo llow
i ng sources may be disp laye d in the
Media men u:
Switch to radio : the R adio menu o pens
-=> page 1 51.
CD Jukebox * .. ... ... ..... ..... ..
@ DVD/CD drive* ..... ....... .. .
® SD card reader . . . . . . . . . . . . . . .
© Audi music interface* ....... ...
such as iPod, U SB st ick
® External audio player . .. ...... .
158
15 7,1 58
157
16 2
162
1l Depend ing o n the DVD, this may not be possible du rin g
playback.
164
s u ch a s an MP3 player conne cte d to
t h e AUX input
@ Bluetooth audio player * .. .... .
(f) Wi -Fi audio player* .......... .
@ Online media* and Internet radio *
159
160
161
- Playing audio/video files : select a so urce in the
Media menu > Category (such as a rtists > al
bum> track).
-Moving one level up in the folder structu re :
press the IBACKI b utton. Or : select and confirm
Folder up.
- Selecting the previous or next track /chapter
1>: press t he On/Off k nob on the MMI control
panel briefly to the left
l
- Fast-forwarding and rew inding audio/video
files :
press and hold t he On/Off knob on the
M Ml control panel to the left
l
a longer time.
-Pausing or resuming playback : press the On/
Off knob on the MMI control panel b riefly.
(D Tips
- Yo u can scroll through long lists quickly by
t ur nin g the control knob quickly. The scroll
ing speed depends o n the number of list en
tries.
- For safety reasons, the vi deo image is on ly
displaye d when the vehicle is stationary. On
ly the so und from the video plays while driv
ing.