2017 AUDI TT ROADSTER clock
[x] Cancel search: clockPage 40 of 314

Power top
• Insert the hex socket wrench into the bolt and
remove it completely ¢
fig. 34. Also remove
the bolt on the front passenger's side.
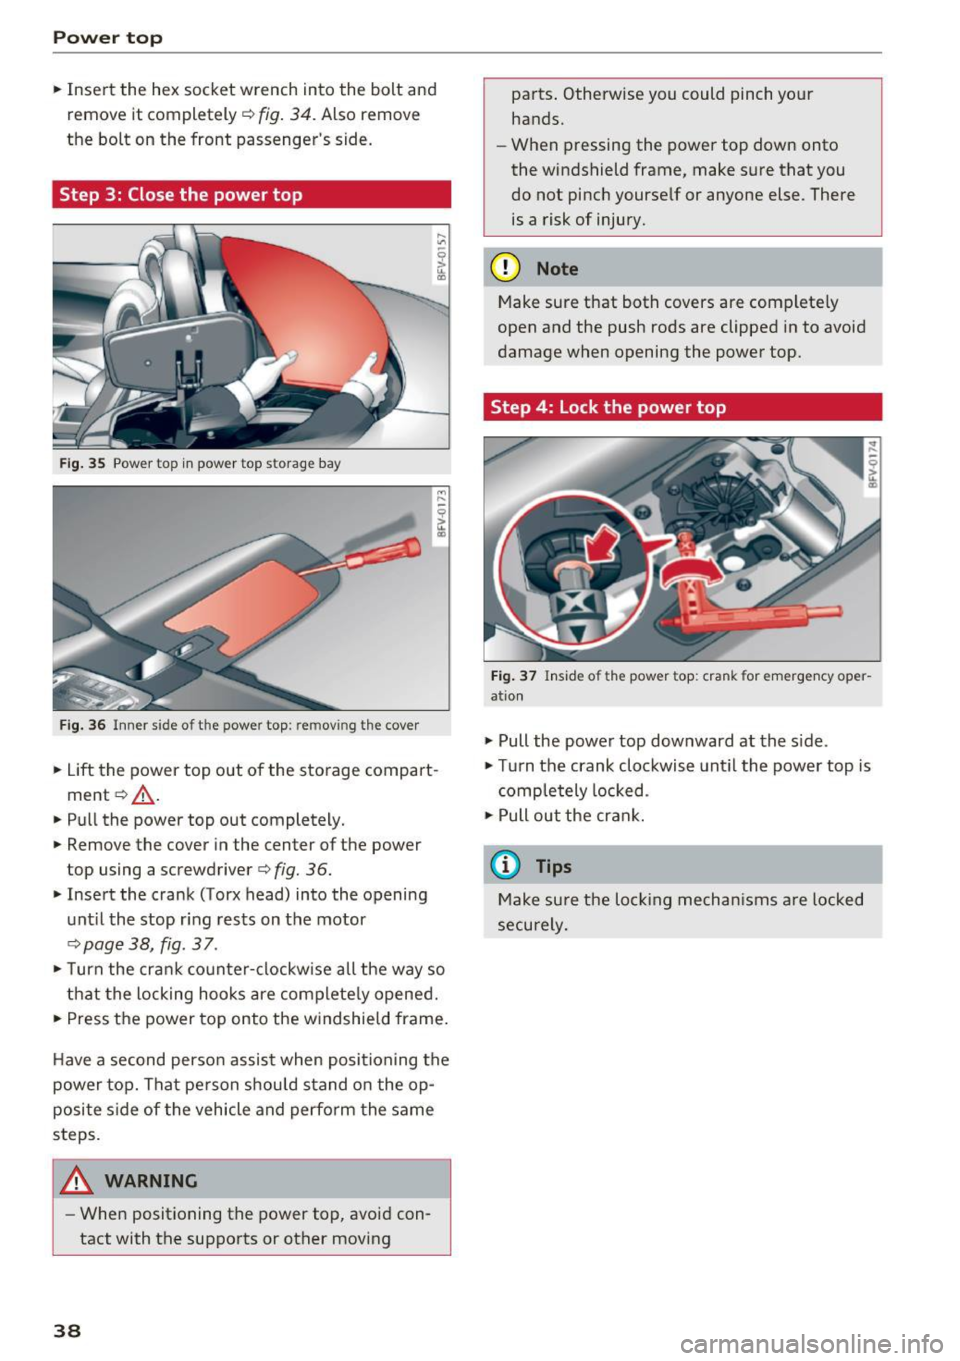
Step 3: Close the power top
Fig. 35 Power top in power top s torage bay
Fig. 36 Inner side o f th e powe r top: re m ov ing the cover
• Lift the power top out of the storage compart
ment ¢,& .
• Pull the power top out completely.
• Remove the cover in the center of the power
top using a screwdriver ¢
fig. 36.
• Insert the crank (Torx head) into the opening
until the stop ring rests on the motor
¢page 38, fig . 37 .
• Turn the crank counter-clockwise all the way so
that the locking hooks are completely opened.
• Press the power top onto the windshield frame.
Have a second person assist when positioning the
power top. That person should stand on the op
posite side of the vehicle and perform the same
steps.
_& WARNING
- When positioning the power top, avoid con
tact with the supports or other moving
38
parts. Otherwise you could pinch your
hands.
- When pressing the power top down onto
the windshield frame, make sure that you
do not pinch yourself or anyone else . There
is a risk of injury.
(D Note
Make sure that both covers are completely
open and the push rods are clipped in to avoid
damage when opening the power top.
Step 4: Lock the power top
Fig. 37 Inside of the power top: crank for emergency oper
ation
• Pull the power top downward at the side.
• Turn the crank clockwise until the power top is
completely locked .
•Pullout the crank.
(D Tips
Make sure the locking mechanisms are locked
securely.
Page 53 of 314

CD
CD
.... N
" N ...... 0 r--. V, co
Lowering the cargo floor
In exceptional situations, the cargo floor can be lowered .
Fig. S9 Luggage compartment: ca rgo floor removed
Fig. 60 Luggage compartment: spare tire rem oved
.. Remove the cargo floor q page 2 72 .
.. Remove the plastic floor panel~
fig. 59 .
.. Turn the handle counter-clockwise to remove
and remove the foam p iece .
.. Remove the spare tire .
.. Reinsert the foam piece and turn the handle
clockwise to tighten .
.,. Now reinsert the cargo floor .
_& WARNING
Please note that you are no longer mob ile i n
t he event of a fla t tire. P lease no te the legal
regulat ions befo re removing the spa re tire.
Seats and storag e
51
Page 61 of 314

CD
CD
.... N
" N ...... 0 r--. V, co
Steering
Adjusting the steering wheel position
The steering wheel position is fully adjustable up
and down and forward and back.
Fig . 6 6 Lever on th e steering column
... Tilt the lever c:::> fig . 66 downward c:::> A
... Bring the steering wheel into the desired posi
tion .
... Push the lever against the steering column un
t il it is secure.
A WARNING
Incorrect use of the steering wheel adj ust
ment and an incorrect seating posi tion can
cause se rious injuries.
- Only adjust the steering column when the vehicle is stat ionary so that you do not lose
cont ro l of the ve hicl e.
- Adjust the dr iver's seat or steering wheel so
that there is at least a 10 in (25 cm) d is
t an ce betwee n your chest a nd the s teering
w heel. If you d o not m aint ain this dis tance,
yo u will no t be proper ly protected by the a ir
bag system.
- If your phys ic al characteris tic s preven t you
from sit ting at least 10 in ( 25 cm) or mo re
away from the steering wheel, see if yo ur
authorized Audi dealer or autho rized Audi
Service Facility can prov ide adapters that
will help.
- If your face is level with the steering wheel,
the a irbag does not provide as much protec
t io n during a collision. A lways make s ure
that the steering wheel is level with you r
chest.
D rivi ng
-Always hold the steering wheel with your
hands in the 9 o'clock and 3 o'clock pos i
tions to reduce the risk of injury if the airbag
deploys.
- Never hold the steering wheel in the 12
o'clock position or with both hands on the
rim or the center of the stee ring wheel.
H old ing the steer ing whee l incorrect ly sig
n ificant ly increases the r isk of injury to the
hands, a rms and head if the airbag deploys.
Starting and stopping
the engine
Starting the engine
The ! S TART ENGINE STOPI button switches the
ignition on and starts the engine .
Fig . 67 Center console: START ENGINE STOP b utto n
Switching the ignition on /off
... To switch t he ignit io n on or off, press t he
!START ENGINE STOPI but ton. Do not press the
brake pedal while doing this.
Starting the engine
... Press the brake pedal a nd move the selector
lever into the P or N position
c:::> ,&. .
... Press the !START ENGINE STOP I butto n
<=:> fig. 67 . The eng ine will start.
If the engine does not start immediately, the
sta rt ing procedure stops automa tica lly after a
sho rt time. Repea t the s ta rt ing process .
A WARNING
-To redu ce the r is k of poiso ning, never allow
the eng ine to run in confined spaces.
59
Page 177 of 314

"' "'
System settings
Setting the date and
time
You can set the clock time manually or using the
C PS .
.,. Se lect : I MENU I button> Settings > left co ntro l
button >
MMI settings > Date & time .
.,. Or :
select : IMENU I button> Vehicle > left con-
t ro l button >
Vehicle settings > Date & time .
Automatic setting
When th is function is sw itched on~. the time
a n d date are a utomat ically set.
Time
R equ irement: the Automatic setting must be
switched off .
Pr ess the cont ro l kn ob . You ca n se t the
Time
manu ally by turning and press ing the con trol
k nob.
Date
R equi remen t: the Automatic setting must be
s witche d off .
Pr ess the cont rol knob . You can set the
Date
manually by turn ing and press ing the con trol
knob.
Time zone
When se lecting the approp riate t ime zone, a
sampling of countr ies in this zone will be listed .
Automatic time zone*
When t his function is sw itched on~' the t ime
will automatically a djust to the correspon ding
time zone .
Time format
If yo u selec t 24h, the clock will disp lay, for ex
ample,
13:00. If yo u se lect AM/PM , the clock
wi ll disp lay, for e xamp le,
1:00 PM .
Date format
....
~ I f yo u sele ct DD.MM.YYYY , the da te di spl ay w ill
N 8 s how, for ex amp le, 31 .08 .2017 . If you se le ct
~ MM/DD/YYYY , the d ate disp lay wi ll s how, fo r ex -
System settings
amp le, 08/31/2017. If you select YYYY-MM
DD ,
the date display wi ll sh ow, fo r exam ple,
2017-08-31.
MMI settings
.,. Select: iME NUI button> Settings > left control
button >
MMI settings .
Language
Yo u ca n cha nge the displ ay la ngu age as well as
t h e la ngu age fo r th e v oic e gui dance* and voi ce
recognition system *.
T he number of language s avai lab le de pend s on
t h e m arket .
Measurement units
The following units ca n be selected:
- Speed (mph o r km/h)
- Distance (miles o r kilomete rs)
- Temperature (°For 0
( )
-Fuel consumption (l/ l0 0k m, mpg ( US), m pg
( UK ) or km/l )
-Volume (li te rs, ga llon s)
Tool tips
When this f unct ion is switched on~' your MMI
s h ows you t ips fo r input. The freq uency of how
often it display s dec reases w ith time . You can
swi tch off the operati ng tips a t any ti me.
Speech dialog system
Applies to : vehicles with voice recogn it ion system
Command display : when this function is sw itch
ed on~ , the MMI w ill show yo u the possible
commands for voice input in the res pect ive
me nu. You ca n sw itch the f unct io n off a t any
t im e.
Short dialog : when th is function is sw itched on
~ . a sho rter form of the prompts is used . You
can sw itch the func tion off at any t ime .
Speech dialog system volume : you can adjust
the volume of t he p rompts by turning the contro l
k nob. .,,.
175
Page 184 of 314

Safe driving
What impairs driving safety?
Safe driving is directly related to the condition of
the vehicle, the driver as well as the driver's abili
ty to concentrate on the road without being dis
tracted.
The driver is respons ible for the safety of the ve
hicle and all of its occupants. If your ability to
drive is impaired, safety risks for everybody in the
vehicle increase and you also become a hazard to
everyone else on the road
c:::> .&_. Therefore :
~ Do not let yourself be distracted by passenger
or by using a cellular telephone.
~ NEVER drive when your driving ability is im
paired (by medications, alcohol, drugs, etc.).
~ Observe all traffic laws, rules of the road and
speed limits and plain common sense.
~ ALWAYS adjust your speed to road, traffic and
weather conditions.
~ Take frequent breaks on long trips. Do not drive
for more than two hours at a stretch.
~ Do NOT drive when you are tired, under pres
sure or when you are stressed.
..&, WARNING
Impaired driving safety increases the risk of
serious personal injury and death whenever a
vehicle is being used.
Correct passenger
seating positions
Proper seating position for the driver
The proper driver seating position is important
for safe, relaxed driving.
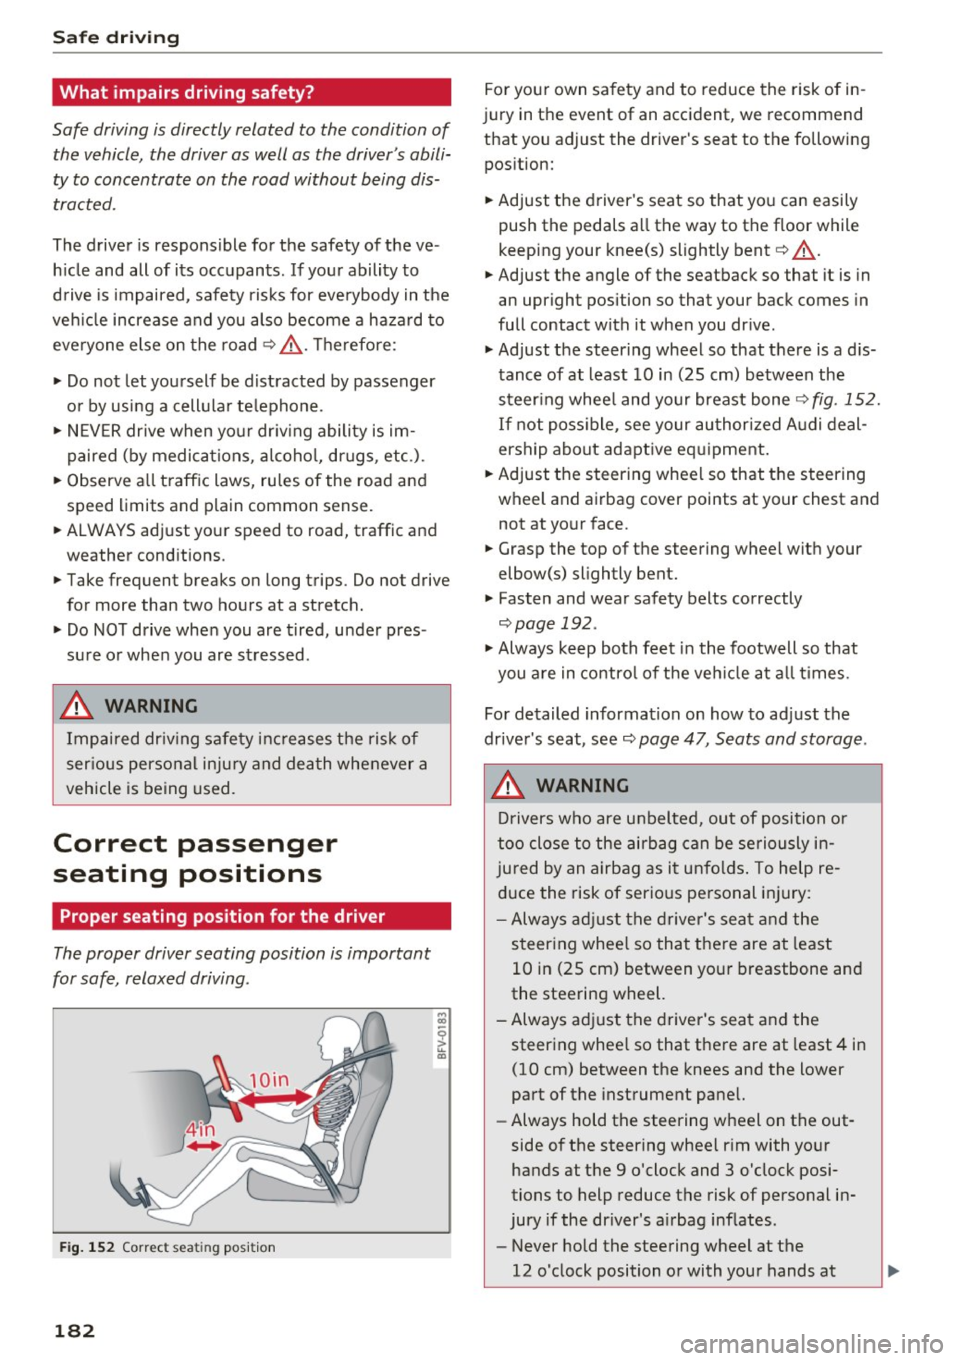
Fig. 152 Correct seating position
182
For your own safety and to reduce the risk of in
jury in the event of an accident, we recommend
that you adjust the driver's seat to the following
position:
~ Adjust the driver 's seat so that you can easily
push the pedals all the way to the floor while
keeping your knee(s) slightly bent
c:::> .&_.
~ Adjust the angle of the seatback so that it is in
an upright position so that your back comes in
full contact with it when you drive.
~ Adjust the steering wheel so that there is a d is
tance of at least 10 in (25 cm) between the
steering wheel and your breast bone
c:::>fig. 152.
If not possible, see your authorized Audi deal
ership about adaptive equipment.
~ Adjust the steering wheel so that the steering
wheel and airbag cover points at your chest and not at your face.
~ Grasp the top of the steering wheel with your
elbow(s) slightly bent.
~ Fasten and wear safety belts correctly
c:::> page 192.
~ Always keep both feet in the footwell so that
you are in control of the vehicle at all times .
For detailed information on how to adjust the
driver's seat, see
c:::> page 47, Seats and storage.
..&, WARNING
Drivers who are unbelted, out of position or
too close to the airbag can be seriously in
jured by an airbag as it unfolds. To help re
duce the risk of serious personal injury:
- Always adjust the driver's seat and the
steering wheel so that there are at least
10 in (25 cm) between your breastbone and
the steering wheel.
-Always adjust the driver's seat and the
steering wheel so that there are at least 4 in
(10 cm) between the knees and the lower
part of the instrument panel.
- Always hold the steering wheel on the out
side of the steering wheel rim with your
hands at the 9 o'clock and 3 o'clock posi
tions to help reduce the risk of personal in
jury if the driver's airbag inflates.
- Never hold the steering wheel at the
12 o'clock position or with your hands at
-
Page 202 of 314

Airbag system
Front airbags
Description of front airbags
The airbag system can provide supplemental
protection to properly restrained front seat occu
pants.
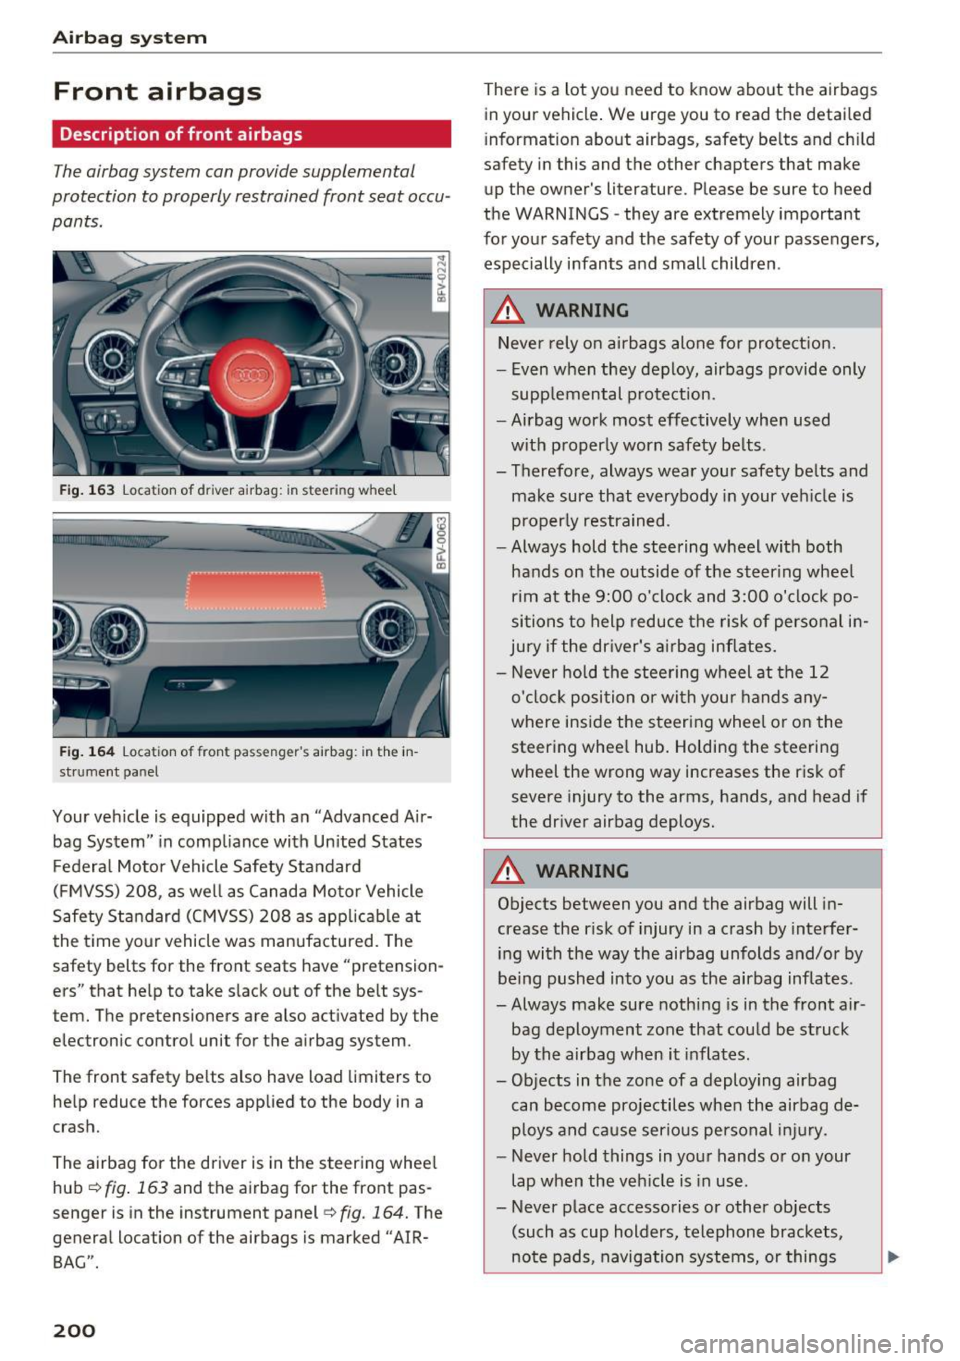
Fig. 163 Location of dr iver airbag: in steering whee l
Fig. 164 Location of front passenger's airbag: in the in
strument panel
Your vehicle is equipped with an "Advanced Air
bag System" in compliance with Un ited States
Federal Motor Vehicle Safety Standard
(FMVSS)
208, as well as Canada Motor Vehicle
Safety Standard (CMVSS)
208 as applicable at
the time your vehicle was manufactured. The
safety belts for the front seats have "pretension
ers" that help to take slack out of the belt sys
tem. The pretensioners are also activated by the
electronic control unit for the airbag system.
The front safety be lts also have load limiters to
help reduce the forces applied to the body in a
crash.
The airbag for the driver is in the steering wheel
hub<=>
fig . 163 and the airbag for the front pas
senger is in the instrument panel
<=>fig. 164. The
general location of the airbags is marked "AIR
BAG".
200
There is a lot you need to know about the airbags
in your vehicle . We urge you to read the detai led
i nformation about airbags, safety belts and ch ild
safety in this and the other chapters that make
up the owner's literature. Please be sure to heed
the WARNINGS -they are extremely important
for your safety and the safety of your passengers,
especially infants and small children .
.&_ WARNING -
Never rely on airbags alone for protection.
- Even when they deploy, airbags provide only
supp lemental protection.
- Airbag work most effectively when used
with properly worn safety belts .
- Therefore, always wear your safety belts and make sure that everybody in your vehicle is
properly restrained.
- Always hold the steering wheel w ith both
hands on the outside of the steering wheel
rim at the 9:00 o'clock and 3:00 o'clock po
sitions to help reduce the risk of personal in
jury if the driver's airbag inflates.
- Never hold the steering wheel at the
12
o'clock position or with your hands any
where inside the steering wheel or on the
steering whee l hub. Holding the steering
wheel the wrong way increases the risk of
severe injury to the arms, hands, and head if
the driver airbag deploys.
.&_ WARNING
Objects between you and the airbag will in
crease the r isk of injury in a crash by interfer
ing with the way the airbag unfolds and/or by
being pushed into you as the airbag inflates.
- Always make sure nothing is in the front air-
bag deployment zone that could be struck
by the airbag when it inflates.
- Objects in the zo ne of a deploying airbag
can become projectiles when the airbag de
ploys and cause serious personal injury.
- Never hold things in your hands or on your
lap when the vehicle is in use.
- Never place accessories or other objects (such as cup holders, telephone brackets,
note pads, navigation systems, or things
-
Page 243 of 314

co
co
.... N
" N .... 0
" "' c:o
Cooling system
Coolant
The engine cooling system is filled with a mixture
of pur ified water and coolant additive at the fac
tory. This coo lant must not be not changed.
The coolant level is monitored through the. in
dicator light
¢page 12. However , we do recom
mend occasionally check ing the coo lant level
manually.
If you must add coolant, use a mixture of water
and coolant addit ive. Mixing the coolant additive
with distilled water is recommended.
Coolant additive
The coolant additive is made of anti-freez ing and
corros ion protection agents. Only use the follow
ing coolant addit ives . These additives may be
mixed with each other.
Coolant additive Specification
G13 TL 774
J
G12++ TL 774 G
The amount of coo lant add itive that needs to be
mixed with water depends on the climate where
the vehicle will be operated. If the coolant addi tive percentage is too low, the coolant can freeze
and damage the engine.
Coolant addi- Freeze protec-
tive tion
Warm regions min. 40%, m in. -13 °F
max. 45% (-25 °C)
Cold regions min. 50%, max
. -40 °F
max. 55% (-40 °C)
(D Note
- Before the start of winter, have your author
ized Audi dealer or authorized Audi Service
Facility check if the coolant additive in your
vehicle matches the percentage appropriate
for the climate . Th is is especially important
when driving in colder climates.
- If the appropriate coolant additive is not
available in an emergency, do not add any
other additive . You could damage the en-
Checking and Filling
gine. If this happens, only use water and re
store the correct mixture ratio with the
specified coolant add it ive as soon as possi
ble.
- Only refill with new coolant .
- Radiator sealant must not be mixed with
the coolant.
Adding coolant
Fig. 184 Engine compartment: coolant expansio n ta nk
cover
-N
-N
"" CD co
Observe the safety precautions ¢ A in Working
in the engine comportment on page 235.
Checking the engine coolant level
.,. Park your vehicle on a leve l surface .
.,. Switch the ignition off.
.,. Read the coolant level on the coolant expansion
tank
¢ page 237, fig . 181. The coolant level
must be between the markings when the en
gine in cold . When the engine is warm it can be
slightly above the upper mark ing .
Adding coolant Requirement: there must be a residual amount of
coolant in the expansion tank
¢ (D .
.,. Let the engine cool down.
.,. Place a cloth over the coolant expansion tank
cap and unscrew the cap counterclockw ise
Q .&, .
.,. Add coolant m ixed in the correct rat io
¢ page 241 up to the upper marking .
.,. Make sure that the fluid level remains stable.
Add more coolant if necessa ry .
.,. Close the cap securely .
Coo lant loss usually indicates there is a leak. Im-
mediately drive your vehicle to an author ized .,..
241
Page 244 of 314

Checking and Filling
Audi dealer or authorized Audi Service Facility
and have the cooling system inspected. If the
cooling system is not leaking, a loss can come
from the coolant boiling through overheating
and being pushed out of the cooling system.
A WARNING
The cooling system is pressurized and can be
come very hot. To reduce the r isk of burns
from hot coolant:
- Do not open the coolant expansion tank cap when the eng ine is hot. This increases the
risk of burns.
- Stop the engine and allow it to cool.
- Protect your face, hands and arms from es-
caping coolant and steam by covering the
coolant tank cap with a large, thick cloth.
- Turn the coolant tank cap counterclockwise
slowly and keep light pressure o n the cap.
- To reduce the risk of burns, do not allow any
antifreeze or coolant to drip onto the ex haust system or hot eng ine components .
T he ethylene glycol in eng ine coolant can
catch fire under certa in circumstances.
- The coo lant add itive and the coolant can be
dange rous to your health. For this reason,
keep the coolan t in the origina l container
and away from children. There is a risk of
poisoning.
- When working in the engine compartmen t,
remember that the radiator fan can switch
on even if the ignition is switched off, which
increases the risk of inj ury.
(D Note
Do not add coolant if the exp ansion tank is
empty . Air could enter the cooling system and
damage the engine . If this is the case, do not
continue driving. See an authorized Audi deal
er or authorized Audi Service Facility for assis
tance.
242
Brake fluid
Fig. 1 85 Eng ine compa rtment: cover o n the brake fluid
reservo ir
Observe the safety precautions ¢ A in Working
in the engine compartment on page 235.
Check ing the brake fluid level
... Read the bra ke fluid level o n the bra ke flu id
reservoir
¢ page 237, fig . 181. The brake f luid
level must be between the MIN and MAX mark
ings ¢&_ .
The brake f lu id leve l is monito red au toma tically.
Changing the brake fluid
Have the brake fluid changed regularly by an au
thorized Audi dea ler or authorized Audi Service
Fac ility.
A WARNING
- I f the brake fl uid leve l is below the MIN
marking, it can impair the bra king effec t
and driving safety, which increase the risk o f
an accident . Do not continue driv ing. See a n
author ized Audi dealer or authorized A udi
Serv ice Facility for assistance.
- If the brake fl uid is old, b ubbles may form
in the brake system during heavy braking.
This would impair braking performance and
driving safety, which increases the r isk of an
accident.
- To ensure the brake system functions cor
rectly, only use brake fluids that comply
w it h VW standard SO l 14 or
FMVSS- 116 DO T 4.