2017 AUDI TT ROADSTER rear view mirror
[x] Cancel search: rear view mirrorPage 33 of 314
CD
CD
.... N
" N ,-I 0 r--. V, co
@ Tips
-You can still open and close the windows for
approximately 10 minutes after turn ing the
ignition off. The power windows do not
switch off until the driver's door or front passenger's door has been opened.
- When opening the doors and when open
i ng/closing the power top, the windows au
tomatically lower approximately 10 mm.
Convenience opening/closing
All windows can be opened and closed at the
same time.
Convenience opening feature
• Press the Im button on the remote control key
until all windows reach the desired position.
Convenience closing feature
• Press the {D button on the remote control key
u nti l all windows are closed¢
A or
Convenience closing with the convenience
key*
• Touch the sensor* on the door handle long
enough until all windows and the power top*
are closed . Do not place your hand in the door
hand le when doing this.
Setting convenience opening in the
Infotainment system
• Select in the Infotainment system: !MENUI but
ton
> Vehicle> left control button >Vehicle set
tings .
To enable the convenience window opening func
tion, the
Long press to open windows function
must be switched
on.
.&_ WARNING
- Never close the windows or power top* care lessly or in an uncontrolled manner, be
cause this increases the risk of injury.
- For security reasons, the windows and the
power top* can only be opened and closed
with the remote control key at a maximum
distance of approximately 6 ft (2 m) away
Open ing and closing
from the vehicle . Always pay attention when
pressing the
Im button to close the w indows
and the power top* so that no one is
pinched. The closing process w ill stop im
mediately when the
Im button is released .
Correcting power window malfunctions
You can reactivate the one-touch up/down func
tion if it malfunctions.
• Pull the power window switch up until the win
dow is completely raised.
• Release the switch and pull it up aga in for at
least one second .
Garage door opener
(Homelink)
Description
Applies to : veh icles w ith garage door o pen er (Home link)
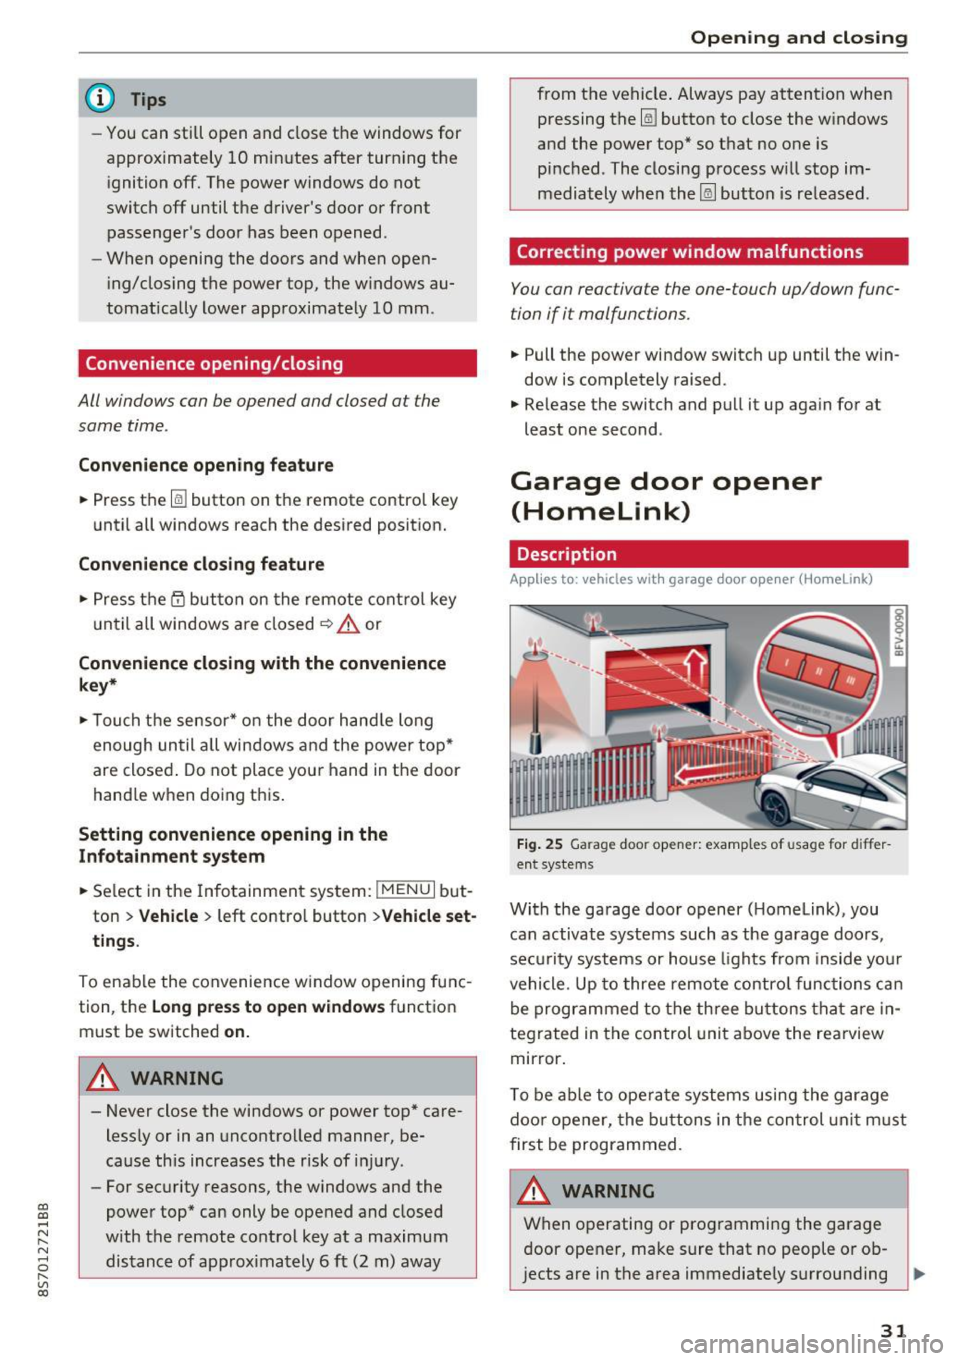
Fig. 25 Garage door opener: examples of usage for differ
ent systems
With the garage door opener ( Homelink), you
can activate systems such as the garage doors,
security systems or house lights from inside your
vehicle. Up to three remote control functions can
be programmed to the three buttons that are in
tegrated in the control unit above the rearview
mirror.
T o be able to operate systems using the garage
door opener, the buttons in the control unit must
first be programmed.
A WARNING ~
When operating or programming the garage
door opener, make sure that no people or ob
jects are in the area immediately surrounding ..,.
31
Page 34 of 314
Opening and closing
the equipment. Peop le can be injured or prop
erty can be damaged if struck when closing.
(D Tips
- For secu rity reasons, we recommend that
you clear the programmed buttons before
selling the vehicle.
- For additional information about Homelink,
v is it
www .homelink .com.
- For the Declaration of Conformity with the
provisions from the FCC in the United States
and Industry Canada, see¢
page 296 .
Operation
Applies to: ve hicles w ith garage doo r opener (Homeli nk)
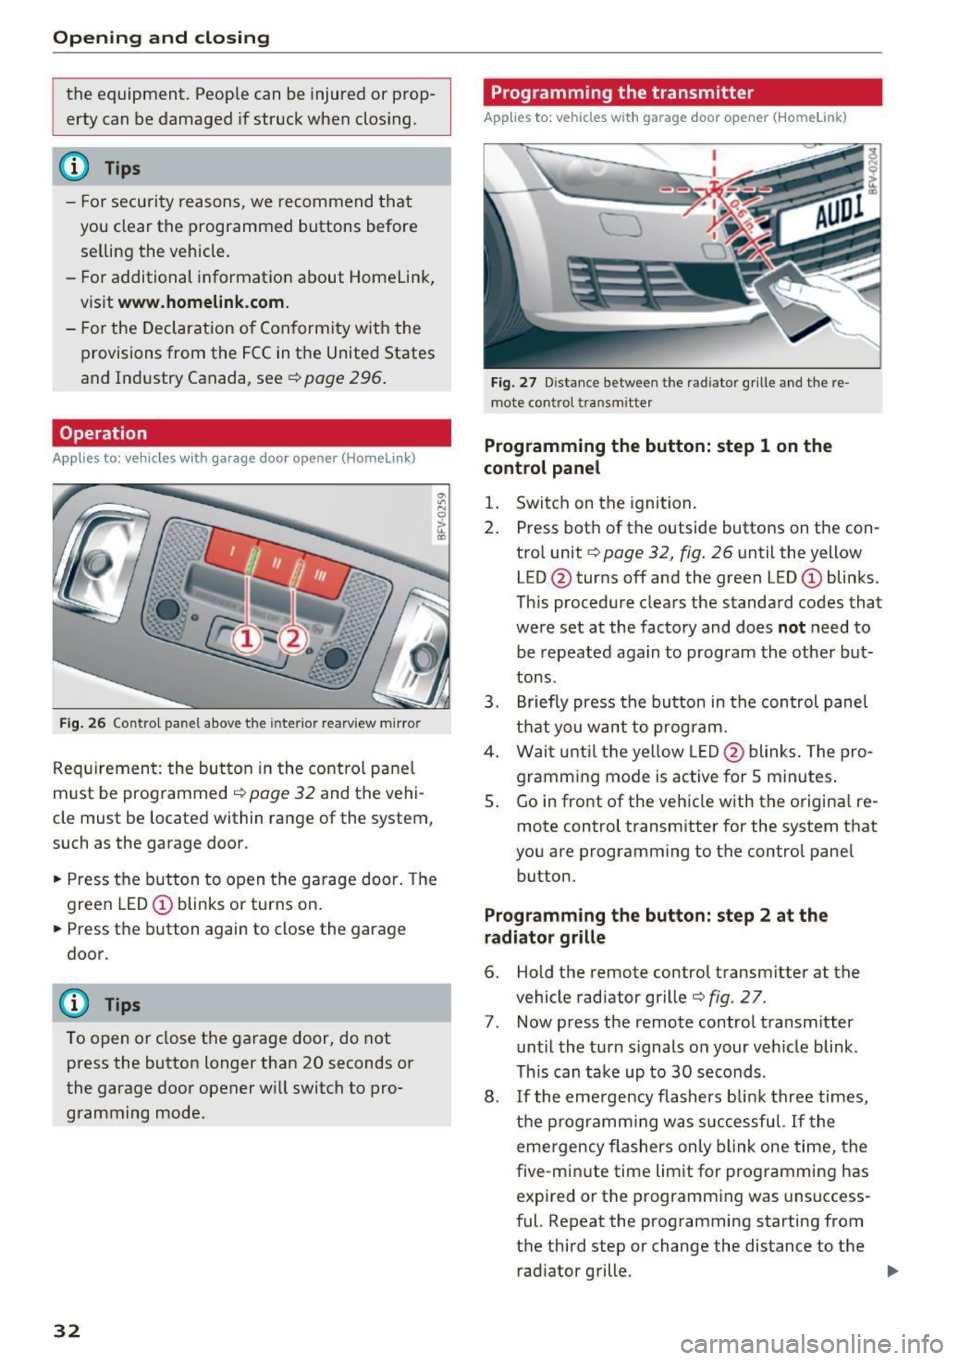
Fig. 26 Contro l pa nel above the inter io r rearview mirror
Requirement: the but ton in the control panel
m ust be programmed
i:!> page 32 and the vehi
cle must be located within range of the system,
such as the garage door .
.. Press the button to open the garage door. The
green LED
CD blinks or turns on.
.. Press the button again to close the garage
door.
(D} Tips
To open or close the garage door, do not
press the button longer than 20 seconds or
the garage door opener w ill switch to pro
gramming mode.
32
Programming the transmitter
App lies to : vehicles wit h garage door o pener (Horne link)
Fig. 27 D istance between the rad iator g rille and the re
mote contro l transm itter
Programming the button: step 1 on the
control panel
1. Switch on the ignition.
2. Press both of the outside buttons on the con
trol unit ¢
page 32, fig. 26 until the yellow
LED @turns off and the green LED
CD blinks.
This procedure clears the standard codes that
were set at the factory and does
not need to
be repeated again to program the other but
tons.
3. Briefly press the button in the control panel
that you want to program.
4. Wait until the yellow LED@blinks. The pro
gramming mode is active for S minutes.
5. Go in front of the vehicle w ith the origina l re
mote control transmitter for the system that
you are programming to the control panel button .
Programming the button: step 2 at the
radiator grille
6. Hold the remote control transmitter at the
vehicle radiator grille¢
fig. 27.
7 . Now press the remote control transm itter
until the turn signals on your veh icle blink .
This can take up to 30 seconds .
8. If the eme rgency flashers blink three times,
the programming was successful. If the
emergency flashers only blink one time, the
five -min ute time limit for programming has
expired or the programming was unsuccess
ful. Repeat the programming starting from
the third step or change the distance to the radiator grille.
Page 45 of 314
CD
CD
.... N
" N ...... 0
" V, co
Dimming the mirrors
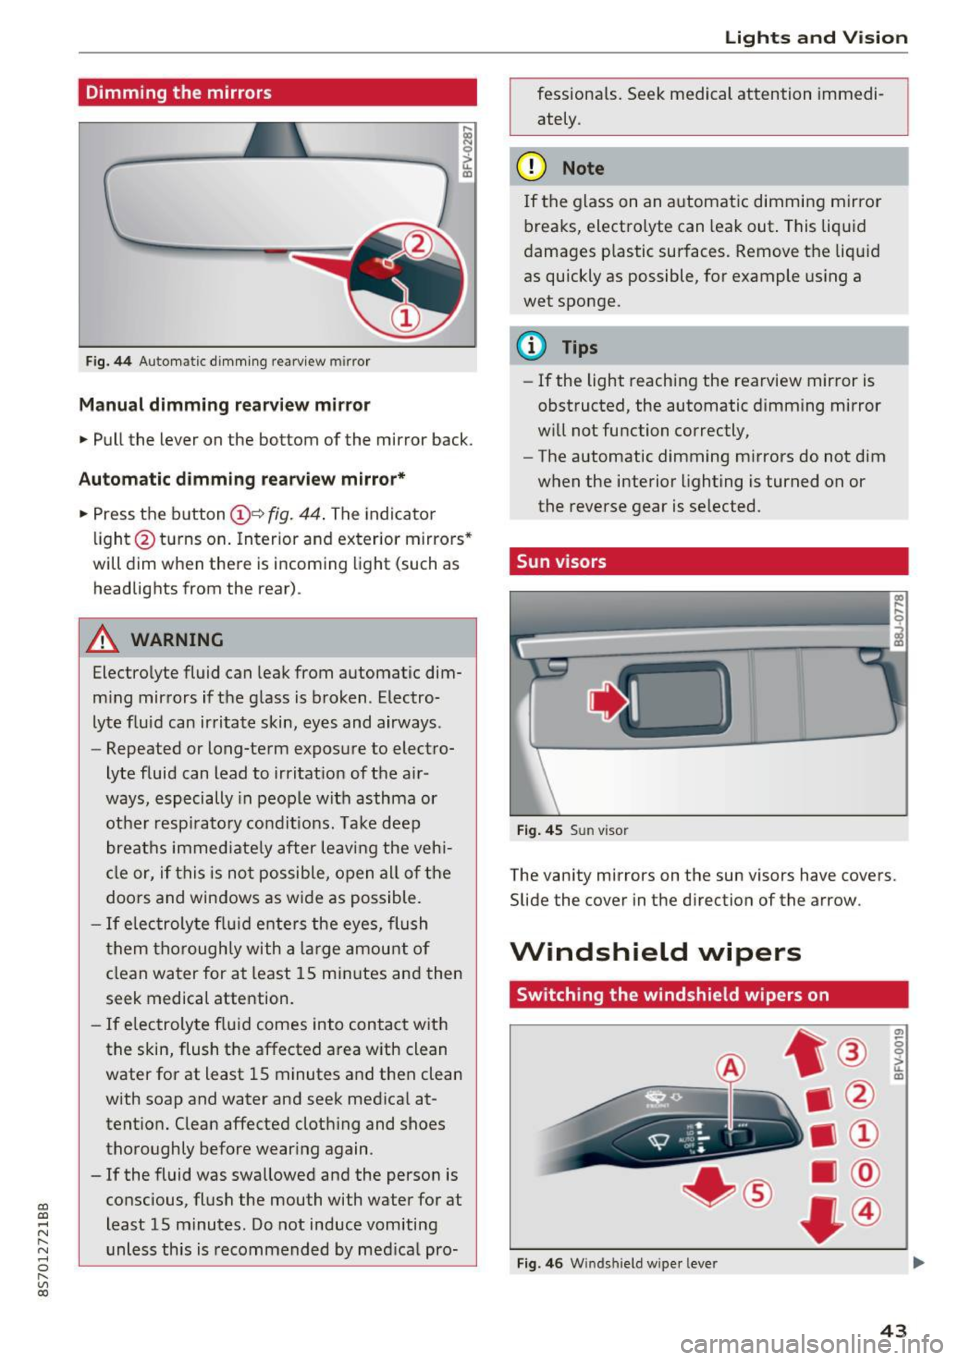
Fig . 44 Automat ic dimm ing rearview mirror
Manual dimming rear view mirror
• Pull the lever on the bottom of the mirror back.
Automatic dimming rea rvie w mirror*
• Press t he button @~
fig. 44 . The indicato r
li ght @turns on. In terior and exterior mirrors"
will dim when there is incoming light (such as
headlights from the rear).
A WARNING
Electrolyte fluid can leak from automat ic dim
m ing mirrors if t he g lass is b roken . Electro
lyte fluid can ir ritate skin, eyes and airways .
- Repeated or long-term exposure to elect ro-
lyte fluid can lead to irritat ion of the a ir
ways, especially in peo ple with asthma or
ot he r resp irato ry condi tions. Take deep
breat hs immed iate ly after leaving the veh i
cl e or, if this is n ot possib le, open all of t he
doo rs and windows as wide as possible.
- If elec troly te flu id ente rs the eyes, flush
t hem thorough ly with a large amou nt o f
cl ean water for at least 15 mi nutes and then
seek medical attention.
- If elec troly te f lu id comes into con tact wit h
the skin, flush t he affected area with clean
water for at least 15 minutes a nd then clean
with soap and water and seek medical at
tent ion. Clean affected cloth ing and shoes
thoroughly before wear ing again .
- If the fluid was swallowed and the person is
conscious, flus h the mouth with water for at
least 15 minutes. Do not induce vomiting
unless this is recommended by med ica l pro-
Lights and V ision
fessionals. Seek medical attention immedi
ately .
(D Note
If the glass on an a utomat ic dimmi ng mirror
breaks, electro lyte can leak out. This liquid
damages plastic sur faces. Remove t he liqu id
as quickly as possible, for example using a
wet sponge.
@ Tips
- If the light reaching the rearview mirror is
obstructed, the automatic dimming mirror
w ill not function correctly,
- The automatic dimming m irrors do not dim
w hen the interior lighting is turned on or
the reverse gear is selected.
Sun visors
Fi g. 4 5 Su n visor
The vanity mirrors on the sun visors have covers.
Slide the
cover in the direction of the arrow.
Windshield wipers
Switching the windshield wipers on
Fig. 4 6 W indshi eld wiper leve r
(7)
-0 0 :,;.. u. m
43
Page 47 of 314
CD
CD
.... N
" N .... 0 r--. V, co
_& WARNING
Dirty windshield wiper blades can impair vi
sion, which increases the risk of a n accident.
Replacing windshield wiper blades
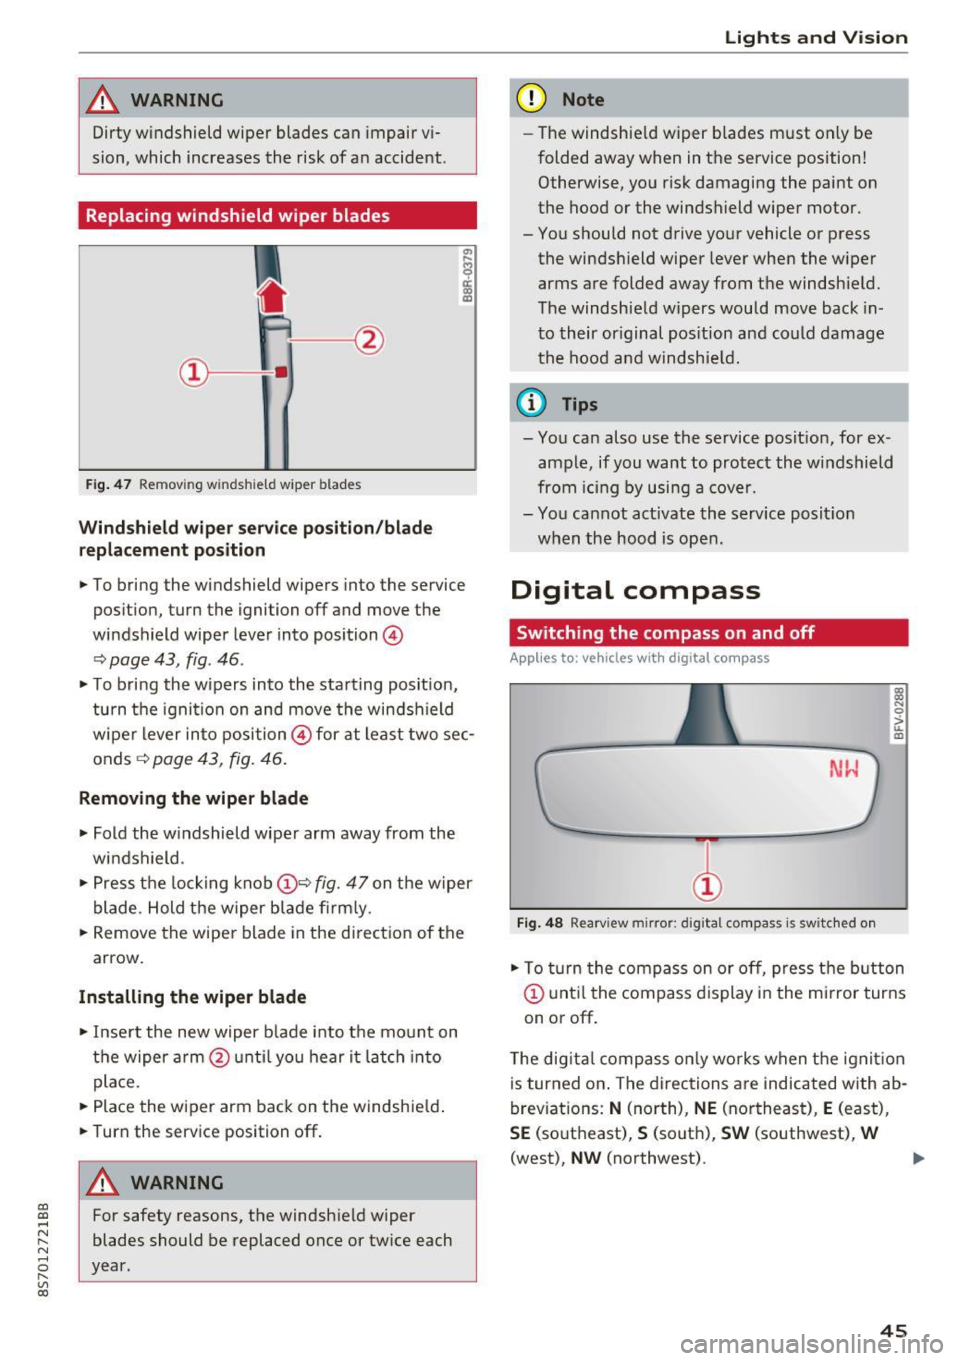
Fig . 47 Remov ing windshie ld wiper blades
Windshield wiper service position /blade
replacement position
"'
~ a: a) OJ
.. To bring the windshield wipers into the service
pos it ion, turn the ignition off and move the
windshield wiper lever into position @
~ page 43, fig. 46 .
.. To bring the wipers into the starting posit ion,
tu rn the ignition on and move the windshield
wiper lever into position@ for at least two sec
onds ~
page 43, fig. 46.
Removing the wiper blade
.. Fold the windshield wiper arm away from the
windshield .
.,. Press the locking knob@~
fig. 47 on the wiper
blade. Hold the wiper blade firmly.
.. Remove the wiper blade in the direct ion of the
arrow.
Installing the wiper blade
.. Insert the new wiper b lade into the mount on
the wiper arm @until you hear it latch into
place.
.. Place the wiper arm back on the windshie ld .
.. Turn the service position off.
A WARNING
-
For safety reasons, the windshield wiper
blades should be replaced once or twice each
year.
Lights and V ision
(D Note
-The windshie ld wiper blades must only be
folded away when in the service position!
Otherwise, you risk damaging the paint on
the hood or the windshield wiper motor.
- You should not drive your vehicle or press the windsh ield wiper lever when the wiper
arms are folded away from the windshield.
The windshield wipers would move back in
to their original pos ition and could damage
the hood and windshie ld.
(1} Tips
-You can also use the service posit ion, for ex
ample, if you want to protect the windshield
from icing by using a cover.
- You cannot act ivate the service posit ion
when the hood is open.
Digital compass
Switching the compass on and off
Applies to: vehicles wit h digita l compass
Fig. 48 Rearview mirror: digita l compass is switc hed on
::l
"' 0
> LL OJ
.. To turn the compass on or off, press the button
@ until the compass d isplay in the mirror turns
on or off .
The digita l compass only works when the ignit ion
is turned on . The directions are indicated with ab
breviations:
N (north), NE (northeast), E (east),
SE (southeast), S (south), SW (southwest), W
(west),
NW (northwest). ..,_
45
Page 48 of 314
Lights and Vision
@ Tips
To prevent inaccurate compass readings, do
not bring any remote controls, e lectr ica l dev i
ces or metall ic objects near the mirro r.
Adjusting the magnetic zone
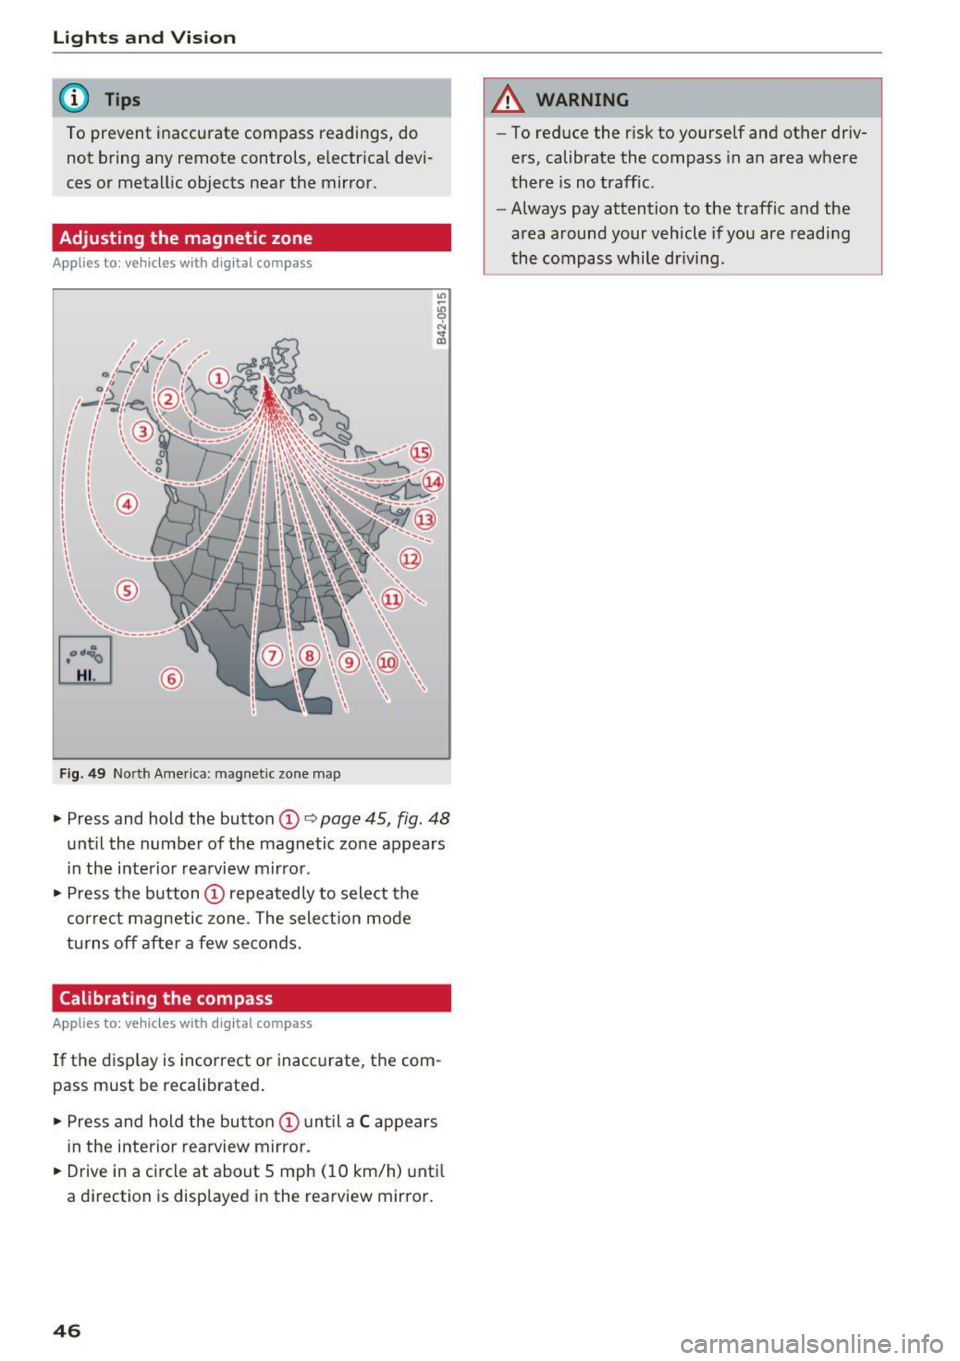
A pp lies to: ve hicles w ith digital compass
[o::J
UiL.J ®
F ig . 4 9 Nort h Amer ica : ma gnetic zo ne m ap
.- Press and hold the button CD i:> page 45, fig. 48
unt il the number of the magnetic zone appears
in the interior rea rview m irro r .
.- Press t he button
CD repea tedly to select the
correc t magne tic zone . The select io n mode
turns off afte r a few seco nds.
Calibrating the compass
A pp lies to: ve hicles w ith digi tal compass
If the d isp lay is incorrect or inacc urate, t he com
pass must be recalibrated .
.- Pre ss and hold the button
CD un til a C appears
in the inte rio r rearview mirror .
.- Drive in a circle at about 5 mph ( 10 km/h) unti l
a dir ection is disp layed i n the rearvi ew mirro r.
46
A WARNING
- To reduce the r isk to yourself and other driv
ers, calibrate the compass in an area whe re
there is no traffic .
- Always pay attention to the traffic and the
area around your vehicle if you are readi ng
the compass whi le dr iv ing .
Page 79 of 314
CD
CD
.... N
" N ...... 0
" V, co
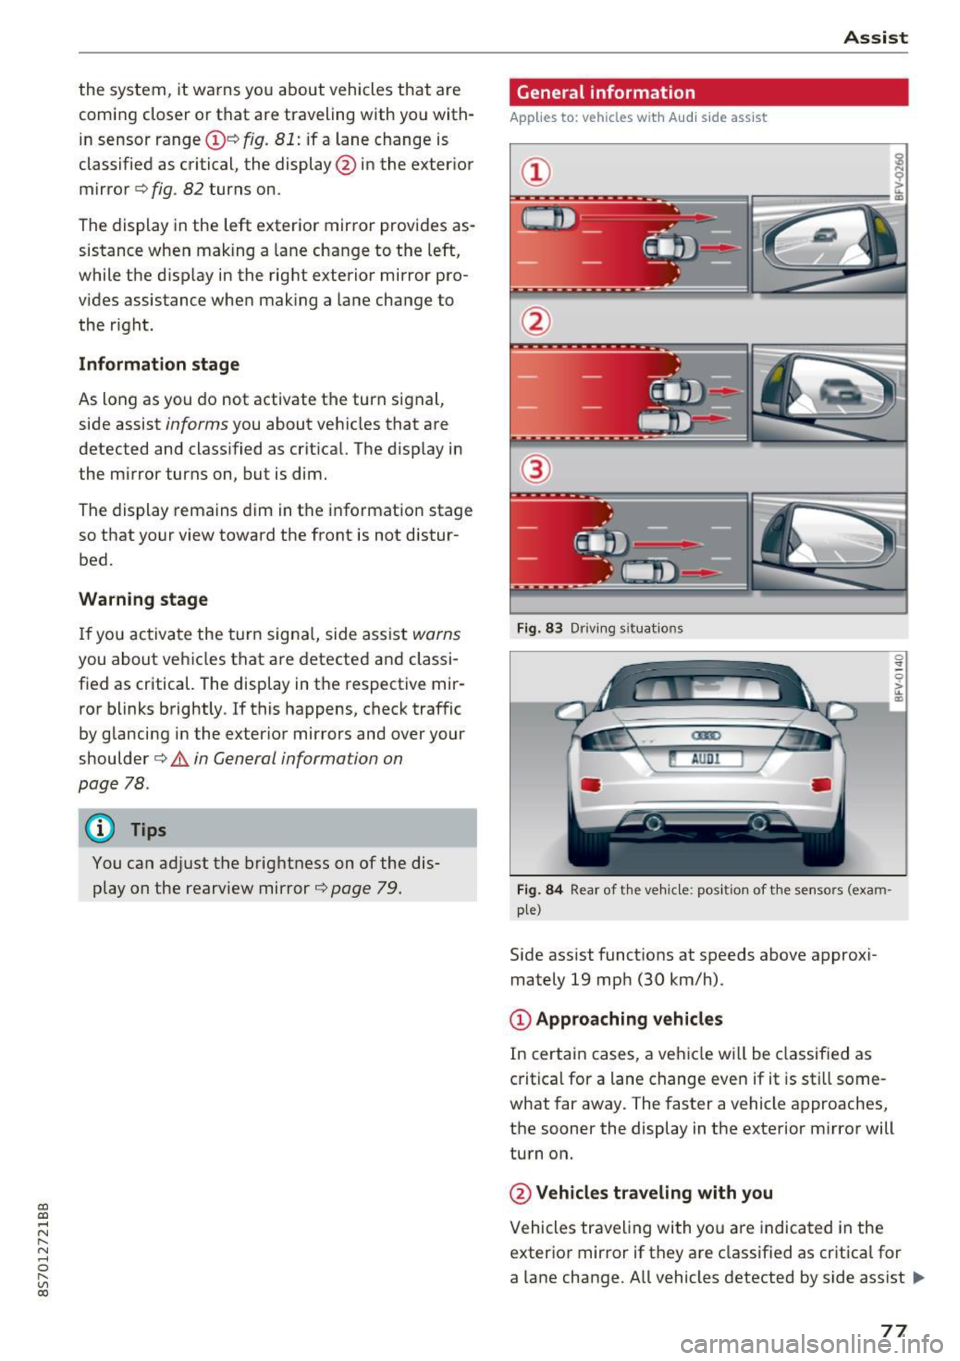
the system, it warns you about vehicles that are
coming closer or that are traveling with you with
in sensor range(!)¢
fig. 81: if a lane change is
classified as critical, the display @ in the exter ior
mirror
¢ fig . 82 turns on.
The display in the left exterior mirror provides as
sistance when making a lane change to the left,
while the d isp lay in the right exterior mirror pro
vides assistance when mak ing a lane change to
the r ight.
Information stage
As long as you do not activate the turn signal,
side assist
informs you about vehicles that are
detected and classified as crit ical. The display in
the m irror turns on, but is dim.
The display remains dim in the information stage
so that your view toward the front is not distur
bed.
Warning stage
If you activate the turn signal, side assist warns
you about vehicles that are detected and classi
fied as critical. The display in the respective mir
ror blinks brightly . If this happens, check traffic
by glancing in the exterior mirrors and over your
shoulder¢ .&
in General information on
page 78.
@ Tips
You can adjust the brightness on of the dis
play on the rearview mirror ¢
page 79.
Assist
General information
Applies to : veh icles w it h Aud i s ide ass ist
Fig . 83 Driv ing s ituat ions
Fig. 84 Rear of t he ve hicle: positio n of the sensors (exam
ple)
S id e assist funct ions at speeds above approxi
mately 19 mph (30 km/h).
@ Approaching vehicles
In certain cases, a vehicle will be classified as
critical for a lane change even if it is still some
what far away. The faster a vehicle approaches,
the sooner the display in the exterior m irror will
turn on.
@ Vehicles traveling with you
Vehicles traveling with yo u are indicated in the
exterior mirror if they are classified as critica l for
a lane change. All vehicles detected by side assist
lli>-
77
Page 284 of 314

Fuses and bulbs
Interior fuse assignment
Fig. 208 Vehicle inter ior: fuse assignme nt
No. Equipment
Fl Power top control modu
le (Roadster)
F2 Power top control module (Roadster)
F3 ESC control module
F4 Central computer processor (MIB-2)
FS Gateway
F6 Anti-theft alarm system Climate control system, selector lever (au-
F7 tomatic transmission), parking heater,
rear window heater relay coil
Diagnos is, electrical parking brake switch,
F8 light swi tch, rain/light sensor, interior
lighting
F9 Steering column switch module
Fl0 Display
F ll Haldex clutch
F12 MMI area
F 13 Adaptive dampers control module
F14 Climate control system blower
FlS Electronic steering co lumn lock
F16 MMI components, safety be
lt microphone
(Roadster)
282
No . Equipment
F17 Instrument cluster
F18 Rearview camera
F19 Convenience key system control module
F20 Power lumbar support adjustment
F22 Front passenger's side neck heating (Road-
ster)
F23 R
ig ht exterior lighting, on-board compute r
(right)
F 25 Driver's s
ide door (for example power win-
dows)
F26 Seat heating
F28 AMI H igh med ia port
F29 On-board computer
F31 Left on-board computer
F32 Driver assistance systems
F33 Airbag
Socket relay, interior sound, back-up light
F34 switch, temperature sensor, oil level sen-
sor
Diagnosis, headlight range control system,
F35 air quality sensor, automatic dimming
rearview mirror
F36 Right cornering light/ r ight LED-h eadlight
F37 Left cornering light/ left LED-headlight
F38 E
ng ine control module, ESC control mod-
ul e
F39 Front passenger's side door (for example
power windows)
F40 Cigarette lighter, sockets
F41 SCR relay and delivery unit
F42 Central locking area
F43 On-board computer
F45 Power adjustable driver's side seat
F46 Driver's side neck heat ing (Roadster)
F49 Starter, clutch sensor
FS0 ESC valves
F53 Rear window defogger
The power seats* are protected v ia
circuit break
ers
that automatically switch on after a few sec
onds after the overload has been reduced.
Page 301 of 314

co
co
.... N
" N .... 0
" "' c:o
Certification . . . . . . . . . . . . . . . . . . . . . . . . . 29 6
Changing e ng ine o il . . . . . . . . . . . . . . . . . . . 240
Changing light bulbs . . . . . . . . . . . . . . . . . . 283
C harg ing the b attery (mob ile dev ices) . . . . 16 2
C hi ld restraint
Danger of us ing ch ild restraints in the front
seat . . . . . . . . . . . . . . . . . . . . . . . . . . . . . . . 197
C hi ld restraints
Where can I get additional informat io n
about ch ild restrai nts and their use? . . . . 230
Chi ld safety . ... .... .. .... ... .. .. .... . 2 18
Important safety instructions for using chi ld
safety seats . . . . . . . . . . . . . . . . . . . . . . . . 221
C hi ld safety sea ts
Booste r seats . . . . . . . . . . . . . . . . . . . . . . . 225
Convertible c hild seats . . . . . . . . . . . . . . . 224
H ow do I proper ly install a child safety seat
. h' l ? inmyve ice ................. .. .. .. . 221
Infant seats . . . . . . . . . . . . . . . . . . . . . . . . 223
Safety instructions . . . . . . . . . . . . . . . . . . . 221
C hild seats . . . . . . . . . . . . . . . . . . . . . . . . . . 223
Securing . . . . . . . . . . . . . . . . . . . . . . . . . . . 227
C igare tte lighte r . . . . . . . . . . . . . . . . . . . . . . . 48
C lea ning . . . . . . . . . . . . . . . . . . . . . . . . . . . .
266
C lea ning/ removing ice from windows . . . . . 268
C lea ning Alcanta ra . . . . . . . . . . . . . . . . . . . . 269
C leaning artificia l leather . . . . . . . . . . . . . . . 269
C le anin g ca rbon parts . . . . . . . . . . . . . 268, 269
C lea ning contro ls . . . . . . . . . . . . . . . . . . . . . 269
C leaning decorative parts and trim . . . . . . . 268
C lea ning displays . . . . . . . . . . . . . . . . . . . . . 268
C leaning exhaust tail p ipes . . . . . . . . . . . . . 267
C lean ing plast ic parts . . . . . . . . . . . . . . . . . . 268
C lea ning rims . . . . . . . . . . . . . . . . . . . . . . . . 267
C leaning seat covers . . . . . . . . . . . . . . . . . . . 269
C le ani ng ta il lights . . . . . . . . . . . . . . . . . . . . 267
C lea ning text iles . . . . . . . . . . . . . . . . . . . . . . 269
C leaning the A udi virt ual cockpit . . . . . . . . . 268
C lea ning the instrument cluster . . . . . . . . . 268
C lean ing the wind deflector . . . . . . . . . . . . . 268
C lima te con trol system (automatic)
Ad justing ai r ven ts . . . . . . . . . . . . . . . . . . . . 53
Ad justing the air vents . . . . . . . . . . . . . . . . . 54
Ad justing the temperature . . . . . . . . . . . . . 53
A ir dist ribution, air vents . . . . . . . . . . . . . . . 53
AUTO (automatic mode) . . . . . . . . . . . . . . . 53
Index
B lower . . . . . . . . . . . . . . . . . . . . . . . . . . . . . 53
Cont rols . . . . . . . . . . . . . . . . . . . . . . . . . . . . 53
Defrosting the windows . . . . . . . . . . . . . . . 54
Drive select . . . . . . . . . . . . . . . . . . . . . . . . . . 80
Rear w indow defogger . . . . . . . . . . . . . . . . . 54
Recirculation mode . . . . . . . . . . . . . . . . . . . 54
C limate contro l system (manua l)
Adjusting the a ir vents . . . . . . . . . . . . . . . . . 54
Clock .... .. .... .. .. ................. 175
Clos ing
Hood . ........ .. .. ................. 236
Windows ..... .. .. .................. 30
Closing/open ing
By remote control . . . . . . . . . . . . . . . . . . . . 26
With the centra l locki ng switch . . . . . . . . . 28
With the conven ience key . . . . . . . . . . . . . . 27
Closing a nd opening
With the door loc k . . . . . . . . . . . . . . . . . . . . 29
Coc kp it (overview) . . . . . . . . . . . . . . . . . . . . . . 6
Coming home . . . . . . . . . . . . . . . . . . . . . . . . . 41
Command (vo ice recogn ition system) . . . . . 108
Compartments . . . . . . . . . . . . . . . . . . . . . . . . 49
Compass in the mirror . . . . . . . . . . . . . . . . . . 45
C ompliance . . . . . . . . . . . . . . . . . . . . . . . . . . 2 96
Conference call . . . . . . . . . . . . . . . . . . . . . . . 118
Connect ion manager
176
Connections
refer to M edi a . . . . . . . . . . . . . . . . . . 156, 164
Connect ion settings . . . . . . . . . . . . . . . . . . . 176
Cons umer i nfo rmation . . . . . . . . . . . . . . . . . 293
Cons ume r Information . . . . . . . . . . . . . . . . . 18 7
Consumption (fuel) . . . . . . . . . . . . . . . . 23, 290
Contacting NH TSA . . . . . . . . . . . . . . . . . . . . 187
Contacts Additional directory . . . . . . . . . . . . . . . . . . 177
I m po rting/expo rting . . . . . . . . . . . . . . . . . 123
Memo ry c apacity . . . . . . . . . . . . . . . . . . . . 1 24
Sea rching . . . . . . . . . . . . . . . . . . . . . . . . . . 122
Showing details . . . . . . . . . . . . . . . . . . . . . 123
Storing as destination . . . . . . . . . . . . . . . . 142
Cont rol bu ttons . . . . . . . . . . . . . . . . . . . . . . . 98
Cont rol knob with joyst ick function . . . . . . . 101
Convenience key Indicator light . . . . . . . . . . . . . . . . . . . . . . . 60
Stopping the eng ine (START ENGINE STOP
button) . . . . . . . . . . . . . . . . . . . . . . . . . . . . . 60
299