2017 AUDI TT ROADSTER display
[x] Cancel search: displayPage 105 of 314
co
co
.... N
" N .... 0
" "' c:o
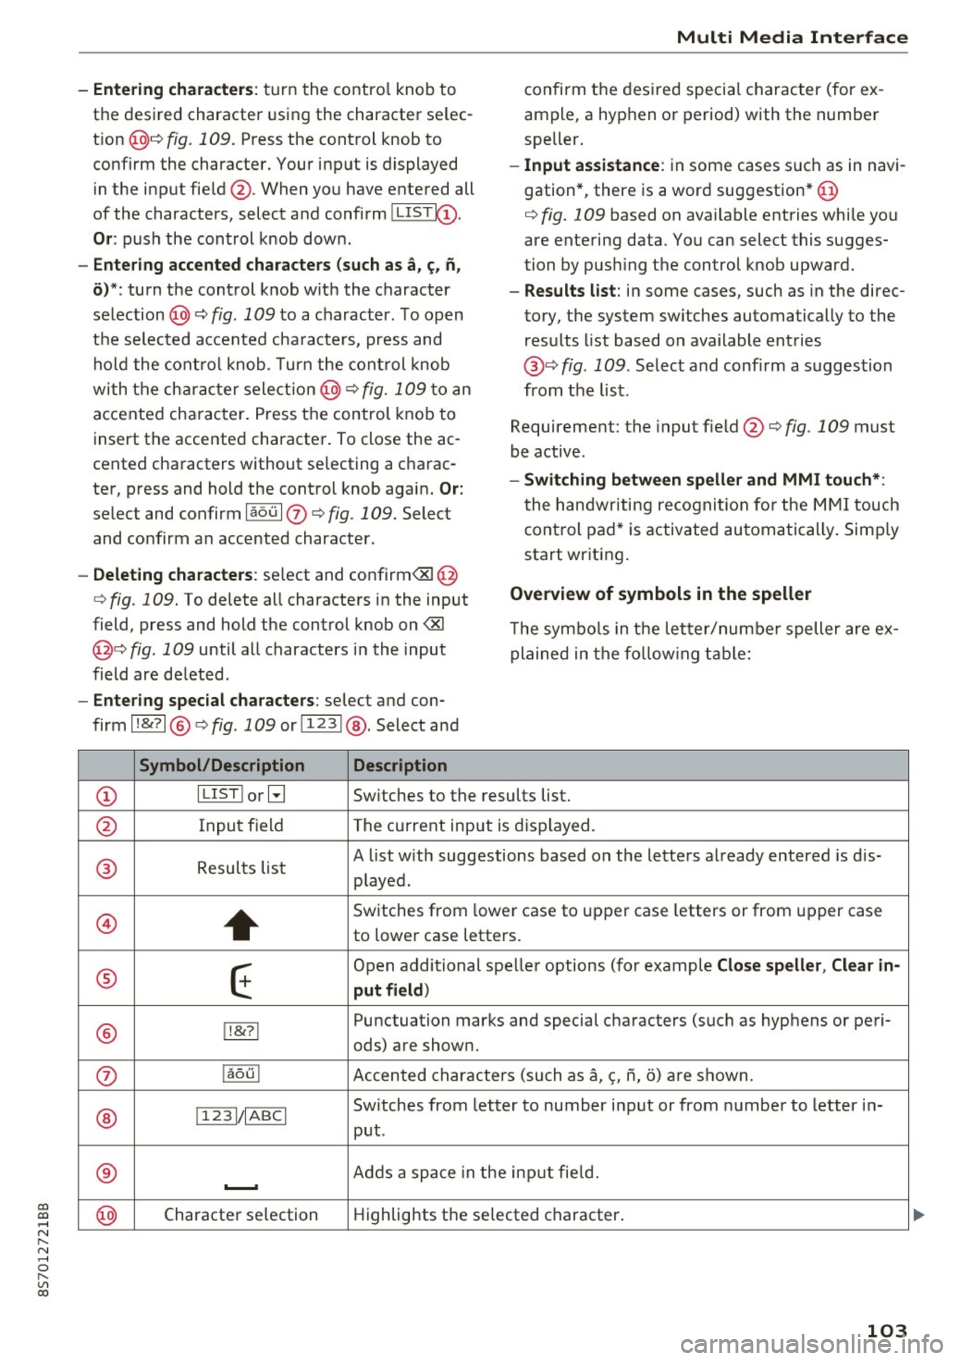
-Entering characters: turn the contro l knob to
the desired character using the character se lec
t ion @¢ fig.
109. Press the control knob to
confirm the character. Your input is displayed
in the input fie ld @ . When you have entered all
of the characters, select and confirm~
Or: push the control knob dow n.
-Entering accented characters (such as a, ~. n,
o) *: turn the control knob w it h the character
selection @¢ fig .
109 to a character. To open
the se lected accen ted cha racters, press and
hold the control knob. T urn the control knob
wi th the charact er selection @¢ fig.
109 to an
accented cha racter. Press the control knob to
insert the accented character. To close the ac
cented characters without se lecting a charac
ter, press and hold the control knob again.
Or:
select and confirm laou 10 ¢ fig . 109. Select
and confirm an accented character .
-Deleting characters: select and confirm<&! @
¢ fig .
109. To delete all characters in the input
field, press and hold the control knob on
<&I
@¢ fig . 109 until a ll characters in the input
field are de leted .
-Entering special characters : select and con
firm l!&?l @¢fig .
109 orll23 I@ . Select and
Symbol/Description Description
Multi Media Interface
confirm the desired special character (for ex
ample, a hyphen or period) with the number
speller .
-Input assistance : in some cases s uch as in navi
gation*, there is a word suggestion* @
¢ fig.
109 based on available entries while you
are entering data. You can select this sugges
tion by pus hing the control knob upward.
- Results list : in some cases, such as in the direc
tory, the system sw itches automatically to the
results list based on available entries
@ ¢
fig. 109. Select and confirm a suggestion
from the list.
Requirement: the input field@¢
fig. 109 must
be active .
-Switching between speller and MMI touch*:
the handwriting recogn itio n for the MMI touch
control pad* is activated automatically . Simply
start wr iting.
Overview of symbols in the speller
T he symbo ls in the letter/numbe r speller are ex
plained in the following table:
CD ILIST lorB
Switches to the results list.
@ Input field The current input is displayed.
® Results list A list w
ith suggestions based on the letters already entered is dis-
played .
@
+
Switches from lower case to upper case letters or from upper case
to lower case letters.
® E
Open additional spe ller options (for example Close speller , Clear in -
put field )
® 1!&71 Punctuation
marks and special characters (such as hyphens or peri-
ods) are shown.
0 l
aou l Accented characters (such as
a, <;, ii, o) are shown .
Sw itches from letter to number input or from number to letter in-
® 11 231/ IABCI
put.
® ...__. Adds
a space in the inp ut fie ld .
@ Character
selection Highlights
the selected character .
103
Page 106 of 314
Multi Media Interface
Symbol /Description Description
@ ..
Inserts the input s uggestion* when yo u pus h the co ntro l knob up .
@ ~ D ele tes t he chara cter to the left o f the cursor.
@ Tips
Accen ted characters are not available for ev
ery letter.
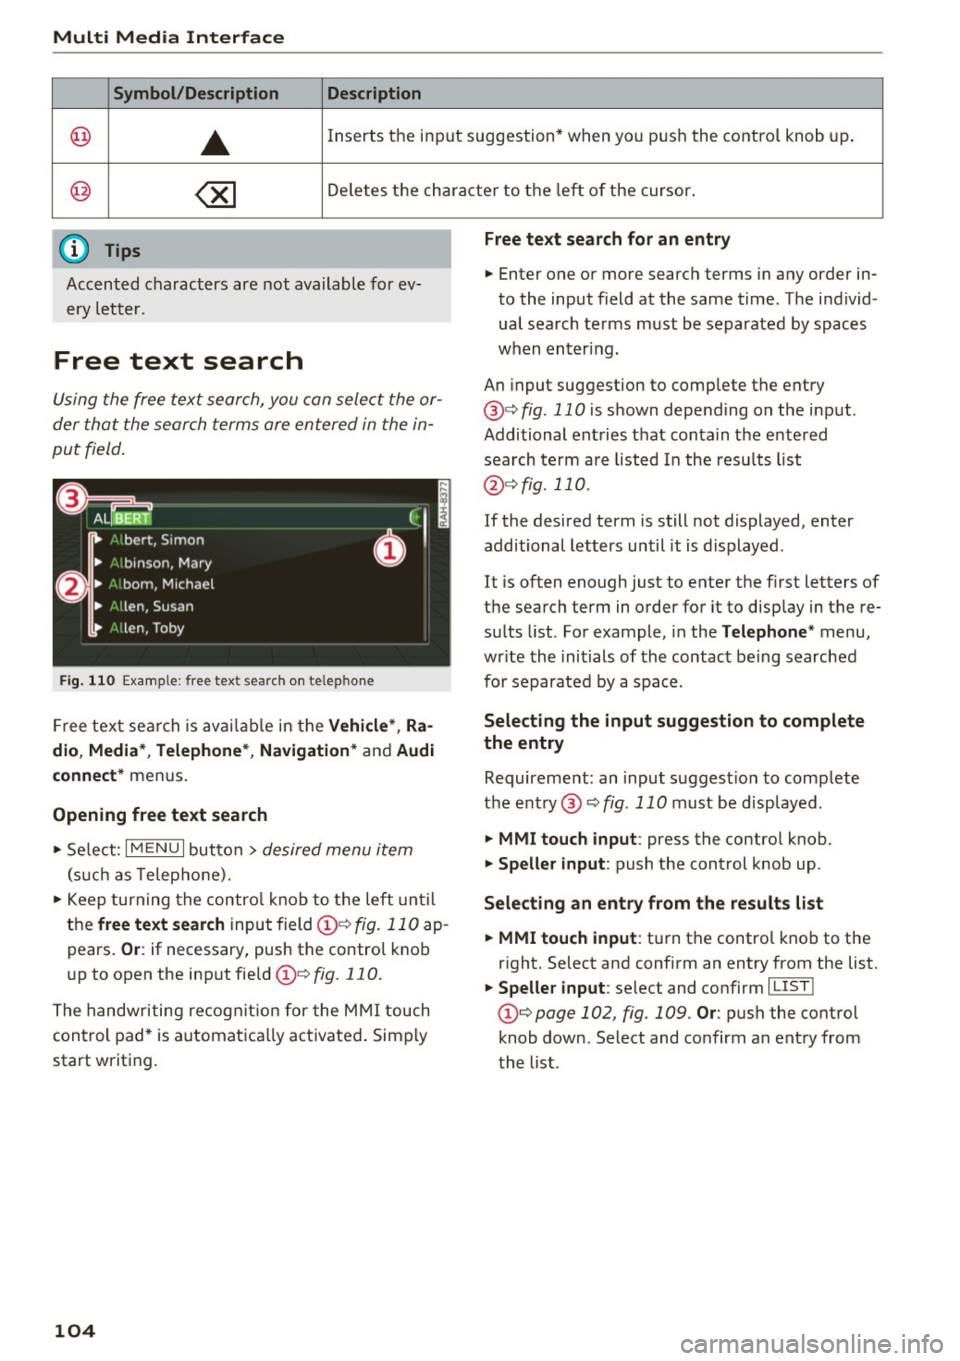
Free text search
Using the free te x t sear ch, you can select the or
der that the search term s are en tered in the in
pu t field .
Fig. 110 Exal'l'lple: free text searc h on telep hon e
Fr ee tex t se arc h is availabl e in the Vehicle *, Ra
dio, Media *, Telephone* , Navigation *
and Audi
connect*
men us.
Opening free text search
"' Se lect : I MENU I button> desired menu item
(such as Telep ho ne).
"' Keep turning the contro l knob to t he left until
the
free text search inpu t field @¢ fig. 11 0 ap
pears .
Or: if necessary, push the contro l kno b
u p to open the inp ut fie ld @ ¢fig.
110.
The handwriting re cog nit ion for the M MI touch
control pad * is a utomatica lly act ivated . Simp ly
start writ ing.
104
Free text search for an entry
.. Enter one or more searc h terms in any order in
to the input field a t the same time . T he individ
ual sea rch terms must be separated by spaces
when en ter ing.
An input suggestion to comp lete the entry
@ ¢
fig. 110 is shown depending on the input.
Additional ent ries t hat conta in t he e nte red
sea rch te rm a re listed In the resu lts list
@ ¢fig. 110.
If the desired term is still not displayed, enter
additional letters until it is displayed .
It is often enough just to enter the f irst letters of
the search term in order fo r it to disp lay in the re
s ul ts list. Fo r example, in the
Telephone * menu,
wr ite the ini tials of the contac t be ing searched
for separated by a space .
Selecting the input suggestion to complete
the entry
Requireme nt: an input suggest io n to comp lete
the entry @¢
fig. 110 must be disp layed.
.. MMI touch input : press the control knob.
.. Speller input : push the control knob up .
Selecting an entry from the results list
.. MMI touch input :
tu rn the contro l knob to the
r ight. Select and confirm an entry from the list.
.. Speller input : select and confirm I LIST!
the list .
Page 107 of 314
CD
CD
.... N
" N ...... 0
" V, co
Multi Media Interface
Menus and Symbols
I~ :c
' ~
@
14
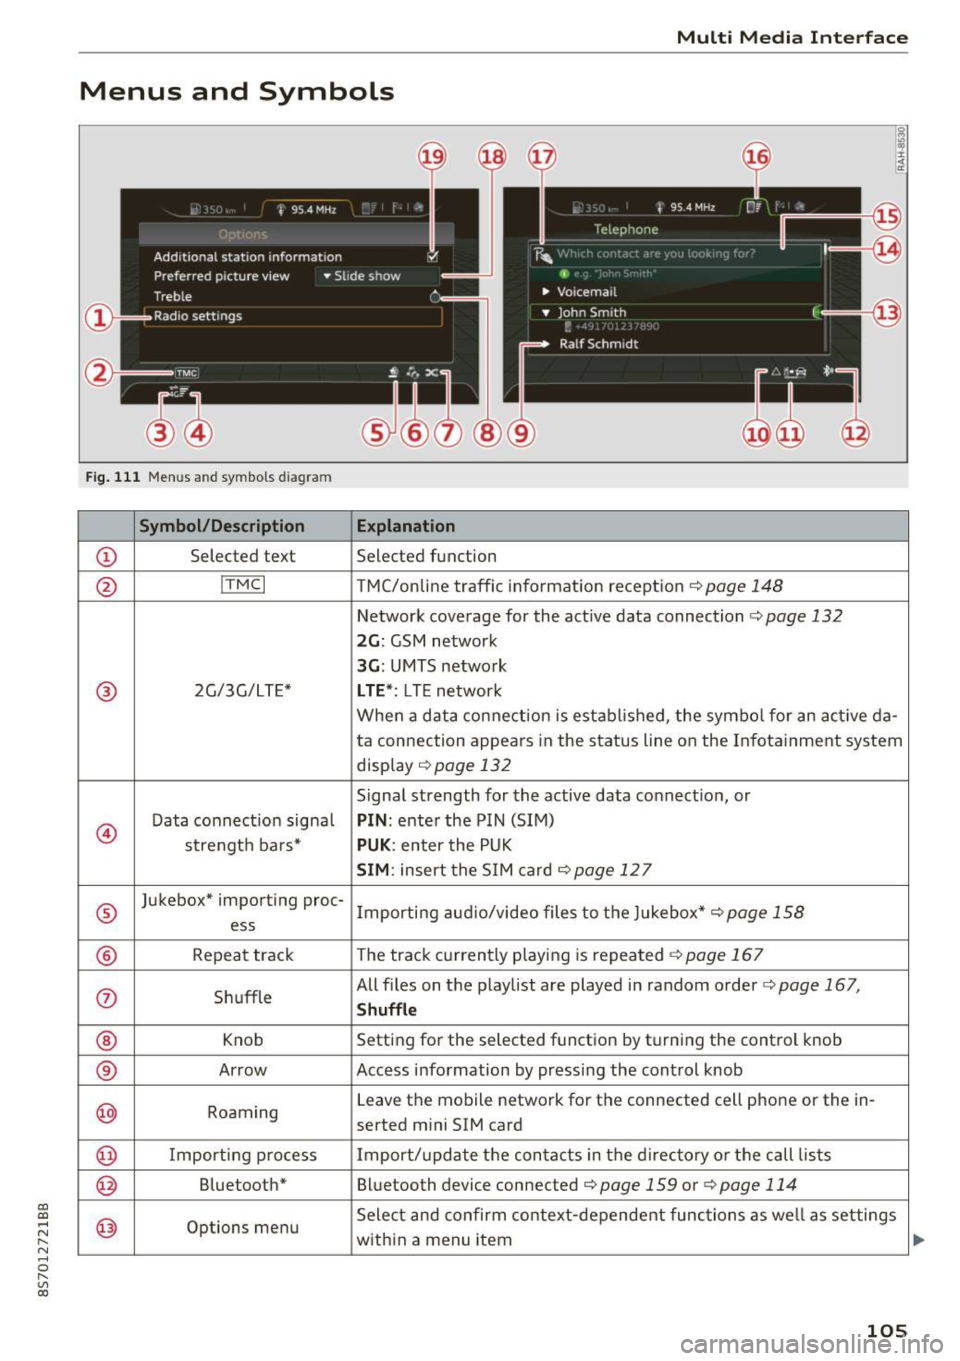
Fig. 111 Menus and symbols diagram
Symbol/Description Explanation
CD Selected text Selected function
@ I
TMC I TMC/online traffic informat ion recept ion c::>page 148
Network coverage for the active data connection c::> page 132
2G: GSM network
3G : UMTS network
® 2G/3G/LTE* LTE *: LTE network
When a data connection is establ ished, the symbol for an act ive da-
ta connection appea rs in the status line on the Infota inment system
display
c::> page 132
Signal strength for the active data connect ion, or
@
Data connect ion signa l PIN: enter the PIN (SIM)
strength bars*
PUK : enter the PUK
SIM: insert the SIM card c::> page 12 7
®
Jukebox* importing proc-
Importing audio/video files to the Jukebox*
c::> page 158
ess
® Repeat track The track currently playing is repeated c::>page 167
0 Shuffle All files on the playlist are played in random o
rder
c::> page 167,
Shuffle
® Knob Setting for the selected function by turning the control knob
® Arrow Access information by pressing the control
knob
@ Roaming Leave the mobile network for the connected cell phone or the in-
serted mini SIM card
@ Importing process Import/update the contacts in the directory or the call lists
@ Bluetooth* Bluetooth device connected c::> page 159 or c::> page 114
@ Options menu Select
and confirm context-dependent functions as well as settings
within a menu item
105
Page 110 of 314

Voice recognition system
Voice recognition system Operating
Applies to: vehicles with vo ice recognition system
You con operate many Infotainment functions
conveniently by speaking.
Req uirement: the ignition and the MMI must be
sw itched on, there m ust be no p hone call in p rog
ress and the park ing system must not be active .
... Switching on : briefly press the~ but ton @
¢page 21, fig. 10 on the mu ltifunction stee r
ing whee l an d say the desired command after
the
Beep .
... Switching off :
press and hold the l2!J button.
Or: say the command C ancel.
.., Pause :
say the command Pause . To resume,
press the
l2!I button .
... Corre cting : press the ~ button one t ime
@ ¢
page 20, fig. 8. Or: say the command Cor
r ec tion .
Input assistance
The system gu ides you through the input with
visual and audio feedback .
-Visual input assistance : after switching on
vo ice recognit ion, a display with a se lection of
poss ible commands appea rs. The command
display can be sw itched on/off under
I M ENU !>
Setting s> left control bu tton > MMI setting s>
Speech dialog sy stem .
-Audio input as sistance :
to have the poss ible
comma nds read, press the
10, I button on the
mul tifunction steering wheel briefly and say
Help .
For the syst em to understand you:
Speak clearly and dist inctly at a normal volume .
Speak louder when d riving faster .
Emphasize the words in the commands evenly
and do not leave long pauses .
Do not speak a command when the voice recogni
tion system is making an announcement .
Close the doors, the windows and the sunroof* to reduce bac kground noise. Make sure t hat passen-
108
gers are not speaking when you are giv ing a voice
command .
Do no t direc t the air ve nts toward the handsfree
micropho ne, which is nea r the fron t interior
li ghts on the roof headliner/on thedriver's safety
belt*. For additional information on the safety
belt m icrophone, see ¢
page 125.
Only use the system from the dr ive r's seat be
ca use the hands free microphone is directed to
ward that seat .
Additional settings
See ¢ page 180, Voice recognition system.
.&_ WARNING
-Dire ct yo ur full attention to dr iv ing . As the
driver, you have complete responsibility fo r
safety in traffic. Only use the functions in
such a way that yo u always maintain com
plete contro l over your vehicle in a ll traffic
situations.
- Do not use the voice recognition system in
emergencies beca use your voice may change
in stressful s ituations. It may take longer to
dia l the number or the system may not be
ab le to dial it at all. Dial the emergency
number manually .
(D Tips
-The d ialog pauses when there is an incom
ing phone call and will continue if you ig
nore the call. The dia log ends if you answer
the ca ll.
- There are no navigation prompts* when a di alog is act ive .
- You can select an item in the list using ei
ther the vo ice recognit ion system or the
control knob .
Command overview
information
Appl ies to: vehicles with voice recognition system
The following overv iews describe the comma nds
that can be used to operate the MMI using the
voice recognition system. ..,.
Page 112 of 314
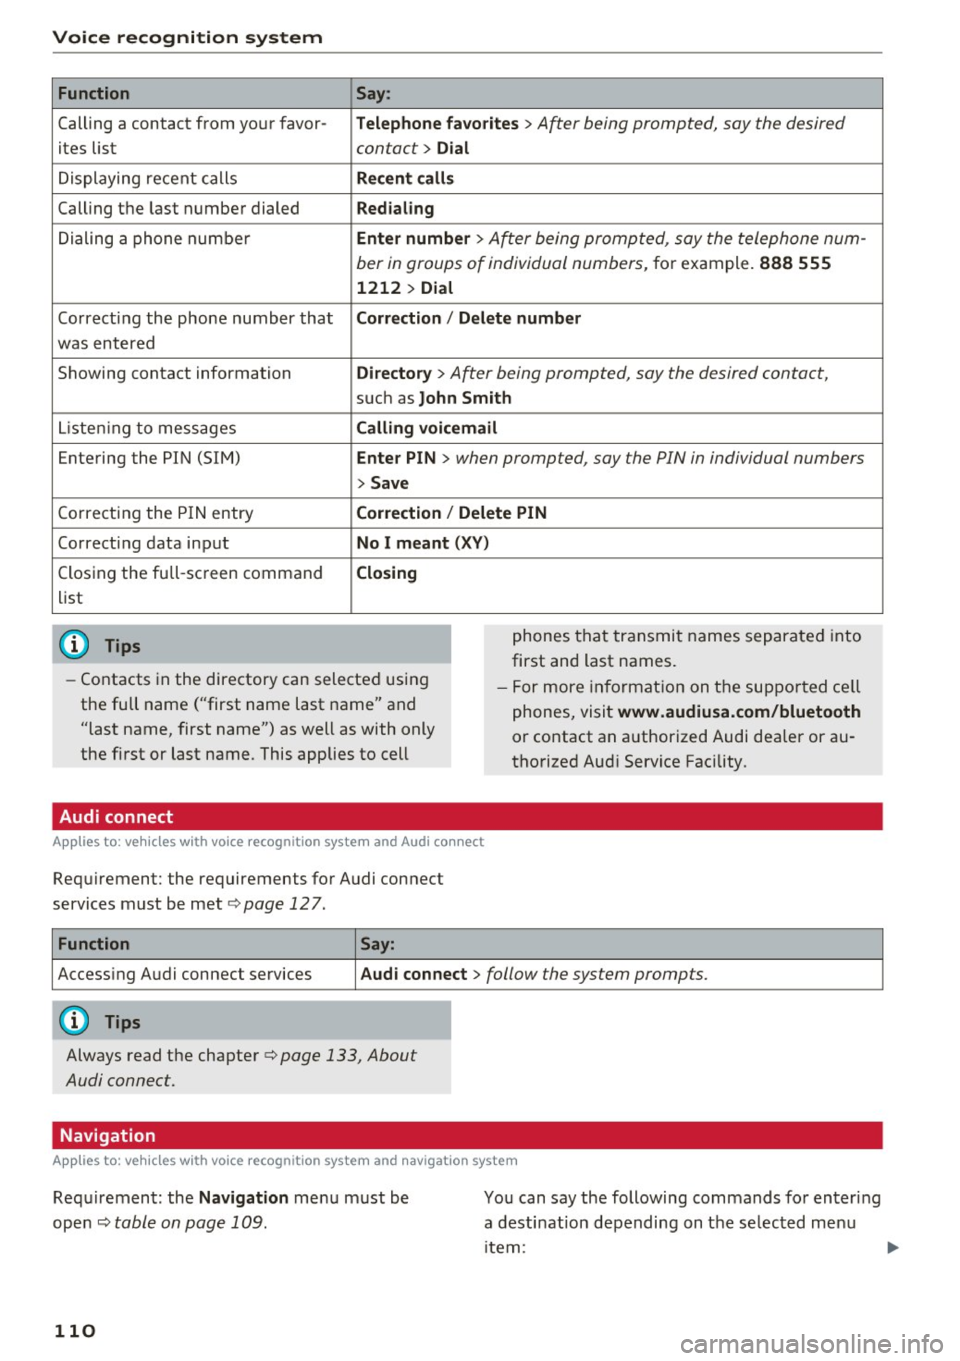
Voice recognition system Function
Calling a contact from your favor -
ites list
Displaying recent calls
Calling the last number dialed
Dialing a phone number
Co rrecting the phone number that
was entered
Showing contact information
L isten ing to messages
Entering the PIN (SIM)
C orrecting the P IN entry
Correcting data input
Closing the full-sc reen command
list
@ Tips
Say :
T elepho ne fa vo rites
> After being prompted, soy the desired
contact>
D ial
Re cen t c alls
Redialing
Enter number
> After being prompted, say the telephone num-
ber in groups of individual numbers,
for example. 888 555
1212 > Dial
Correct ion / Delete number
Dire ctory >
After being prompted, soy the desired contact,
such as John Smi th
Calling voic email
Ente r PIN
> when prompted, soy the PIN in individual numbers
> Save
Correct ion
I Delete PIN
No I m eant ( XV )
Closing
phones that transmit names separated into
first and last names.
- Contacts in the directory can selected using
the full name ("first name last name" and
"last name, first name") as well as with only
the first or last name. This applies to cell -
For more information on the suppo rted ce ll
phones, visit
www.audiusa.com/bluetooth
or contact an authorized Audi dealer or au
thorized Aud i Service Facility.
Audi connect
A ppl ies to: ve hicles w ith vo ice recognit ion sys te m and Audi co nnect
Requirement: the requirements for Audi connect
services must be met
c> page 12 7.
Function Say:
Accessing Audi connect services Aud i connect > follow the system prompts.
(D Tips
Always read the chapter c> page 133, About
Audi connect.
Navigation
A pp lies to: ve hicles w ith vo ice recognition syste m and navigation system
Requirement: the Navigation menu must be
ope n
Q table on page 109 .
110
You can say the following commands fo r entering
a desti nation depending on the se lec ted menu
i tem:
Page 117 of 314
co
co
.... N
" N .... 0
" "' c:o
~ Enter the PIN for connecting on your cell
phone.
O r: when the PIN is displayed on your
ce ll phone, confirm the PIN on your ce ll phone
and in the MMI. The time allowed for entering
the PIN is limited to approximately 30 seconds.
~ Pay attention to any additional system prompts
displayed on your cell phone, for example if the
system should connect automatically in the fu
ture. Depend ing on the ce ll phone, you may
have to confirm downloading the directory sep
arately.
After conn ecting succes sfully
After connecting successfully, a sho rt message
w ith informat ion about the connected profi les
will appear. You can also change profiles later.
Select:
IMENU ! button> Setting s> left control
button >
MMI setting s > Conn ecti on ma nag er
c>page 177.
In addition, the cell phone contacts are automat
ically loaded in the MMI directory. This p rocess
can take several minutes, depending on the num
ber of contacts.
@ Tips
- Making phone calls through the MMI is only
possib le using the
Hand sfree Bl uetooth pro
file.
- You can apply additional settings to con
nected cell phones using the connection
manager
c> page 176.
- You can also search for the MMI in you r ce ll
phone using the Bluetooth device search .
- You only have to pair your dev ice one time.
Bluetooth devices that are already paired
automatically connect to the MMI when the Bluetooth function is switched on, they are
within range and the ignit ion is switched on.
The last connected cell phone is given first
prior ity .
- Authorizing the MMI connection in your cell
phone will make automat ic connection pos
s ible .
- Pay attention to any system prompts dis
played on your cell phone, for example if
the system should connect automat ica lly in
the future. Depending on the cell phone,
T e le ph on e
you may also need to download the directo
ry and confirm access to your text messages
separately .
- When leaving the vehicle, the Bluetooth
connection to the cell phone will automati
cally disconnect. Depending on your cell
phone, phone calls in progress may be auto
matically redirected from the MMI to your
cell phone and you can continue the call on
your phone.
- You can obtain more information from your
cell phone service provider or from yo ur cell
phone user gu ide. For informat ion on us ing
the te lephone, v is it
www .audiu sa .co m/
blu eto oth
or contact your authorized A udi
dea ler or authorized Audi Service Facility .
Operating two telephones through the
MMI
You can connect two cell phones to the MMI, for
example your business cell phone as the main
phone and your private cell phone as the addi
tional phone. You con be reached in your vehicle
through both cell phones.
The first connected ce ll phone is displayed as the
main phone in the MMI. The second cell phone is
connected as the additional phone.
The directory from the connected main phone
will a lways be displayed. If you would like to use
the d irectory from the additional phone, you
must switch the main and addit ional phone
c> page 116.
Connecting a ce ll phone as the m ain phone
Connect your cell phone to the MMI via Blue
tooth. The first connected cell phone is disp layed
as the
Main phone in the MMI.
See
c> page 114, Connecting a cell phone using
Bluetooth .
Connecting a ce ll phone as the additional
phone
Requirement: a ce ll phone must be connected to
the MMI as the main phone.
Se lect:
I MENU I button> Tel ephon e> right con-
t rol button >
Connect additional telephone . ..,.
115
Page 118 of 314
Telephone
Se e¢ pag e 114, Conn ecting a cell phone using
Bluetooth .
Example: you have connected yo ur business cell
phone to the MMI as the ma in phone and your
p rivate ce ll phone as the additiona l phone . To be
ab le to call contacts from your private c ell phone
directory , you must switch the ma in and addi
tional phone, since the directory from the main
phone is always displayed.
S wi tc h ing the ma in and add itional phone
Requirement: a main phone and an addit ional
phone must be connect ed.
Sw itc h main and additional ph one: select:
I MENU ! button >Telephone > right control but
ton >
S wi tch ma in and addit ional ph one.
(D Tips
-Please note that the directory from the
main phone is always displayed.
- You can see if a cell p hone is connected as
the main o r additional phone in the connec
tion manager ¢
page 176. Or: the device
name of the connected main phone is
shown in the
T elephone menu (s uch as My
Phone).
- If the main phone does not connect auto
matically to the MMI when the ignition is
switched on, for examp le because it is out
of the vehicle range or the B luetooth func
tion is switched off, then a previously paired
additional phone is automatically connected
as the main phone .
- You can send and receive messages on your
main phone as well as on your additional
phone
c> page 116, fig . 11 4. You do not
need to switch you r main phone and addi
tiona l phone for this.
- You can also make your connected cell
phone the default phone by selecting
S et a s
default telepho ne
in the Connection m an·
age r¢
page 177 .
116
Using the telephone
Opening the telephone
App lies to: vehicles with telepho ne
Fig . 11 4 Telep hone fu nctio ns in se lect ion me nu
Fig. 115 A dva nced selectio n menu in t he te le p hone
Requirement: a cell phone must be connected to
the MMI
r:::;, page 114 .
"'Select : !M ENUI button> Tele phone > left con
trol button .
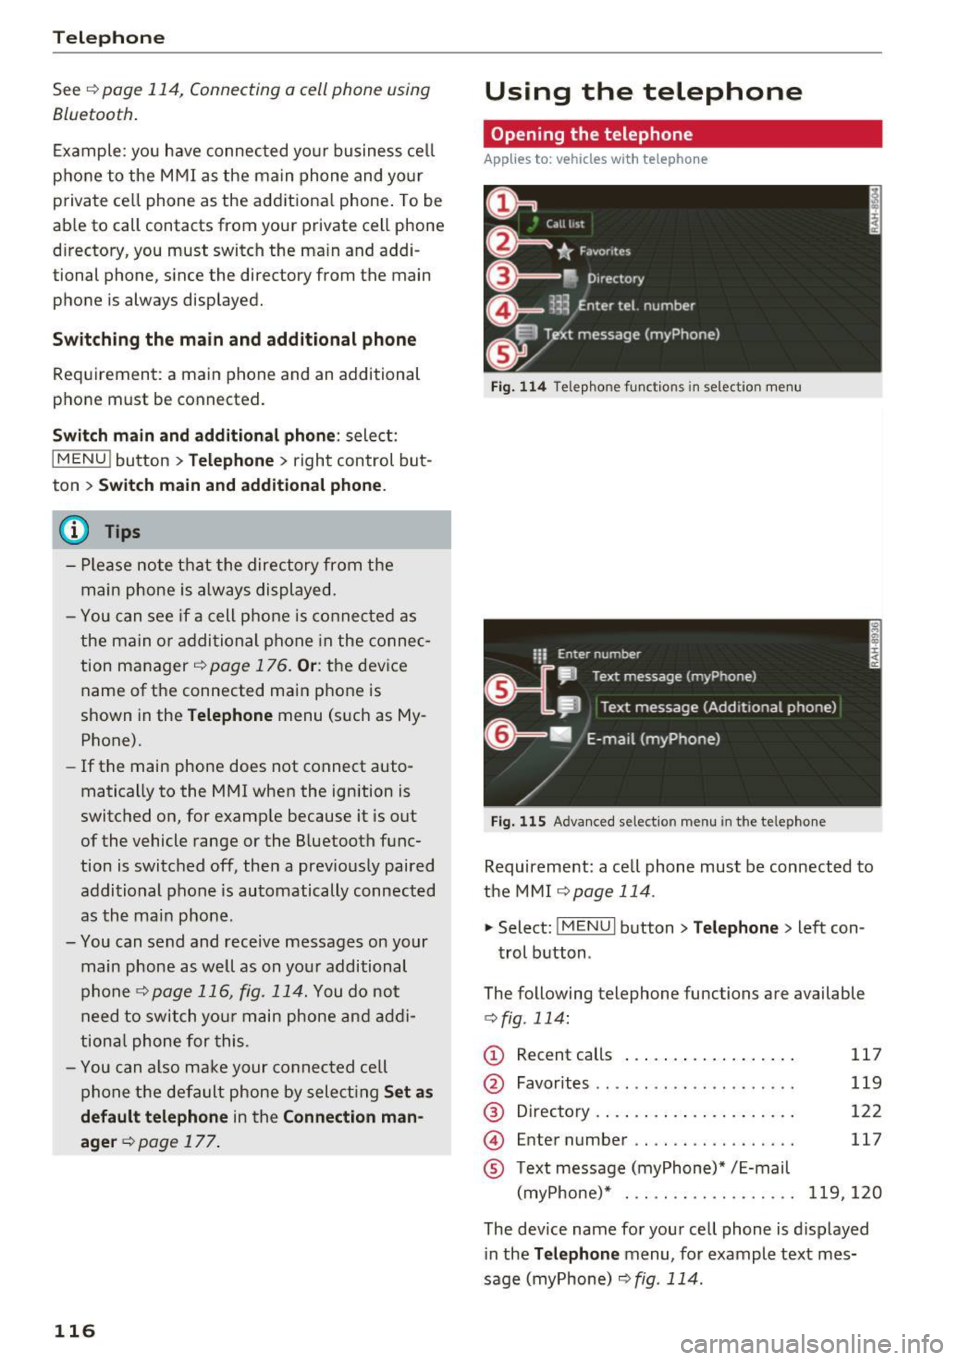
The following telephone functions are available
c> fig. 114:
(!) Rec ent calls
@
®
©
®
Favorites .. .. .. .. .. .... .. .... .
D irectory .. .. .. .. .. ..... ..... .
Enter number .. .. .. .... .. .... .
Text message (myPhone)* / E-mail
(myPhone)* . .. .. .. ... .. . .... .
117
119
122
117
119,120
The device name for your cell phone is d isplayed
in the
Tel ephone menu, for example text mes
sage (myPhone)
r:::;, fig . 114.
Page 119 of 314
CD
CD
.... N
" N .... 0 r--. V, co
Dialing a phone number
Appl ies to: ve hicles with tele phone
Fig. 116 Number speller
Fig. 1 17 Dialing a phone number fro m the recent calls list
.,.. Select : I MENU I button> Telephone > left con-
trol button.
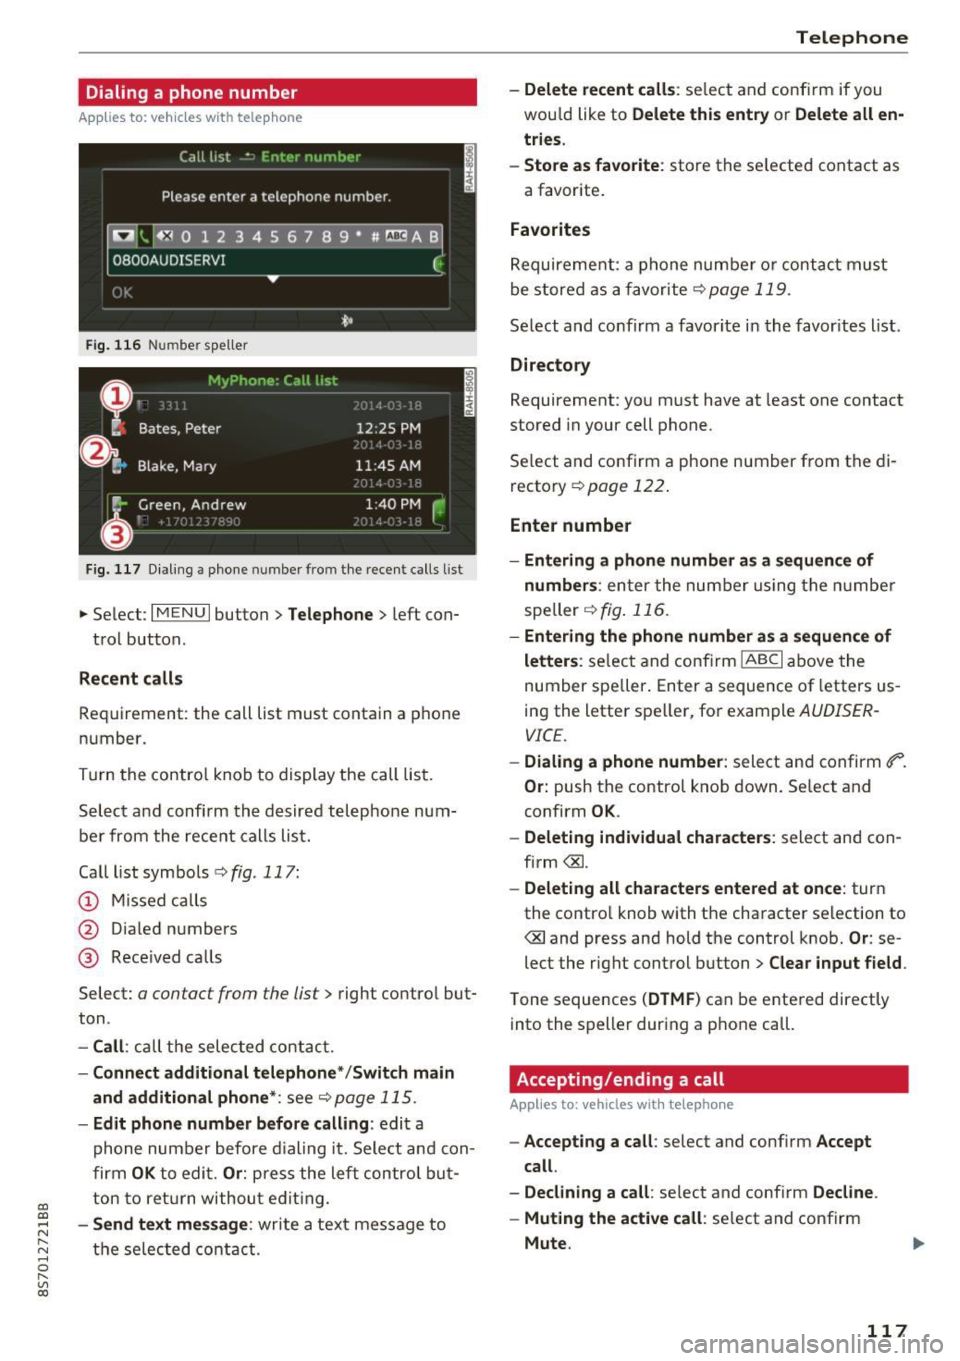
Recent calls
Requirement: the call list must contain a phone
number.
Turn the contro l knob to display the call lis t.
Select and confirm the desired telephone num
be r from the rece nt calls list.
Ca lllistsymbo ls ¢ fig .117:
@ M issed calls
@ Dia led numbers
@ Rece ived ca lls
Select:
a contact from the list> right contro l but
ton .
-Call : call the selec ted contact.
- Connect additiona l te lephone */Switch main
and additional phone *:
see¢ page 115.
-Edit phone number befor e calling : edit a
phone number before d ialing it. Select and con
firm
OK to edi t. Or : press the left contro l but
ton to ret urn withou t edit ing.
- Send text me ssage : write a text message to
the se lec ted contac t.
Teleph one
- Delete recent calls : select and conf irm if you
wou ld like to
Delete this entry or Delete all en
tries .
- Sto re as fav orite :
store the se lected contact as
a favor ite .
Favorites
Requireme nt: a phone number o r contact must
be stored as a favorite ¢
page 119.
Select and confirm a favori te i n the favor ites list .
Directo ry
Requirement: you must have at least one contact
stored in your cell phone.
Se lect and confirm a phone number from the di
recto ry ¢
page 122 .
Enter number
- Entering a phone number a s a sequ ence of
numbers :
enter the num ber using the numbe r
speller ¢
fig. 116 .
-Entering the phone number as a sequen ce of
letter s:
select and conf irm IABC I above the
number spe ller . Enter a sequence of letters us
ing the letter speller, fo r example
AUDISER
VICE.
- Dialing a phone number : select and confirm ti".
Or: push the control knob down . Se lect and
confirm
OK .
-Deleting individual characters : select and con
firm <&l.
-Delet ing all characters entered at once : turn
the contro l knob with the character selection to
<&land press and hold the control knob.
Or: se
lect the right control button>
Clear input field .
Tone sequences (DTMF ) can be ente red directly
into the speller during a phone call.
Accepting/ending a call
Applies to : vehicles wit h telephone
- Ac cepting a call : select and conf irm Accept
call .
- Declining a c all :
se lect and conf irm Decline .
- Muting the active call :
select and confirm
Mute .
117