2017 AUDI TT ROADSTER display
[x] Cancel search: displayPage 177 of 314
"' "'
System settings
Setting the date and
time
You can set the clock time manually or using the
C PS .
.,. Se lect : I MENU I button> Settings > left co ntro l
button >
MMI settings > Date & time .
.,. Or :
select : IMENU I button> Vehicle > left con-
t ro l button >
Vehicle settings > Date & time .
Automatic setting
When th is function is sw itched on~. the time
a n d date are a utomat ically set.
Time
R equ irement: the Automatic setting must be
switched off .
Pr ess the cont ro l kn ob . You ca n se t the
Time
manu ally by turning and press ing the con trol
k nob.
Date
R equi remen t: the Automatic setting must be
s witche d off .
Pr ess the cont rol knob . You can set the
Date
manually by turn ing and press ing the con trol
knob.
Time zone
When se lecting the approp riate t ime zone, a
sampling of countr ies in this zone will be listed .
Automatic time zone*
When t his function is sw itched on~' the t ime
will automatically a djust to the correspon ding
time zone .
Time format
If yo u selec t 24h, the clock will disp lay, for ex
ample,
13:00. If yo u se lect AM/PM , the clock
wi ll disp lay, for e xamp le,
1:00 PM .
Date format
....
~ I f yo u sele ct DD.MM.YYYY , the da te di spl ay w ill
N 8 s how, for ex amp le, 31 .08 .2017 . If you se le ct
~ MM/DD/YYYY , the d ate disp lay wi ll s how, fo r ex -
System settings
amp le, 08/31/2017. If you select YYYY-MM
DD ,
the date display wi ll sh ow, fo r exam ple,
2017-08-31.
MMI settings
.,. Select: iME NUI button> Settings > left control
button >
MMI settings .
Language
Yo u ca n cha nge the displ ay la ngu age as well as
t h e la ngu age fo r th e v oic e gui dance* and voi ce
recognition system *.
T he number of language s avai lab le de pend s on
t h e m arket .
Measurement units
The following units ca n be selected:
- Speed (mph o r km/h)
- Distance (miles o r kilomete rs)
- Temperature (°For 0
( )
-Fuel consumption (l/ l0 0k m, mpg ( US), m pg
( UK ) or km/l )
-Volume (li te rs, ga llon s)
Tool tips
When this f unct ion is switched on~' your MMI
s h ows you t ips fo r input. The freq uency of how
often it display s dec reases w ith time . You can
swi tch off the operati ng tips a t any ti me.
Speech dialog system
Applies to : vehicles with voice recogn it ion system
Command display : when this function is sw itch
ed on~ , the MMI w ill show yo u the possible
commands for voice input in the res pect ive
me nu. You ca n sw itch the f unct io n off a t any
t im e.
Short dialog : when th is function is sw itched on
~ . a sho rter form of the prompts is used . You
can sw itch the func tion off at any t ime .
Speech dialog system volume : you can adjust
the volume of t he p rompts by turning the contro l
k nob. .,,.
175
Page 178 of 314
System settings
Individual speech training (on ly when the vehi
cle is stationary): yo u can adapt the voice recog
n ition system to yo ur voice or pro nunciat ion in
order to improve the system's ability to recogni ze
your speech. Individua l train ing is comprised of
20 speech e ntries that cons ist of commands and
sequences o f num bers . You can dele te the p ro
g ramm ed vo ice tra ining w ith the
Reset individu·
al spee ch training
func tion.
Factory settings
The fo llow ing funct ions can be reset to the facto
ry default set tings :
-Sound settings
- Rad io
- Media settings
-Jukebox *
- Directory *
- Telephone*
- Bluetooth and Wi-Fi *
- Navigation sett ings *
- Navigation and online memory*
- Voice recognition system*
- Message settings*
-Apps *
- Tool tips
- Audi connect *
You can select the desi red functions individually
or all at once with the
Select all entries option.
Select and confirm
Restore factory settings .
@ Tips
-Make su re that not only t he settings we re
d eleted but also the stored data, if ap plica
bl e.
- If you reset the
Navigation and online
memory* or Audi connect*
to t he factory
default settings, the system automatically
r estarts afte r approximate ly 20 seconds.
The I nfota inme nt system display will be
b lack for several m inu tes when r estart ing.
- Please note t hat the vo ice recog nit io n sys
t e m* is not availabl e in Cabr io le ts t hat do
not hav e a factory- insta lled safety bel t mi
crophone.
176
Connection manager
' Introduction
The connection manager gives you an overview
of your connected devices and their network sta
tus.
"' Select: !ME NUI button> Settings > left control
button
> MMI settings > Conne ction manager .
"'Select and confirm a menu i tem .
If a mobile device was already connected and you
se lect and co nfirm the corresponding menu item,
the dev ice name and co nnect ion mode a re dis
played under the men u item.
You can individ ually
connect (~) or disconnect
(0) a pa ired device.
' Using the telephone
App lies to : vehicles wit h te lepho ne
- Connect new device: search for and con nect a
cell p ho ne.
- List of devices already paired : select your ce ll
phone from t he list of all th e dev ices tha t are
already paired .
Second telephone
Applies to : vehicles wi th telepho ne
- Connect new device : search for and co nnect a
c ell p hone.
- List of device s already paired : sele ct yo ur cell
ph one fr om t he list of all the dev ices tha t ar e
a lready paired .
Data connection
Applies to : vehicles wi th Audi connec t
-Connect new device: search for and con nect a
mob ile dev ice (such as a smart pho ne).
- List of devices already paired : select yo ur ce ll
phone from t he list of all the dev ices that a re
already paired.
Or: insert a m ini SIM ca rd into
the SIM card
reader *¢page 127.
Page 179 of 314
MMI connect app
Applies to: vehicles with Audi connect
Requ ireme nt: the Audi MMI connect app m ust
be i nst alled and open on your mobile devi ce.
- Connect new dev ice : search for and connect a
mobile device (s uch as a smartp hone).
- List of devices already paired : select your mo
bile device from th e list of a ll the devices that
are already paired.
Music
Applies to vehicles with Bluetooth or Wi -Fi audio player
Audio player
Req uirement: the Bl uetooth func tion a nd v is ib ili
ty mus t be sw itche d on in the MMI
¢page 177
and on the ce ll phone.
- Connect new device : press the contro l knob .
Se lect
Bluetooth audio player . Search fo r and
c o nne ct a mobile device.
- List of devices already paired : selec t a Bl ue
tooth device fro m the l ist of all the devi ces that
are already paire d.
Wi-Fi audio player
Req uirement: the Wi -Fi hotspot on the M MI
¢
page 131 and the Wi-Fi o n your cell p ho ne
must be switch ed on .
-Connect new device : press the control knob.
Sea rch for and connect a Wi-Fi capable device .
-DisconnectWi-Fi audio player : deactivate the
Wi-Fi on your Wi-Fi capab le device . The dev ice
will be automat ically removed from the list .
Directory
Applies to: vehicles with telephone
Display contacts from a cell phone (or an addi
tional cell phone) .
Requirement: cell phones must not be connected
to the MMI through the B luetooth remote SIM
access p rofile o r thr ough t he
Handsfree profi le.
co -Connect new device : search for and connect a co
;:::: new cell p hone.
" N ...... 0
" "' c:o
System settings
- List of devices already paired : select yo ur cell
phone from t he list of all the cell phones that
are a lready paired .
Audi smartphone
Applies to: vehicles with Aud i smartphone interface
- Connect yo ur ce ll phone to the Audi music in
terface¢
page 162 using a USB adapter
¢ page 162, fig . 142 .
-Select your cell pho ne from the list of cell
p hones that have a lready bee n connected .
Additional options
Depending on the selected f unction, yo u can use
t h e right contro l bu tto n to access the ava ilab le
additional options in t he connection manager.
Bluetooth settings
- Bluetooth:
select a nd confi rm a setti ng for the
Bluetooth co nnection visib ility . Se lect
Visible
for the MMI to be vis ible to othe r devic es. Se
lect
Invisible for the MMI to not be visib le to
o the r dev ices. However, i t is st ill poss ible t o es ·
t ablish a Blue tooth connec tion wit h pa ire d de
vices when the vi sibili ty is sw itched off . Select
Off to turn v is ib ility off . Then a Bl uetooth con
nection is not possib le .
- Bluetooth audio player: when t his function is
sw itched on~, the B luetooth a udio p laye r is
avai lab le as a source in the
Media men u.
- Delete Bluetooth device : the selected cell
phone/mob ile dev ice is disconnected from the
M MI.
- Show Bluetooth profile : you can Connect or
Disconnect the Handsfree profile and the Di
rectory/contacts *
separately.
- Bluetooth audio player : switch this f unction on
~ to be able to select the Bluetooth aud io play
er as a source i n the Med ia menu .
-Bluetooth name : the MMI Bluetooth name (fo r
examp le .,A UDI MMI 2017") is d isp layed and
can be changed.
When the funct io n is switched on~, the symbol
@ ¢
page 105 , fig. 111 appea rs in the In fotain-
ment system display.
1111-
177
Page 180 of 314
System settings
Online settings*
- Data connection setting s:
see~ page 132,
Configuring the data connection
- Data u sage counter : the amount of d ata p ack
e ts tha t ar e sent and received throug h the MM I
is d isp layed. You can reset the data usage infor
mation to zero using the
Reset data counter
option.
- Network statu s: the mobile netwo rk p rovider
for data se rvice as well as t he network status
are displayed.
Wi -Fi settings*
See Q page 131, Wi- Fi ho tspo t.
SIM PIN settings*
- Automatic PIN entry:
when t his fu nction is
swi tched on@', th e S IM PI N is automatically
saved in the M MI after it is e nte red for the f irst
t im e. The S IM PIN for four dif feren t SIM cards
c a n be save d in t he MM I. W ith the func tion
swi tc h ed o ff, the cur ren tly store d SI M P IN i s
deleted from the MMI. When the a utomatic
PI N entry is switched on, there are no SI M PIN
prompts.
- Disable PIN query : when switched on, the re are
no SI M PIN queries. The a utomat ic PIN entry is
not used in t his case .
-Change PIN : you can change the PI N on your
SIM card. First enter the c urrent SIM PI N. The
SIM PIN may only contain d ig its 0-9. The new
SIM PIN must be ente red tw ice for secur ity and
then it w ill be saved to t he SIM ca rd .
Apple CarPlay sound settings/ Android Auto
sound settings
A ppl ies to: ve hicles w ith Audi smartpho ne inte rface
See Qpoge 179.
About Apple CarPlay/About Android Auto
Appl ies to: ve hicles w ith Audi smartpho ne inte rface
Here you will f ind lega l in fo rmation regar ding
the use of App le Ca rPlay or Android Auto and in
formation abo ut dev ice-specif ic data excha nge.
178
Delete CarPlay device/Delete Android Auto
device
App lies to: vehicles wi th Audi s m art ph one interface
Requirement: yo ur cell phone m ust not be con
nected to the Aud i m usic interface with a USB
adapter.
To remove your cell phone from t he list of all ce ll
p hones t hat are a lready paired, se lect and con
firm
Delete CarPlay device or Delete Android Au·
to device .
(D Tips
Some SIM cards do not a llow the SI M PIN
qu eries to be sw itche d off.
System update
.,. Select: !ME NUI bu tton> Settings > left control
button >
System maintenance .
- System update :
slide the storage device with
the update data into t he a pprop riate drive
r=> poge 157. Se lect and confi rm the dr ive>
Start update . The length of the process de
pends on the size of the update .
-Reset driver installation: the selecte d media
driver package is reset to the settings at the
time of delivery.
- Version informat ion : info rmation on the MMI
software ve rsion and the navigation database*
so ftware ve rsion is d isp layed . The
Software in
formation
fu nction also prov ides infor mat ion
on t he softwa re contai ned in the M MI and the
li censing ag ree men t.
Page 201 of 314
co
co
.... N
" N .... 0
" "' c:o
smash the child seat and child against the
backrest, center armrest, door or roof.
- Forward-facing child seats installed on the
front passenger's seat may interfere with
the deployment of the airbag and cause se
rious personal injury to the child.
A WARNING
If, in exceptional circumstances, you must in
stall a forward-facing child restraint on the
front passenger's seat:
- Always make sure the forward-facing seat
has been designed and certified by its man
ufacturer for use on a front seat with a pas
senger front and side airbag.
- Never put the forward-facing child restraint
up against or very near the instrument pan
el.
- Always move the front passenger seat to
the highest position in the up and down ad
justment range and move it back to the
rearmost position in the seat's fore and aft
adjustment range, as far away from the air
bag as possible, before installing the for·
ward-facing child restraint.
- Always make sure that the safety belt upper
anchorage is behind the child restraint and
not next to or in front of the child restraint
so that the safety belt will be properly posi
tioned.
- Make sure that the
PASSENGER AIR BAG
OFF~;
light comes on and stays on all the
time whenever the ignition is switched on.
A WARNING
To reduce the risk of serious injury, make sure
that the
PASSENGER AIR BAG OFF~; light
will be displayed whenever a child restraint is
installed on the front passenger seat and the
ignition is switched on.
- If the PASSENGER AIR BAG OFF~; light
does not stay on, perform the checks descri
bed
Q page 20 7, Monitoring the Advanced
Airbag System.
- Have the airbag system inspected by your
Audi dealer immediately.
Airbag system
-Always carefully follow instructions from
child restraint manufacturers when instal
ling child restraints.
A WARNING
If, in exceptional circumstances, you must in
stall a forward or rearward-facing child re
straint on the front passenger's seat:
- Improper installation of child restraints can
reduce their effectiveness or even prevent
them from providing any protection.
- An improperly installed child restraint can
interfere with the airbag as it deploys and
seriously injure or even kill the child -even
with an Advanced Airbag System.
- Always carefully follow the manufacturer's
instructions provided with the child seat or
earner.
-Always make sure that there is nothing on
the front passenger seat that will cause the
capacitive passenger detection system in
the seat to signal to the Airbag System that
the seat is occupied by a person when it is
not, or to signal that it is occupied by some ·
one who is heavier than the person actually
sitting on the seat. The presence of addi
tional objects could cause the passenger
front airbag to be turned on when it should
be off, or could cause the airbag to work in a
way that is different from the way it would have worked without the object on the seat.
199
Page 239 of 314
CD
CD
.... N
" N .... 0
" V, co
Checking and Filling
Engine compartment overview
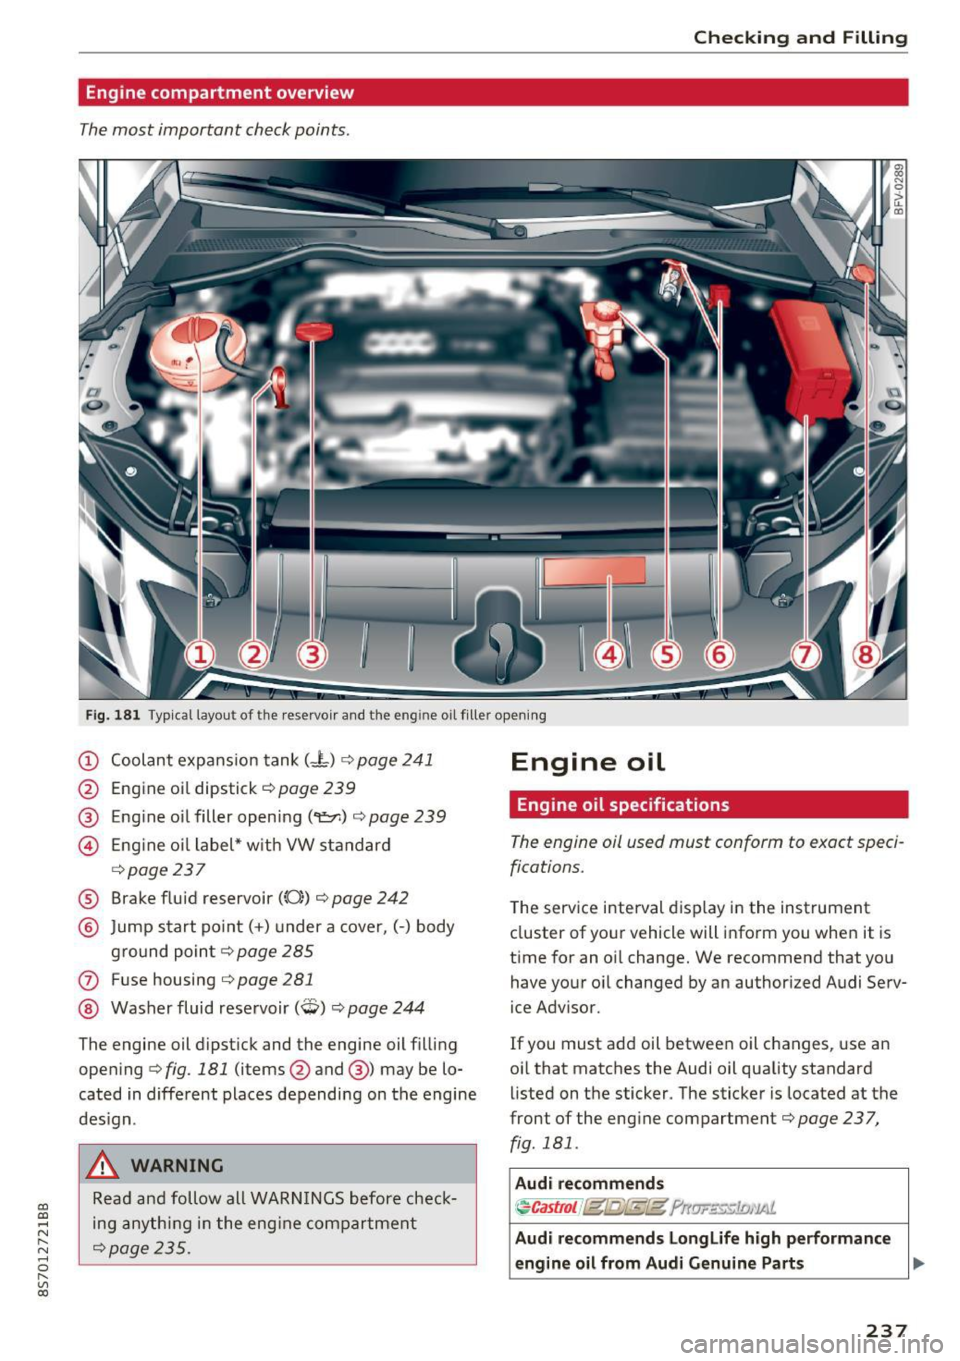
The most important check points .
Fig. 181 Typ ica l layout of the reservo ir and the eng ine o il filler open ing
(D Coolant expans ion tank (- l) ¢ page 241
@ Engine oi l dipstick¢ page 239
@ Engine oil filler opening
(
¢ page237
® Brake fluid reservoir ((0)) ¢ page 242
@ Jump start po in t (+ ) under a cove r, (-) body
g ro und poin t¢ page 285
(J) Fuse housing ¢ page 281
@ Washer fluid rese rvoir (W) ¢ page 244
The engine oil dipst ick and the engine oil filling
ope ning ¢ fig. 181 (items@and @) may be lo
cated in diffe rent places depending on the engine
des ign .
& WARNING
Read and follow all WARN INGS before check
ing any th ing in t he eng ine com par tment
¢page 235.
Engine oil
Engine oil specifications
The engine oil used must conform to exact speci
fications.
T he serv ice interval display in the instrument
cluster of yo ur vehicle will inform you when it is
time for an oil change. We recommend that you
have your o il changed by an authorized Audi Serv
ice Adv isor.
If you must add oil betwee n oil changes, use an
oil that matc hes the Audi oil quality standard
listed on the sticker. The sticker is located at the
front of the engine compartment¢ page 237,
fig. 181 .
Audi recommend s
~Castrot f (gfg{E@ ?rtlJF'E:£5:1£11'1Ai.
Audi recommend s Longlife high performanc e
engine oil from Aud i Genu ine Parts .,,.
237
Page 240 of 314

Check ing and F illing
Using the proper engine oil is impo rtant for the
functionality and service life of the engine. Your engine was facto ry-filled with a h igh-quality oi l
which can usually be used throughout the entire
year.
@) Note
Your Limited New Vehicle War ranty does not
cover damage or malfunctions due to failure
to follow recommended maintenance and use
requirements as set forth in the Audi Owner's
Manual and Warran ty
& Maintenance booklet.
- Use only a high quality eng ine oil t hat ex-
p ressly complies with the Audi oil qua lity
standard specified for your vehicle's engine .
Using a ny o ther oil can cause serious engine
d am age.
- D o not mix any lubricants o r other addit ives
i nto the engine oil. Doing so ca n cause en
g ine damage.
(D Tips
I f you need to add oil and there is none availa
ble t hat meets the Audi o il quality standard
your eng ine requi res , you m ay ad d a tot al of
no more than 0.5 q t (0,5
l) of a h igh-quali ty
"synthe tic"oil that meets t he following speci
fications.
- AC EA A3 o r API SM wi th a viscosity grade o f
SAE 0W-30, SAE 5W-30 or SAE 5W-40.
- F or more inform ation about engine o il that
has been approve d for your ve hicl e, please
contact eithe r you r a uthorized Audi dea le r
or A udi C ustome r Relat ions at
1 (800) 822-2834 or visit o ur web site at
www.audiusa.com or www.audicanada.ca .
Engine oil consumption
T he engine in your vehicle depends on an ade
quate amoun t of oil to lubricate and cool all of
i ts moving par ts.
In order to p rovide effective lubr ication and cool
ing of internal engine components, all interna l
combustion engines consume a cer tain amount
of oil. Oi l co nsumption varies from engine to en
g ine and may change significant ly over the life of
the eng ine . Typically, eng ines with a specified
238
b reak -in period (see q page 57) cons ume more
oi l during the break-in period than they consume
after o il consumption has stab ilized.
U nder normal cond itions, the ra te of oil con
s u mption depends on the q ua lity and viscos ity o f
the oil , the RPM (revo lutions per minute) at
which the engine is operated, the amb ient tem
perature and road condit ions. Further facto rs a re
the amount of o il di lution from wate r condensa
tion or fue l resid ue a nd the oxidation level of the
o il. As any engine is subject to wear as mileage
builds up, the o il consumption may increase ove r
ti me until replacement o f wo rn components may
become ne cessary.
With a ll these va riables coming into p lay, no
standard rate of o il consumption can be estab
li sh ed or spec ified . T he re is no alte rnative to reg
u lar and freq uen t che cki ng of the oil level , see
Note .
If the yellow engine oil level warning symbo l l!I
in the instrument clus ter lights up , you sho uld
c h eck t he o il level as soon as poss ible
q page 239 . Top off the o il at your earlies t con
venience
q page 239.
_& WARNING
Before you check a nyt hing in the en gine com
partment, always read and heed all WARN
INGS
9 page 235.
@ Note
D riving w ith an insufficient oil level is like ly to
cause severe damage to the eng ine.
(D Tips
- The oil pressure warning display. is not
an indicator of the oil level. Do not rely on
it . Instead, check the oil level in your en
gine at regular intervals , preferably each
time you refuel, and always befo re going
on a long trip .
- If you have the impress io n your engine con
sumes excessive amounts of oil, we recom
mend that yo u consult an authorized A udi
dea le r to have t he cause of your concern
properly diagnosed. Keep in mind that the .,.
Page 247 of 314
co
co
.... N
" N .... 0
" "' c:o
-Do not use a glass cleaner that contains
paint solvents, because this could damage
the pa int.
Service interval display
The service interval display detects when your ve
hicle is due for service.
The service interval display works in two stages:
- Inspection or oil change reminder: after a cer-
tain distance driven, a message appears in the
Infotainment system display each time the ig
nition is switched on or off. The remaining dis
tance or time is displayed briefly.
- Inspection or oil change due: if your vehicle
has reached an inspection or oil change interval
or both intervals at the same time, the mes
sage
Inspection due! or Oil change due! or Oil
change and inspection duel
appears briefly af
ter switching the ignition on/off .
Checking service intervals
You can check the remaining distance or time un
til the next oil change or next inspection. Select
in the Infotainment system: the !MENU ! button>
Vehicle > left control button > Service & checks >
Service intervals .
(D Note
-Following the service intervals is critical to
maintain ing the service life and value of
your vehicle, especially the engine. Even if
the mileage on the vehicle is low, do not ex
ceed the time for the next service.
- Calcu lating the time to the next oil change
i s interrupted when the vehicle battery is
disconnected~
page 271.
Checking and Filling
245