Page 65 of 214

Illustration of variant 2
Seat fore-and-aft adjustment
XRemove the seat belt from the belt loop by
opening the press stud.
XLift handle0087and slide the seat forwards
or rearwards.
XRelease lever 0087again.
Make sure that you hear the seat engage in
position.
Backrest angle
Variant 1
XRelieve the pressure on the backrest.
XTurn handwheel 0043forwards or backwards.
Variant 2
XRelieve the pressure on the backrest.
XPull release lever 0043.
The backrest is released.
XMove the backrest forwards or backwards.
XLet go of release lever 0043again.
Seat height1
XOnly variant 2: pull handle 0044up or push it
down repeatedly until the seat has reached the desired height.
Folding down the front-passenger seat
You can increase the size of the luggage com-
partment by folding the front-passenger seat
backrest forwards. Observe the loading guidelines (
Ypage 142)
and the notes in the "Child restraint system
on the front-passenger seat" section
(
Ypage 45).
Folding down
Illustration of variant 1
Illustration of variant 2
Variant 1:
XSlide the right-hand front seat to its rear-
most position.
XTurn handwheel 0043forward until the
desired seat backrest position is achieved
Variant 2:
XSlide the right-hand front seat to its rear-
most position.
XHold onto the backrest at the head restraint
with one hand.
XPull release lever 0043.
The backrest is released.
XFold the seat forwards.
1Only driver's seat, depending on equipment.
Seats63
>> Seats, steering wheel and mirrors.
Z
Page 66 of 214

Folding back
GWARNING
If the seat backrest is not engaged, it may
fold forwards, e.g. during braking or in the event of an accident.
RAs a result, a backrest which is not
engaged would press you into the seat
belt. The seat belt can no longer offer the
intended level of protection and can even
cause injuries.
RThe backrest cannot restrain objects or
loads in the trunk.
There is an increased risk of injury.
Before every journey, make sure that the
backrest is engaged as described.
Variant 1:
XTurn handwheel 0043back until the desired
seat backrest position is achieved
Variant 2:
XPull release lever 0043.
The backrest is released.
XFold the backrest backwards.
XEnsure that the seat backrest is engaged
again.
Switching the seat heating on/off
Activating/deactivating
GWARNING
Repeatedly switching on the seat heating
can cause the seat cushion and backrest
pads to become very hot. The health of per- sons with limited temperature sensitivity
or a limited ability to react to excessively
high temperatures may be affected or they
may even suffer burn-like injuries. There
is a risk of injury.
Therefore, do not switch the seat heating on
repeatedly.
XTurn the SmartKey to position 2in the igni-
tion lock (Ypage 87).
XTo switch on: press button0044.
Indicator lamp 0043in the button lights up.
XTo switch off: press button0044.
Indicator lamp 0043in the button goes out.
iIf the battery voltage is too low, the seat
heating may switch off.
The seat heating switches off automati-
cally after about 10 minutes.
64Seats
>> Seats, steering wheel and mirrors.
Page 67 of 214

Problems with the seat heating
ProblemPossible causes/consequences and0050Solutions
The seat heating has
switched off prema-
turely or cannot be
switched on.The on-board voltage is too low because too many electrical con-
sumers are switched on.
XSwitch off electrical consumers that you do not need, such as the
rear window defroster or interior lighting.
Once the battery is sufficiently charged, the seat heating will
switch back on automatically.
Steering wheel
Important safety notes
GWARNING
You could lose control of your vehicle if you
do the following while driving:
Radjust the driver's seat, steering wheel
or mirrors
Rfasten the seat belt
There is a risk of an accident.
Adjust the driver's seat, steering wheel or
mirrors and fasten your seat belt before
starting the engine.
GWARNING
Children could injure themselves if they
adjust the steering wheel. There is a risk of
injury.
When leaving the vehicle, always take the
SmartKey with you and lock the vehicle.
Never leave children unsupervised in the
vehicle.
Adjusting the steering wheel
GWARNING
If the steering wheel is unlocked while the
vehicle is in motion, it could change posi-
tion unexpectedly. This could cause you to
lose control of the vehicle. There is a risk
of an accident.
Before starting off, make sure the steering wheel is locked. Never unlock the steering
wheel while the vehicle is in motion.
0043Release lever
0044To adjust the steering wheel height
XPush release lever 0043down completely.
The steering column is unlocked.
XSet desired steering wheel height 0044.
XPush release lever0043up completely.
The steering column is locked.
XCheck if the steering column is locked. To
do so, try and push the steering wheel up or down.
Steering wheel65
>> Seats, steering wheel and mirrors.
Z
Page 68 of 214

Mirrors
Rear-view mirror
XAnti-glare mode:pivot anti-glare
switch 0043forwards or back.
Exterior mirrors
Important safety notes
GWARNING
You could lose control of your vehicle if you
do the following while driving:
Radjust the driver's seat, steering wheel
or mirrors
Rfasten the seat belt
There is a risk of an accident.
Adjust the driver's seat, steering wheel or
mirrors and fasten your seat belt before
starting the engine.
GWARNING
The exterior mirrors reduce the size of the
image. Visible objects are actually closer
than they appear. This means that you could
misjudge the distance from road users
traveling behind, e.g. when changing lane.
There is a risk of an accident.
For this reason, always make sure of the
actual distance from the road users trav-
eling behind by glancing over your shoul-
der.
Adjusting the exterior mirrors manually
XTo adjust the mirror: move lever0043to the
right or left, up or down.
Adjusting the exterior mirrors electri-
cally
XTurn the SmartKey to position 1or 2in the
ignition (Ypage 87).
XTo select an exterior mirror: turn control
0087 to position 0047for the left exterior mir-
ror or to position 0048for the right exterior
mirror.
XTo adjust the mirror: move control0087to the
right or left, up or down.
The exterior mirrors can be heated by switch- ing on the rear window heating (
Ypage 82).
Exterior mirror pushed out of position
If an exterior mirror has been pushed for-
wards or backwards out of position, push the
exterior mirror into the correct position
manually.
66Mirrors
>> Seats, steering wheel and mirrors.
Page 69 of 214

Useful information
i
This Operator's Manual describes all
models and all standard and optional
equipment of your vehicle available at the
time of publication of the Operator's Man- ual. Country-specific differences are pos-
sible. Bear in mind that your vehicle may
not feature all functions described here.
This also applies to safety-relevant sys-
tems and functions.
iRead the information on qualified spe-
cialist workshops: (Ypage 20).
Exterior lighting
General notes
For reasons of safety, smart recommends that
you drive with the lights switched on even
during the daytime. In some countries, oper-
ation of the headlamps varies due to legal
requirements and self-imposed obligations.
Exterior lighting settings
Operation
0043Combination switch control
0044Marking
0049003FLights off
004A 0060standing lamp, parking lamp,
license plate lighting
004B0057High-beam headlamps
004C0058Automatic headlamp mode, control-
led by the light sensor
004D0058Low-beam headlamps
006CMarking
006DCombination switch middle ring
00BE005AFront fog lamps
00BF005ERear fog lamp
If you hear a warning tone when you leave the
vehicle, the lights may still be switched on.
XTurn combination switch control 0043until
0058 or003F is at marking 0044.
When in the 0058position the exterior light-
ing switches off automatically if you:
Rswitch off the engine
Ropen the driver's door
Rlock the vehicle
Rdo not switch on the high-beam headlamps
Automatic headlamp mode
0058 is the favored light switch setting. The
light setting is automatically selected
according to the brightness of the ambient
light (exception: poor visibility due to
weather conditions such as fog, snow or
spray):
RWith the engine running: depending on the ambient light conditions, the daytime
driving lights or the parking and low-beam
headlamps are switched on or off automat-
ically
XTo switch on automatic headlamp mode: turn
combination switch control 0043until 0058
is at marking 0044.
GWARNING
When the light switch is set to 0058, the
low-beam headlamps may not be switched on
automatically if there is fog, snow or other causes of poor visibility due to the weather
Exterior lighting67
>> Lights and windshield wipers.
Z
Page 70 of 214

conditions such as spray. There is a risk ofan accident.
In such situations, turn the light switch to
0058.
The automatic headlamp feature is only an
aid. The driver is responsible for the vehi-
cle's lighting at all times.
Low-beam headlamps
XTo switch on: turn combination switch con-
trol 0043until 0058is at marking 0044.
The 0058 indicator lamp in the instrument
cluster lights up.
Parking lamps
XTo switch on: turn combination switch con-
trol 0043until 0060is at marking 0044.
Canada only: the standing lamps are only
switched on when the engine is switched off.
When the engine is running, the low-beam
headlamps are switched on.
Front fog lamps
Only vehicles with front foglamps have the
"Foglamps" function.
XTo switch on: make sure that the standing
lamps or low-beam headlamps are switched on.
XTurn combination switch middle ring 006D
until marking 006Cis at 005A.
The 005A indicator lamp in the instrument
cluster lights up.
After releasing, the middle ring returns
automatically back to the neutral position.
XTo switch off: turn combination switch
middle ring 006Duntil marking 006Cis at
005A.
The 005A indicator lamp in the instrument
cluster goes out.
After releasing, the middle ring returns
automatically back to the neutral position.
iIf you switch off the engine (only in the
0058 position) or turn off the lights, the
foglamps are also switched off.
Rear fog lamp
XTo switch on: make sure that the fog lamps
or low-beam headlamps are switched on.
XTurn combination switch middle ring 006D
until marking 006Cis at 005E.
The 005E indicator lamp in the instrument
cluster lights up.
After releasing, the middle ring returns
automatically back to the neutral position.
XTo switch off: turn combination switch
middle ring 006Duntil marking 006Cis at
005E.
The 005E indicator lamp in the instrument
cluster goes out.
After releasing, the middle ring returns
automatically back to the neutral position.
iIf you switch off the engine (only in the
0058 position) or turn off the lights, the
rear foglamps are also switched off.
Switching on the turn signals
XStart the engine.
XTo indicate briefly: press the combination
switch briefly to the pressure point in the direction of arrow 0043(right turn signal)
or 0044 (left turn signal).
The corresponding turn signal flashes
three times.
XTo indicate: press the combination switch
beyond the pressure point in the direction
of arrow 0043(right turn signal) or 0044(left
turn signal).
68Exterior lighting
>> Lights and windshield wipers.
Page 71 of 214
 is at the mark-
ing.")
Switching on the high-beam headlamps
and headlamp flasher
High-beam headlamps
XTo switch on: start the engine.
XTurn the combination switch control until
0057or0058 (if available) is at the mark-
ing.
XPress the combination switch beyond the
pressure point in the direction of
arrow 0043.
The 0057 indicator lamp in the instrument
cluster lights up.
XTo deactivate: move combination switch 0043
back to its normal position.
The 0057 indicator lamp in the instrument
cluster goes out.
High-beam flasher
XTo switch on: pull the combination switch
in the direction of arrow 0044.
Hazard warning lamps
The hazard warning lamps automatically
switch on if:
Ran air bag is deployed
Rthe vehicle decelerates rapidly from a
speed of above 45 mph (70 km/h) and comes to
a standstill
XTo switch on the hazard warning lamps:
press button0043.
All turn signals flash. If you now switch on
a turn signal using the combination switch,
only the turn signal lamp on the corre-
sponding side of the vehicle will flash.
XTo switch off the hazard warning lamps:
press button 0043.
The hazard warning lamps switch off automat- ically if the vehicle reaches a speed of above
6 mph (10 km/h) again after a full brake appli-
cation.
iThe hazard warning lamps still operate if
the ignition is switched off.
Headlamps fogged up on the inside
Certain climatic and physical conditions
may cause moisture to form in the headlamp.
This moisture does not affect the function-
ality of the headlamp.
Interior lighting
Overview
0043Interior lighting
0044Switches the left-hand reading lamp
on/off
0087Depending on the position of the switch:
Interior lighting switched on
Automatic interior lighting control on
Interior lighting69
>> Lights and windshield wipers.
Z
Page 72 of 214

Interior lighting switched off
0085Switches the right-hand reading lamp on/
off
The interior lighting is switched on when a
door is open: if the corresponding door is
closed correctly the interior lighting goes
out.
Interior lighting control
If the doors are unlocked with the remote con-
trol, the interval timer for the interior
lighting is triggered. The interval timer
restarts when a door is opened.
The front interior lighting and the luggage
compartment light go out gradually.
The interior lighting interval timer is
switched off:
Rif a door remains open, the interior light-
ing switches off after 15 minutes without
dimming
Rif all doors (with additional locking mech-
anism) are closed, the interior lighting
switches off after 15 seconds
Rif all doors (without locking mechanism)
are closed, the interior lighting switches
off after 3 to 4 minutes
Ras soon as the engine is started and for as
long as the engine is running
Replacing bulbs
Important safety notes
GWARNING
Bulbs, lamps and connectors can get very
hot when operating. If you change a bulb,
you could burn yourself on these compo-
nents. There is a risk of injury.
Allow these components to cool down before changing a bulb.
Do not use a bulb that has been dropped or if
its glass tube has been scratched.
The bulb may explode if:
Ryou touch it
Rit is hot
Ryou drop it
Ryou scratch it
Only operate bulbs in enclosed lamps
designed for that purpose. Only fit spare
bulbs of the same type and the specified volt-
age.
Marks on the glass tube reduce the service
life of the bulbs. Do not touch the glass tube
with your bare hands. If necessary, clean the
glass tube when cold with alcohol or spirit
and rub it off with a lint-free cloth.
Protect bulbs from moisture during opera-
tion. Do not allow bulbs to come into contact
with liquids.
Replace only the bulbs listed (
Ypage 70).
If you require assistance replacing bulbs,
consult a qualified specialist workshop.
If the new bulb still does not light up, consult
a qualified specialist workshop.
The daytime driving lights and part of the
rear light clusters of your vehicle are equip-
ped with LED light bulbs. Do not replace these
bulbs yourself. Contact a qualified special-
ist workshop which has the necessary spe-
cialist knowledge and tools to carry out the
work required.
Headlamps and lamps are an important aspect
of vehicle safety. You must therefore make
sure that these function correctly at all
times. Have the headlamp setting checked
regularly.
Overview: changing bulbs/bulb types
You can replace the following bulbs. The bulb
type can be found in the legend.
0043Low-beam/high-beam headlamps: HB2
0044Turn signal lamp: PY 21 W
0087Foglamps: H16
70Replacing bulbs
>> Lights and windshield wipers.
 1
1 2
2 3
3 4
4 5
5 6
6 7
7 8
8 9
9 10
10 11
11 12
12 13
13 14
14 15
15 16
16 17
17 18
18 19
19 20
20 21
21 22
22 23
23 24
24 25
25 26
26 27
27 28
28 29
29 30
30 31
31 32
32 33
33 34
34 35
35 36
36 37
37 38
38 39
39 40
40 41
41 42
42 43
43 44
44 45
45 46
46 47
47 48
48 49
49 50
50 51
51 52
52 53
53 54
54 55
55 56
56 57
57 58
58 59
59 60
60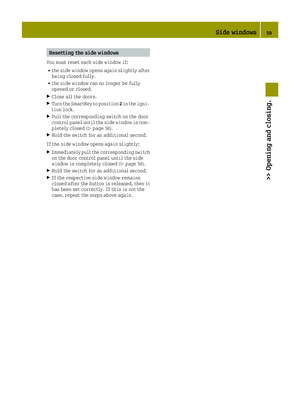 61
61 62
62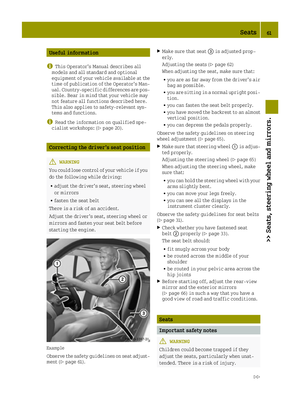 63
63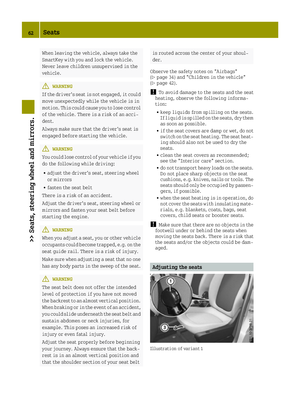 64
64 65
65 66
66 67
67 68
68 69
69 70
70 71
71 72
72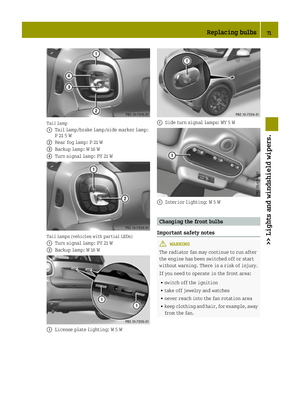 73
73 74
74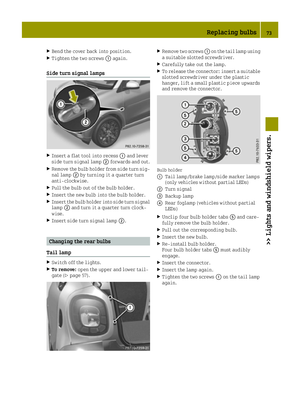 75
75 76
76 77
77 78
78 79
79 80
80 81
81 82
82 83
83 84
84 85
85 86
86 87
87 88
88 89
89 90
90 91
91 92
92 93
93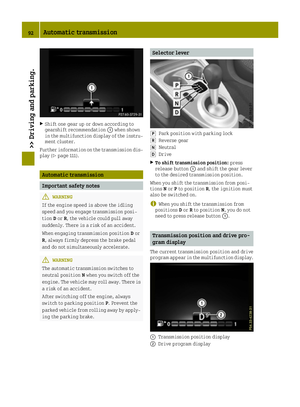 94
94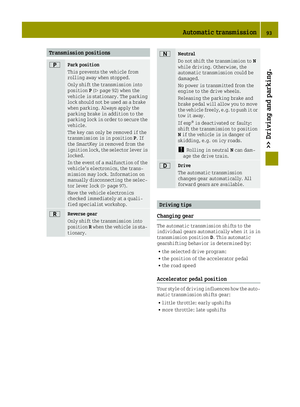 95
95 96
96 97
97 98
98 99
99 100
100 101
101 102
102 103
103 104
104 105
105 106
106 107
107 108
108 109
109 110
110 111
111 112
112 113
113 114
114 115
115 116
116 117
117 118
118 119
119 120
120 121
121 122
122 123
123 124
124 125
125 126
126 127
127 128
128 129
129 130
130 131
131 132
132 133
133 134
134 135
135 136
136 137
137 138
138 139
139 140
140 141
141 142
142 143
143 144
144 145
145 146
146 147
147 148
148 149
149 150
150 151
151 152
152 153
153 154
154 155
155 156
156 157
157 158
158 159
159 160
160 161
161 162
162 163
163 164
164 165
165 166
166 167
167 168
168 169
169 170
170 171
171 172
172 173
173 174
174 175
175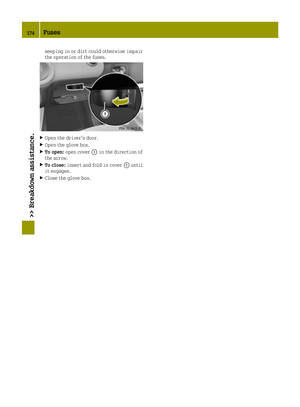 176
176 177
177 178
178 179
179 180
180 181
181 182
182 183
183 184
184 185
185 186
186 187
187 188
188 189
189 190
190 191
191 192
192 193
193 194
194 195
195 196
196 197
197 198
198 199
199 200
200 201
201 202
202 203
203 204
204 205
205 206
206 207
207 208
208 209
209 210
210 211
211 212
212 213
213