Page 161 of 214

!Do not affix the following to plastic sur-
faces:
Rstickers
Rfilms
Rscented oil bottles or similar items
You can otherwise damage the plastic.
!Do not allow cosmetics, insect repellent
or sunscreen to come into contact with the
plastic trim. This maintains the high-
quality look of the surfaces.
XWipe the plastic trim with a damp, lint-
free cloth, e.g. a microfiber cloth.
XHeavy soiling: use care products and clean-
ing agents recommended and approved by
smart.
The surface may change color temporarily.
Wait until the surface is dry again.
Cleaning the steering wheel and gear or
selector lever
XThoroughly wipe with a damp cloth or use
leather care agents that have been recom-
mended and approved by smart.
Cleaning the seat covers
General notes
!Do not use a microfiber cloth to clean
covers made out of real leather, artificial leather or DINAMICA. If used often, these
can damage the cover.
iNote that regular care is essential to
ensure that the appearance and comfort of
the covers is retained over time.
Genuine leather seat covers
Leather is a natural product.
It exhibits natural surface characteristics,
for example:
RDifferences in the texture
Rmarks caused by growth and injury
RSlight nuances of color
These are characteristics of leather and not
material defects.
!To retain the natural appearance of the
leather, observe the following cleaning
instructions:
RClean genuine leather covers carefully
with a damp cloth and then wipe the cov-
ers down with a dry cloth.
RMake sure that the leather does not
become soaked. It may otherwise become
rough and cracked.
ROnly use leather care agents that have
been recommended by smart. You can
obtain these from a qualified specialist
workshop.
Seat covers of other materials
!Observe the following when cleaning:
Rclean artificial leather covers with a
cloth moistened with a solution contain-
ing 1% detergent (e.g. dish washing liq-
uid).
Rclean cloth covers with a microfiber
cloth moistened with a solution contain-
ing 1% detergent (e.g. dish washing liq-
uid). Rub carefully and always wipe
entire seat sections to avoid leaving
visible lines. Leave the seat to dry
afterwards. Cleaning results depend on
the type of dirt and how long it has been
there.
Rclean DINAMICA covers with a damp cloth.
Make sure that you wipe entire seat sec-
tions to avoid leaving visible lines.
Cleaning the seat belts
GWARNING
Seat belts can become severely weakened if bleached or dyed. This could cause the seat
belts to tear or fail, for instance, in the
event of an accident. This poses an
increased risk of injury or fatal injury.
Never bleach or dye the seat belts.
!Do not clean the seat belts using chemical
cleaning agents. Do not dry the seat belts by
heating at temperatures above 176 ‡(80 †)
or in direct sunlight.
XUse clean, lukewarm water and soap solu-
tion.
Care159
>> Maintenance and care.
Z
Page 162 of 214
Cleaning the roof lining and carpets
XRoof lining:if it is very dirty, use a soft
brush or a cleaning agent recommended and
approved by smart.
XCarpets: use the carpet and textile clean-
ing agents recommended and approved by
smart.
160Care
>> Maintenance and care.
Page 163 of 214

Useful information
i
This Operator's Manual describes all
models and all standard and optional
equipment of your vehicle available at the
time of publication of the Operator's Man- ual. Country-specific differences are pos-
sible. Bear in mind that your vehicle may
not feature all functions described here.
This also applies to safety-relevant sys-
tems and functions.
iRead the information on qualified spe-
cialist workshops: (Ypage 20).
Where will I find...?
Vehicle tool kit
The TIREFIT kit and the towing eye are located
in the stowage well under the front-passenger
footwell.
XUnscrew wing nuts 0043.
XRemove the vehicle tool tray.
0043Towing eye
0044Tire sealant filler bottle
0087Tire inflation compressor
Flat tire
Preparing the vehicle
Your vehicle may be equipped with a TIREFIT
kit (Ypage 161).
Information on changing/mounting a wheel
(
Ypage 197).
XStop the vehicle on solid, non-slippery and
level ground, as far away as possible from
traffic.
XSwitch on the hazard warning lamps.
XSecure the vehicle against rolling away
(Ypage 100).
XIf possible, bring the front wheels into the
straight-ahead position.
XSwitch off the engine.
XRemove the SmartKey from the ignition
lock.
XMake sure that the passengers are not
endangered as they get out of the vehicle.
Make sure that no one is near the danger
area while a wheel is being changed. Any-
one who is not directly assisting in the
wheel change should, for example, stand
behind the barrier.
XGet out of the vehicle. Pay attention to
traffic conditions when doing so.
XClose the driver's door.
TIREFIT kit
Important safety notes
TIREFIT is a tire sealant.
You can use TIREFIT to seal punctures of up to
0.16 in (4 mm), particularly those in the tire
tread. You can use TIREFIT at outside tem-
peratures down to 00F84‡(00F820 †).
Flat tire161
>> Breakdown assistance.
Page 164 of 214

GWARNING
In the following situations, the tire seal-
ant is unable to provide sufficient break-
down assistance, as it is unable to seal the
tire properly:
Rthere are cuts or punctures in the tire
larger than those mentioned above.
Rthe wheel rim is damaged.
Ryou have driven at very low tire pressures
or on a flat tire.
There is a risk of an accident.
Do not drive the vehicle. Contact a quali-
fied specialist workshop.
GWARNING
The tire sealant is harmful and causes irri-
tation. It must not come into contact with
your skin, eyes or clothing or be swallowed.
Do not inhale TIREFIT fumes. Keep tire
sealant away from children. There is a risk
of injury.
If you come into contact with the tire seal-
ant, observe the following:
RRinse off the tire sealant from your skin
immediately with water.
RIf the tire sealant comes into contact
with your eyes, immediately rinse them
thoroughly with clean water.
RIf tire sealant is swallowed, immediately
rinse your mouth out thoroughly and
drink plenty of water. Do not induce vom-
iting, and seek medical attention imme-
diately.
RImmediately change out of clothing
which has come into contact with tire
sealant.
RIf an allergic reaction occurs, seek med-
ical attention immediately.
!Do not operate the tire inflation com-
pressor for longer than 15 minutes at a time
without a break. It may otherwise overheat.
The tire inflation compressor can be oper-
ated again once it has cooled down. Comply with the manufacturer’s safety
instructions on the sticker on the tire infla-
tion compressor.
Using the TIREFIT kit
XDo not remove any foreign objects which
have penetrated the tire, e.g. screws or
nails.
XRemove the tire sealant bottle and the tire
inflation compressor from the front-
passenger footwell (
Ypage 161).
XAffix the 50 mph (80 km/h) maximum speed
sticker to the instrument cluster within the
driver's field of vision.
XUnwind plug
0043with the cable from the tire
inflation compressor 0044.
XRemove hose0083from the bottom section of
tire inflation compressor housing 0044.
XRemove cap on tire sealant bottle0085and
connect hose 0083.
XRemove the cap from valve 006Don the faulty
tire.
XRemove cap on filler hose 0087and screw
filler hose 0087onto the valve.
XInsert connector 0043into the 12 V socket in
your vehicle (Ypage 147).
162Flat tire
>> Breakdown assistance.
Page 165 of 214
.
XPress on/off switch 0084on tire inflation
compressor 0044toI.
The tire inflation compressor is switched
on. The tire is inflated.
iFirst, ti")
XTurn the key to position1in the ignition
lock (Ypage 87).
XPress on/off switch 0084on tire inflation
compressor 0044toI.
The tire inflation compressor is switched
on. The tire is inflated.
iFirst, tire sealant is pumped into the
tire. The pressure can briefly rise to
approximately 600 kPa (6.0 bar/86 psi).
Do not switch off the tire inflation com-
pressor during this phase.
XLet the tire inflation compressor run for a
maximum of 15 minutes. The tire should then
have attained a pressure of at least 180 kPa
(1.8 bar/26 psi).
If a tire pressure of 180 kPa (1.8 bar/26 psi) is
achieved after a maximum of 15 minutes, see
"Tire pressure is achieved" (
Ypage 163).
If a tire pressure of 180 kPa (1.8 bar/26 psi)
has not been achieved after a maximum of
15 minutes, see "Tire pressure is not ach-
ieved" (
Ypage 163).
iIf tire sealant leaks out, allow it to dry. It
can then be removed like a layer of film.
If your clothes are soiled with tire sealant,
have them cleaned with perchloroethylene
at a dry cleaner as soon as possible.
Tire pressure not reached
If a tire pressure of 180 kPa (1.8 bar/26 psi)
has not been achieved after a maximum of
10 minutes:
XSwitch off the tire inflation compressor.
XUnscrew the filler hose from the valve of
the faulty tire.
XVery slowly drive forwards or reverse
approximately 30 ft (10 m).
XPump up the tire again.
After a maximum of 10 minutes, the tire
pressure must be at least 180 kPa (1.8 bar/
26 psi).
GWARNING
If the required tire pressure is not reached after the specified time, the tire is too
badly damaged. The tire sealant cannot
repair the tire in this instance. Damaged
tires and a tire pressure that is too low can
significantly impair the vehicle's braking
and driving characteristics. There is a
risk of accident.
Do not continue driving. Contact a quali-
fied specialist workshop.
Tire pressure reached
GWARNING
A tire temporarily sealed with tire sealant impairs the driving characteristics and is
not suitable for higher speeds. There is a
risk of accident.
You should therefore adapt your driving
style accordingly and drive carefully. Do
not exceed the specified maximum speed
with a tire that has been repaired using
tire sealant.
The maximum speed for a tire sealed with tire
sealant is 50 mph (80 km/h). The 50 mph
(80 km/h) maximum speed sticker must be
affixed to the instrument cluster within the
driver's field of vision.
!After use, excess tire sealant may run out
of the filler hose. This could cause stains.
Therefore, place the filler hose in the
plastic bag that contained the TIREFIT kit.
HEnvironmental note
Have the used tire sealant bottle disposed
of professionally, e.g. at a qualified spe-
cialist workshop.
If a tire pressure of 180 kPa (1.8 bar/26 psi)
has been achieved after 10 minutes:
XSwitch off the tire inflation compressor.
XUnscrew the filler hose from the valve of
the faulty tire.
XStow the tire sealant bottle and the tire
inflation compressor.
XPull away immediately.
XStop after driving for approximately
2 miles (3 km) and check the tire pressure
with the tire inflation compressor.
The tire pressure must now be at least
130 kPa (1.3 bar/19 psi).
Flat tire163
>> Breakdown assistance.
Z
Page 166 of 214

GWARNING
If the required tire pressure is not reached after driving for a short period, the tire is
too badly damaged. The tire sealant cannot repair the tire in this instance. Damaged
tires and a tire pressure that is too low can
significantly impair the vehicle's brakingand driving characteristics. There is a
risk of accident.
Do not continue driving. Contact a quali-
fied specialist workshop.
XCorrect the tire pressure if it is still at
least 130 kPa (1.3 bar/19 psi). For values, see
the tire and loading information table on
the driver's side B-pillar.
XTo increase the tire pressure: switch on the
tire inflation compressor.
XTo reduce the tire pressure: depress pres-
sure release button 0043next to pressure
gauge 0044.
XIf the tire pressure is correct, unscrew the
filler hose from the valve of the sealed
tire.
XScrew the valve cap onto the valve of the
sealed tire.
XDrive to the nearest qualified specialist
workshop and have the tire changed there.
XHave the tire sealant bottle and the filler
hose replaced as soon as possible at a
qualified specialist workshop.
XHave the tire sealant bottle replaced every
four years at a qualified specialist work-
shop.
Battery (vehicle)
Important safety notes
Special tools and expert knowledge are
required when working on the battery, e.g.
removal and installing. You should therefore
have all work involving the battery carried
out at a qualified specialist workshop.
GWARNING
Work carried out incorrectly on the battery
can lead, for example, to a short circuit and
thus damage the vehicle electronics. This
can lead to function restrictions applying
to safety-relevant systems, e.g the lighting system, the ABS (anti-lock braking system)
or the ESP
®(Electronic Stability Program).
The operating safety of your vehicle may be restricted.
You could lose control of the vehicle, for
example:
Rwhen braking
Rin the event of abrupt steering maneuvers
and/or when the vehicle's speed is not
adapted to the road conditions
There is a risk of an accident.
In the event of a short circuit or a similar
incident, contact a qualified specialist
workshop immediately. Do not drive any
further. You should have all work involving
the battery carried out at a qualified spe-
cialist workshop.
Further information about ABS (
Ypage 47) and
esp®(Ypage 49).
GWARNING
Electrostatic build-up can lead to the cre- ation of sparks, which could ignite the
highly explosive gases of a battery. There
is a risk of an explosion.
Before handling the battery, touch the
vehicle body to remove any existing elec-
trostatic build-up.
The highly flammable gas mixture forms when charging the battery as well as when jump-
starting.
164Battery (vehicle)
>> Breakdown assistance.
Page 167 of 214

Always make sure that neither you nor the bat-
tery is electrostatically charged. There is a
build-up of electrostatic charge, e.g.:
Rby wearing clothing made from synthetic
fibers
Rdue to friction between clothing and seats
Rif you push or pull the battery across the
carpet or other synthetic materials
Rif you wipe the battery with a cloth.
GWARNING
During the charging process, a battery pro-
duces hydrogen gas. If a short circuit
occurs or sparks are created, the hydrogen
gas can ignite. There is a risk of an explo- sion.
RMake sure that the positive terminal of a
connected battery does not come into
contact with vehicle parts.
RNever place metal objects or tools on a
battery.
RIt is important that you observe the
described order of the battery terminals
when connecting and disconnecting a
battery.
RWhen jump-starting, make sure that the
battery poles with identical polarity are
connected.
RIt is particularly important to observe
the described order when connecting and
disconnecting the jumper cables.
RNever connect or disconnect the battery
terminals while the engine is running.
GWARNING
Battery acid is caustic. There is a risk of
injury.
Avoid contact with skin, eyes or clothing.
Do not inhale any battery gases. Do not lean
over the battery. Keep children away from
batteries. Wash away battery acid immedi-
ately with plenty of clean water and seek
medical attention.
HEnvironmental note
Batteries contain danger-
ous substances. It is
against the law to dispose
of them with the household
rubbish. They must be col-
lected separately and recy-
cled to protect the envi-
ronment.
Dispose of batteries in an
environmentally friendly
manner. Take discharged
batteries to a qualified
specialist workshop or a
special collection point
for used batteries.
!Have the battery checked regularly at a
qualified specialist workshop.
Observe the service intervals in the Main-
tenance Booklet or contact a qualified spe-
cialist workshop for more information.
!You should have all work involving the
battery carried out at a qualified special-
ist workshop. In the exceptional case that
it is necessary for you to disconnect the
battery yourself, make sure that:
Ryou switch off the engine and remove the
SmartKey. Check that all the indicator
lamps in the instrument cluster are off.
Otherwise, electronic components, such
as the alternator, may be damaged.
Ryou first remove the negative terminal
clamp and then the positive terminal
clamp. Never swap the terminal clamps.
Otherwise, the vehicle's electronic sys-
tem may be damaged.
The battery and the cover of the positive
terminal clamp must be installed securely
during operation.
Comply with safety precautions and take pro-
tective measures when handling batteries.
WARNING
Fire, open flames and smoking are
prohibited when handling the bat-
tery. Avoid creating sparks.
Battery (vehicle)165
>> Breakdown assistance.
Z
Page 168 of 214

Battery acid is caustic. Avoid con-
tact with skin, eyes or clothing.
Wear suitable protective clothing,especially gloves, apron and face-
guard.
Rinse any acid spills immediately
with clear water. Contact a physi-
cian if necessary.
Wear eye protection.
Keep children away.
Observe this Operator's Manual.
For safety reasons, smart recommends that you
only use batteries which have been tested and
approved specifically for your vehicle by
smart. These batteries provide increased
impact protection to prevent vehicle occu-
pants from suffering acid burns should the
battery be damaged in the event of an acci-
dent.
In order for the battery to achieve the maxi-
mum possible service life, it must always be
sufficiently charged.
Like other batteries, the vehicle battery may discharge over time if you do not use the
vehicle. In this case, have the battery dis-
connected at a qualified specialist work-
shop. To maintain the charge, you can also
charge the battery with a charger recommen-
ded by smart. Contact a qualified specialist
workshop for further information.
Have the battery charge status checked more
frequently if you use the vehicle mainly for
short trips or if you leave it standing idle for
a lengthy period. Consult a qualified spe-
cialist workshop if you wish to leave your
vehicle parked for a long period of time.
When replacing a battery, only use a battery
recommended by smart.
iRemove the SmartKey if you park the vehi-
cle and do not require any electrical con-
sumers. The vehicle will then use very lit-
tle energy, thus conserving battery power.
Charging the battery
GWARNING
During charging and jump-starting, explo- sive gases can escape from the battery.
There is a risk of an explosion.
Particularly avoid fire, open flames, cre-
ating sparks and smoking. Ensure there is
sufficient ventilation while charging and
jump-starting. Do not lean over a battery.
GWARNING
Battery acid is caustic. There is a risk of
injury.
Avoid contact with skin, eyes or clothing.
Do not inhale any battery gases. Do not lean
over the battery. Keep children away from
batteries. Wash away battery acid immedi-
ately with plenty of clean water and seek
medical attention.
GWARNING
A discharged battery can freeze at temper-
atures below freezing point. When jump-
starting the vehicle or charging the bat-
tery, gases can escape from the battery.
There is a risk of an explosion.
Allow the frozen battery to thaw out before
charging it or jump-starting.
!Only use battery chargers with a maximum
charging voltage of 14.8 V.
XOpen the service cover (Ypage 151).
XConnect the battery charger to the positive
terminal and ground point in the same
order as when connecting the donor battery
in the jump-starting procedure
(
Ypage 168).
If, at low temperatures, the indicator lamps/
warning lamps in the instrument cluster do
not light up, it is highly likely that the dis-
charged battery has frozen. In this case you
may neither jump-start the vehicle nor
charge the battery. The service life of a
thawed-out battery may be shorter. The start-
ing characteristics can be impaired, partic-
ularly at low temperatures. Have the thawed-
out battery checked at a qualified specialist
workshop.
166Battery (vehicle)
>> Breakdown assistance.
 1
1 2
2 3
3 4
4 5
5 6
6 7
7 8
8 9
9 10
10 11
11 12
12 13
13 14
14 15
15 16
16 17
17 18
18 19
19 20
20 21
21 22
22 23
23 24
24 25
25 26
26 27
27 28
28 29
29 30
30 31
31 32
32 33
33 34
34 35
35 36
36 37
37 38
38 39
39 40
40 41
41 42
42 43
43 44
44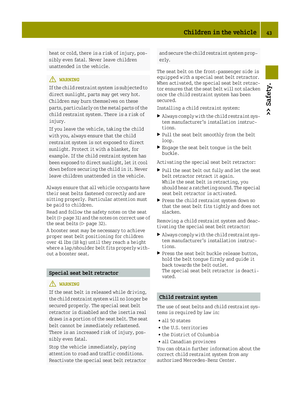 45
45 46
46 47
47 48
48 49
49 50
50 51
51 52
52 53
53 54
54 55
55 56
56 57
57 58
58 59
59 60
60 61
61 62
62 63
63 64
64 65
65 66
66 67
67 68
68 69
69 70
70 71
71 72
72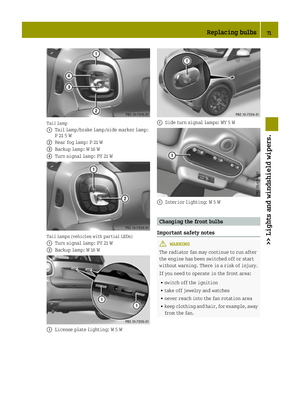 73
73 74
74 75
75 76
76 77
77 78
78 79
79 80
80 81
81 82
82 83
83 84
84 85
85 86
86 87
87 88
88 89
89 90
90 91
91 92
92 93
93 94
94 95
95 96
96 97
97 98
98 99
99 100
100 101
101 102
102 103
103 104
104 105
105 106
106 107
107 108
108 109
109 110
110 111
111 112
112 113
113 114
114 115
115 116
116 117
117 118
118 119
119 120
120 121
121 122
122 123
123 124
124 125
125 126
126 127
127 128
128 129
129 130
130 131
131 132
132 133
133 134
134 135
135 136
136 137
137 138
138 139
139 140
140 141
141 142
142 143
143 144
144 145
145 146
146 147
147 148
148 149
149 150
150 151
151 152
152 153
153 154
154 155
155 156
156 157
157 158
158 159
159 160
160 161
161 162
162 163
163 164
164 165
165 166
166 167
167 168
168 169
169 170
170 171
171 172
172 173
173 174
174 175
175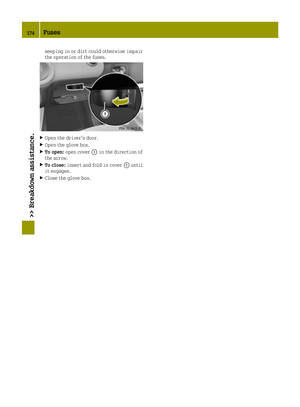 176
176 177
177 178
178 179
179 180
180 181
181 182
182 183
183 184
184 185
185 186
186 187
187 188
188 189
189 190
190 191
191 192
192 193
193 194
194 195
195 196
196 197
197 198
198 199
199 200
200 201
201 202
202 203
203 204
204 205
205 206
206 207
207 208
208 209
209 210
210 211
211 212
212 213
213