Page 153 of 214

HEnvironmental note
When adding oil, take care not to spill any.
If oil enters the soil or waterways, it is
harmful to the environment.
!Do not add too much oil. adding too much
engine oil can result in damage to the
engine or to the catalytic converter. Have
excess engine oil siphoned off.
You will find further information on engine
oils you can use in the "Technical data" sec-
tion (
Ypage 209).
XTurn cap 0043counter-clockwise and remove
it.
XAdd engine oil.
If the oil level is at or below the MIN mark on the oil dipstick, top up once with a max-
imum of 1.1 US qt (1 l) of engine oil.
XReplace cap 0043on the filler neck and turn
clockwise.
Ensure that the cap locks into place
securely.
XCheck the oil level again with the oil dip- stick (Ypage 150).
Front compartment
Service cover
Important safety notes
GWARNING
If the service cover is not locked, it may
come loose during driving and block your
view or endanger other road users. There is
a risk of an accident and injury.
Therefore, make sure that the service cover
is locked before every journey.
GWARNING
If the windshield wipers begin to operate
while the service cover is open, there is a
danger of injury from the wiper arms. There
is a risk of injury.
Always switch off the windshield wipers
and the ignition before opening the ser-
vice cover.
!To ensure unhindered air intake, care-
fully remove any snow or dirt from the ven- tilation slots above the service cover.
To prevent it from becoming damaged or
dirty, the service cover can be removed and
hung on the front of the vehicle.
The service cover is attached to the rear side
of the vehicle body with a strap.
XPark the vehicle on a flat, level surface.
XApply the parking brake.
XSelect a gear.
XSwitch the ignition off.
Removing
XTo unlock: remove lock cover 0043(driver's
side only) with the key.
XInsert the key into the lock and turn it to
position 0092.
Checking service products151
>> Maintenance and care.
Z
Page 154 of 214
XPull both levers0043with both index fingers
in the direction of the arrows.
XFirst pull both levers 0044forwards and then
completely out.
XLift service cover 0087and pull forwards.
XHook service cover 0087at the top rear in the
openings on the vehicle.
Inserting
XLift service cover 0087.
XSlide bars0085on the left and right of the
service cover under the bars on fender.
XPress service cover 0087down in the direc-
tion of the arrow.
XSlide both levers 0044in and then back.
XPress lever 0044in the radiator trim and
allow it to engage.
XTo lock: insert the key into the lock and
turn it to position 0047.
Insert lock cover 0043flush (on the driver's
side) and clip it into place.
152Checking service products
>> Maintenance and care.
Page 155 of 214

Coolant
Important safety notes
GWARNING
The cooling system is pressurized, partic- ularly when the motor is warm. If you open
the cap, you could be scalded if hot coolant
sprays out. There is a risk of injury.
Let the engine cool down before you open
the cap. Wear gloves and eye protection.
Slowly open the cap to relieve pressure.
Checking the coolant
The coolant expansion tank is in the area
under the service cover.
XOpen the service cover (Ypage 151).
XLet the coolant cool down for at least
30 minutes.
XPark the vehicle on a level surface.
Only check the coolant level when the vehi-cle is on a level surface and the engine has
cooled down.
XCheck the reservoir visually.
The fluid level must be between MIN and
MAX.
Adding coolant
XCover cap 0043of coolant expansion tank 0044
with a cloth.
XSlowly turn cover cap 0043anti-clockwise to
allow excess pressure to escape.
XTurn cap 0043further anti-clockwise and
remove it.
XDo not exceed the maximum filling level
when adding coolant.
XScrew on cap 0043tightly. For further information on coolant, see
(
Ypage 210).
Windshield washer system
GWARNING
Windshield washer concentrate is highly
flammable. If it comes into contact with hot
components in the front compartment, it
may ignite. There is a risk of fire and
injury.
Make sure that no windshield washer con-
centrate is spilled next to the filler neck.
XOpen the service cover (Ypage 151).
XTo open: pull cap0043upwards by the tab.
XIf available, pull the removable nozzle up
as far as the stop.
XAdd the premixed washer fluid.
XTo close: if available, push the removable
nozzle down and push it inside.
XPress cap 0043onto the filler neck until it
engages.
Further information on windshield washer
fluid/antifreeze (
Ypage 211).
Maintenance
Service display
Service message
The service display informs you of the next
service due date. Depending on the operating
conditions of the vehicle, the remaining time
or distance until the next service due date is displayed.
Maintenance153
>> Maintenance and care.
Z
Page 156 of 214
.
For further information inquire at any smart
center or look under
http://www.smartUSA.com (only USA).")
Information on the type of service and ser-
vice intervals (see the separate Maintenance
Booklet).
For further information inquire at any smart
center or look under
http://www.smartUSA.com (only USA).
iThe service display does not show any
information on the engine oil level.
Observe the notes on the engine oil level
(
Ypage 150).
Whenever a service is due, this is shown
approximately 30 days or 1500 km (1000 miles)
beforehand. After starting the engine, a ser-
vice message appears in the instrument clus-
ter display for a few seconds; see the follow-
ing example.
Next
Servicein.. Daystogether with the
0099 or009A symbol. If the service due date
has been exceeded, Service Due .. Days
Ago.
The symbol shows the type of service. 0099
stands for a minor service and 009Afor a
major service.
The service display does not take into
account any periods of time during which the
battery is disconnected.
Maintaining the time-dependent service
schedule:
XNote down the service due date in the ser-
vice display before disconnecting the bat-
tery.
or
XAfter reconnecting the battery, subtract
the battery disconnection periods from the
service date shown on the display.
Hiding a service message
XPress the 0076button on the multifunction
steering wheel.
Calling up the service display
XSwitch on the ignition.
XPress the 0063or0064 button on the steer-
ing wheel to select the MessagesandSer‐vicemenu.
The service display shows when the service
is due.
Information about Service
Resetting the service display
!Have service work carried out as descri-
bed in the Maintenance Booklet. This may
otherwise lead to increased wear and dam-
age to the major assemblies or the vehicle.
A qualified specialist workshop, e.g. a smart center, will reset the service interval dis-
play after the service work has been carried
out. You can also obtain further information
on maintenance work, for example.
Special service requirements
The prescribed service interval is based on
normal operation of the vehicle. Service work
will need to be performed more often if the
vehicle is operated under arduous conditions
or increased loads, for example:
Rregular city driving with frequent inter-
mediate stops
Rif the vehicle is primarily used to travel
short distances
Rfor frequent operation in mountainous ter-
rain or on poor road surfaces
Rif the engine is often left idling for long
periods
In these or similar operating conditions,
have, for example, the air filter, engine oil
and oil filter changed more frequently. The
tires must be checked more frequently if the
vehicle is operated under increased loads.
You can obtain further information at a
qualified specialist workshop, e.g. a smart
center.
Driving abroad
An extensive smart service network is also
available in other countries. For further
information inquire at any smart center.
Care
General notes
HEnvironmental note
Dispose of empty packaging and cleaning
cloths in an environmentally responsible
manner.
154Care
>> Maintenance and care.
Page 157 of 214

!For cleaning your vehicle, do not use any
of the following:
Rdry, rough or hard cloths
Rabrasive cleaning agents
Rsolvents
Rcleaning agents containing solvents
Do not scrub.
Do not touch the surfaces or protective
films with hard objects, e.g. a ring or ice
scraper. You could otherwise scratch or
damage the surfaces and protective film.
!Do not park the vehicle for an extended
period straight after cleaning it, partic-
ularly after having cleaned the wheels with
wheel cleaner. Wheel cleaners could cause
increased corrosion of the brake discs and
brake pads/linings. For this reason, you
should drive for a few minutes after clean-
ing. Braking heats the brake discs and the
brake pads/linings, thus drying them. The
vehicle can then be parked.
Regular care of your vehicle is a condition
for retaining the quality in the long term.
Use care products and cleaning agents rec-
ommended and approved by smart.
Exterior care
Automatic car wash
GWARNING
Braking efficiency is reduced after wash-
ing the vehicle. There is a risk of an acci-
dent.
After the vehicle has been washed, brake
carefully while paying attention to the
traffic conditions until full braking power
is restored.
!Never clean your vehicle in a Touchless
Automatic Car Wash as these use special
cleaning agents. These cleaning agents can
damage the paintwork or plastic parts.
!Make sure that:
Rthe side windows are fully closed
Rthe climate control blower is switched
off
Rthe windshield wiper switch is at posi-
tion 0
The vehicle may otherwise be damaged.
You can wash the vehicle in an automatic car
wash from the very start.
If the vehicle is very dirty, pre-wash it
before cleaning it in an automatic car wash.
After using an automatic car wash, wipe off
wax from the windshield and the wiper blades.
This will prevent smears and reduce wiping
noises caused by residue on the windshield.
Washing by hand
In some countries, washing by hand is only
allowed at specially equipped washing bays.
Observe the legal requirements in each coun-
try.
XDo not use hot water and do not wash the
vehicle in direct sunlight.
XUse a soft sponge to clean.
XUse a mild cleaning agent, such as a car
shampoo approved by smart.
XThoroughly hose down the vehicle with a
gentle jet of water.
XDo not point the water jet directly towards
the air inlet.
XUse plenty of water and rinse out the sponge frequently.
XRinse the vehicle with clean water and dry
thoroughly with a chamois.
XDo not let the cleaning agent dry on the
paintwork.
Carefully remove all deposits of road salt as
soon as possible when driving in winter.
Power washers
GWARNING
The water jet from a circular jet nozzle
(dirt blasters) can cause invisible exte-
rior damage to the tires or chassis compo- nents. Components damaged in this way may
fail unexpectedly. There is a risk of an
accident.
Care155
>> Maintenance and care.
Z
Page 158 of 214
 between")
Do not use power washers with circular jet
nozzles to clean the vehicle. Have damaged
tires or chassis components replaced
immediately.
!Always maintain a distance of at least
11.8 in (30 cm) between the vehicle and the
power washer nozzle. Information about the
correct distance is available from the
equipment manufacturer.
Move the power washer nozzle around when
cleaning your vehicle.
Do not aim directly at any of the following:
Rtires
Rdoor gaps, roof gaps, joints, etc.
Relectrical components
Rbattery
Rconnectors
Rlights
Rseals
Rtrim
Rventilation slots
Damaged seals or electrical components
can lead to leaks or failures.
Cleaning the paintwork
!Do not affix:
Rstickers
Rfilms
Rmagnetic plates or similar items
to painted surfaces. You could otherwise
damage the paintwork.
XRemove dirt immediately, where possible,
while avoiding rubbing too hard.
XSoak insect remains with insect remover
and rinse off the treated areas afterwards.
XSoak bird droppings with water and rinse
off the treated areas afterwards.
XRemove coolant, brake fluid, tree resin,
oils, fuels and greases by rubbing gently
with a cloth soaked in petroleum ether or
lighter fluid.
XUse tar remover to remove tar stains.
XUse silicone remover to remove wax.
XUse a suitable touch-up stick, e.g. MB
Touch-Up Stick, to repair slight damage to
the paintwork quickly and provisionally. The following cannot always be completely
repaired:
Rscratches
Rcorrosive deposits
Rareas affected by corrosion
Rdamage caused by inadequate care
In such cases, visit a qualified specialist
workshop.
When water no longer forms beads on the paint surface, use the care product Paint Care,
which has been approved by smart. This is the
case approximately every three to five
months, depending on the climate conditions
and the care product used.
If the dirt has penetrated the paint surface or
if the paintwork has become dull, then the
paintwork should be cleaned. Use the care
product Paint Care, which has been approved
by smart to clean the paintwork.
Do not use these care products in the sun or on
the hood while the hood is hot.
Matte finish care
!Never polish the vehicle or the light alloy
wheels. Polishing causes the finish to
shine.
!The following may cause the paint to
become shiny and thus reduce the matte
effect:
Rstrong rubbing of the paintwork with
unsuitable materials
Rfrequent use of automatic car washes
Rwashing the vehicle in direct sunlight
!Never use paint cleaner, buffing or pol-
ishing products, or gloss preserver, e.g.
wax. These products are only suitable for
high-gloss surfaces. Their use on vehicles
with matte finish leads to considerable
surface damage (shiny, mottled areas).
Always have paintwork repairs carried out
at a qualified specialist workshop.
!Do not use wash programs with a hot wax
treatment under any circumstances.
Observe these notes if your vehicle has a
clear matte finish. This will help you to avoid
damage to the paintwork due to incorrect
treatment.
These notes also apply to light alloy wheels
with a clear matte finish.
156Care
>> Maintenance and care.
Page 159 of 214

iThe vehicle should preferably be washed
by hand using a soft sponge, car shampoo
and plenty of water.
iUse only insect remover and car shampoo
from the range of approved smart care
products.
Cleaning the panoramic roof
!Only use cleaning agents or cleaning
cloths which are suitable for plastic light
lenses. Unsuitable cleaning agents or
cleaning cloths could scratch or damage
the plastic windows of the panoramic roof.
Do not use cleaning agents which contain
solvents.
XClean the plastic panes of the panoramic
roof using a wet sponge and a mild cleaning
agent, e.g. smart car shampoo, a commer-
cially available glass cleaner or cleaning
cloths.
Cleaning the wheels
GWARNING
The water jet from a circular jet nozzle
(dirt blasters) can cause invisible exte-
rior damage to the tires or chassis compo- nents. Components damaged in this way may
fail unexpectedly. There is a risk of an
accident.
Do not use power washers with circular jet
nozzles to clean the vehicle. Have damaged
tires or chassis components replaced
immediately.
!Do not use acidic wheel cleaning products
to remove brake dust. This could damage
wheel bolts and brake components.
!Do not park the vehicle for an extended
period straight after cleaning it, partic-
ularly after having cleaned the wheels with
wheel cleaner. Wheel cleaners could cause
increased corrosion of the brake discs and
brake pads/linings. For this reason, you
should drive for a few minutes after clean-
ing. Braking heats the brake discs and the
brake pads/linings, thus drying them. The
vehicle can then be parked.
Cleaning the windows
GWARNING
You could become trapped by the wind-
shield wipers if they start moving while
cleaning the windshield or wiper blades.
There is a risk of injury.
Always switch off the windshield wipers
and the ignition before cleaning the wind-
shield or wiper blades.
!Do not use dry cloths, abrasive products,
solvents or cleaning agents containing
solvents to clean the inside of the windows.
Do not touch the insides of the windows with
hard objects, e.g. an ice scraper or ring.
There is otherwise a risk of damaging the
windows.
!Clean the water drainage channels of the
windshield and the rear window at regular
intervals. Deposits such as leaves, petals
and pollen may under certain circumstan-
ces prevent water from draining away. This
can lead to corrosion damage and damage to
electronic components.
XClean the inside and outside of the windows
with a damp cloth and a cleaning agent that
is recommended and approved by smart.
Cleaning wiper blades
GWARNING
You could become trapped by the wind-
shield wipers if they start moving while
cleaning the windshield or wiper blades.
There is a risk of injury.
Always switch off the windshield wipers
and the ignition before cleaning the wind-
shield or wiper blades.
!Do not pull the wiper blade. Otherwise,
the wiper blade could be damaged.
!Do not clean wiper blades too often and do
not rub them too hard. Otherwise, the
graphite coating could be damaged. This
could cause wiper noise.
Care157
>> Maintenance and care.
Z
Page 160 of 214

XFold the windshield wiper arms away from
the windshield.
XCarefully clean the wiper blades with a
damp cloth.
XFold the windshield wiper arms back againbefore switching on the ignition.
!Hold the wiper arm securely when folding
back. The windshield could be damaged if
the wiper arm smacks against it suddenly.
Cleaning the exterior lighting
!Only use cleaning agents or cleaning
cloths which are suitable for plastic light
lenses. Unsuitable cleaning agents or
cleaning cloths could scratch or damage
the plastic light lenses.
XClean the plastic lenses of the exterior
lighting using a wet sponge and a mild
cleaning agent, e.g. smart car shampoo or
cleaning cloths.
Cleaning the sensors
!If you clean the sensors with a power
washer, make sure that you keep a distance
of at least 11.8 in (30 cm) between the vehi-
cle and the power washer nozzle. Informa-
tion about the correct distance is availa-
ble from the equipment manufacturer.
XClean sensors 0043of the driving systems
with water, car shampoo and a soft cloth.
Cleaning the exhaust pipe
Impurities combined with the effects of road
grit and corrosive environmental factors may
cause flash rust to form on the surface. You
can restore the original shine of the exhaust
pipe by cleaning it regularly, especially in
winter and after washing.
!Do not clean the exhaust pipe with acid-
based cleaning agents, such as bathroom
cleaner or wheel cleaner.
XClean the exhaust pipe with a care product tested and approved by smart.
Interior care
Cleaning the display
!For cleaning, do not use any of the fol-
lowing:
Ralcohol-based thinner or gasoline
Rabrasive cleaning agents
Rcommercially-available household
cleaning agents
These may damage the display surface. Do
not put pressure on the display surface
when cleaning. This could lead to irrepar-
able damage to the display.
XBefore cleaning the display, make sure that
it is switched off and has cooled down.
XClean the display surface using a commer-
cially available microfiber cloth and TFT/
LCD display cleaner.
XDry the display surface using a dry micro-
fiber cloth.
Cleaning the plastic trim
GWARNING
Care products and cleaning agents contain-
ing solvents cause surfaces in the cockpit
to become porous. As a result, plastic parts may come loose in the event of air bag
deployment. There is a risk of injury.
Do not use any care products and cleaning
agents to clean the cockpit.
158Care
>> Maintenance and care.
 1
1 2
2 3
3 4
4 5
5 6
6 7
7 8
8 9
9 10
10 11
11 12
12 13
13 14
14 15
15 16
16 17
17 18
18 19
19 20
20 21
21 22
22 23
23 24
24 25
25 26
26 27
27 28
28 29
29 30
30 31
31 32
32 33
33 34
34 35
35 36
36 37
37 38
38 39
39 40
40 41
41 42
42 43
43 44
44 45
45 46
46 47
47 48
48 49
49 50
50 51
51 52
52 53
53 54
54 55
55 56
56 57
57 58
58 59
59 60
60 61
61 62
62 63
63 64
64 65
65 66
66 67
67 68
68 69
69 70
70 71
71 72
72 73
73 74
74 75
75 76
76 77
77 78
78 79
79 80
80 81
81 82
82 83
83 84
84 85
85 86
86 87
87 88
88 89
89 90
90 91
91 92
92 93
93 94
94 95
95 96
96 97
97 98
98 99
99 100
100 101
101 102
102 103
103 104
104 105
105 106
106 107
107 108
108 109
109 110
110 111
111 112
112 113
113 114
114 115
115 116
116 117
117 118
118 119
119 120
120 121
121 122
122 123
123 124
124 125
125 126
126 127
127 128
128 129
129 130
130 131
131 132
132 133
133 134
134 135
135 136
136 137
137 138
138 139
139 140
140 141
141 142
142 143
143 144
144 145
145 146
146 147
147 148
148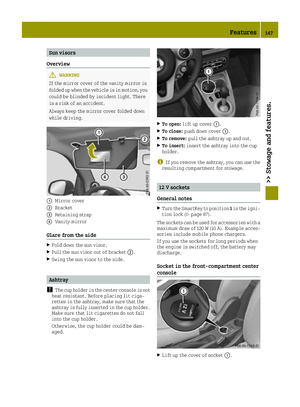 149
149 150
150 151
151 152
152 153
153 154
154 155
155 156
156 157
157 158
158 159
159 160
160 161
161 162
162 163
163 164
164 165
165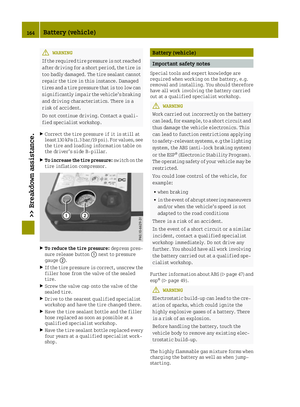 166
166 167
167 168
168 169
169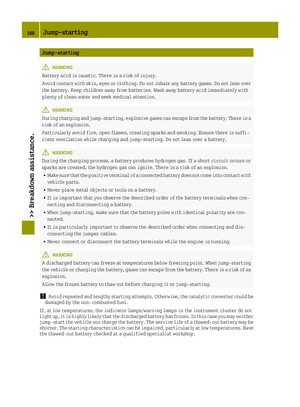 170
170 171
171 172
172 173
173 174
174 175
175 176
176 177
177 178
178 179
179 180
180 181
181 182
182 183
183 184
184 185
185 186
186 187
187 188
188 189
189 190
190 191
191 192
192 193
193 194
194 195
195 196
196 197
197 198
198 199
199 200
200 201
201 202
202 203
203 204
204 205
205 206
206 207
207 208
208 209
209 210
210 211
211 212
212 213
213