Page 145 of 214

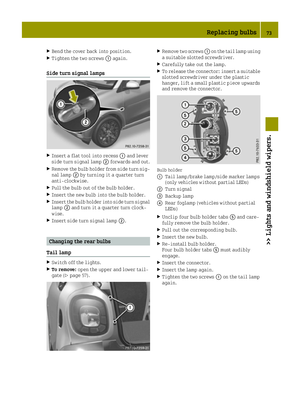
RAll closable stowage compartments
should be closed before beginning your
journey.
RAlways stow and secure heavy, hard, poin-
ted, sharp-edged, fragile objects or
objects which are too large behind the
last bench seat or under the passenger
seats.
Observe the loading guidelines (
Ypage 142).
Glove box
XTo open: pull handle 0043.
The glove box can be locked with the Smart-
Key.
XTo lock: insert the SmartKey into the lock
and turn it 90° clockwise to position 0048.
XTo unlock:insert the SmartKey into the lock
and turn it 90° counter-clockwise to posi-
tion 0047.
Stowage compartment in the doors
The stowage compartments are located in the
driver's door and front-passenger door.
0043Stowage compartment
Bottles can be stowed in the doors.
Drawer in the center console
XPull drawer 0044by handle 0043in the direc-
tion of the arrow.
Additional stowage areas
RBracket on the front-passenger seat for a
tablet, such as an iPad Air®
RStowage net in front-passenger footwell
Stowage compartment in the tailgate
The stowage compartment in the tailgate
offers additional stowage space for small
objects. You can keep the fluorescent jacket,
first-aid kit and warning triangle here, for
example.
Stowage areas143
>> Stowage and features.
Z
Page 146 of 214

XTo open:open the tailgate.
XPull back handle 0043on the inside of the
tailgate.
XFold the lid of the stowage compartment
forwards in the direction of the arrow.
XTo close: fold the lid of the stowage com-
partment back in the opposite direction to the arrow.
XPress the cover firmly closed in the middle
until it engages audibly.
Cargo compartment cover
Important safety notes
GWARNING
The trunk cover alone cannot retain or
secure any heavy objects, items of luggage
or heavy loads. You may be struck by unse-
cured loads in the event of sudden changes
in direction, braking or an accident. There is a risk of injury or even fatal injury.
Always stow objects in such a way that they
cannot be thrown around. Secure objects,
luggage or loads by, for example, lashing
them down to prevent them from slipping or
tipping over, even if you use the trunk
cover.
Observe the loading guidelines (
Ypage 142).
The trunk cover:
Rconceals objects in the vehicle's trunk
Rprevents smaller objects from slipping
from the trunk into the vehicle interior,
but will not restrain loads in the event of
an accident The luggage net bag:
Rserves to hold small, light objects
Rprevents smaller objects from slipping
within the vehicle interior
Fitting
If you use the trunk cover under normal cir-
cumstances, install it in brackets
0044. If you
do not need to use the trunk cover, install it in brackets 0087.
XFor easier fitting, fold the front-
passenger seat backrests forwards
(
Ypage 63).
XOpen the upper and lower tailgate
(Ypage 57).
XHold trunk cover 0043in the trunk with the
luggage net bag at the front.
XInsert the trunk cover into upper
bracket 0044or into lower bracket 0087on the
right-hand side.
iLower bracket 0087can only be used if there
is no subwoofer fitted.
144Stowage areas
>> Stowage and features.
Page 147 of 214

XSlide handle0085to the right in the direc-
tion of the arrow.
XInsert the trunk cover into bracket 0044or0087
on the left side paneling and release the
handle.
Trunk cover 0043snaps into place.
XPull luggage net bag 0083down slightly and
secure with the Velcro fasteners.
To remove, follow the sequence in reverse.
Installing and removing the trunk cover
XTo install: grip trunk cover 0043in the mid-
dle and pull it back.
XHook trunk cover 0043into left and right rear
brackets 0084and release.
XTo remove: grip trunk cover 0043in the mid-
dle, pull it back and unhook it from rear
brackets 0084.
XSlide trunk cover 0043back.
Fitting/removing the subwoofer
XTo fit: insert connector 0043.
XPlace subwoofer0044on the side trim.
XSlide subwoofer 0044to bracket 0087.
XSlide the subwoofer up in the direction of
the arrow on bracket 0087.
XThen slide the subwoofer over bracket 0087in
the direction of the arrow until the sub-
woofer slides down.
XClose quick-release fastener 0085.
XTo remove:release quick-release fas-
tener 0085.
XSlide the subwoofer up over bracket 0087and
remove.
Stowage areas145
>> Stowage and features.
Z
Page 148 of 214

XDisconnect plug0043.
XTake out subwoofer 0043.
Features
Cup holder
Important safety notes
GWARNING
The cup holder cannot hold a container
secure whilst traveling. If you use a cup
holder whilst traveling, the container may
be flung around and liquid may be spilled.
The vehicle occupants may come into con-
tact with the liquid and if it is hot, they
may be scalded. You may be distracted from
the traffic conditions and you could lose
control of the vehicle. There is a risk of an
accident and injury.
Only use the cup holder when the vehicle is stationary. Only use the cup holder for con-
tainers of the right size. Always close the
container, particularly if the liquid is
hot.
GWARNING
If you transport objects in the vehicle
interior and these are not adequately
secured, they could slip or be flung around
and thereby strike vehicle occupants. In
addition, cup holders, open stowage spaces and mobile phone brackets may not always
be able to hold the objects placed in them
in the event of an accident. There is a risk
of injury, particularly in the event of sharp
braking or sudden changes of direction.
RAlways stow objects in such a way that
they cannot be tossed about in these or
similar situations.
RAlways make sure that objects do not pro-
trude out of the stowage spaces, luggage
nets or stowage nets.
REnsure that closable stowage spaces are
shut before beginning your journey.
RAlways stow and secure heavy, hard, poin-
ted, sharp-edged, fragile or large
objects in the cargo compartment.
!Only use the cup holders for containers of
the right size and which have lids. The
drinks could otherwise spill.
Observe the loading guidelines (
Ypage 142).
Cup holder in the front-compartment
center console
0043Cup holder
Cup holder in the center console
0043Cup holder
The cup holder has a recess for storing selec-
ted mobile phones.
146Features
>> Stowage and features.
Page 149 of 214

Sun visors
Overview
GWARNING
If the mirror cover of the vanity mirror is
folded up when the vehicle is in motion, you
could be blinded by incident light. There
is a risk of an accident.
Always keep the mirror cover folded down
while driving.
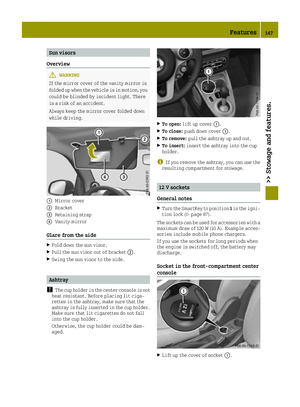
0043Mirror cover
0044Bracket
0087Retaining strap
0085Vanity mirror
Glare from the side
XFold down the sun visor.
XPull the sun visor out of bracket 0044.
XSwing the sun visor to the side.
Ashtray
!
The cup holder in the center console is not
heat resistant. Before placing lit ciga-
rettes in the ashtray, make sure that the
ashtray is fully inserted in the cup holder.
Make sure that lit cigarettes do not fall
into the cup holder.
Otherwise, the cup holder could be dam-
aged.
XTo open: lift up cover 0043.
XTo close:push down cover 0043.
XTo remove:pull the ashtray up and out.
XTo insert:insert the ashtray into the cup
holder.
iIf you remove the ashtray, you can use the
resulting compartment for stowage.
12 V sockets
General notes
XTurn the SmartKey to position 1in the igni-
tion lock (Ypage 87).
The sockets can be used for accessories with a
maximum draw of 120 W(10A). Example acces-
sories include mobile phone chargers.
If you use the sockets for long periods when
the engine is switched off, the battery may
discharge.
Socket in the front-compartment center
console
XLift up the cover of socket 0043.
Features147
>> Stowage and features.
Z
Page 150 of 214
Floormat on the driver's side
GWARNING
Objects in the driver's footwell can
restrict the pedal travel or obstruct a
depressed pedal. The operating and road
safety of the vehicle is jeopardized. There
is a risk of an accident.
Make sure that all objects in the vehicle are
stowed correctly, and that they cannot enter
the driver's footwell. Install the floormats securely and as specified in order to
ensure sufficient clearance for the pedals.
Do not use loose floormats and do not place
floormats on top of one another.
XSlide the driver's seat backwards.
XTo install: place the floormat in the foot-
well.
XPress safety catch knobs 0043onto retain-
ers 0044.
XTo remove: pull the floormat off retain-
ers 0044.
XRemove the floormat.
148Features
>> Stowage and features.
Page 151 of 214

Useful information
i
This Operator's Manual describes all
models and all standard and optional
equipment of your vehicle available at the
time of publication of the Operator's Man- ual. Country-specific differences are pos-
sible. Bear in mind that your vehicle may
not feature all functions described here.
This also applies to safety-relevant sys-
tems and functions.
iRead the information on qualified spe-
cialist workshops: (Ypage 20).
Checking service products
Engine compartment (rear)
Engine compartment cover
GWARNING
The engine compartment cover may become
very hot. If you remove the cover to do work on the engine compartment, there is a risk
of injury!
Allow the engine to cool down and then
remove the engine compartment cover after
cooling has taken place.
GWARNING
Combustion engines emit poisonous
exhaust gases such as carbon monoxide. If
the engine compartment cover has not been installed correctly, when the engine is
running, particularly if the vehicle is
moving, exhaust fumes could enter the
passenger compartment. There is a risk of
poisoning.
Always switch off the engine before remov-
ing the engine compartment cover. Make
sure that the engine compartment cover has
been installed correctly.
XTo open: apply the parking brake.
XSelect a gear.
XSwitch the ignition off.
XRemove the SmartKey from the ignition
lock.
XOpen the upper and lower tailgate
(Ypage 57).
XFor vehicles with the subwoofer: remove the
subwoofer (Ypage 149).
XRemove luggage compartment cover 0043if
necessary (Ypage 144).
XHold the carpet on the right and left sides
and fold upwards.
XVehicles with a trunk cover: attach the hook to upper bracket of trunk cover 0043
(
Ypage 144).
XUnscrew screws 0087from engine compart-
ment cover 0044manually.
XRemove engine compartment cover 0044.
XTo close:slide engine compartment
cover 0044forward as far as it will go.
XRetighten screws 0087manually.
XVehicles with a trunk cover: unhook the
hooks.
XPut the carpet back into the vehicle.
XFold down the carpet and push it under the
side paneling.
XFor vehicles with the subwoofer: fit the
subwoofer again (Ypage 149).
XClose the tailgate.
Engine oil
General notes
Depending on your driving style, the vehicle
consumes up to 0.55 US qt (0.5 liters) of oil per
600 miles (1000 km). The oil consumption may
be higher than this when the vehicle is new or
if you frequently drive at high engine speeds.
Checking service products149
>> Maintenance and care.
Z
Page 152 of 214

When checking the oil level:
Rpark the vehicle on a level surface.
Rthe engine should be switched off for
approximately 5 minutes if the engine is at
normal operating temperature
Rif the engine is not at normal operating
temperature, e.g. if the engine was only
started briefly, wait approximately
30 minutes before carrying out the meas-
urement
Checking the oil level using the oil dip-
stick
GWARNING
Certain components in the engine compart- ment, such as the engine, radiator and parts
of the exhaust system, can become very hot.
Working in the engine compartment poses a risk of injury.
Where possible, let the engine cool down
and touch only the components described in
the following.
GWARNING
Opening the hood when the engine is over-
heated or when there is a fire in the engine
compartment could expose you to hot gases
or other service products. There is a risk of injury.
Let an overheated engine cool down before
opening the hood. If there is a fire in the
engine compartment, keep the hood closed
and contact the fire department.
GWARNING
The engine compartment contains moving
components. Certain components, such as
the radiator fan, may continue to run or
start again suddenly when the ignition is
off. There is a risk of injury.
If you need to do any work inside the engine compartment:
Rswitch off the ignition
Rnever reach into the area where there is a
risk of danger from moving components,
such as the fan rotation area
Rremove jewelry and watches
Rkeep items of clothing and hair, for
example, away from moving parts
XOpen the engine compartment cover
(Ypage 149).
Example
XPull oil dipstick 0043out of the dipstick
guide tube.
XWipe off oil dipstick 0043.
XSlowly slide oil dipstick 0043into the guide
tube to the stop, and take it out again.
If the level is between MIN mark 0087and MAX
mark 0044, the oil level is correct.
Adding engine oil
GWARNING
Certain components in the engine compart- ment, such as the engine, radiator and parts
of the exhaust system, can become very hot.
Working in the engine compartment poses a risk of injury.
Where possible, let the engine cool down
and touch only the components described in
the following.
GWARNING
If engine oil comes into contact with hot
components in the engine compartment, it
may ignite. There is a risk of fire and
injury.
Make sure that engine oil is not spilled
next to the filler neck. Let the engine cool down and thoroughly clean the engine oil
off the components before starting the
engine.
150Checking service products
>> Maintenance and care.