Page 201 of 214

The vehicle may only be raised at the desig-
nated jacking points on the sill.
The jacking points are located just behind
the wheel housings of the front wheels and
just in front of the wheel housings of the rear
wheels (arrows). You can identify the jacking
points by the triangular indentations on the
sill.
To avoid damage, position the jack centrally
under the triangular indentations.
XPosition jack 0044centrally under the tri-
angular indentations at the jacking points on the sill 0043.
Example
XMake sure the foot of the jack is directly
beneath the jacking point.
XRaise the vehicle with jack 0044until the
tire is a maximum of 1.2 in (3 centimeters)
off the ground.
Removing a wheel
!Do not place wheel bolts in sand or on a
dirty surface. The bolt and wheel hub
threads could otherwise be damaged when
you screw them in.
XUnscrew the wheel bolts.
XRemove the wheel.
Mounting a new wheel
GWARNING
Oiled or greased wheel bolts or damaged
wheel bolts/hub threads can cause the wheel
bolts to come loose. As a result, you could
lose a wheel while driving. There is a risk of accident.
Never oil or grease wheel bolts. In the event
of damage to the threads, contact a quali-
fied specialist workshop immediately.
Have the damaged wheel bolts or hub threads
replaced/renewed. Do not continue driv-
ing.
GWARNING
If you tighten the wheel bolts or wheel nuts when the vehicle is raised, the jack could
tip over. There is a risk of injury.
Only tighten the wheel bolts or wheel nuts
when the vehicle is on the ground.
Always pay attention to the instructions and
safety notes in the "Changing a wheel" sec-
tion (
Ypage 196).
Only use wheel bolts that are designed for the
wheel and the vehicle. For safety reasons,
smart recommends that you only use wheel
bolts which have been approved for smart
vehicles and the respective wheel.
!To prevent damage to the paintwork, hold
the wheel securely against the wheel hub
while screwing in the first wheel bolt.
Changing a wheel199
>> Wheels and tires.
Z
Page 202 of 214

XClean the wheel and wheel hub contact sur-faces.
XPlace the new wheel on the wheel hub and
push it on.
XTighten the wheel bolts until they are fin-
ger-tight.
Lowering the vehicle
GWARNING
The wheels could work loose if the wheel
nuts and bolts are not tightened to the
specified tightening torque. There is a
risk of accident.
Have the tightening torque immediately
checked at a qualified specialist workshop
after a wheel is changed.
XLower the vehicle until it is once again
standing firmly on the ground.
XPlace the jack to one side.
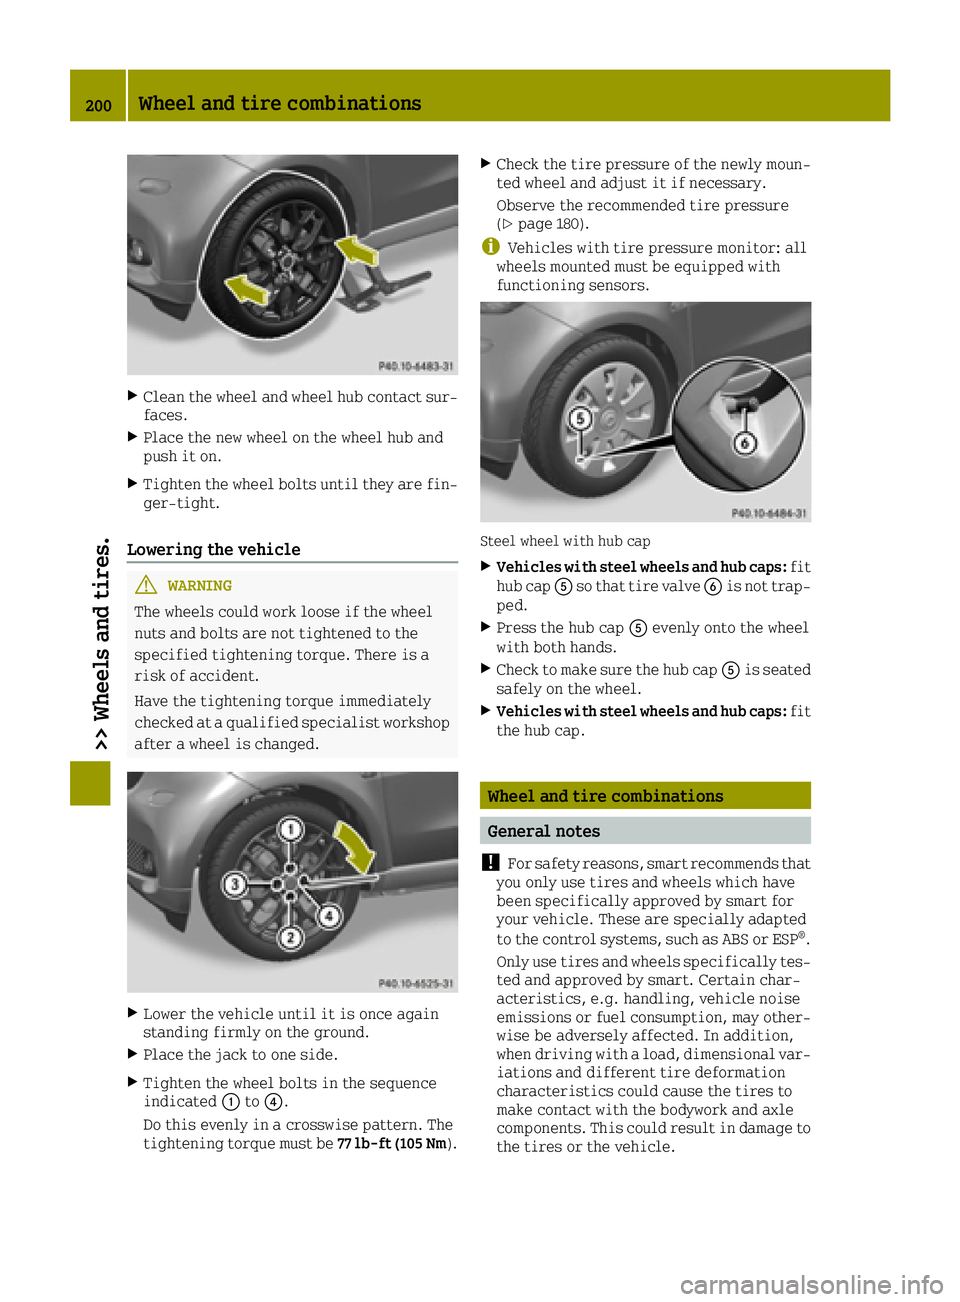
XTighten the wheel bolts in the sequence
indicated 0043to0085.
Do this evenly in a crosswise pattern. The
tightening torque must be 77 lb-ft (105 Nm).
XCheck the tire pressure of the newly moun-
ted wheel and adjust it if necessary.
Observe the recommended tire pressure
(
Ypage 180).
iVehicles with tire pressure monitor: all
wheels mounted must be equipped with
functioning sensors.
Steel wheel with hub cap
XVehicles with steel wheels and hub caps: fit
hub cap 0083so that tire valve 0084is not trap-
ped.
XPress the hub cap 0083evenly onto the wheel
with both hands.
XCheck to make sure the hub cap 0083is seated
safely on the wheel.
XVehicles with steel wheels and hub caps: fit
the hub cap.
Wheel and tire combinations
General notes
!
For safety reasons, smart recommends that
you only use tires and wheels which have
been specifically approved by smart for
your vehicle. These are specially adapted
to the control systems, such as ABS or ESP
®.
Only use tires and wheels specifically tes-
ted and approved by smart. Certain char-
acteristics, e.g. handling, vehicle noise
emissions or fuel consumption, may other-
wise be adversely affected. In addition,
when driving with a load, dimensional var-
iations and different tire deformation
characteristics could cause the tires to
make contact with the bodywork and axle
components. This could result in damage to
the tires or the vehicle.
200Wheel and tire combinations
>> Wheels and tires.
Page 203 of 214

smart accepts no liability for damage
resulting from the use of tires or wheels
other than those tested and approved.
Information on wheels and tires can be
obtained at a qualified specialist work-
shop, e.g. a smart center.
!Retreaded tires have not been tested by
smart and are not recommended. Previous
damage sustained by the tires (before the
retreading process) cannot always be rec-
ognized. As a result, smart cannot guaran-
tee vehicle safety if retreaded tires are
fitted.
Overview of abbreviations used in the fol-
lowing tire tables:
RBA: both axles
RFA: front axle
RRA: rear axle
The recommended pressures for various oper- ating conditions can be found:
Ron the Tire and Loading Information plac-
ard with the recommended tire pressures on
the B-pillar on the driver's side
Rin the tire pressure table on the inside of
the fuel filler flap
Observe the notes on recommended tire pres-
sures under various operating conditions
(
Ypage 180).
Check tire pressures regularly, and only when
the tires are cold. Comply with the mainte-
nance recommendations of the tire manufac-
turer in the vehicle document wallet.
Notes on the vehicle equipment – always
equip the vehicle with:
Rtires of the same size on a given axle (left/
right)
Rwith the same type of tires on all wheels at a given time (summer tires, winter tires)
Exception: it is permissible to fit a dif-
ferent type or make in the event of a flat
tire.
iThe following pages contain information
on approved wheel rim and tire sizes for
equipping your vehicle with winter tires.
Winter tires are not available at the fac-
tory as standard equipment or optional
extras.
If you want to equip your vehicle with
approved winter tires, it may be necessary
to obtain wheel rims in the corresponding size. The size of the approved winter tires
may differ from the standard tires. This is
dependent on the model and the equipment
installed at the factory.
The tires and wheel rims, as well as further
information, can be obtained at a quali-
fied specialist workshop.
iNot all wheel and tire combinations are
available at the factory for all countries.
Wheel and tire combinations201
>> Wheels and tires.
Z
Page 204 of 214
Tires
smart fortwo coupe 66 kW Turbo
All-weather tires
R 15
TiresWheels
FA: 165/65 R15 81 T M+S
RA: 185/60 R15 84 T M+SSteel wheels:
FA: 5.0 J x 15 H2
Wheel offset: 1.25 in (32 mm)
RA: 5.5 J x 15 H2
Wheel offset: 1.65 in (42 mm)
Light-alloy wheels:
FA: 5.0 J x 15 CH
Wheel offset: 1.25 in (32 mm)
RA: 5.5 J x 15 CH
Wheel offset: 1.65 in (42 mm)
FA: 165/65 R15 81 H M+S
RA: 185/60 R15 84 H M+SSteel wheels:
FA: 5.0 J x 15 H2
Wheel offset: 1.25 in (32 mm)
RA: 5.5 J x 15 H2
Wheel offset: 1.65 in (42 mm)
Light-alloy wheels:
FA: 5.0 J x 15 CH
Wheel offset: 1.25 in (32 mm)
RA: 5.5 J x 15 CH
Wheel offset: 1.65 in (42 mm)
R 16
TiresWheels
FA: 185/50 R16 81 H M+S
RA: 205/45 R16 83 H M+SLight-alloy wheels:
FA: 6.0 J x 16 CH
Wheel offset: 1.73 in (44 mm)
RA: 6.5 J x 16 CH
Wheel offset: 1.57 in (40 mm)
202Wheel and tire combinations
>> Wheels and tires.
Page 205 of 214
Winter tires
R 15
TiresWheels
FA: 165/65 R15 81 T M+S004D
RA: 185/60 R15 84 T M+S004DSteel wheels:
FA: 5.0 J x 15 H2
Wheel offset: 1.25 in (32 mm)
RA: 5.5 J x 15 H2
Wheel offset: 1.65 in (42 mm)
Light-alloy wheels:
FA: 5.0 J x 15 CH
Wheel offset: 1.25 in (32 mm)
RA: 5.5 J x 15 CH
Wheel offset: 1.65 in (42 mm)
Wheel and tire combinations203
>> Wheels and tires.
Z
Page 206 of 214

Useful information
i
This Operator's Manual describes all
models and all standard and optional
equipment of your vehicle available at the
time of publication of the Operator's Man- ual. Country-specific differences are pos-
sible. Bear in mind that your vehicle may
not feature all functions described here.
This also applies to safety-relevant sys-
tems and functions.
iRead the information on qualified spe-
cialist workshops: (Ypage 20).
Information regarding technical data
General information
i
The data stated here specifically refers
to a vehicle with standard equipment. Con- sult a smart center for the data for all vehi-
cle variants and trim levels.
Vehicle electronics
Retrofitting two-way radios and
mobile phones (RF transmitters)
GWARNING
The electromagnetic radiation from modi-
fied or incorrectly retrofitted RF-trans-
mitters can interfere with the vehicle
electronics. This can compromise the
operational safety of the vehicle. There is
a risk of an accident.
You should have all work to electrical and
electronic equipment carried out at a
qualified specialist workshop.
GWARNING
The electromagnetic radiation from incor-
rectly operated RF transmitters can inter-
fere with the vehicle electronics, for
example:
Rif the RF transmitter is not connected
with an exterior antenna
Rthe exterior antenna has been installed
incorrectly or is not a low-reflection
type
This can compromise the operational safety
of the vehicle. There is a risk of an acci-
dent.
Have the low-reflection exterior antenna
mounted at a qualified specialist work-
shop. When operating RF transmitters in
the vehicle, always connect them with the
low-reflection exterior antenna.
!The operating permit may be invalidated
if the instructions for installation and use of RF transmitters are not observed.
In particular, the following conditions
must be complied with:
Ronly approved wavebands may be used.
Rcompliance with the maximum permissi-
ble output in these wavebands is
required.
Ronly approved antenna positions may be
used.
Excessive levels of electromagnetic radia-
tion may cause damage to your health and the
health of others. Using an exterior antenna
takes into account current scientific discus-
sions relating to the possible health hazards
that may result from electromagnetic fields.
The following antenna positions may be used
if RF transmitters have been properly instal- led:
204Vehicle electronics
>> Technical data.
Page 207 of 214

Approved antenna positions
0043
Front roof area
0044Rear roof area
Use the Technical Specification ISO/TS 21609
when retrofitting RF transmitters (Road
Vehicles - EMC guidelines for installation of
aftermarket radio frequency transmitting
equipment). Observe the legal requirements
for retrofittings.
If your vehicle has fittings for two-way radio
equipment, use the power supply or antenna
connections intended for use with the basic
wiring. Be sure to observe the manufacturer's additional instructions when installing.
Deviations with respect to wavebands, maxi-
mum transmission outputs or antenna posi-
tions must be approved by smart.
iDamage or consequential damage arising
from retrofitting RF transmitters in the
vehicle, is not covered by the smart war-
ranty.
The maximum transmission output (PEAK) at
the base of the antenna must not exceed the
following values:
WavebandMaximum trans- mission output
Tetra
380 - 410 MHz20 W
Mobile communications
generation 2G/3G/4G6 W
The following can be used in the vehicle with-
out restrictions:
RRF transmitters with a maximum transmis-
sion output of up to 100 mW
RMobile phones (2G/3G/4G) There is no restriction for antenna positions
on the outside of the vehicle for the following
wavebands:
RTetra
RMobile communications (2G/3G/4G)
Identification plates
Vehicle identification plate with
vehicle identification number (VIN)
XOpen the driver's door.
You will see vehicle identification
plate
0043.
Example: vehicle identification plate (USA
only)
0044
Vehicle model
0087Paint code
Identification plates205
>> Technical data.
Z
Page 208 of 214
Example: vehicle identification plate (Canada
only)
0044
VIN
0087Paint code
iThe data shown on the vehicle identifi-
cation plate is used only as an example.
This data is different for every vehicle and
can deviate from the data shown here. You
can find the data applicable to your vehi-
cle on the vehicle identification plate.
Vehicle identification number (VIN)
XSlide the right-hand front seat to its rear-
most position.
XFold up floor covering 0043in front of the
right-hand front seat.
You will see VIN 0044.
The VIN can also be found in the following
locations:
Rat lower edge of the windshield 0043
Ron the vehicle identification plate
(Ypage 205)
Engine number
0043Engine number (stamped into the crank-
case)
0043Emissions control information plate
206Identification plates
>> Technical data.