Page 113 of 214

Operating the on-board computer
0043Color display
0044Left control panel
XTo activate the on-board computer:unlock
the vehicle and open a door.
If you do not subsequently lock the door, the
on-board computer will remain active for
approximately 15 minutes without any fur-
ther activity.
or
XTurn the key to position 1in the ignition
lock.
You can control the display and the settings
in the on-board computer using the steering
wheel buttons on left control panel 0044.
Left control panel 0044
0063
0064Press briefly:
RTo scroll through a menu
RTo scroll through a sub-menu or
list
Press and hold:
RTo switch directly to the Dis‐tancemenu at menu level
RTo switch directly to the backfunction at the submenu level
0076RConfirms your selection
RIn certain menus, switches to the
Reset Values?function
RHides the display message
Display
0043Time (Ypage 114)
0044SET
0087Digital speedometer (Ypage 115)
0085Outside temperature display
(Ypage 109)
0083Display field for display messages, menus
and lists
008400B4 Reserve fuel display (Ypage 110)
006B00B4Fuel level (Ypage 110)
006CTransmission display
Vehicles with manual transmission:
¿Standard display
Vehicles with automatic transmission:
005B Standard display with drive program
or 0040 Gear indicator (manual mode)
0078 Vehicles with manual transmission:
gearshift recommendation (
Ypage 91)
0079 Transmission malfunction
(
Ypage 97)
006D0085 Cruise control (Ypage 105)
Menus and sub menus
Menu overview
Picture the arrangement of the menus and dis-
plays as a circle.
At the menu level, a segment display is shown
on the right side of the display to help nav-
igation. The segment marked corresponds
with the list position of the menu in the fol-
lowing list. For long lists within the menus
and submenus, a scroll bar on the right side of
the display serves to assist orientation.
Operating the on-board computer
(
Ypage 111).
Menus and sub menus111
>> On-board computer and displays.
Z
Page 114 of 214

Rfrom Starttrip computer menu
(Ypage 112)
Rfrom Resettrip computer menu
(Ypage 11")
Depending on the vehicle equipment, you can
call up the following menus one after the
other:
RDistancemenu (Ypage 112)
Rfrom Starttrip computer menu
(Ypage 112)
Rfrom Resettrip computer menu
(Ypage 112)
RFuel consumptionmenu (Ypage 112)
RCoolant Temperaturemenu (Ypage 113)
RMessages and Servicemenu (Ypage 113)
RSettingsmenu (Ypage 114)
Odometer menu
Example: distance
XTo show: press the 0063or0064 button on
the steering wheel to select the trip meter display.
The display shows trip meter 0043and total
distance recorder 0044.
XTo reset the data:press the0076button on
the steering wheel.
XPress the 0063or0064 button to select yesand press the0076button to confirm.
The trip meter is reset.
You can change the unit for the trip meter in
the Display
submenu (Ypage 116).
Trip computer menu "From start" or
"From reset"
Example: trip computer "From start"
0043
Elapsed time
0044Distance
0087Average speed
0085Average fuel consumption
XTo display: press the0063or0064 button
on the steering wheel to select the from
Startorfrom Resettrip computer menu.
The data in the from Start
trip computer
menu refers to the start of the journey. The
data in the from Reset
trip computer sub-
menu refers to the last time the submenu was
reset.
The from Start
trip computer is automati-
cally reset when:
Rthe ignition has been switched off for more
than 4 hours.
R999 hours have been exceeded.
R9,999 miles have been exceeded.
The from Reset
trip computer is automati-
cally reset if the value exceeds 9,999 hours or 99,999 miles.
The unit of distance for the journey, speed
and consumption information can be changed
in the Display
submenu (Ypage 116).
Fuel consumption menu
Example: fuel consumption
112Menus and sub menus
>> On-board computer and displays.
Page 115 of 214

XPress the0063or0064 button on the steer-
ing wheel to select the display of current
fuel consumption.
The display shows the fuel consumption over
the previous 15 minutes as a bar chart. The
display additionally shows the current fuel
consumption as a numeric value in the upper
right section of the display.
If you switch off the ignition, or change the
distance unit, the fuel consumption data is
deleted automatically.
You can change the distance unit in the Dis‐
playsubmenu (Ypage 116).
Coolant temperature menu
Under normal operating conditions and with
the specified coolant level, the coolant tem-
perature may rise to 230‡(110 †).
Example: coolant temperature
XPress the 0063or0064 button on the steer-
ing wheel to select the coolant temperature
display.
The display shows the current coolant tem-
perature as a bar in the range between 50
and 110 †.
If the coolant temperature rises above
110 †, then the display shows a display
message (
Ypage 125). Observe the display
message. You could otherwise damage the
engine.
You can change the temperature unit in the
Display
submenu (Ypage 116).
Messages and service menu
Example: messages and service
If you have hidden display messages these are
saved in the message memory. The menu shows
the number of display messages in message
memory 0043and next service due date 0044
(
Ypage 153). The message memory can only be
called up when the ignition is switched on.
XPress the 0063or0064 button on the steer-
ing wheel to select the MessagesandSer‐vicemenu.
The display shows the number of display
messages in the message memory and the
next service due date.
If there are no display messages, then the
value in brackets is 0 and the information
on the 0076button is hidden.
XTo show display messages: press the0076
button on the steering wheel.
The lower area on the right of the display
shows the display message, its list number
and then number of display messages in the
message memory.
XPress 0063to scroll through the display
messages in the message memory.
Pressing 0064only allows you to scroll
back to messages which have already been
read.
If you scroll back from the first display
message using 0064, theMessages and
Servicemenu will again be shown in the
display. Existing display messages are not
shown.
Menus and sub menus113
>> On-board computer and displays.
Z
Page 116 of 214

Settings menu
Introduction
In the Settingsmenu, as well as in its sub-
menus, a navigation bar is also shown at the
top of the display field. The navigation bar
serves for quick orientation and shows the
navigation path to the current selection
shown in the display (submenu/function). The
selection shown in the display is highlighted
in the navigation path.
Depending on the vehicle equipment, you can
call up the following submenus in the Set‐
tingsmenu:
RTimesubmenu (Ypage 114)
For vehicles with a smart Media-System,
the time is set using the smart Media-Sys-
tem.
-Sets the time and the time format (12/24 h)
RDisplaysubmenu (Ypage 115)
-Adjusts the instrument cluster lighting
-Shows and sets the digital speedometer
-Sets the units for distance and tempera-
ture
RAmbient Lightingsubmenu (Ypage 116)
-Sets and switches the ambient lighting
on/off
RTire Pressure Monitorsubmenu
-Restarts the tire pressure monitor
(Ypage 185)
RLanguage (Language)submenu
(Ypage 117)
-Sets the menu language
The Settings
menu and some submenus also
show the backfunction.
If the back
function is shown, you have to
select the function to leave the menu.
XPress the 0063or0064 button on the steer-
ing wheel to select the backfunction andpress
0076on the steering wheel to con-
firm.
This exits the menu, and the display shows
the next higher menu level.
iIf you press and hold 0063or0064, you
change directly to the backfunction.
Time submenu
Introduction
This submenu is not available on vehicles
with a smart Media-System. You set the time
using the smart Media-System.
TheTime
submenu offers the following
options:
RSetting the time
RSetting the time format (12/24 h)
XTo leave the submenu: press the0063
or 0064 button on the steering wheel to
select the back
function and press 0076on
the steering wheel to confirm.
The display shows the Settings
menu.
iIf you press and hold0063or0064, you
change directly to the backfunction.
Setting the time
XPress the0063or0064 button on the steer-
ing wheel to select the Settingsmenu and
press 0076on the steering wheel to con-
firm.
XPress the 0063or0064 button to select the
Timesubmenu and confirm with 0076.
XPress the0063or0064 button to select SetClockand press the0076button to confirm.
XPress the 0063or0064 button to set the
hour and confirm with 0076.
XPress the0063or0064 button to set the
minutes and confirm with 0076.
The time is set and the display shows the
Time
submenu.
iIf you are setting the time and keep the
0063 or0064 button depressed, then the
numerical value changes continuously.
Setting the time format (12/24 h)
XPress the 0063or0064 button on the steer-
ing wheel to select the Settingsmenu and
114Menus and sub menus
>> On-board computer and displays.
Page 117 of 214
and confirm with 0076.
XPress00")
press0076on the steering wheel to con-
firm.
XPress the 0063or0064 button to select the
Timesubmenu and confirm with 0076.
XPress0063or0064 to select TimeFormat(12/24 h)and confirm with 0076.
XPress0063or0064 to select the desired
time format 24Hoursor12Hours(am/pm)and confirm with 0076.
The time format is accepted and the display
shows the Time
submenu.
Display submenu
Introduction
In theDisplaysubmenu, you can call up the
following submenus:
RBrightness Display/Switchessubmenu
(Ypage 115)
-Adjusting the instrument cluster light-
ing
RDigital Speedometersubmenu, see
(Ypage 115)
-Shows and sets the digital speedometer
RUnits of Distancesubmenu (Ypage 116)
-Setting the units of distance
RUnits of Temperaturesubmenu
(Ypage 116)
-Setting the units of temperature
XTo leave the submenu: press the0063
or 0064 button on the steering wheel to
select the back
function and press 0076on
the steering wheel to confirm.
The display shows the Settings
menu.
iIf you press and hold0063or0064, you
change directly to the backfunction.
Adjusting the instrument cluster lighting
Instrument cluster lighting includes illumi-
nation of the instrument cluster, the addi-
tional instruments on the dashboard, the dis-
plays and the controls.
You can set the brightness of the instrument
cluster to different levels with the Bright‐
ness Display/Switchesfunction.
XPress the0063or0064 button on the steer-
ing wheel to select the Settingsmenu andpress
0076on the steering wheel to con-
firm.
XPress the 0063or0064 button to select the
Displaysubmenu and confirm with 0076.
XPress the0063or0064 button to select
Brightness Display/Switchesand press
the 0076 button to confirm.
XPress the 0063or0064 button to set the
brightness level. Level 1corresponds to
dimmed instrument lighting and level 5to
bright instrument lighting.
With the selection during night-time driv-
ing, the instrument cluster brightness
level is set at the same time.
XPress the 0076button to confirm the set-
ting.
The instrument lighting is set and the dis-
play shows the Display
submenu.
Digital speedometer submenu
In theDigital Speedometersubmenu you
have the following options:
Rshowing/hiding the digital speedometer
Rsetting the unit for speed in the digital
speedometer
XTo call up the submenu: press the0063
or 0064 button on the steering wheel to
select the Settings
menu and press 0076on
the steering wheel to confirm.
XPress the 0063or0064 button to select the
Displaysubmenu and confirm with 0076.
XPress the0063or0064 button to select the
Digital Speedometersubmenu and con-
firm with 0076.
XTo show/hide the digital speedometer:
press the0063or0064 button to select the
On
function.
XActivate or deactivate the Onfunction by
pressing the 0076button.
When the function is highlighted, it is
activated and the display shows the digital
speedometer (
Ypage 111).
XTo set the unit of speed: press the0063
or 0064 button to select Unitand press the
0076 button to confirm.
XPress the 0063or0064 button to select the
unit of speed km/hormphand confirm with
0076.
The display shows the Digital Speedome‐
tersubmenu.
Menus and sub menus115
>> On-board computer and displays.
Z
Page 118 of 214

XTo leave the submenu:press the0063
or 0064 button to select the backfunction
and confirm with 0076.
The display shows the Display
submenu.
iIf you press and hold0063or0064, you
change directly to the backfunction.
Setting the unit of measurement for dis-
tance
If you change the unit of measurement for
distance, the values in the:
Rtrip computer "From start" or "From reset"
(Ypage 112)
RFuel consumption (Ypage 112)
menus are also reset automatically.
You can only set the unit of measurement for
distance when the vehicle is stationary.
XPress the 0063or0064 button on the steer-
ing wheel to select the Settingsmenu and
press 0076on the steering wheel to con-
firm.
XPress the 0063or0064 button to select the
Displaysubmenu and confirm with 0076.
XPress the0063or0064 button to select
Units of Distanceand press the 0076
button to confirm.
XPress the 0063or0064 button to select
Kilometersor Milesas the unit of meas-
urement for distance and press 0076to
confirm.
The display shows the Display
submenu.
The selected unit of measurement for dis-
tance applies as the basis for:
Rthe trip computer
Rthe service display
Rthe fuel consumption display
Rthe total distance recorder and the trip
meter display
Rthe cruise control speed display
Setting the temperature unit
You can switch the display of the outside tem-
perature and the coolant temperature between
† and ‡.
XPress the 0063or0064 button on the steer-
ing wheel to select the Settingsmenu andpress
0076on the steering wheel to con-
firm.
XPress the 0063or0064 button to select the
Displaysubmenu and confirm with 0076.
XPress the0063or0064 button to select
UnitsofTemperatureand press the 0076
button to confirm.
XPress the 0063or0064 button to select the
unit of temperature °Cor°Fand confirm
with 0076.
The display shows the Display
submenu.
Ambient lighting submenu
Introduction
In theAmbient Lightingsubmenu you have
the following options:
Rswitching the ambient lighting on/off
Rsetting the brightness of the ambient
lighting to different levels
XTo leave the submenu: press the0063
or 0064 button on the steering wheel to
select the back
function and press 0076on
the steering wheel to confirm.
The display shows the Settings
menu.
iIf you press and hold0063or0064, you
change directly to the backfunction.
Switching the ambient lighting on/off
XPress the0063or0064 button on the steer-
ing wheel to select the Settingsmenu and
press 0076on the steering wheel to con-
firm.
XPress the 0063or0064 button to select the
AmbientLightingsubmenu and confirm by
pressing the 0076button.
XPress the 0063or0064 button to select the
onfunction.
XActivate or deactivate the onfunction by
pressing the 0076button.
When the function is highlighted it is
activated and the ambient lighting is
switched on.
To set the brightness
You can set the brightness of the ambient
lighting to different levels.
XPress the 0063or0064 button on the steer-
ing wheel to select the Settingsmenu and
116Menus and sub menus
>> On-board computer and displays.
Page 119 of 214

press0076on the steering wheel to con-
firm.
XPress the 0063or0064 button to select the
AmbientLightingsubmenu and confirm by
pressing the 0076button.
You will see the selected setting.
XPress the 0063or0064 button to select
Brightnessand press the 0076button to
confirm.
XPress the 0063or0064 button to set the
brightness level. Level 1corresponds to
dimmed ambient lighting and level 5to
bright ambient lighting.
With the selection, the ambient lighting
brightness level is set at the same time.
XPress the 0076button to save the setting.
The brightness of the ambient lighting is
set and the display shows the Ambient
Lightingsubmenu.
Language submenu
XPress the0063or0064 button on the steer-
ing wheel to select the Settingsmenu and
press 0076on the steering wheel to con-
firm.
XUse 0063 or0064 to select the Language(Language)submenu and confirm with
0076.
XPress the 0063or0064 button to select the
desired language for the displays and mes-
sages and confirm with 0076.
XPress the0063or0064 button on the steer-
ing wheel to select the backfunction and
press 0076on the steering wheel to con-
firm.
The display shows the Settings
menu in the
selected language.
iIf you press and hold 0063or0064, you
change directly to the backfunction.
Menus and sub menus117
>> On-board computer and displays.
Z
Page 120 of 214

Display messages
Introduction
Display messages with graphic symbols are simplified in the Operator's Manual and may differ
from the symbols in the display. The display shows high-priority messages in red. For certain
display messages a warning tone also sounds.
Please respond in accordance with the display messages and follow the additional notes in this
Operator's Manual.
You can use the0076button on the multifunction steering wheel to hide low-priority mes-
sages. The display messages are stored in the message memory and can be called up as for as
long as the ignition remains switched on (
Ypage 113). When the ignition is turned off, the
message memory is deleted and no display messages are stored. The cause of a display message
should be remedied as soon as possible.
High-priority display messages cannot be hidden. The multifunction display shows these
messages continuously until the causes for the messages have been remedied.
118Display messages
>> On-board computer and displays.
 1
1 2
2 3
3 4
4 5
5 6
6 7
7 8
8 9
9 10
10 11
11 12
12 13
13 14
14 15
15 16
16 17
17 18
18 19
19 20
20 21
21 22
22 23
23 24
24 25
25 26
26 27
27 28
28 29
29 30
30 31
31 32
32 33
33 34
34 35
35 36
36 37
37 38
38 39
39 40
40 41
41 42
42 43
43 44
44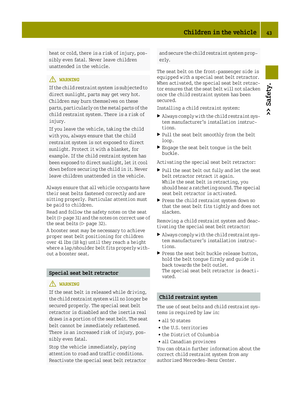 45
45 46
46 47
47 48
48 49
49 50
50 51
51 52
52 53
53 54
54 55
55 56
56 57
57 58
58 59
59 60
60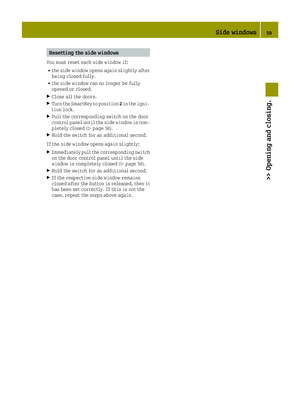 61
61 62
62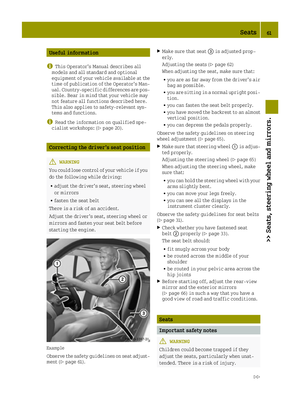 63
63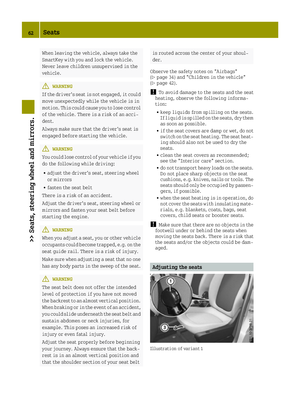 64
64 65
65 66
66 67
67 68
68 69
69 70
70 71
71 72
72 73
73 74
74 75
75 76
76 77
77 78
78 79
79 80
80 81
81 82
82 83
83 84
84 85
85 86
86 87
87 88
88 89
89 90
90 91
91 92
92 93
93 94
94 95
95 96
96 97
97 98
98 99
99 100
100 101
101 102
102 103
103 104
104 105
105 106
106 107
107 108
108 109
109 110
110 111
111 112
112 113
113 114
114 115
115 116
116 117
117 118
118 119
119 120
120 121
121 122
122 123
123 124
124 125
125 126
126 127
127 128
128 129
129 130
130 131
131 132
132 133
133 134
134 135
135 136
136 137
137 138
138 139
139 140
140 141
141 142
142 143
143 144
144 145
145 146
146 147
147 148
148 149
149 150
150 151
151 152
152 153
153 154
154 155
155 156
156 157
157 158
158 159
159 160
160 161
161 162
162 163
163 164
164 165
165 166
166 167
167 168
168 169
169 170
170 171
171 172
172 173
173 174
174 175
175 176
176 177
177 178
178 179
179 180
180 181
181 182
182 183
183 184
184 185
185 186
186 187
187 188
188 189
189 190
190 191
191 192
192 193
193 194
194 195
195 196
196 197
197 198
198 199
199 200
200 201
201 202
202 203
203 204
204 205
205 206
206 207
207 208
208 209
209 210
210 211
211 212
212 213
213