Page 129 of 173
JauneNoirNoir texte
5.17
ENG_UD7320_1
Eclairage intérieur : remplacement des lampes (X76 - Renault)
ENG_NU_854-2_X76LL_Renault_5
intEriOr lighting: changing bulbs (3/3)
Passenger compartment
light 11
(depending on vehicle)
– Tilt lens 11.
–
Remove it by hand.
Release bulb 12.
Bulb
type: 7 W festoon type bulb.
11
12
Page 130 of 173
bulbschanging ......................................... (up to the end of the DU)
changing a bulb .................................... (up to the end of the DU)
practical advice ..................................... (up to the end of the DU)
luggage compartment lighting changing bulbs ................................ (up to the end of the DU)
bulbs changing ......................................... (up to the end of the DU)
5.18
ENG_UD7321_1
Eclaireur de coffre : remplacement de la lampe (X76 - Renault)
ENG_NU_854-2_X76LL_Renault_5
Luggage compartment light
light A
Press tabs 1 to release the bulb holder.
P
ress tab 2 to release the lens and
access bulb
3.
Bulb
type: 7 W festoon type bulb.
light FOr luggAgE cOmPArtmEnt : changing bulbs
1
2
3
light B
Unclip light B on the side indicated
(using a flat-blade screwdriver or simi-
lar).
Bulb
type: 10 W festoon type bulb
Open flap 4
located at the rear of the
light.
Release bulb
5.
1
A
B
A
B
4
5
Page 131 of 173

batterytroubleshooting ............................... (up to the end of the DU)
practical advice ..................................... (up to the end of the DU) 5.19
ENG_UD14324_2
Batterie : dépannage (X76 - Renault)
ENG_NU_854-2_X76LL_Renault_5
Battery: troubleshooting
BA ttEry : troubleshooting (1/2)
Handle the battery with care
as it contains sulphuric acid,
which must not come into
contact with eyes or skin. If
it does, wash the affected area with
plenty of cold water. If necessary,
consult a doctor.
Ensure that naked flames, red hot
objects and sparks do not come into
contact with the battery as there is a
risk of explosion.
The engine may be hot when car-
rying out operations in close prox-
imity. In addition, the engine cooling
fan can come on at any moment.
Risk of injury.
t o avoid all risk of sparks:
– Ensure that any consumers (cour-
tesy lights, etc.) are switched off
before disconnecting or reconnect-
ing the battery.
–
When charging, stop the charger
before connecting or disconnecting
the battery.
–
Do not place metal objects on the
battery to avoid creating a short cir-
cuit between the terminals.
–
Always wait at least twenty seconds
after the engine has been switched
off before disconnecting a battery.
–
Make sure that you reconnect the
battery terminals after refitting.
As the battery is specific
to
the vehicle (presence of
a ventilation pipe to expel
corrosive and explosive
gases), make sure that it is replaced
with a battery that enables this pipe
to be connected. Consult an ap-
proved Dealer.
Page 132 of 173

5.20
ENG_UD14324_2
Batterie : dépannage (X76 - Renault)
ENG_NU_854-2_X76LL_Renault_5
BA ttEry: troubleshooting (2/2)
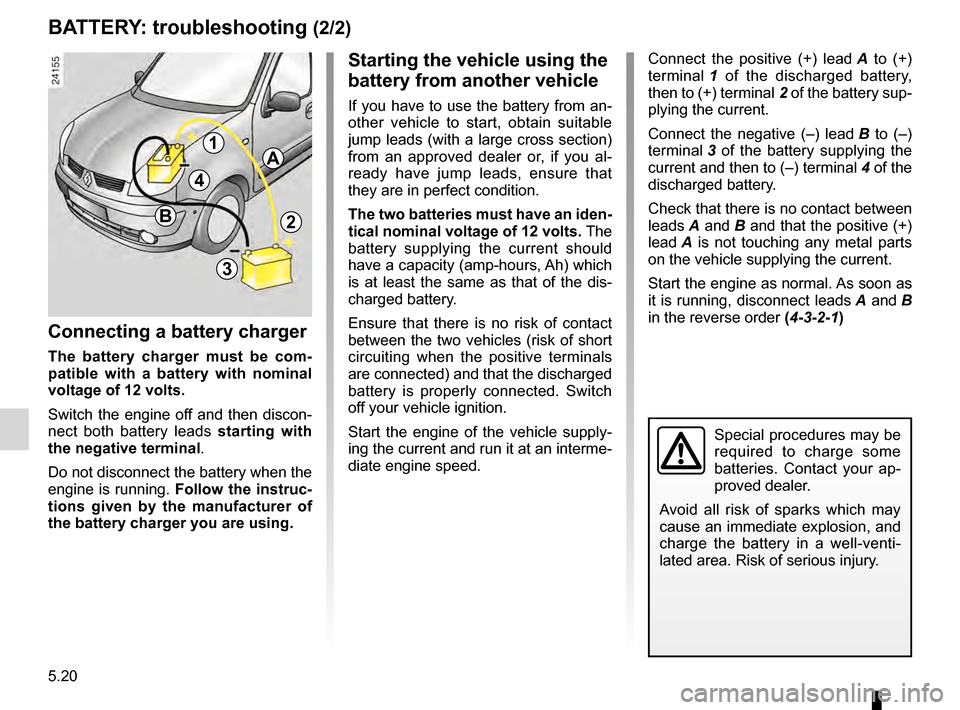
Connect the positive (+) lead A to (+)
t
erminal 1 of the discharged battery,
then
to (+) terminal 2 of the battery sup-
plying the current.
C
onnect the negative (–) lead B to (–)
t
erminal 3 of the battery supplying the
current
and then to (–) terminal 4 of the
discharged battery.
Check that there is no contact between
leads
A and B and that the positive (+)
l
ead A is not touching any metal parts
on the vehicle supplying the current.
Start the engine as normal. As soon as
it
is running, disconnect leads A and B
in the reverse order (4-3-2-1)
connecting a battery charger
the battery charger must be com-
p
atible with a battery with nominal
voltage
of 12 volts.
Switch the engine off and then discon-
nect both battery leads s
tarting with
the
negative terminal .
Do not disconnect the battery when the
engine is running. Follow
the instruc-
t
ions given by the manufacturer of
the
battery charger you are using.
starting the vehicle using the
battery
from another vehicle
If you have to use the battery from an-
other vehicle to start, obtain suitable
jump leads (with a large cross section)
from an approved dealer or, if you al-
ready have jump leads, ensure that
they are in perfect condition.
t
he two batteries must have an iden -
tical
nominal voltage of 12 volts. The
battery supplying the current should
have a capacity (amp-hours, Ah) which
is at least the same as that of the dis-
charged battery.
Ensure that there is no risk of contact
between the two vehicles (risk of short
circuiting when the positive terminals
are connected) and that the discharged
battery is properly connected. Switch
off your vehicle ignition.
Start the engine of the vehicle supply-
ing the current and run it at an interme-
diate engine speed.
Special procedures may be
required to charge some
batteries. Contact your ap-
proved dealer.
Avoid all risk of sparks which may
cause an immediate explosion, and
charge the battery in a well-venti-
lated area. Risk of serious injury.
1A
2
4
B
3
Page 133 of 173
5.21
ENG_UD7323_1
Fusibles 800-1 (X76 - Renault)
ENG_NU_854-2_X76LL_Renault_5
Fuses
Remove the fuse using tweezers 2.
To remove the fuse from the tweez-
ers, slide the fuse in the direction of the
arrow.
In accordance with local legislation
or as a precautionary measure:
Obtain an emergency kit containing
a set of spare bulbs and fuses from
your approved Dealer.
incOrrEct
cOrrEct
FusEs (1/3)
Fuse box 1
If an electrical component does not
work, check the condition of the fuses. U nclip cover
3 (under the steering
wheel).
To identify the fuses, refer to fuse allo-
c
ation label 4 (shown on the page op-
posite).
It is not advisable to use the free fuse
locations.
Check the fuse in question and replace it, if necessary, with a fuse of
the
same rating .
If a fuse is fitted where the rating is too high, it may cause the electrical
circuit to overheat (risk of fire) in the event of an item of equipment using
an excessive amount of current.
4
32
1
3
2
Page 134 of 173
5.22
ENG_UD7323_1
Fusibles 800-1 (X76 - Renault)
ENG_NU_854-2_X76LL_Renault_5
Jaune NoirNoir texte
FusEs (2/3)
Allocation of fuses (the presence of the fuses DEPE nDs On thE VEhiclE’s EQuiPmEnt lEVEl)
symbol Allocation
a
Instrument panel/
Electric door mirrors/
Radio/Car phone
ZCourtesy light/Luggage
compartment light
öConsumer cut-out
ÝTowing equipment
Î
Diagnostic socket/
Dipped headlights/
Alarm
CHeated rear screen
symbol Allocation
hElectric windows/
General supply
ñHeated seats
mNot used
xAir conditioning
îRadio/Car phone
xHeating
symbol Allocation
M
Electric locking/
Immobiliser/General
supply
GFront fog lights
kRear screen washer/
wiper/Reversing lights
fFront wiper/Rear wiper
ß
Brake lights/Instrument
panel/Air bag/
Pretensioners/Speed
limiter
nAnti-lock Braking System
(ABS)
Page 135 of 173
JauneNoirNoir texte
5.23
ENG_UD7323_1
Fusibles 800-1 (X76 - Renault)
ENG_NU_854-2_X76LL_Renault_5
FusEs (3/3)
Allocation of fuses (the presence of the fuses DEPEnDs On thE VEhiclE’s EQuiPmEnt lEVEl)
symbol Allocation
ÆCigar lighter/accessories
socket
Q
Left-hand main beam
headlight/Instrument
panel
PRight-hand main beam
headlight
L
Left-hand dipped beam
headlight/Headlight
beam adjustment.
T
Right-hand dipped beam
headlight/Instrument
panel
Y
Left-hand side light/
Instrument panel/
Instrument lighting/Speed
limiter.
symbol Allocation
VRight-hand side light/
Instrument lighting
FRear fog light/
Instrument panel
DFlasher unit
ÌHorn
ëAccessories socket
gElectric door mirrors
symbol Allocation
ÄLPG
ûNot used
qAlarm/General supply
}Not used
SNot used
ôMain power supply
Page 136 of 173

wiper blades ......................................... (up to the end of the DU)
practical advice ..................................... (up to the end of the DU)
windscreen washer/wiper replacing blades .............................. (up to the end of the DU)
5.24
ENG_UD7324_1
Balais d essuie-vitres (X76 - Renault)
ENG_NU_854-2_X76LL_Renault_5
Jaune NoirNoir texte
Wiper blades
replacing windscreen wiper
blades 1
Lift wiper arm 3.
Turn the wiper blade until it is horizon-
tal.
P
ress tab 2 and slide the wiper blade
downwards
to release hook 4 from the
wiper arm.
Slide the blade (A) then lift it ( B) to re-
lease it.
WinDscrEEn WiPEr BlADEs (1/2)
B
A
12
3
4
56
7
refitting a front or rear wiper
blade
Proceed in reverse order. Make sure
that the blade is correctly locked in po-
sition.
replacing the rear screen
wiper
blade (hinged door)
Lift wiper arm 6.
P
ress tab 5 and slide the wiper blade
downwards to release hook
7.
Check the condition of the wiper
blades. You are responsible for their
service life:
–
clean the blades, windscreen and
rear screen regularly with soapy
water;
–
do not use them when the wind -
screen or rear screen are dry;
–
free them from the windscreen or
rear screen when they have not
been used for a long time.