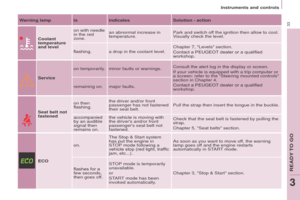
Page 49 of 296

Instruments and controls
47
SeRVICe INDICAto R
This programmes service intervals
according to the use of the vehicle. More than 1 000 miles/km before the
next service is duee
xample: 4 800 miles/km remain
before the next service is due. When
the ignition is switched on and for a
few seconds, the screen shows:
A few seconds after the ignition is
switched on, the oil level is displayed
(depending on version), then the total
distance recorder resumes normal
operation showing the total and trip
distances.
Less than 1 000 miles/km before the
next service is due
each time the ignition is switched on and for a
few seconds, the spanner flashes and the number
of miles/kilometres remaining is displayed:
A few seconds after the ignition is
switched on, the oil level is displayed
(depending on version), then the total
distance recorder resumes normal
operation and the spanner remains on.
This indicates that a service should be
carried out shortly.
Service overdue
o
peration
A few moments after the ignition
has been switched on, the spanner
indicating a service operation comes
on; the display for the total distance
recorder gives (in round figures) the
distance remaining before the next
service.
The points at which a service is due
are calculated from the last indicator
zero reset.
The point at which a service is due is
determined by two parameters:
-
the distance travelled,
-
the time which has elapsed since
the last service. The distance remaining before the
next service may be weighted by
the time factor
, depending on the
type of driving. With the engine running the spanner
remains on until the service has been
carried out.
For BlueHDi Diesel versions, this
alert is also accompanied by the fixed
illumination of the Service warning
lamp, on switching on the ignition.
e
ach time the ignition
is switched on and for a
few
seconds, the spanner
flashes and the excess
distance is displayed.
For BlueHDi Diesel versions, the
spanner can also come on early,
according the level of deterioration
of the engine oil. Deterioration of the
engine oil depends on the conditions of
use of the vehicle.
ReADY to go
3
Page 50 of 296

Instruments and controls
48
trip recorder zero reset button
After this operation, if you wish to
disconnect the battery, lock the
vehicle and wait for at least five
minutes, otherwise the zero re-set will
not be registered.
engine oil level indicator
Depending on your vehicle's engine,
when the ignition is switched on,
the engine oil level is indicated for
a few
seconds, after the service
information.
o
il level correct
Low oil level
Flashing of " o IL",
linked with the
service warning lamp,
accompanied by an
audible signal and a message in the
screen, indicates a low oil level which
could damage the engine.
If the low oil level is confirmed by a
check using the dipstick, it is essential
that the level is topped up.
o
il level gauge fault
Flashing of " o IL--"
indicates a
malfunction of the
engine oil level
indicator. Contact a P eugeo T dealer
or a qualified workshop.
The level read will only be correct
if the vehicle is on level ground
and the engine has been off for
more than 30 minutes. Dipstick
A = maximum, never exceed
this level as a surplus of oil
may damage the engine.
Contact a P
eugeo T dealer
or a qualified workshop
without delay.
B = minimum, top up the level
via the oil filler cap, using the
grade of oil suited to your
engine.
Lighting dimmer
With the ignition on, press
the button until the zeros
appear.
With the lighting on,
press the button to vary
the brightness of the
instruments and controls.
When the lighting
reaches the minimum (or
maximum) setting, release the button
then press it again to increase (or
reduce) the brightness.
As soon as the lighting is of the
required brightness, release the button.
Zero reset
Your PEUGEOT dealer or a qualified
workshop carries out this operation
after each service.
However, if you carry out the service
yourself, the re-set procedure is as
follows:
-
switch of
f the ignition,
-
press and hold the trip recorder
reset button,
-
switch on the ignition.
The display begins a countdown.
When the display shows
"=0", release
the button; the spanner disappears.
Page 51 of 296

49
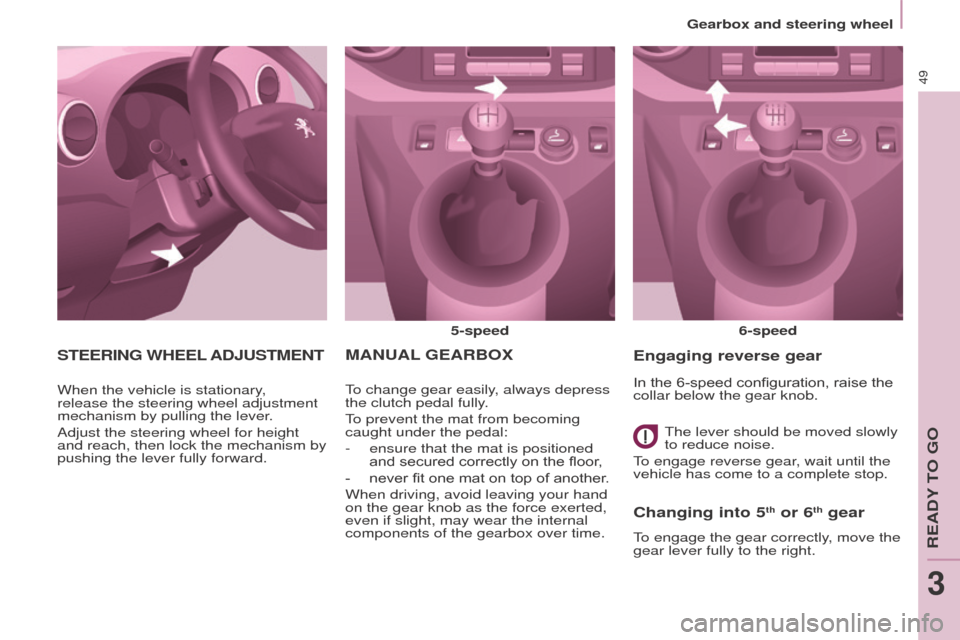
MANuAL geARB ox
5-speed
6-speed
To change gear easily, always depress
the clutch pedal fully.
To prevent the mat from becoming
caught under the pedal:
-
ensure that the mat is positioned
and secured correctly on the floor
,
-
never fit one mat on top of another
.
When driving, avoid leaving your hand
on the gear knob as the force exerted,
even if slight, may wear the internal
components of the gearbox over time.
Changing into 5th or 6th gear
To engage the gear correctly, move the
gear lever fully to the right.
engaging reverse gear
The lever should be moved slowly
to reduce noise.
To engage reverse gear, wait until the
vehicle has come to a complete stop.
SteeRINg WH ee L ADJ u S t M e N t
When the vehicle is stationary,
release the steering wheel adjustment
mechanism by pulling the lever.
Adjust the steering wheel for height
and reach, then lock the mechanism by
pushing the lever fully forward. In the 6-speed configuration, raise the
collar below the gear knob.
gearbox and steering wheel
ReADY To go
3
Page 52 of 296

50
The information appears in
the instrument panel in the
form of an arrow.
The system adapts its gear
change recommendation
according to the driving conditions
(slope, load, ...) and the demands
of the driver (power, acceleration,
braking, ...).
The system never suggests:
-
engaging first gear
,
-
engaging reverse gear
.
With an electronic gearbox, the system
is only active in manual mode.
geAR SHIFt INDICAt o R
System which reduces fuel
consumption by recommending the
most appropriate gear.
operation
Depending on the driving situation and
your vehicle's equipment, the system
may advise you to skip one (or more)
gear(s). You can follow this instruction
without engaging the intermediate
gears.
The gear engagement
recommendations must not be
considered compulsory. In fact, the
configuration of the road, the amount
of traffic and safety remain determining
factors when choosing the best
gear. Therefore, the driver remains
responsible for deciding whether or
not to follow the advice given by the
system.
This function cannot be deactivated.
gearbox and steering wheel
Page 53 of 296

51
6-SPeeD eLeCtRoNIC geARBox
- automatic mode: gear selector in
position A.
-
manual mode: gear selector in
position
M.
For safety:
It is only possible to come out
of position N if the brake pedal is
pressed.
The change from position A (driving in
automatic mode) to position M (driving
in manual mode) or vice versa can be
made at any time. The warning lamp A
goes off in the instrument panel.
Mode selection Moving off
- To start the engine, the gear
selector must be in position N.
-
Press firmly on the brake pedal.
-
o perate the starter.
-
When the engine is running, place
the gear selector on
R, A or M as
desired.
-
Release the brake pedal and
accelerate.
If the gear selector is not in position
N,
and/or if the brake pedal is not
pressed, the engine will not start.
Repeat the above procedure.
Reverse gear
e
ngaging reverse gear
Move the gear selector to R.
o
nly attempt to select reverse gear
when the vehicle is stationary.
Neutral
Changing to neutral
Move the gear selector to N. If the
vehicle is moving, do not select this
position even momentarily.
gearbox and steering wheel
ReADY To go
3
Page 54 of 296

52
Acceleration
For optimum acceleration (e.g. to
overtake another vehicle), simply
press the pedal beyond the point of
resistance at the end of its travel, by
pressing down firmly.
Vehicle stationary, with the
engine running
In the event of a prolonged stop with
the engine running, the gearbox
changes automatically to neutral N.
Stopping the vehicle
Before stopping the engine, put the
gear selector in position N.
In all cases, it is essential to apply
the parking brake. Check that the
parking brake warning lamp is on in the
instrument panel.Before doing anything in the
engine compartment, check that
the gear selector is in neutral N.
Changing gear
In situations of high engine speeds
(heavy acceleration), a change
up will not occur unless the driver
operates the electronic gearbox control
paddle. Pull on the "+" control
paddle to change up.
Pull on the "-" control
paddle to change
down.
-
If the vehicle stops or reduces
speed (for example when
approaching a stop sign),
the gearbox changes down
automatically
, to first gear if
needed.
-
It is not necessary to release the
accelerator completely during gear
changes.
-
A
gear change instruction is
accepted only if the engine speed
permits.
-
For safety reasons, depending on
the engine speed, a change down
may be performed automatically
.
Manual mode
Changing to manual mode
Move the gear selector to M. Automatic mode Changing to automatic
mode
Move the gear selector to A.
The gearbox then operates in
automatic mode, without any action on
your part.
It constantly selects the gear that is
best suited to the following conditions:
-
driving style,
-
road profile,
-
optimum fuel consumption.
gearbox and steering wheel
Page 55 of 296

53
StoP & StARt
The Stop & Start system puts the
engine temporarily on standby - STo P
mode - during stops in the traffic (red
lights, traffic jams, or other...). The
engine restarts automatically - START
mode - as soon as you want to move
off. The restart takes place instantly,
quickly and silently.
Perfect for urban use, the Stop & Start
system reduces fuel consumption and
exhaust emissions as well as the noise
level when stationary.
operation
going into engine StoP mode
The " e C o " warning lamp
comes on in the instrument
panel and the engine goes
into standby:
-
with a manual gearbox
, at speeds
below 12 mph (20 km/h), when you
put the gear lever into neutral and
release the clutch pedal,
-
with
a 6-speed electronic
gearbox, at speeds below 5 mph
(8 km/h), when you press the brake
pedal or put the gear lever into
position N. If your vehicle is fitted with the system,
a time counter calculates the sum of
the periods in ST
o
P mode during a
journey. It rests itself to zero every time
the ignition is switched on with the key.
With a 6-speed electronic
gearbox, for your comfort during
parking manoeuvres, ST
o
P mode
is not available for a few seconds after
coming out of reverse gear.
ST
o
P mode does not affect the
functionality of the vehicle, such as
braking, power steering, for example.
Never refuel with the engine in
ST
o
P mode; you must switch off
the ignition with the key. Special cases: S to P mode
unavailable
ST
o
P mode is not invoked when:
-
the driver's door is open,
-
the driver's seat belt is not
fastened,
-
the vehicle has not exceeded
6
mph (10 km/h) since the last
engine start using the key,
-
the engine is needed to maintain
a comfortable temperature in the
passenger compartment,
-
demisting is on,
-
some special conditions (battery
charge, engine temperature,
braking assistance, ambient
temperature...) where the engine
is needed to assure control of a
system.
In this case, the
" e C o "
warning lamp flashes for a
few seconds, then goes off.
t
his operation is perfectly normal.
Stop & Start
ReADY To go
3
Page 56 of 296

54
going into engine StARt mode
The " e C o " warning lamp
goes off and the engine
starts:
-
with a manual gearbox
, when you
fully depress the clutch pedal,
-
with
a 6-speed electronic
gearbox:
●
gear lever in position
A or M,
when you release the brake
pedal,
●
or gear lever in position
N and
the brake pedal released, when
you move the gear lever to
position A or M,
●
or when you engage reverse
gear
.
With a manual gearbox in ST
o
P
mode, if a gear is engaged without
fully depressing the clutch pedal, a
warning lamp comes on or a message
is displayed asking you to depress the
clutch pedal to restart the engine. Special cases: S
tAR t invoked
automatically
For your safety and comfort, START is
invoked automatically when:
-
you open the driver's door
,
-
you unfasten the driver's seat belt,
-
the speed of the vehicle exceeds
15 mph (25 km/h) with a manual
gearbox or 7 mph (1
1 km/h) with
the 6-speed electronic gearbox
system,
-
some special conditions (battery
charge, engine temperature,
braking assistance, ambient
temperature...) where the engine
is needed to assure control of a
system.In this case the
" e C o "
warning lamp flashes for
few
seconds, then goes off.
t
his operation is perfectly normal.
Deactivation
At any time, press the "eCo oFF" switch to deactivate the
system.
This is confirmed by the switch warning
lamp coming on accompanied by a
message in the screen.
If the system has been deactivated
in ST
o
P mode, the engine restarts
immediately.
Reactivation
Press the "eCo oFF" switch again.
The system is active again; this is
confirmed by the switch warning
lamp going of
f and a message in the
instrument panel.
The system is reactivated
automatically at every new start
using the key.
operating fault
In the event of a malfunction
with the system, the " e C o
o
FF" switch warning lamp
flashes, then comes on
continuously.
Have it checked by a P
eugeo T
dealer or a qualified workshop.
In the event of a fault in ST
o
P mode,
the vehicle may stall. All of the warning
lamps in the instrument panel come
on. It is then necessary to switch off
the ignition and start the engine again
using the key.
Stop & Start