Page 145 of 296

143
ISoFIx MouNtINgS
Your vehicle has been approved in
accordance with the latest ISo FIX regulation.
The mountings comprise three rings for
each seat.
Two front rings A, located between
the vehicle seat backrest and cushion,
indicated by a marking. A rear ring B, located on the back
of the vehicle's seat backrest, for
securing the upper strap referred to as
the Top Tether.
The Top Tether is used to secure the
upper strap of child seats that have
one. This arrangement limits the
forward tipping of the child seat in the
event of a frontal impact.
This IS
o FIX mounting system
guarantees you fast, reliable and safe
fitting of the child seat in your vehicle.
The ISOFIX child seats are fitted with
two latches which are secured on the
two front rings A.
Some also have an upper strap which
is attached to the rear ring B. Follow strictly the instructions for
fitting child seats contained in the
manufacturer's installation guide.
To secure the child seat to the Top
Tether:
-
remove and stow the head restraint
before installin
g the child seat in
this seating position (refit it once
the child seat has been removed),
-
pass the upper strap of the child
seat over the top of the seat
backrest, between the apertures for
the head restraint rods,
-
secure the hook on the upper strap
to the rear ring,
-
tighten the upper strap.
The incorrect installation of a child
seat in a vehicle compromises the
protection of the child in the event
of an accident.
Refer to the table for information on
the installation of IS
o FIX child seats in
your vehicle.
5
SAFeTY
Child safety
Page 146 of 296
144
This child seat can also be used on seats which are not fitted with ISOFIX
mountings.
In this case, it must be attached to the vehicle seat using the three po\
int seat
belt.
Follow the instructions for fitting the child seat given in the seat
manufacturer's installation guide.
Recommended ISoFIx seat
"ISoFIx RÖMeR Duo plus"
(size category B1)
g
roup 1: from 9 to 18 kg
Installed only in the forward facing position. Secured to rings A, as well as ring B,
called the Top Tether, using an upper strap.
Three seat body angles: sitting, reclining, lying.
Child safety
Page 147 of 296

145
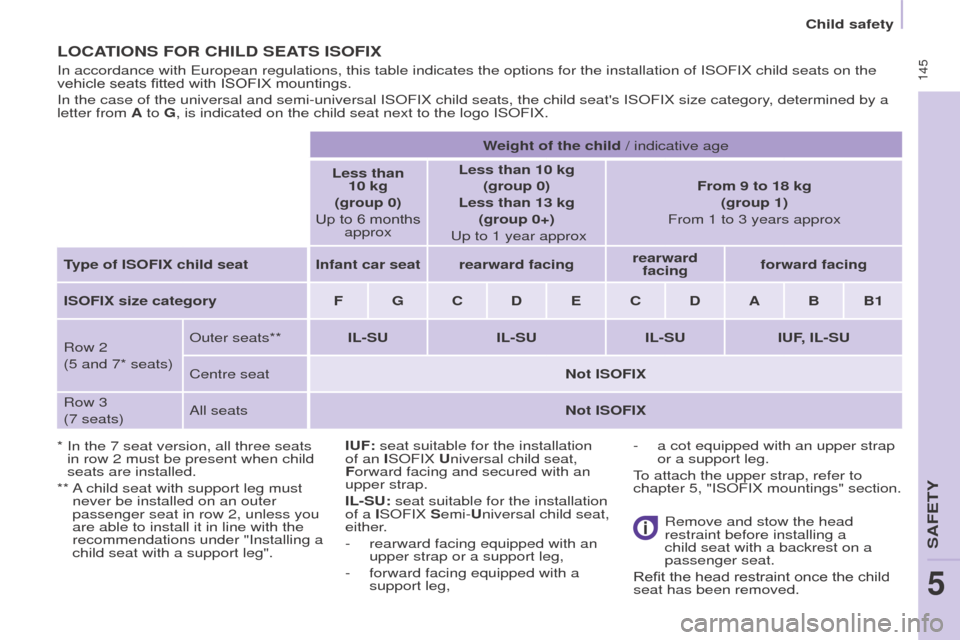
LoCAtI o NS F o R CHILD S e At S IS o FI x
* In the 7 seat version, all three seats
in row 2 must be present when child
seats are installed.
**
A
child seat with support leg must
never be installed on an outer
passenger seat in row 2, unless you
are able to install it in line with the
recommendations under "Installing a
child seat with a support leg".
In accordance with
e uropean regulations, this table indicates the options for the installati\
on of IS o FIX child seats on the
vehicle seats fitted with ISOFIX mountings.
In the case of the universal and semi-universal IS o FIX child seats, the child seat's IS o FIX size category, determined by a
letter from A to g , is indicated on the child seat next to the logo IS o FIX.
Weight of the child / indicative age
Less than 10 kg
(group 0)
Up to 6 months approx Less than 10 kg
(group 0)
Less than 13 kg (group 0+)
u p to 1 year approx
From 9 to 18 kg
(group 1)
From 1 to 3 years approx
type of
IS o FI x child seat Infant car seat rearward facing
rearward
facing forward facing
IS o FI x size category
F
gC DeC D A B B1
Row 2
(5 and 7* seats)
o
uter seats**
IL-S u
IL-S
u
IL-S
u
I
u F, IL-S u
Centre seat
Not IS
o FI x
Row 3
(7 seats)
All seats
Not
IS o FI xI
u F: seat suitable for the installation
of an IS o FIX u niversal child seat,
Forward facing and secured with an
upper strap.
IL-S
u : seat suitable for the installation
of a IS
o FIX Semi- u niversal child seat,
either.
-
rearward facing equipped with an
upper strap or a support leg,
-
forward facing equipped with a
support leg, Remove and stow the head
restraint before installin
g a
child seat with a backrest on a
passenger seat.
Refit the head restraint once the child
seat has been removed.
-
a cot equipped with an upper strap
or a support leg.
T
o attach the upper strap, refer to
chapter 5, "IS
o FIX mountings" section.
5
SAFeTY
Child safety
Page 148 of 296

146
ADVICe oN CHILD SeAtS
At the rear, always leave sufficient
space between the front seat and:
-
a rearward facing child seat,
-
the feet of a child seated in a
forward facing child seat.
For this, move the front seat forward
and, if necessary
, straighten its
backrest as well. The incorrect installation of a child seat
in a vehicle compromises the child's
protection in the event of an accident.
Check that there is no seat belt or seat
belt buckle under the child seat, as this
could destabilise the seat.
Remember to fasten the seat belts or
the child seat harnesses keeping the
slack relative to the child's body to a
minimum, even for short journeys.
For the installation of a child seat using
the seat belt, ensure that the seat belt
is well tensioned on the child seat
and that it is holding the child seat
firmly against the vehicle's seat. If the
passenger seat is adjustable, move it
forward if necessary. For the optimum installation of a
forward facing child seat, ensure that
the back of the child seat is as close as
possible to the backrest of the vehicle's
seat, or in contact if possible.
The head restraint must be removed
before installing a child seat with a
backrest on the passenger seat.
e
nsure that the head restraint is
stowed or attached securely so that it
is not thrown around the vehicle in the
event of sharp braking.
Refit the head restraint as soon as the
child seat is removed.Children at the front
The legislation on carrying a child on
the front passenger seat is specific to
each country. Refer to the legislation in
force in your country.
Deactivate the passenger's airbag
when a rearward facing child seat is
installed on the front seat.
o
therwise, the child would risk being
seriously injured or killed if the airbag
were deployed.
Installing a booster seat
The chest part of the seat belt must
be positioned on the child's shoulder
without touching the neck.
e
nsure that the lap part of the seat belt
passes correctly over the child's thighs.
P
eugeo T recommends the use of a
booster seat which has a back, fitted
with a seat belt guide at shoulder level.
As a safety precaution, never leave:
-
one or more children alone and
unsupervised in a vehicle,
-
a child or an animal in a vehicle
which is exposed to the sun, with
the windows closed,
-
the keys within reach of children
inside the vehicle.
T
o prevent accidental opening of the
doors, use the "Child Lock".
Take care not to open the rear windows
by more than one third.
To protect young children from the rays
of the sun, fit side blinds to the rear
windows.
For an installation in row 3, put the
backrests of the outer and centre
seats in row 2 in the table position, or
remove these seats in row 2, so that
the child seat or the child's legs do not
touch the seats in row 2.
Child safety
Page 149 of 296
147
CHILD LoCK
This prevents opening of the siding
side doors from the inside.
Manual
e
lectric
With the ignition on, press
this button in the middle of
the dashboard.
Indicator lamp on = child lock
on.
Please note: this system is
independent of the central locking
control.
Always remove the ignition key
when leaving the vehicle, even for
a short time.
It is advisable to check the state of
the child lock each time the ignition is
switched on.
In the event of a serious impact the
electric child lock is deactivated
automatically.
A label indicates the position of the
lever and the state of the child lock.
-
o
pen fully past the point of
resistance.
-
T
ilt the lever, located on the rear
section of the door.
5
SAFeTY
Child safety
Page 150 of 296
148
towing a trailerFor more information about
weights and towed loads, refer to
chapter 9, "W
eights" section.
toWIN g A t RAIL e R , A CARA VAN ...
Distribution of loads
Distribute the load in the trailer so
that the heaviest objects are as
close as possible to the axle and
the nose weight is close to the
maximum authorised without, however,
exceeding it.
Cooling
Towing a trailer on a slope increases
the coolant temperature. As the fan is electrically controlled, its
cooling capacity is not dependent on
the engine speed.
You should therefore use a high gear
to lower the engine speed and reduce
your speed.
In all cases, pay attention to the
coolant temperature.
Driving advice
A towed vehicle must free wheel:
gearbox in neutral.
Page 151 of 296

149
towing a trailer
good Practice
In certain cases of particularly arduous
use (towing the maximum load up a
steep slope in high temperatures), the
engine automatically limits its power.
In this case, the air conditioning is
automatically cut off to save engine
power.
tyres
Check the tyre pressures of the towing
vehicle and of the trailer
, observing the
recommended pressures. Chapter 7, "Levels" section.If the coolant temperature
warning lamp comes on, stop
the vehicle and switch off the
engine as soon as possible. Brakes
Towing increases the braking distance.
Drive at a moderate speed, change
down early and brake gradually.
towbar
We recommend the use of genuine
P
eugeo T towbars and their wiring
harnesses, which have been tested
and approved from the design stage of
your vehicle, and that you entrust the
fitting of this equipment to a PEUGEOT
dealer.
If this equipment is not fitted by a
P
eugeo T dealer, it is imperative that
it is fitted using the electrical pre-
equipment installed at the rear of the
vehicle and in accordance with the
manufacturer's instructions.
In accordance with the general
instructions a reminder of which has
been given above, we draw your
attention to the risk associated with
fitting a towbar or electrical accessory
not recommended by P
eugeo T.
Fitting such equipment could result in
the failure of your vehicle's electronic
system. Please obtain information from
the Manufacturer before fitting this type
of equipment.
Side wind
Sensitivity to side wind is increased.
Drive smoothly and at a moderate
speed.
ABS/DSC
The ABS or DSC systems only control
the vehicle, not the trailer or caravan.
Parking sensors
The rear parking sensors system does
not function while the vehicle is towing.
Chapter 9, "Identification
markings" section.
ACCeSSoRIeS
6
Page 152 of 296
150
towing a trailer
toWBAR WI t H SWAN N e CK to WBALL ,
L
o CKABL e AND
Q
u ICKLY
D
et
ACHABL
e
Presentation
This swan neck towbar, delivered
assembled, can be removed and fitted
easily. No tools are needed.
Instructions for fitting and before
every use
Check that the swan neck is correctly
locked by verifying the following points:
-
the green mark on the locking
wheel is visible,
-
the safety lock on the locking wheel
is directed toward the rear
,
-
the safety lock is closed and the
key removed; the locking wheel can
no longer be operated,
-
the swan neck must no longer
move at all in its carrier
.
When hooking up the trailer, don't
forget to connect the trailer harness.
Fitting