2016 NISSAN NOTE belt
[x] Cancel search: beltPage 3126 of 3641

SR-10
< BASIC INSPECTION >
COLLISION DIAGNOSIS
Diagnosis sensor unitIf none of the SRS components have been activated:
1. Check case and bracket for dents, cracks or deformities.
2. Check connectors for damage, and terminals for deformities.
3. If no damage is found, reinstall the diagnosis sensor unit with new fasteners.
4. If damaged — REPLACE the diagnosis sensor unit with new fasteners.
Seat belt pre-tensioner assem-
blies
(All applicable locations: buckle,
retractor, lap outer) If the pre-tensioners have NOT been activated:
1. Remove seat belt pre-tensioners.
Check harness cover and connectors for damage, terminals for deformities, and harness for
binding.
2. Check belts for damage and anchors for loose mounting.
3. Check retractor for smooth operation.
4. Check seat belt adjuster for damage.
5. Check for deformities of the center pillar inner.
6. If no damage is found, reinstall seat belt pre-tensioner assembly with new fasteners.
7. If damaged —REPLACE. Install the seat belt pre-tensioner assembly with new fasteners.
Seat (with front side air bag) If the front LH or front RH side air bag modules have NOT deployed: 1. Visually check the seat on the collision side.
2. Remove the seat on the collision side and check the following for damage and deformities.
- Harness, connectors and terminals
- Frame and recliner (for front and rear seat), and also adjuster and slides (for front seat)
3. If no damage is found, reinstall the seat.
4. If damaged— REPLACE the damaged seat parts using new fasteners. If the front seat back is damaged, the front seat back assembly must be replaced.
Center inner pillar 1. Check the center inner pillar on the collision side for damage (dents, cracks, deformation,
etc.).
2. If damaged - REPAIR the center inner pillar.
Trim/headlining 1. Check for visible signs of damage (dents, cracks, deformation, etc.) of the interior trim on the
collision side.
2. If damaged - REPLACE the damaged trim parts.
Door-mounted curtain air bag
module LH If the door-mounted curtain air bag LH has NOT deployed:
1. Check for visible signs of damage (dents, tears, deformation, etc.) of the door finisher on the
collision side.
2. If damaged - REPLACE the door finisher LH with new fasteners.
3. Check for visible signs of damage (tears etc.) of the door-mounted curtain air bag module LH.
4. Check harness and connectors for damage, and terminals for deformities.
5. If no damage is found, reinstall door finisher. CAUTION:
When removing door mounted curtain air bag module from door finisher, do not reuse
door finisher.
6. If damaged - REPLACE the door finisher LH and door-mounted curtain air bag module LH with new fasteners.
Door-mounted curtain air bag
module RH If the door-mounted curtain air bag RH has NOT deployed:
1. Check for visible signs of damage (dents, tears, deformation, etc.) of the door finisher on the
collision side.
2. If damaged - REPLACE the door finisher RH with new fasteners.
3. Check for visible signs of damage (tears etc.) of the door-mounted curtain air bag module RH.
4. Check harness and connectors for damage, and terminals for deformities.
5. If no damage is found, reinstall door finisher.
CAUTION:
When removing door mounted curtain air bag module from door finisher, do not reuse
door finisher.
6. If damaged - REPLACE the door finisher RH and door-mounted curtain air bag module RH with new fasteners.
Part
Inspection
Revision: August 2015 2016 Versa Note
cardiagn.com
Page 3140 of 3641

SR-24
< REMOVAL AND INSTALLATION >
CRASH ZONE SENSOR
CRASH ZONE SENSOR
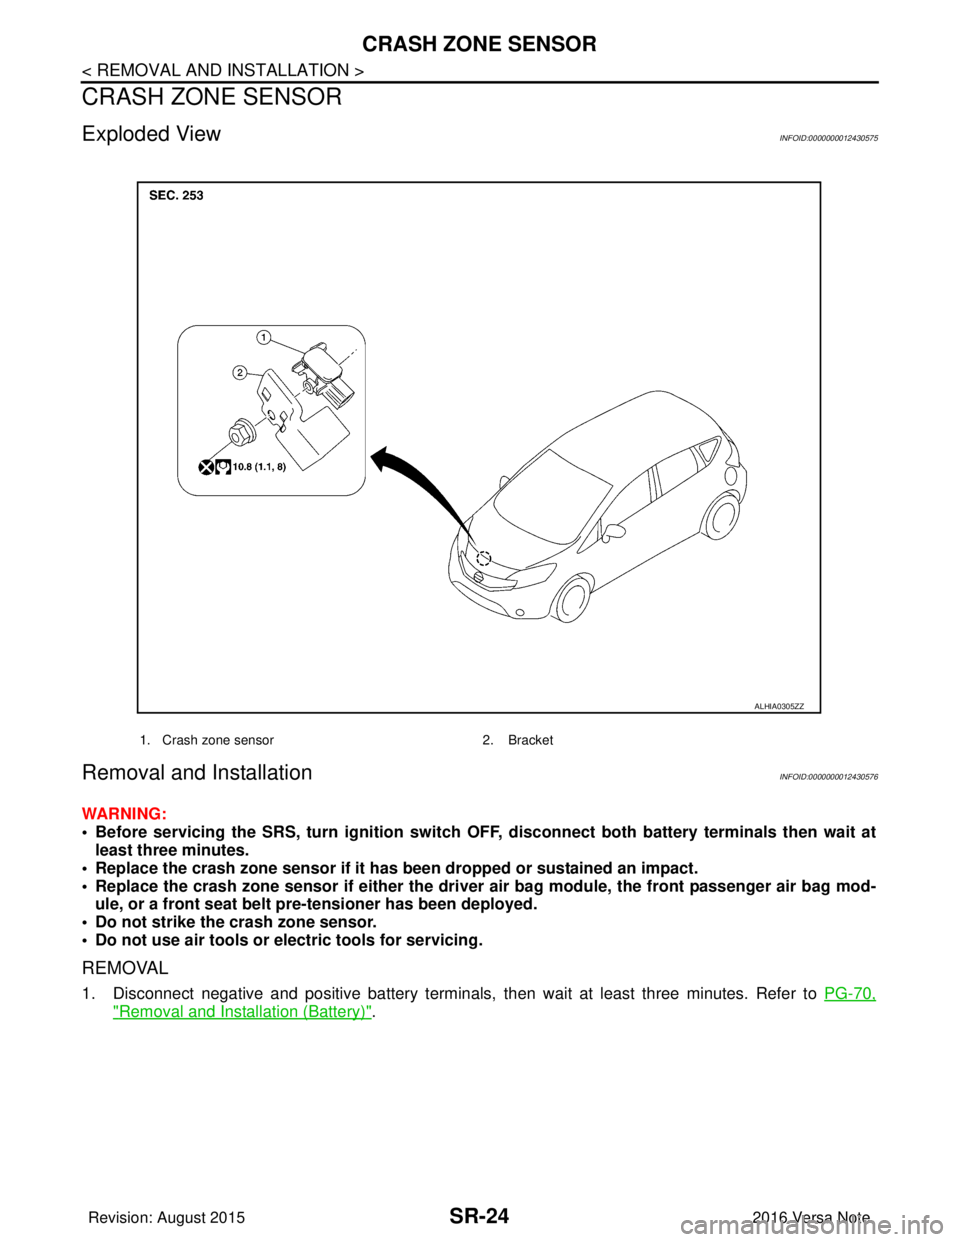
Exploded ViewINFOID:0000000012430575
Removal and InstallationINFOID:0000000012430576
WARNING:
• Before servicing the SRS, turn ignition switch OFF, disconnect bot h battery terminals then wait at
least three minutes.
• Replace the crash zone sensor if it has been dropped or sustained an impact.
• Replace the crash zone sensor if either the driver air bag module, the front passenger air bag mod- ule, or a front seat belt pre-tensioner has been deployed.
• Do not strike the crash zone sensor.
• Do not use air tools or el ectric tools for servicing.
REMOVAL
1. Disconnect negative and positive battery terminals, then wait at least three minutes. Refer to PG-70,
"Removal and Installation (Battery)".
1. Crash zone sensor 2. Bracket
ALHIA0305ZZ
Revision: August 2015 2016 Versa Note
cardiagn.com
Page 3146 of 3641

SR-30
< REMOVAL AND INSTALLATION >
AIR BAG DIAGNOSIS SENSOR UNIT
AIR BAG DIAGNOSIS SENSOR UNIT
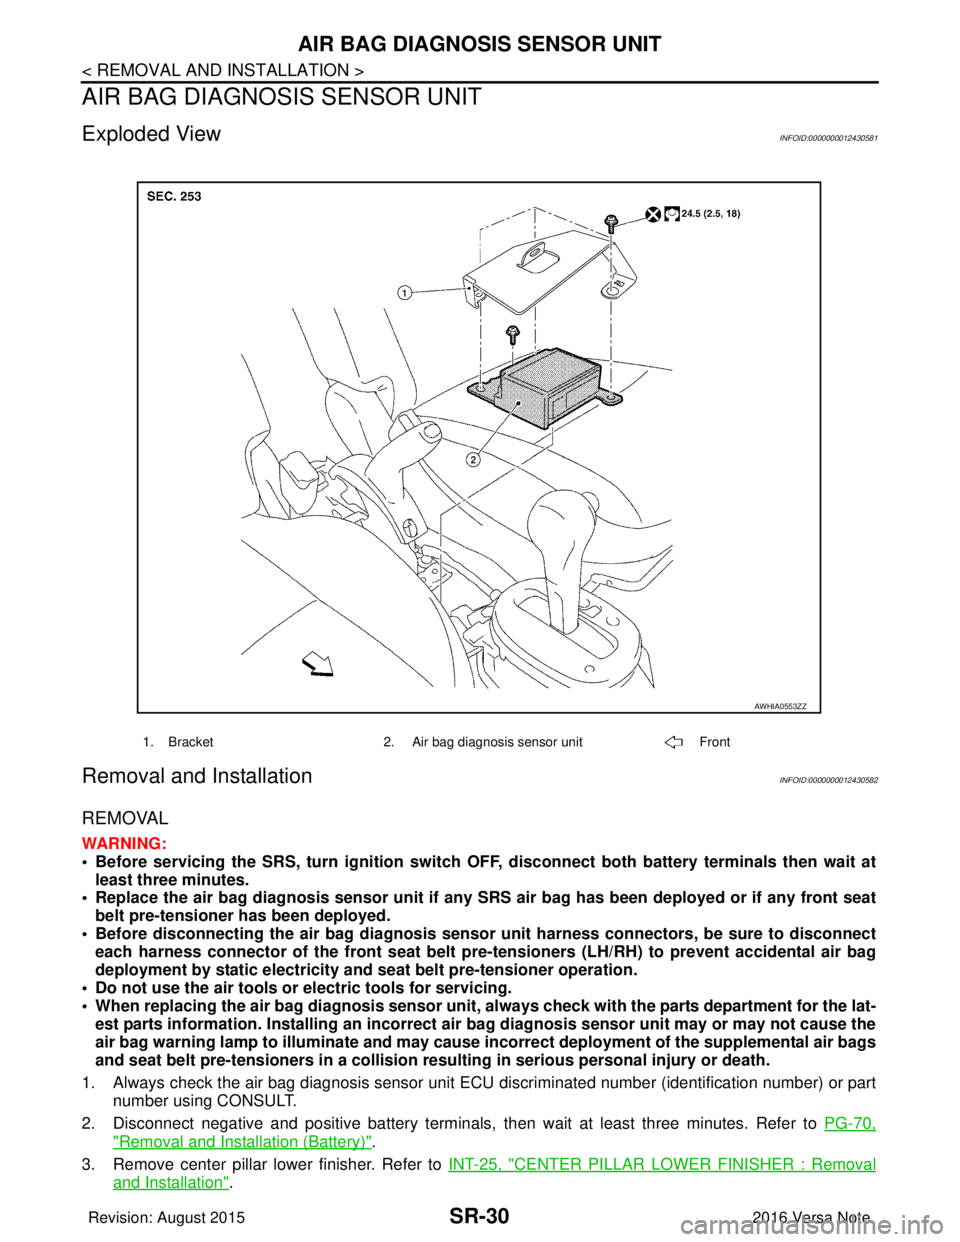
Exploded ViewINFOID:0000000012430581
Removal and InstallationINFOID:0000000012430582
REMOVAL
WARNING:
• Before servicing the SRS, turn ignition switch OFF, disconnect bot h battery terminals then wait at
least three minutes.
• Replace the air bag diagnosis senso r unit if any SRS air bag has been deployed or if any front seat
belt pre-tensioner has been deployed.
• Before disconnecting the air bag diagnosis sensor unit harness conn ectors, be sure to disconnect
each harness connector of the front seat belt pre-tensioners (LH/RH) to prevent accidental air bag
deployment by static electricity and seat belt pre-tensioner operation.
• Do not use the air tools or electric tools for servicing.
• When replacing the air bag diagno sis sensor unit, always check with th e parts department for the lat-
est parts information. Installing an incorrect air bag diagnosis sen sor unit may or may not cause the
air bag warning lamp to illuminate and may cause in correct deployment of the supplemental air bags
and seat belt pre-tensioners in a collision resulting in serious personal injury or death.
1. Always check the air bag diagnosis sensor unit ECU discriminated number (identification number) or part
number using CONSULT.
2. Disconnect negative and positive battery terminals, then wait at least three minutes. Refer to PG-70,
"Removal and Installation (Battery)".
3. Remove center pillar lower finisher. Refer to INT-25, "
CENTER PILLAR LOWER FINISHER : Removal
and Installation".
1. Bracket2. Air bag diagnosis sensor unit Front
AWHIA0553ZZ
Revision: August 2015 2016 Versa Note
cardiagn.com
Page 3147 of 3641

AIR BAG DIAGNOSIS SENSOR UNITSR-31
< REMOVAL AND INSTALLATION >
C
DE
F
G
I
J
K L
M A
B
SR
N
O P
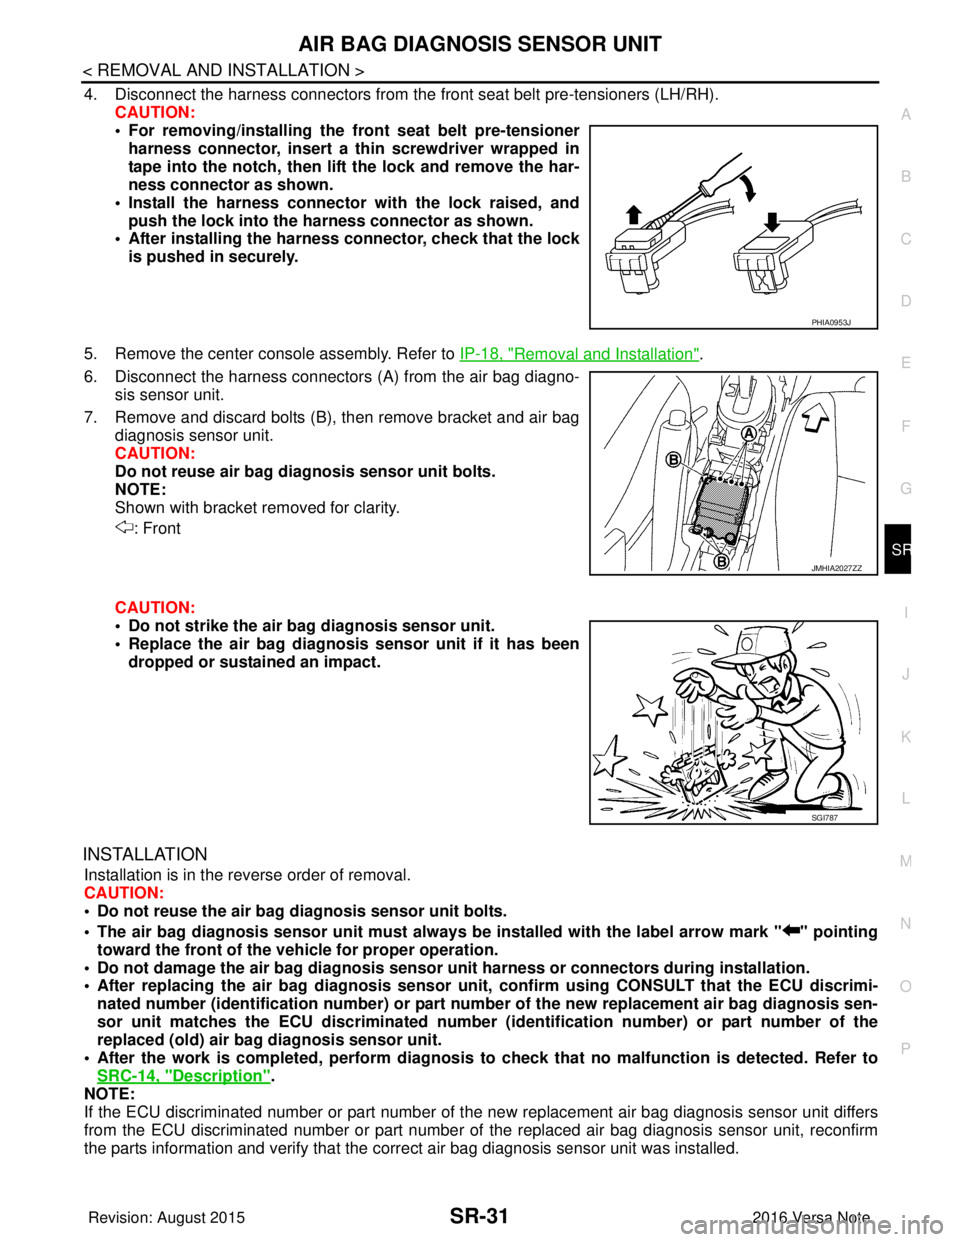
4. Disconnect the harness connectors from the front seat belt pre-tensioners (LH/RH).
CAUTION:
• For removing/installing the front seat belt pre-tensioner
harness connector, insert a thin screwdriver wrapped in
tape into the notch, then lift the lock and remove the har-
ness connector as shown.
• Install the harness connector with the lock raised, and push the lock into the harness connector as shown.
• After installing the harness connector, check that the lock
is pushed in securely.
5. Remove the center console assembly. Refer to IP-18, "
Removal and Installation".
6. Disconnect the harness connectors (A) from the air bag diagno-
sis sensor unit.
7. Remove and discard bolts (B), then remove bracket and air bag diagnosis sensor unit.
CAUTION:
Do not reuse air bag diagnosis sensor unit bolts.
NOTE:
Shown with bracket removed for clarity.
: Front
CAUTION:
• Do not strike the air ba g diagnosis sensor unit.
• Replace the air bag diagnosis sensor unit if it has been
dropped or sustained an impact.
INSTALLATION
Installation is in the reverse order of removal.
CAUTION:
• Do not reuse the air bag diagnosis sensor unit bolts.
• The air bag diagnosis sensor unit must always be installed with the label arrow mark " " pointing
toward the front of the vehicle for proper operation.
• Do not damage the air bag diagnosis sensor un it harness or connectors during installation.
• After replacing the air bag diagnosis sensor un it, confirm using CONSULT that the ECU discrimi-
nated number (identification number) or part number of the new replacement air bag diagnosis sen-
sor unit matches the ECU discrimin ated number (identification number) or part number of the
replaced (old) air bag diagnosis sensor unit.
• After the work is completed, perform diagnosis to check that no malfunction is detected. Refer to
SRC-14, "
Description".
NOTE:
If the ECU discriminated number or part number of the new replacement air bag diagnosis sensor unit differs
from the ECU discriminated number or part number of the replaced air bag diagnosis sensor unit, reconfirm
the parts information and verify that the corre ct air bag diagnosis sensor unit was installed.
PHIA0953J
JMHIA2027ZZ
SGI787
Revision: August 2015 2016 Versa Note
cardiagn.com
Page 3150 of 3641

SR-34
< REMOVAL AND INSTALLATION >
SEAT BELT PRE-TENSIONER
SEAT BELT PRE-TENSIONER
Removal and InstallationINFOID:0000000012430584
The front seat belt pre-tensioner is part of the front seat belt retractor. Refer to SB-9, "SEAT BELT RETRAC-
TOR : Removal and Installation".
Revision: August 2015 2016 Versa Note
cardiagn.com
Page 3151 of 3641

FRONT SEAT BELT BUCKLE SWITCHSR-35
< REMOVAL AND INSTALLATION >
C
DE
F
G
I
J
K L
M A
B
SR
N
O P
FRONT SEAT BELT BUCKLE SWITCH
Removal and InstallationINFOID:0000000012430585
The front seat belt buckle switch is part of the front seat belt buckle. Refer to SB-8, "FRONT SEAT BELT
BUCKLE : Removal and Installation".
Revision: August 2015 2016 Versa Note
cardiagn.com
Page 3153 of 3641

STR-1
ENGINE
C
DE
F
G H
I
J
K L
M
SECTION STR
A
STR
N
O P
CONTENTS
STARTING SYSTEM
PRECAUTION ....... ........................................2
PRECAUTIONS .............................................. .....2
Precaution for Supplemental Restraint System
(SRS) "AIR BAG" and "SEAT BELT PRE-TEN-
SIONER" ............................................................. ......
2
PREPARATION ............................................3
PREPARATION .............................................. .....3
Special Service Tool ........................................... ......3
Commercial Service Tools ........................................3
SYSTEM DESCRIPTION ..............................4
COMPONENT PARTS ................................... .....4
STARTING SYSTEM (WITHOUT INTELLIGENT
KEY) ....................................................................... ......
4
STARTING SYSTEM (WITHOUT INTELLIGENT
KEY) : Component Parts Location ...................... ......
4
STARTING SYSTEM (WITHOUT INTELLIGENT
KEY) : Component Description .......................... ......
5
STARTING SYSTEM (WITH INTELLIGENT KEY) ......5
STARTING SYSTEM (WITH INTELLIGENT KEY)
: Component Parts Location ......................................
6
STARTING SYSTEM (WITH INTELLIGENT KEY)
: Component Description ..........................................
6
SYSTEM ..............................................................8
STARTING SYSTEM (WITHOUT INTELLIGENT
KEY) ....................................................................... ......
8
STARTING SYSTEM (WITHOUT INTELLIGENT
KEY) : System Diagram ...................................... ......
8
STARTING SYSTEM (WITHOUT INTELLIGENT
KEY) : System Description .................................. ......
8
STARTING SYSTEM (WITH INTELLIGENT KEY) ......8
STARTING SYSTEM (WITH INTELLIGENT KEY)
: System Diagram ......................................................
9
STARTING SYSTEM (WITH INTELLIGENT KEY)
: System Description ............................................ .....
9
WIRING DIAGRAM ......................................10
STARTING SYSTEM .........................................10
Wiring Diagram - With Intelligent Key System ..... ....10
Wiring Diagram - Without Intelligent Key System ....16
BASIC INSPECTION ....... ............................21
DIAGNOSIS AND REPAIR WORKFLOW ........21
Work Flow (With GR8-1200 NI) ........................... ....21
Work Flow (Without GR8-1200 NI) ..........................25
DTC/CIRCUIT DIAGNOSIS .........................27
B TERMINAL CIRCUIT .....................................27
Description ........................................................... ....27
Diagnosis Procedure ...............................................27
S CONNECTOR CIRCUIT .................................29
Description ...............................................................29
Diagnosis Procedure ...............................................29
SYMPTOM DIAGNOSIS ..............................30
STARTING SYSTEM .........................................30
Symptom Table ................................................... ....30
REMOVAL AND INSTALLATION ...............31
STARTER MOTOR ...........................................31
Exploded View ..................................................... ....31
Removal and Installation .........................................31
SERVICE DATA AND SPECIFICATIONS
(SDS) ............... .......................................... ...
32
SERVICE DATA AND SPECIFICATIONS
(SDS) .................................................................
32
Starter Motor ........................................................ ....32
Revision: August 2015 2016 Versa Note
cardiagn.com
Page 3154 of 3641

STR-2
< PRECAUTION >
PRECAUTIONS
PRECAUTION
PRECAUTIONS
Precaution for Supplemental Restraint System (SRS) "AIR BAG" and "SEAT BELT
PRE-TENSIONER"
INFOID:0000000012432057
The Supplemental Restraint System such as “A IR BAG” and “SEAT BELT PRE-TENSIONER”, used along
with a front seat belt, helps to reduce the risk or severity of injury to the driver and front passenger for certain
types of collision. Information necessary to service the system safely is included in the SR and SB section of
this Service Manual.
WARNING:
• To avoid rendering the SRS inopera tive, which could increase the risk of personal injury or death in
the event of a collision which would result in air bag inflation, all maintenance must be performed by
an authorized NISSAN/INFINITI dealer.
• Improper maintenance, including in correct removal and installation of the SRS, can lead to personal
injury caused by unintent ional activation of the system. For re moval of Spiral Cable and Air Bag
Module, see the SR section.
• Do not use electrical test equipmen t on any circuit related to the SRS unless instructed to in this
Service Manual. SRS wiring harn esses can be identified by yellow and/or orange harnesses or har-
ness connectors.
PRECAUTIONS WHEN USING POWER TOOLS (AIR OR ELECTRIC) AND HAMMERS
WARNING:
• When working near the Airbag Diagnosis Sensor Unit or other Airbag System sensors with the Igni-
tion ON or engine running, DO NOT use air or electri c power tools or strike near the sensor(s) with a
hammer. Heavy vibration could activate the sensor( s) and deploy the air bag(s), possibly causing
serious injury.
• When using air or electric power tools or hammers , always switch the Ignition OFF, disconnect the
battery and wait at least three minutes before performing any service.
Revision: August 2015 2016 Versa Note
cardiagn.com