2016 NISSAN NOTE coolant reservoir
[x] Cancel search: coolant reservoirPage 1619 of 3641
![NISSAN NOTE 2016 Service Repair Manual CO-14
< REMOVAL AND INSTALLATION >[HR16DE]
RADIATOR
1. Drain engine coolant. Refer to
CO-8, "Draining Engine Coolant".
CAUTION:
• Perform this step when the engine is cold.
• Do not spill engine NISSAN NOTE 2016 Service Repair Manual CO-14
< REMOVAL AND INSTALLATION >[HR16DE]
RADIATOR
1. Drain engine coolant. Refer to
CO-8, "Draining Engine Coolant".
CAUTION:
• Perform this step when the engine is cold.
• Do not spill engine](/manual-img/5/57363/w960_57363-1618.png)
CO-14
< REMOVAL AND INSTALLATION >[HR16DE]
RADIATOR
1. Drain engine coolant. Refer to
CO-8, "Draining Engine Coolant".
CAUTION:
• Perform this step when the engine is cold.
• Do not spill engine coolant on drive belt.
2. Remove air duct (inlet). Refer to EM-26, "
Removal and Installation".
3. Disconnect battery negative terminal. Refer to PG-70, "
Removal and Installation (Battery)".
4. Remove radiator hose (lower).
5. Remove radiator hose (upper) from water outlet.
6. Remove the front under cover. Refer to EXT-39, "
FRONT UNDER COVER : Removal and Installation".
7. Remove the front grille. Refer to EXT-32, "
Removal and Installation".
8. Disconnect reservoir tank hose, and remove reservoir tank.
9. Disconnect harness connector from fan motor, and move harness aside.
10. Remove radiator core support (upper). Refer to DLK-144, "
RADIATOR CORE SUPPORT UPPER :
Removal and Installation".
11. Remove the condenser bolts and place aside. Refer to HA-31, "
CONDENSER : Removal and Installa-
tion".
12. Remove radiator hose (upper) from radiator.
13. Remove cooling fan assembly. Refer to CO-16, "
Removal and Installation".
CAUTION:
Be careful not to damage or scratch the radiator.
14. Disconnect CVT cooler lines.
15. Remove the radiator from bottom of the vehicle. CAUTION:
When removing, do not damage or scrat ch radiator core or A/C condenser.
INSTALLATION
Installation is in the reverse order of removal.
CAUTION:
Do not reuse O-ring.
• Insert the radiator hose (1) all the way to the stopper (2) or by 33 mm (1.30 in) (hose without a stopper) as
shown.
• The correct orientation of the hose clamps are as shown.
*: Refer to the illustrations for the specific position for each hose clamp tab. 1. Radiator hose
2. Stopper
A. Radiator side B. Engine side
JPBIA4294GB
Radiator hoseHose endPaint mark
Position of hose clamp*
Radiator hose (upper) Radiator side
UpperA
Engine side UpperB
Radiator hose (lower) Radiator side
LowerC
Engine side UpperD
Revision: August 2015 2016 Versa Note
cardiagn.com
Page 1621 of 3641
![NISSAN NOTE 2016 Service Repair Manual CO-16
< REMOVAL AND INSTALLATION >[HR16DE]
COOLING FAN
COOLING FAN
Exploded ViewINFOID:0000000012432141
Removal and InstallationINFOID:0000000012432142
REMOVAL
WARNING:
Do not remove the radiator cap NISSAN NOTE 2016 Service Repair Manual CO-16
< REMOVAL AND INSTALLATION >[HR16DE]
COOLING FAN
COOLING FAN
Exploded ViewINFOID:0000000012432141
Removal and InstallationINFOID:0000000012432142
REMOVAL
WARNING:
Do not remove the radiator cap](/manual-img/5/57363/w960_57363-1620.png)
CO-16
< REMOVAL AND INSTALLATION >[HR16DE]
COOLING FAN
COOLING FAN
Exploded ViewINFOID:0000000012432141
Removal and InstallationINFOID:0000000012432142
REMOVAL
WARNING:
Do not remove the radiator cap when the engine is hot. Serious burns could
occur from high-pressure
engine coolant escaping from the radi ator. Wrap a thick cloth around the radiator cap. Slowly turn it a
quarter of a turn to release built-up pressure. Carefu lly remove radiator cap by turning it all the way.
NOTE:
When removing components such as hoses, tubes/lines, etc. , cap or plug openings to prevent fluid from spill-
ing.
1. Drain engine coolant. Refer to CO-8, "
Draining Engine Coolant".
CAUTION:
• Perform this step when the engine is cold.
• Do not spill engine coolant on drive belt.
2. Disconnect battery negative terminal. Refer to PG-70, "
Removal and Installation (Battery)".
3. Remove the front grille. Refer to EXT-32, "
Removal and Installation".
4. Remove reservoir tank. Refer to CO-13, "
Exploded View".
5. Disconnect harness connector from fan motor, and move harness aside.
6. Remove radiator core support (upper). Refer to DLK-144, "
RADIATOR CORE SUPPORT UPPER :
Removal and Installation".
7. Remove cooling fan assembly. CAUTION:
Be careful not to damage or scratch the radiator.
INSTALLATION
Installation is in the reverse order of removal.
CAUTION:
Only use Genuine NISSAN parts for the fan shroud bolt.
NOTE:
Cooling fan assembly is controlled by ECM. For details, refer to EC-38, "
COOLING FAN CONTROL : System
Description".
1. Fan shroud2. Fan motor3. Cooling fan
A. Cooling fan nut L. Genuine NISSAN high strength lock-
ing sealant
AWBIA1140GB
Revision: August 2015 2016 Versa Note
cardiagn.com
Page 1630 of 3641
![NISSAN NOTE 2016 Service Repair Manual SERVICE DATA AND SPECIFICATIONS (SDS)CO-25
< SERVICE DATA AND SPECIFICATIONS (SDS) [HR16DE]
C
D
E
F
G H
I
J
K L
M A
CO
NP
O
SERVICE DATA AND SPECIFICATIONS (SDS)
SERVICE DATA AND SPECIFICATIONS (SDS) NISSAN NOTE 2016 Service Repair Manual SERVICE DATA AND SPECIFICATIONS (SDS)CO-25
< SERVICE DATA AND SPECIFICATIONS (SDS) [HR16DE]
C
D
E
F
G H
I
J
K L
M A
CO
NP
O
SERVICE DATA AND SPECIFICATIONS (SDS)
SERVICE DATA AND SPECIFICATIONS (SDS)](/manual-img/5/57363/w960_57363-1629.png)
SERVICE DATA AND SPECIFICATIONS (SDS)CO-25
< SERVICE DATA AND SPECIFICATIONS (SDS) [HR16DE]
C
D
E
F
G H
I
J
K L
M A
CO
NP
O
SERVICE DATA AND SPECIFICATIONS (SDS)
SERVICE DATA AND SPECIFICATIONS (SDS)
Standard and LimitINFOID:0000000012432150
Engine coolant capa
city (approximate)
Unit: (US qt, Imp qt)
*: Includes reservoir amount.
Radiator
Unit: kPa (kg/cm2, psi)
Thermostat
Standard
Engine coolant capacity (With reservoir tank at “MAX” level)* CVT models
7.3 (7-3/4, 6-3/8)
M/T models 6.7 (7-1/8, 5-7/8)
Reservoir tank engine coolant capacity (At “MAX” level) 0.7 (3/4, 5/8)
Cap relief pressureStandard 88 (0.90, 12.8)
Radiator leak test pressure 156 (1.59, 22.6)
Valve opening temperature 80.5 - 83.5°C (177 - 182 °F)
Maximum valve lift 8.0 mm/95°C (0.315 in/203 °F)
Valve closing temperature 77°C (171 °F)
Revision: August 2015 2016 Versa Note
cardiagn.com
Page 2321 of 3641
MA-6
< PERIODIC MAINTENANCE >
GENERAL MAINTENANCE
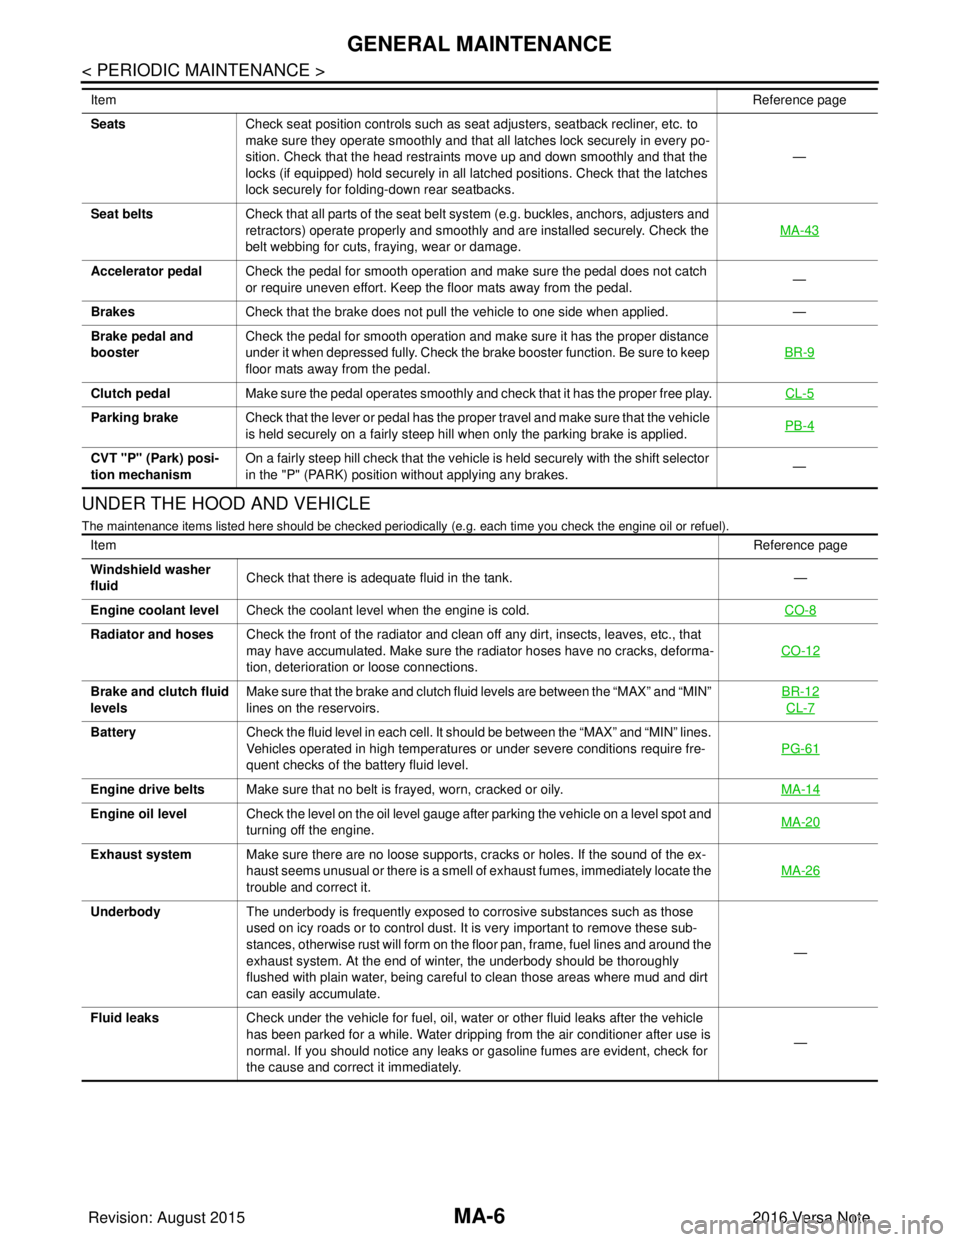
UNDER THE HOOD AND VEHICLE
The maintenance items listed here should be checked periodically (e.g. each time you check the engine oil or refuel).
SeatsCheck seat position controls such as seat adjusters, seatback recliner, etc. to
make sure they operate smoothly and that all latches lock securely in every po-
sition. Check that the head restraints move up and down smoothly and that the
locks (if equipped) hold securely in all latched positions. Check that the latches
lock securely for folding-down rear seatbacks. —
Seat belts Check that all parts of the seat belt system (e.g. buckles, anchors, adjusters and
retractors) operate properly and smoothly and are installed securely. Check the
belt webbing for cuts, fraying, wear or damage. MA-43
Accelerator pedal
Check the pedal for smooth operation and make sure the pedal does not catch
or require uneven effort. Keep the floor mats away from the pedal. —
Brakes Check that the brake does not pull the vehicle to one side when applied. —
Brake pedal and
booster Check the pedal for smooth operation and make sure it has the proper distance
under it when depressed fully. Check the brake booster function. Be sure to keep
floor mats away from the pedal. BR-9
Clutch pedal
Make sure the pedal operates smoothly and check that it has the proper free play. CL-5
Parking brakeCheck that the lever or pedal has the proper travel and make sure that the vehicle
is held securely on a fairly steep hill when only the parking brake is applied. PB-4
CVT "P" (Park) posi-
tion mechanismOn a fairly steep hill check that the vehicle is held securely with the shift selector
in the "P" (PARK) position without applying any brakes.
—
Item
Reference page
Item Reference page
Windshield washer
fluid Check that there is adequate fluid in the tank.
—
Engine coolant level Check the coolant level when the engine is cold. CO-8
Radiator and hosesCheck the front of the radiator and clean off any dirt, insects, leaves, etc., that
may have accumulated. Make sure the radiator hoses have no cracks, deforma-
tion, deterioration or loose connections. CO-12
Brake and clutch fluid
levelsMake sure that the brake and clutch fluid levels are between the “MAX” and “MIN”
lines on the reservoirs. BR-12
CL-7
Battery
Check the fluid level in each cell. It should be between the “MAX” and “MIN” lines.
Vehicles operated in high temperatures or under severe conditions require fre-
quent checks of the battery fluid level. PG-61
Engine drive belts
Make sure that no belt is frayed, worn, cracked or oily. MA-14
Engine oil levelCheck the level on the oil level gauge after parking the vehicle on a level spot and
turning off the engine. MA-20
Exhaust system
Make sure there are no loose supports, cracks or holes. If the sound of the ex-
haust seems unusual or there is a smell of exhaust fumes, immediately locate the
trouble and correct it. MA-26
Underbody
The underbody is frequently exposed to corrosive substances such as those
used on icy roads or to control dust. It is very important to remove these sub-
stances, otherwise rust will form on the floor pan, frame, fuel lines and around the
exhaust system. At the end of winter, the underbody should be thoroughly
flushed with plain water, being careful to clean those areas where mud and dirt
can easily accumulate. —
Fluid leaks Check under the vehicle for fuel, oil, water or other fluid leaks after the vehicle
has been parked for a while. Water dripping from the air conditioner after use is
normal. If you should notice any leaks or gasoline fumes are evident, check for
the cause and correct it immediately. —
Revision: August 2015
2016 Versa Note
cardiagn.com
Page 2326 of 3641
RECOMMENDED FLUIDS AND LUBRICANTSMA-11
< PERIODIC MAINTENANCE >
C
DE
F
G H
I
J
K L
M B
MA
N
O A
RECOMMENDED FLUIDS AND LUBRICANTS
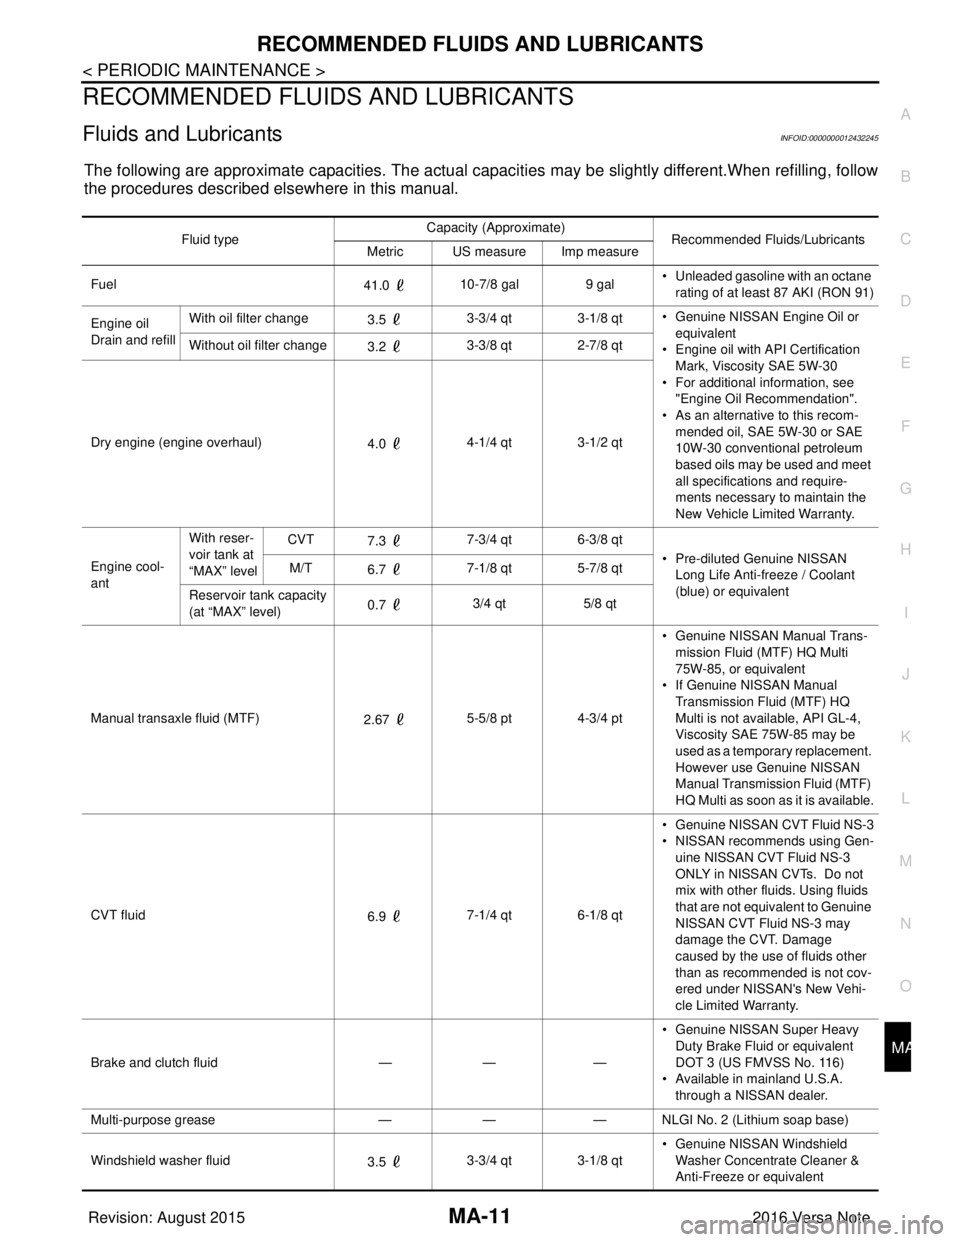
Fluids and LubricantsINFOID:0000000012432245
The following are approximate capacities. The actual capa
cities may be slightly different.When refilling, follow
the procedures described elsewhere in this manual.
Fluid type Capacity (Approximate)
Recommended Fluids/Lubricants
Metric US measure Imp measure
Fuel 41.0 10-7/8 gal
9 gal• Unleaded gasoline with an octane
rating of at least 87 AKI (RON 91)
Engine oil
Drain and refill With oil filter change
3.5 3-3/4 qt 3-1/8 qt
• Genuine NISSAN Engine Oil or
equivalent
• Engine oil with API Certification
Mark, Viscosity SAE 5W-30
• For additional information, see "Engine Oil Recommendation".
• As an alternative to this recom-
mended oil, SAE 5W-30 or SAE
10W-30 conventional petroleum
based oils may be used and meet
all specifications and require-
ments necessary to maintain the
New Vehicle Limited Warranty.
Without oil filter change
3.2 3-3/8 qt 2-7/8 qt
Dry engine (engine overhaul) 4.0 4-1/4 qt 3-1/2 qt
Engine cool-
ant With reser-
voir tank at
“MAX” level
CVT
7.3 7-3/4 qt 6-3/8 qt
• Pre-diluted Genuine NISSAN Long Life Anti-freeze / Coolant
(blue) or equivalent
M/T
6.7 7-1/8 qt 5-7/8 qt
Reservoir tank capacity
(at “MAX” level) 0.7
3/4 qt
5/8 qt
Manual transaxle fluid (MTF) 2.67 5-5/8 pt 4-3/4 pt • Genuine NISSAN
Manual Trans-
mission Fluid (MTF) HQ Multi
75W-85, or equivalent
• If Genuine NISSAN Manual
Transmission Fluid (MTF) HQ
Multi is not available, API GL-4,
Viscosity SAE 75W-85 may be
used as a temporary replacement.
However use Genuine NISSAN
Manual Transmission Fluid (MTF)
HQ Multi as soon as it is available.
CVT fluid 6.9 7-1/4 qt 6-1/8 qt • Genuine NISSAN CVT Fluid NS-3
• NISSAN recommends using Gen-
uine NISSAN CVT Fluid NS-3
ONLY in NISSAN CVTs. Do not
mix with other fluids. Using fluids
that are not equivalent to Genuine
NISSAN CVT Fluid NS-3 may
damage the CVT. Damage
caused by the use of fluids other
than as recommended is not cov-
ered under NISSAN's New Vehi-
cle Limited Warranty.
Brake and clutch fluid —— —• Genuine NISSAN Super Heavy
Duty Brake Fluid or equivalent
DOT 3 (US FMVSS No. 116)
• Available in mainland U.S.A.
through a NISSAN dealer.
Multi-purpose grease —— — NLGI No. 2 (Lithium soap base)
Windshield washer fluid 3.5 3-3/4 qt 3-1/8 qt • Genuine NISSAN Windshield
Washer Concentrate Cleaner &
Anti-Freeze or equivalent
Revision: August 2015 2016 Versa Note
cardiagn.com
Page 2327 of 3641
MA-12
< PERIODIC MAINTENANCE >
RECOMMENDED FLUIDS AND LUBRICANTS
Engine Oil Recommendation
INFOID:0000000012432246
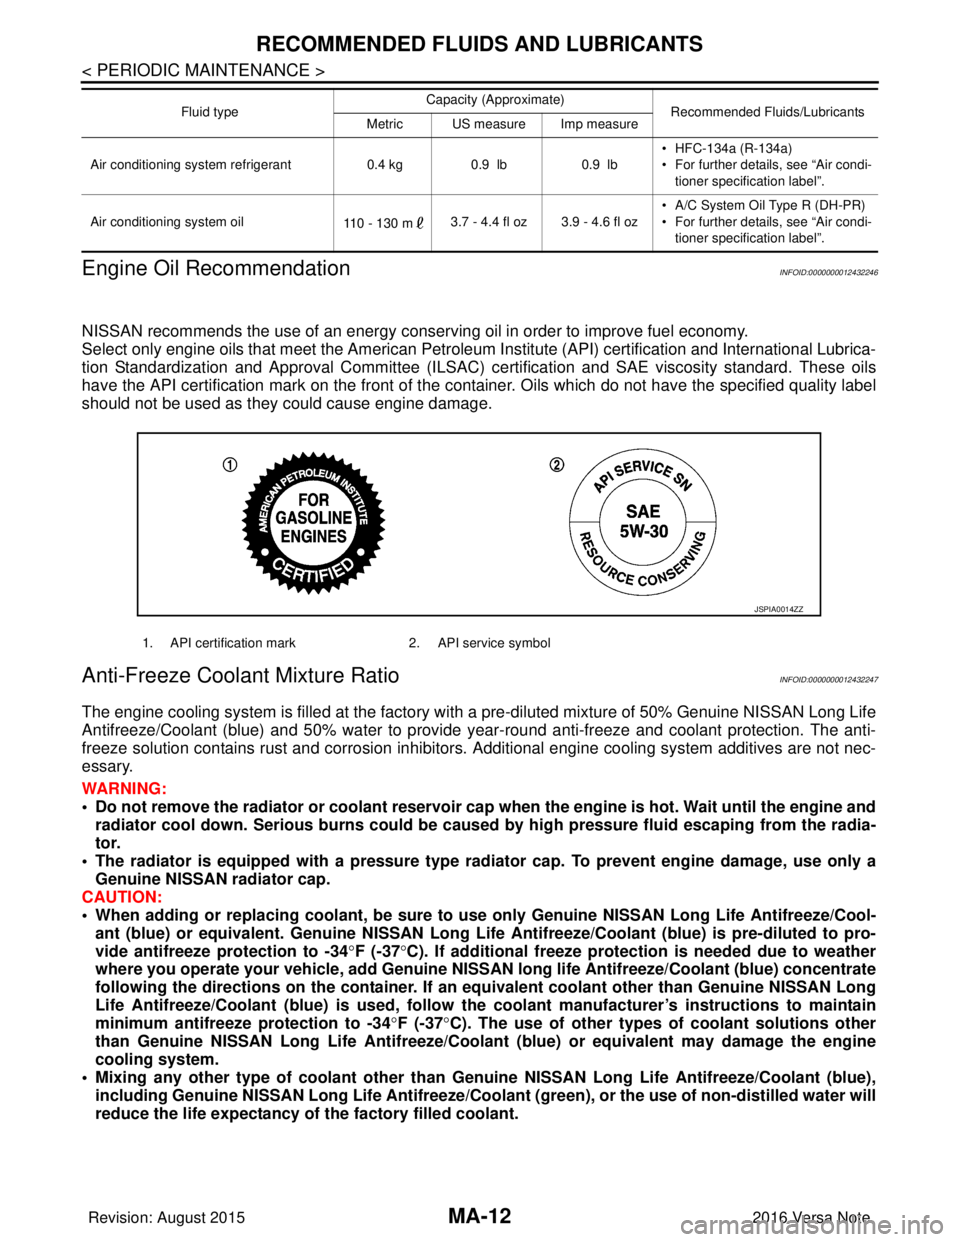
NISSAN recommends the use of an energy conservi ng oil in order to improve fuel economy.
Select only engine oils that meet the American Petroleum Institute (API) certification and International Lubrica-
tion Standardization and Approval Committee (ILSAC) ce rtification and SAE viscosity standard. These oils
have the API certification mark on the front of the container. Oils whic h do not have the specified quality label
should not be used as they could cause engine damage.
Anti-Freeze Coolant Mixture RatioINFOID:0000000012432247
The engine cooling system is filled at the factory with a pre-diluted mixture of 50% Genuine NISSAN Long Life
Antifreeze/Coolant (blue) and 50% water to provide year-round anti-freeze and coolant protection. The anti-
freeze solution contains rust and corrosion inhibitors. Additional engine cooling system additives are not nec-
essary.
WARNING:
• Do not remove the radiator or coolant reservoir cap when the engine is hot. Wait until the engine and radiator cool down. Serious burns could be caused by high pressure fluid escaping from the radia-
tor.
• The radiator is equipped with a pressure type radiator cap. To prevent engine damage, use only a
Genuine NISSAN radiator cap.
CAUTION:
• When adding or replacing coolant, be sure to use only Genuine NISSAN Lo ng Life Antifreeze/Cool-
ant (blue) or equivalent. Genuine NISSAN Long Life Antifreeze/Coolant (blue) is pre-diluted to pro-
vide antifreeze protection to -34 °F (-37 °C). If additional freeze protect ion is needed due to weather
where you operate your vehicle, add Genuine NISSAN long life Antifreeze/Coolant (blue) concentrate
following the directions on the container. If an equivalent coolant other than Genuine NISSAN Long
Life Antifreeze/Coolant (blue) is used, follow the coolant manufact urer’s instructions to maintain
minimum antifreeze protection to -34 °F (-37 °C). The use of other types of coolant solutions other
than Genuine NISSAN Long Life Antifreeze/Coolant (blue) or equivalent may damage the engine
cooling system.
• Mixing any other type of coolant other than Genuine NISSAN Long Life Antifreeze/Coolant (blue),
including Genuine NISSAN Long Life Antifreeze/Coolant (green), or the use of non-distilled water will
reduce the life expectancy of the factory filled coolant.
Air conditioning system refrigerant 0.4 kg0.9 lb 0.9 lb• HFC-134a (R-134a)
• For further details, see “Air condi-
tioner specification label”.
Air conditioning system oil 110 - 130 m3.7 - 4.4 fl oz 3.9 - 4.6 fl oz • A/C System Oil Type R (DH-PR)
• For further details, see “Air condi-
tioner specification label”.
Fluid type
Capacity (Approximate)
Recommended Fluids/Lubricants
Metric US measure Imp measure
1. API certification mark 2. API service symbol
JSPIA0014ZZ
Revision: August 2015 2016 Versa Note
cardiagn.com
Page 2330 of 3641
ENGINE MAINTENANCEMA-15
< PERIODIC MAINTENANCE >
C
DE
F
G H
I
J
K L
M B
MA
N
O A
• When checking immediately after in
stallation, first adjust it to the specified value. Then, after
turning crankshaft two turns or more, readjust to the specified value to avoid variation in deflec-
tion between pulleys.
• When the tension adjustment is performed, the lo ck nut should be in the condition at Step 2. If
the tension adjustment is perfo rmed when the lock nut is loosened more than the temporary
tightening, the idler pulley tilts and the co rrect tension adjustment cannot be performed.
4. Tighten the lock nut to final tightening specification.
ENGINE COOLANT
ENGINE COOLANT : InspectionINFOID:0000000012432252
CHECKING COOLING SYSTEM HOSES
Check hoses for the following:
• Improper attachment
• Leaks
•Cracks
• Damage
• Loose connections
• Chafing
• Deterioration
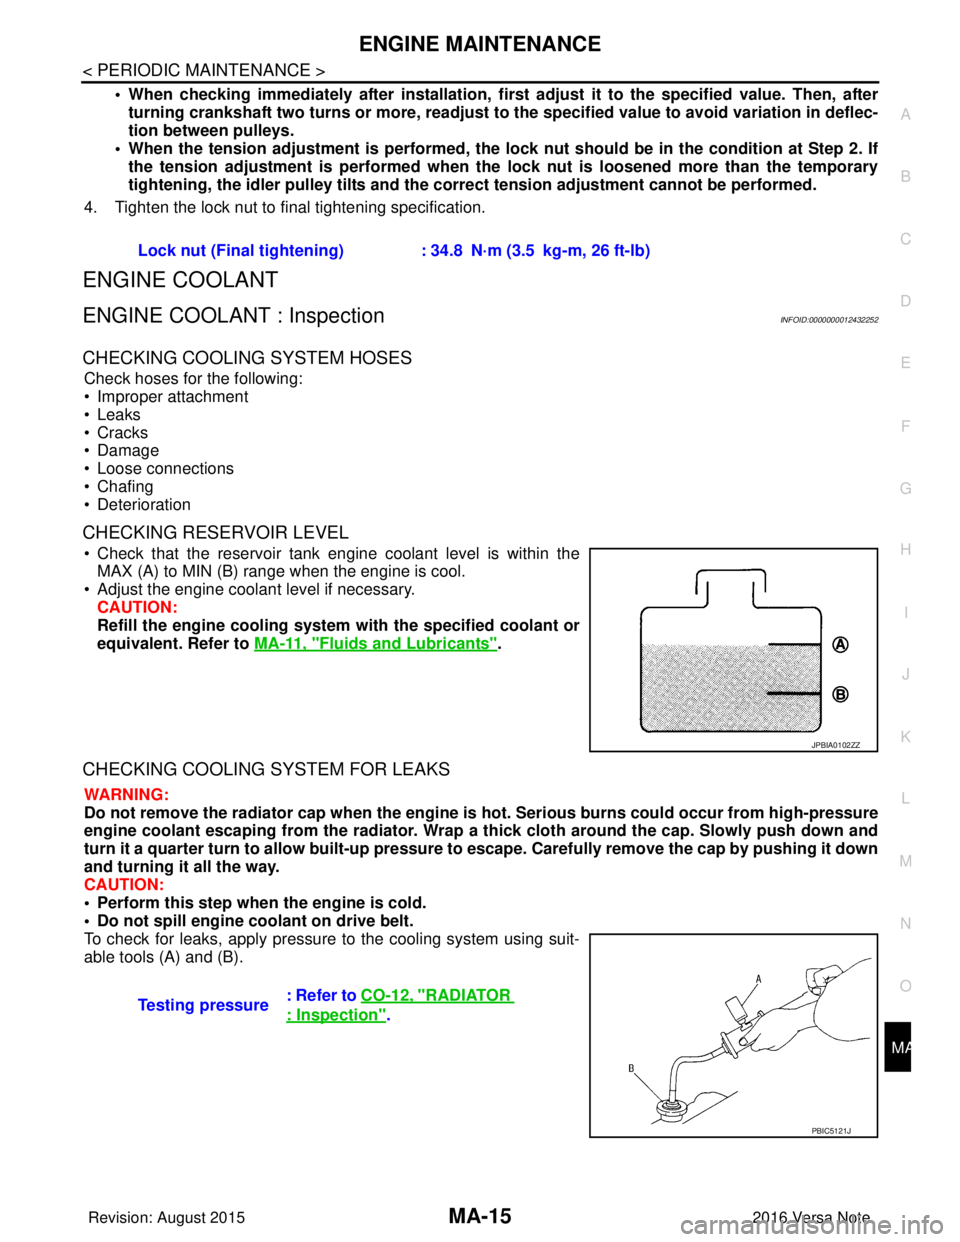
CHECKING RESERVOIR LEVEL
• Check that the reservoir tank engine coolant level is within the MAX (A) to MIN (B) range when the engine is cool.
• Adjust the engine coolant level if necessary. CAUTION:
Refill the engine cooling system with the specified coolant or
equivalent. Refer to MA-11, "
Fluids and Lubricants".
CHECKING COOLING SYSTEM FOR LEAKS
WARNING:
Do not remove the radiator cap when the engine is hot. Serious burns could occur from high-pressure
engine coolant escaping from the radiator. Wrap a thick cloth around the cap. Slowly push down and
turn it a quarter turn to allow built-up pressure to escape. Carefully remove the cap by pushing it down
and turning it all the way.
CAUTION:
• Perform this step when the engine is cold.
• Do not spill engine coolant on drive belt.
To check for leaks, apply pressure to the cooling system using suit-
able tools (A) and (B). Lock nut (Final tightening) :
34.8 N·m (3.5 kg-m, 26 ft-lb)
JPBIA0102ZZ
Testing pressure: Refer to CO-12, "RADIATOR
: Inspection".
PBIC5121J
Revision: August 2015
2016 Versa Note
cardiagn.com
Page 2331 of 3641
MA-16
< PERIODIC MAINTENANCE >
ENGINE MAINTENANCE
ENGINE COOLANT : Draining Engine Coolant
INFOID:0000000012432253
WARNING:
Do not remove the radiator cap when the engine is hot. Serious burns could occur from high-pressure
engine coolant escaping from the radiator. Wrap a th ick cloth around the cap. Slowly push down and
turn it a quarter turn to allow built-up pressure to escape. Carefully remove the cap by pushing it down
and turning it all the way.
1. Remove front under cover. Refer to EXT-39, "
FRONT UNDER COVER : Removal and Installation".
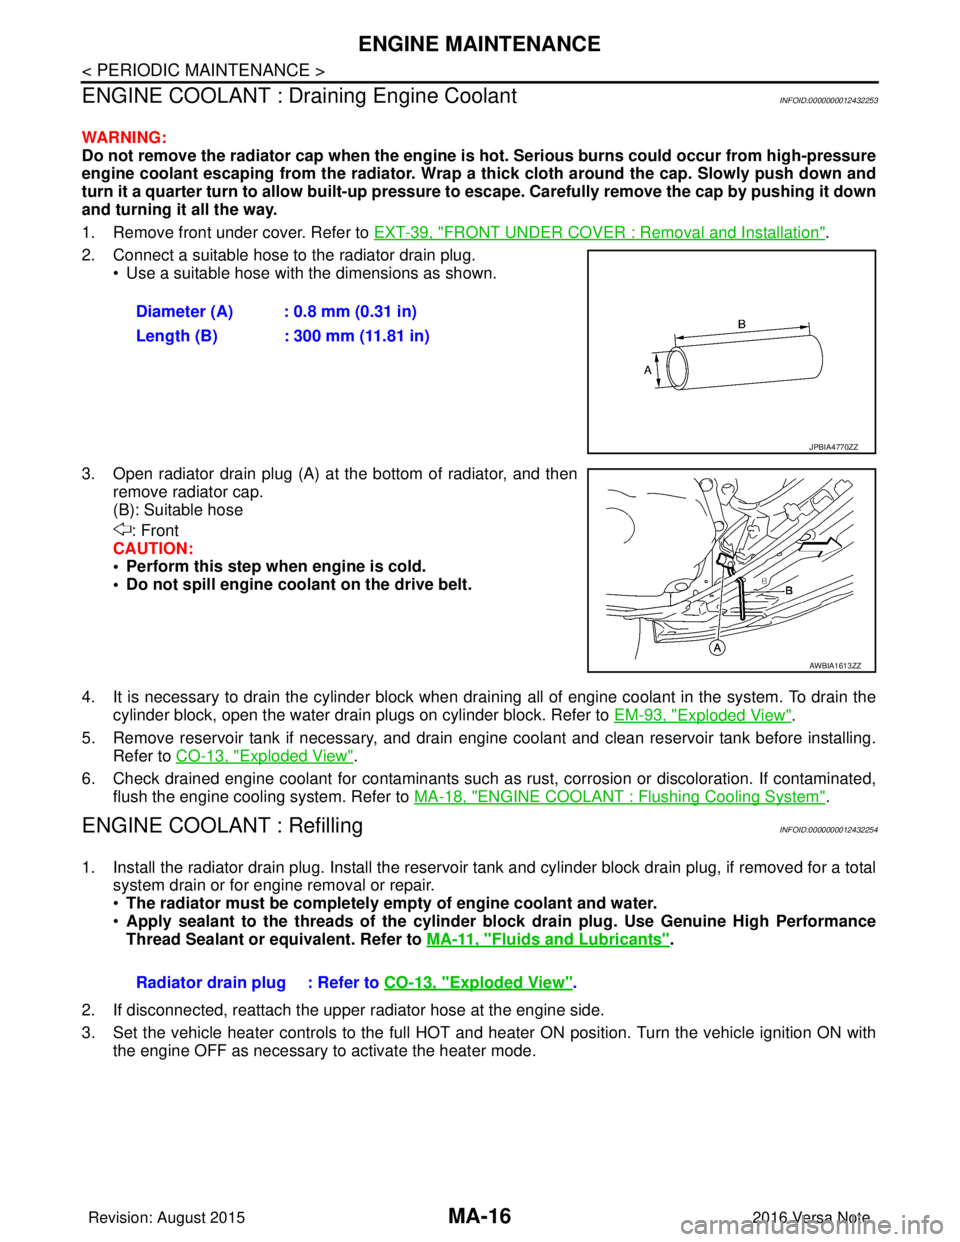
2. Connect a suitable hose to the radiator drain plug. • Use a suitable hose with the dimensions as shown.
3. Open radiator drain plug (A) at the bottom of radiator, and then remove radiator cap.
(B): Suitable hose
: Front
CAUTION:
• Perform this step when engine is cold.
• Do not spill engine coolant on the drive belt.
4. It is necessary to drain the cylinder block when drai ning all of engine coolant in the system. To drain the
cylinder block, open the water drain plugs on cylinder block. Refer to EM-93, "
Exploded View".
5. Remove reservoir tank if necessary, and drain engine coolant and clean reservoir tank before installing. Refer to CO-13, "
Exploded View".
6. Check drained engine coolant for contaminants such as rust, corrosion or discoloration. If contaminated, flush the engine cooling system. Refer to MA-18, "
ENGINE COOLANT : Flushing Cooling System".
ENGINE COOLANT : RefillingINFOID:0000000012432254
1. Install the radiator drain plug. Install the reservoir tank and cylinder block drain plug, if removed for a total
system drain or for engine removal or repair.
• The radiator must be completely empty of engine coolant and water.
• Apply sealant to the threads of the cylinder block drain plug. Use Genuine High Performance
Thread Sealant or equivalent. Refer to MA-11, "
Fluids and Lubricants".
2. If disconnected, reattach the upper radiator hose at the engine side.
3. Set the vehicle heater controls to the full HOT and heat er ON position. Turn the vehicle ignition ON with
the engine OFF as necessary to activate the heater mode. Diameter (A) : 0.8 mm (0.31 in)
Length (B) : 300 mm (11.81 in)
JPBIA4770ZZ
AWBIA1613ZZ
Radiator drain plug : Refer to
CO-13, "Exploded View".
Revision: August 2015 2016 Versa Note
cardiagn.com