2016 MERCEDES-BENZ G-CLASS SUV ESP
[x] Cancel search: ESPPage 194 of 261
Setting warnings for speed limits
The following functions are available:
R Warn When Speeding Warn When Speeding:
- Audio and Visual Audio and Visual:ift he vehicle speed
exceeds the maximum permissible speed,
the multimedia system issues an audible
and avisual warning
- Display Display:ift he vehicle speed exceeds the
maximum permissible speed, the multime- dia system issues avisual warning
- Disabled
Disabled:t he multimedia system does not
issue awarning
R Speed Limit Always Visible
Speed Limit Always Visible :ifthis func-
tion is activated, the maximum permissible
speed appears in the multimedia system
R Outside Towns: %d%% of the Speed Outside Towns: %d%% of the Speed
Limit Limit:ift he vehicle speed increases up to
the set percentage of the permissiblem axi-
mum speed, the multimedia system issues a
warning
R Within Towns: %d%% of the Speed Within Towns: %d%% of the Speed
Limit Limit:ift he vehicle speed increases up to
the set percentage of the permissiblem axi-
mum speed, the multimedia system issues a
warning
X Press the NAVI button.
The main menu appears.
X Select Settings Settings.
X Select Warnings
Warnings.
X Select Speed Limit
Speed Limit.
X To set the warning type: selectWarn
WarnWhen
When
Speeding
Speeding.
Am enu appears.
X Select the desired function.
The Ytick indicates the activated function.
X To switch the speed limit display on or off:
select Speed Limit Always Visible Speed Limit Always Visible.
The function is activated or deactivated.
X To define how far the speed limit may be
exceeded: selectOutside Towns: %d%%
Outside Towns: %d%%
of
of the
the Speed
Speed Limit
LimitorWithin
Within Towns:
Towns:%d
%d
%% of the Speed Limit
%% of the Speed Limit.
Am enu appears.
X Set the desired percentage.
Setting warnings for alert points
If this function is activated and the vehicle is
approaching an alert point, the multimedia sys-
tem issues awarning. An alert point is an area
requiring the driver to be especially attentive,
e.g. arailway crossing or aschool. i
This function is not permitted in all countries
and regions. Observe the legal requirements
for the country you are in.
The following functions are available:
R Warning Type
Warning Type:
- Audio and Visual Audio and Visual:ift he vehicle is
approaching an alert point, the multimedia
system issues an audibl eand avisual warn-
ing
- Visual
Visual:ift he vehicle is approaching an
alert point, the multimedia system issues a
visual warning
R Audio Warning
Audio Warning:
- Only When Speeding
Only When Speeding:i fthe vehicle is
approaching an alert point and exceeds the maximum permissible speed in the proc-
ess, the multimedia system issues an audi-ble warning
- When Approaching When Approaching :ifthe vehicle is
approaching an alert point, the multimedia
system issues an audibl ewarning. If the
vehicle exceeds the maximum permissible
speed, the multimedia system issues adif-
ferent audibl ewarning
X Press the NAVI button.
The main menu appears.
X Select Settings
Settings.
X Select Warnings Warnings.
X Select Alert Points
Alert Points.
X Select Alert Point Warnings Alert Point Warnings.
The function is activated or deactivated.
If the function is activated, amessage
appears.
X To activat ethe function: selectActivate Activate.
X If you do not wish to activat
ethe function:
select Cancel
Cancel.
X To set awarning: selectAlert Types
Alert Types.
Am enu appears.
X Select the desired alert point.
X Select Warning Type
Warning Type orAudio Warning
Audio Warning.
X Select the desired function.
The Ytick indicates the activated function.
i The digital map may include
apermissible or
expected maximum speed for some alert
points. In this case, the audibl ewarning may
differ when you exceed or drop below the
maximum permissible speed. Navigati
on
191Multimedi asystem Z
Page 201 of 261
Loading guidelines
G
WARNING
If objects, luggage or loads are not secured or not secured sufficiently, the ycoulds lip,tip
over or be flung around and thereby hit vehicle
occupants. There is arisk of injury ,especially
when braking or abruptly changing directions.
Always store objects so that they cannot be
flung around. Secure objects, luggage or
loads against slipping or tipping before the
journey. G
WARNING
If you loadt he vehicleunevenly, driving char-
acteristics such as steering and braking
behaviou rmay be severely impaired .There is
ar isk of an accident.
Load the vehicl eevenly .Secure the loadso
that it cannot slip. G
WARNING
The exhaust tail pipea nd tail pipetrim can
become very hot. If you come into contact
with these parts of the vehicle, you coul dburn
yourself. There is arisk of injury.
Always be particularl ycarefu laround the
exhaust tail pipea nd the tail pipetrim. Allow
these components to cool downb efore touch-
ing them. G
WARNING
Combustio nengines emit poisonous exhaust
gase ssuch as carbon monoxide .Ifthe rear
door is open when the engine is running, par- ticularly if the vehicl eismoving, exhaust
fumes coul denter the passenger compart-
ment. There is arisk of poisoning.
Turn off the engine before opening the rear
door. Never drive with the rear door open. Driving, braking and steering characteris
tics
change depending on:
R typ eofl oad
R weight
R the centre of gravity of the load
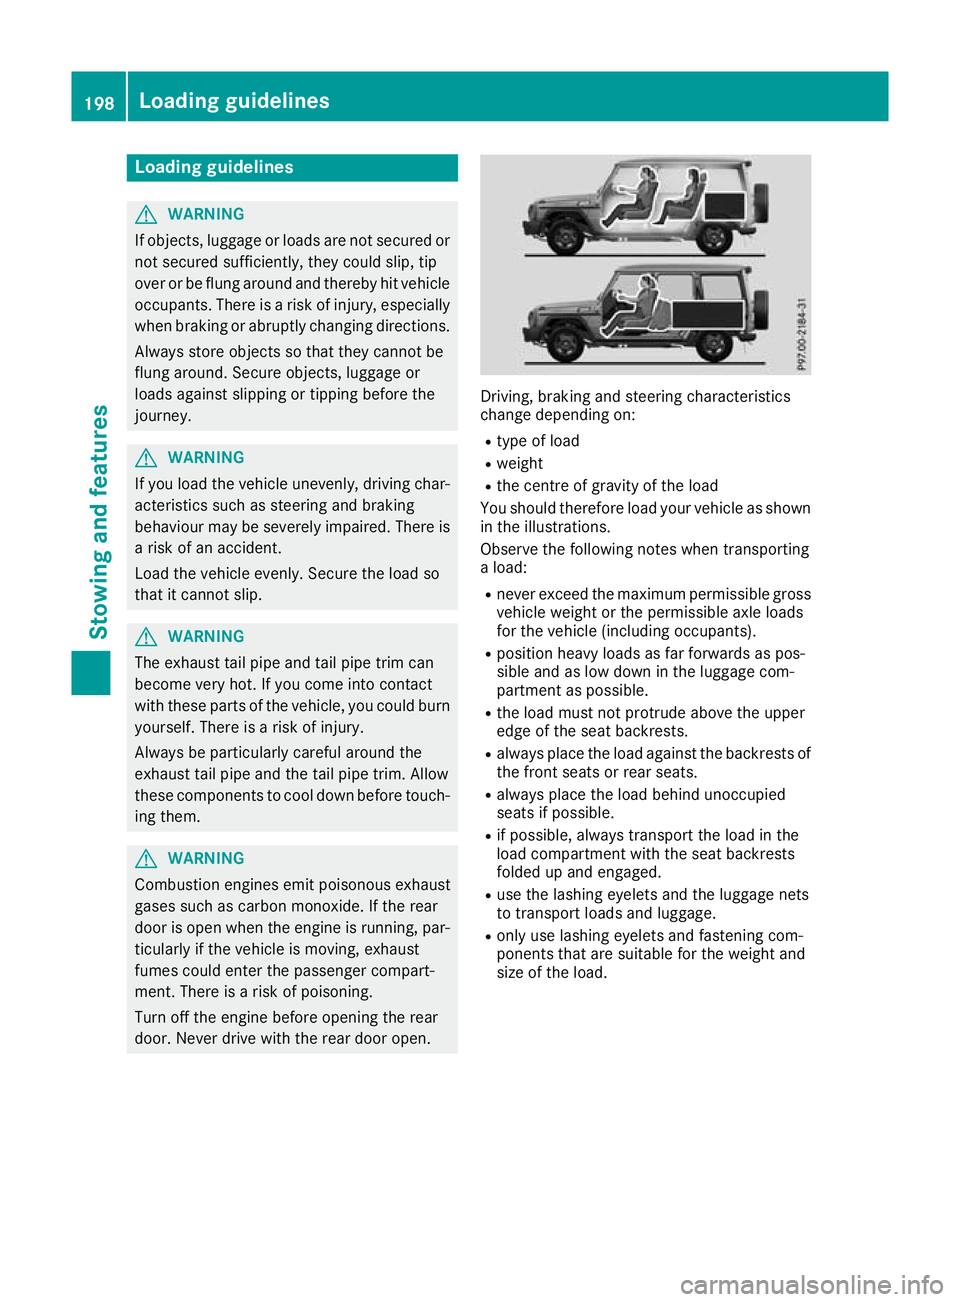
Yo us houl dtherefore load your vehicl easshown
in the illustrations.
Observe the following note swhent ransporting
al oad:
R neve rexceed the maximum permissibl egross
vehicl eweigh tort he permissibl eaxlel oads
for the vehicl e(including occupants).
R positio nheavy loadsasf arforwards as pos-
sibl eand as lo wdownint he luggage com-
partment as possible.
R the load must not protrude above the upper
edge of the sea tbackrests.
R always place the load against the backrests of
the front seats or rea rseats.
R always place the load behind unoccupied
seats if possible.
R if possible, always transport the load in the
load compartment with the sea tbackrests
folde dupa nd engaged.
R uset he lashing eyelets and the luggage nets
to transport load sand luggage.
R onl yuselashing eyelets and fastening com-
ponents tha tare suitabl efor the weight and
size of the load. 198
Loadin
gguidelinesStowing and features
Page 202 of 261
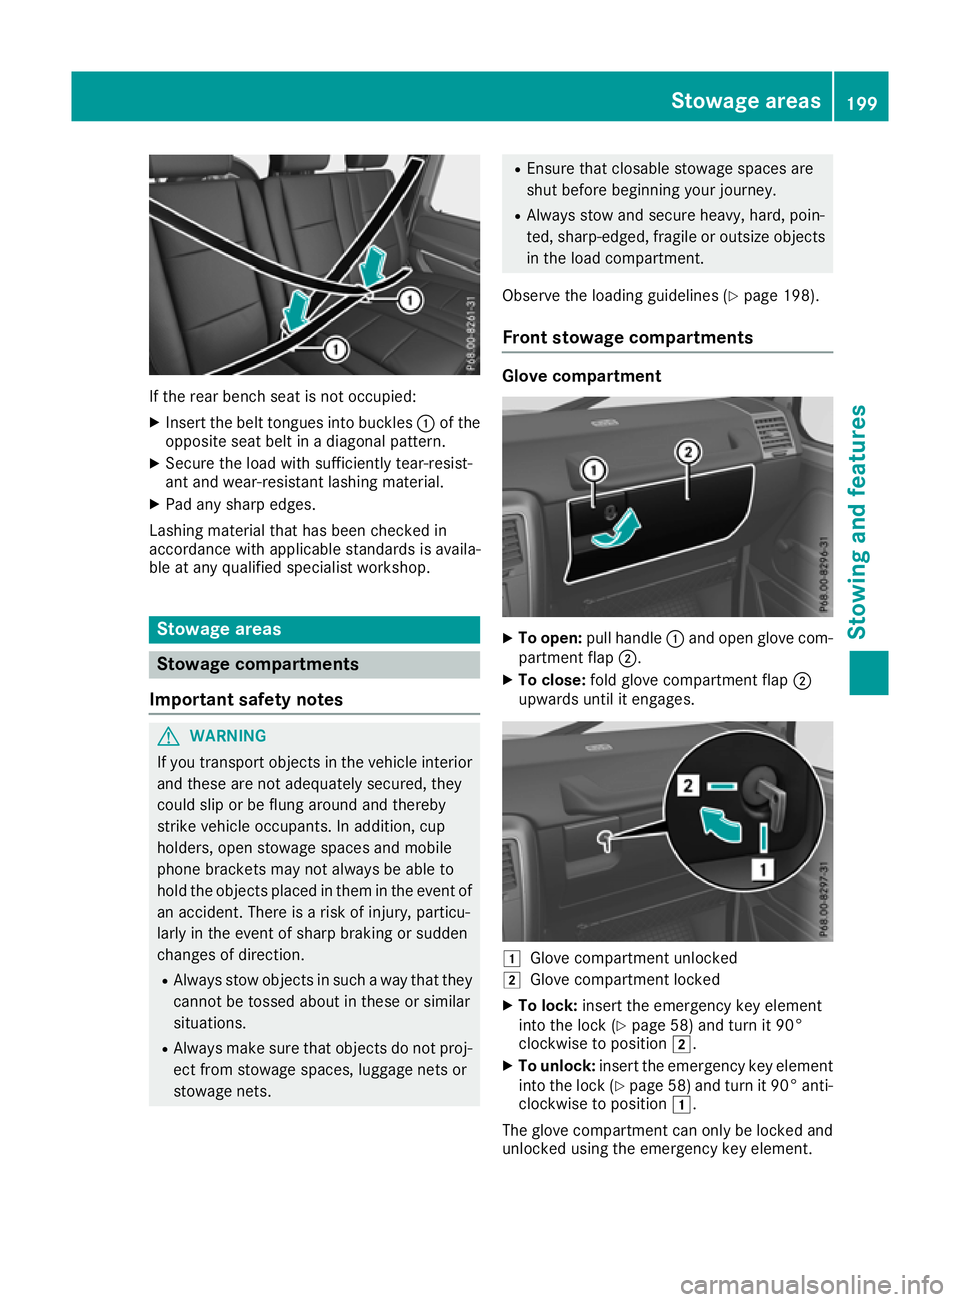
If the rear bench seat is not occupied:
X Insert the belt tongues into buckles :of the
opposite seat belt in adiagonal pattern.
X Secure the load with sufficiently tear-resist-
ant and wear-resistant lashing material.
X Pad any sharp edges.
Lashing materia lthat has been checked in
accordance with applicables tandards is availa-
ble at any qualifieds pecialist workshop. Stowage areas
Stowage compartments
Important safety notes G
WARNING
If you transport objects in the vehicle interior and these are not adequately secured, they
could slip or be flung around and thereby
strike vehicle occupants. In addition, cup
holders, open stowage spaces and mobile
phone brackets may not always be ableto
hold the objects placed in them in the event of an accident. There is arisk of injury ,particu-
larl yint he event of sharp braking or sudden
changes of direction.
R Always stow objects in such away that they
cannot be tossed about in these or similar
situations.
R Always make sure that objects do not proj-
ect from stowage spaces, luggage nets or
stowage nets. R
Ensure that closable stowag espacesa re
shu tbefor eb egin ning your journey.
R Alway sstow and secur eheavy, hard, poin-
ted ,sharp-edged ,fragile or outsize objects
in the load compartment.
Observe the loading guideline s(Ypage 198).
Front stowage compartments Glov
ecompartment X
To open: pull handle :and open glove com-
partment flap ;.
X To close: fold glove compartment flap ;
upwards until it engages. 1
Glove compar tmentu nlocked
2 Glove compartmen tlocked
X To lock: insert theemergency ke yelement
int ot he lock(Ypage 58) and tur nit90°
clockwise to position 2.
X To unlock: insert theemergency ke yelement
int othe lock(Ypage 58 )and tur nit90°anti-
clockwise to position 1.
The glov ecompartmen tcan only be locke dand
unlocked usin gthe emergency ke yelement. Stowage areas
199Stowing and feat ures Z
Page 204 of 261
Befor
eevery trip ,make sur ethat the seat
backrests and the rea rbench seat/rea rseat
are engaged before every trip. G
WARNING
Combustio nengines emit poisonous exhaust
gase ssuch as carbon monoxide .Ifthe rear
door is open when the engine is running, par- ticularly if the vehicl eismoving, exhaust
fumes coul denter the passenger compart-
ment. There is arisk of poisoning.
Turn off the engine before opening the rear
door. Never drive with the rear door open.
Observe the loading guidelines (Y page198).
The left-hand and right-hand rear bench seats
can be folde dforward to increas ethe capacity
of the rear compartment. You can:
R fold the seat backrests forward
R fold the rear bench seat completely forward
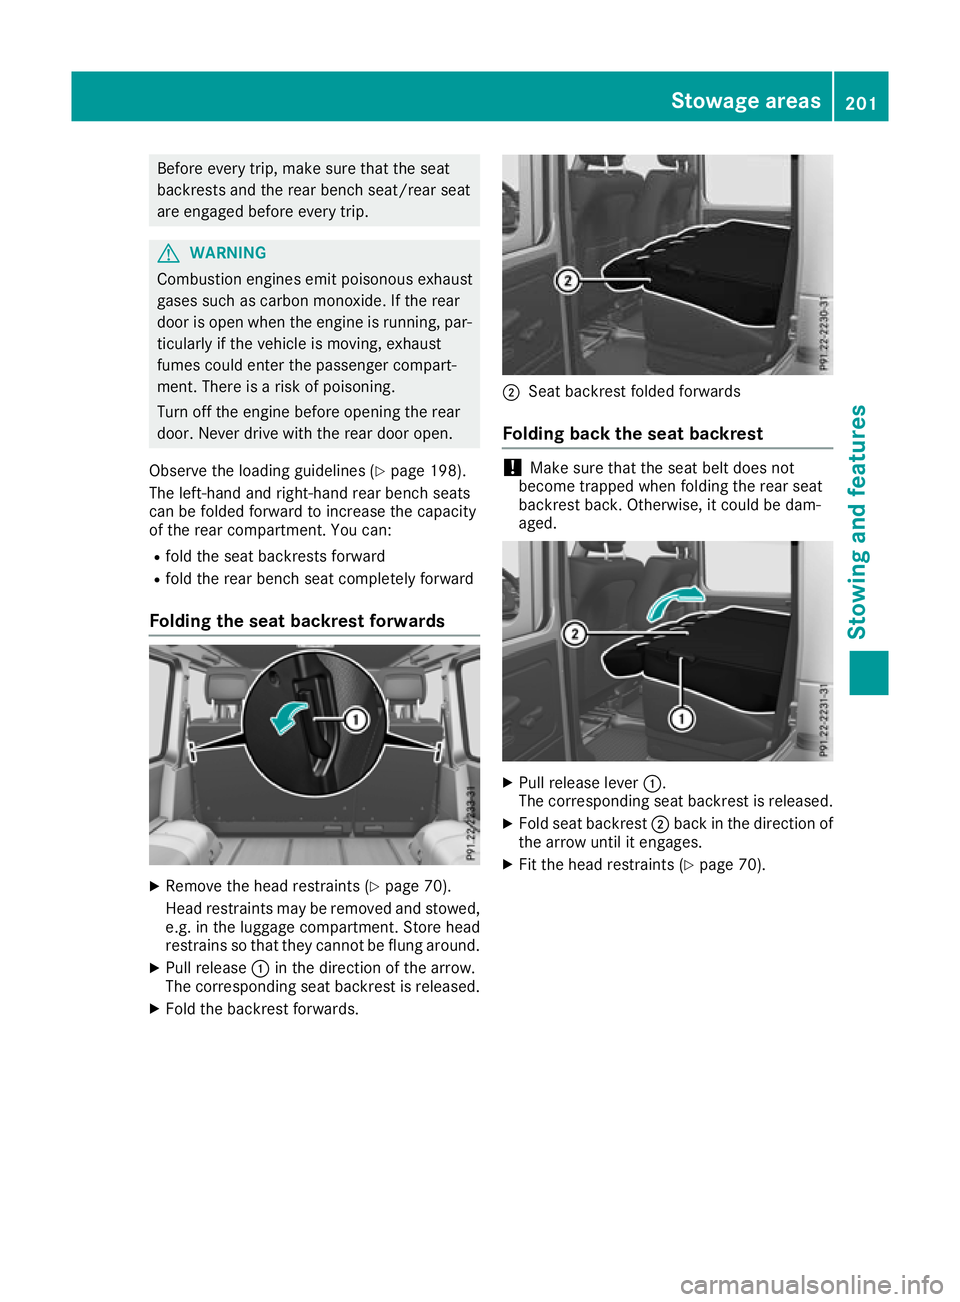
Folding the seat backrest forwards X
Remove the head restraints (Y page 70).
Head restraints ma yberemove dand stowed,
e.g. in th eluggag ecom partment. Store head
restrain ssothatthe yc anno tbeflungaround.
X Pull release :in th edirection of th earrow.
The corresponding seat backrest is released.
X Fold th ebackrest forwards. ;
Seat backres tfolded forwards
Folding bac kthe seat backrest !
Make sure that the seat belt does not
become trapped when folding the rear seat
backrest back .Otherwise, it could be dam-
aged. X
Pull release lever :.
The corresponding seat backrest is released.
X Fold seat backrest ;back in the direction of
the arrow until it engages.
X Fit the head restraints (Y page 70). Stowage areas
201Stowing and features Z
Page 205 of 261
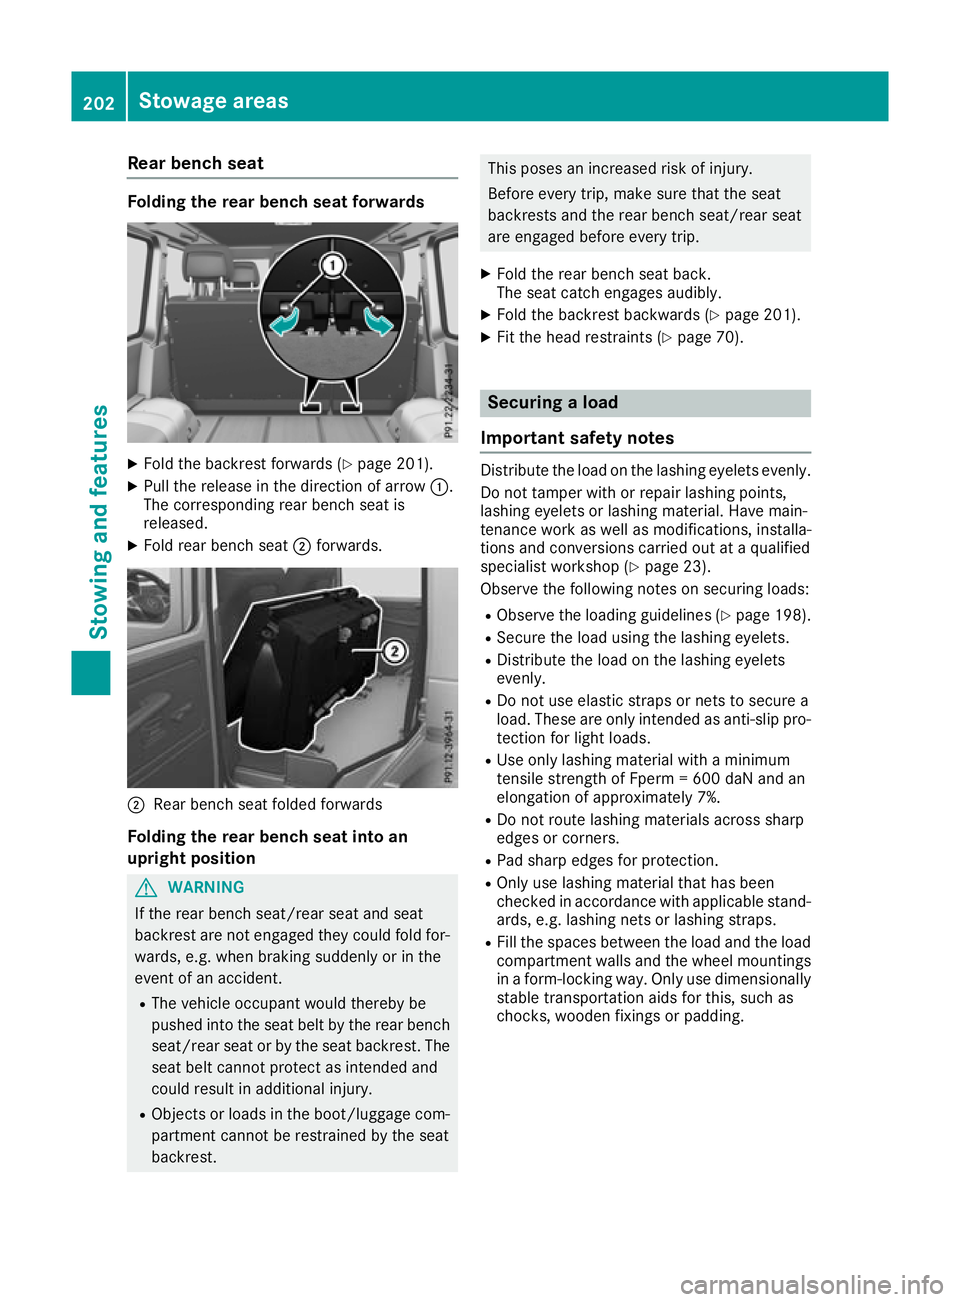
Rear benc
hseat Folding th
erearb ench seat forwards X
Fold th ebackrest forward s(Ypage 201).
X Pull the release in the directio nofarrow:.
The corresponding rea rbench sea tis
released.
X Fold rea rbench seat ;forwards. ;
Rear bench seat foldedf orwards
Folding th erearb ench sea tint oan
upright position G
WARNING
If th erear bench seat/rea rseat and seat
backrest are not engaged they coul dfold for-
wards, e.g. when braking suddenly or in the
event of an accident.
R The vehicl eoccupant would thereby be
pushed into the seat beltb ythe rear bench
seat/rea rseat or by the seat backrest. The
seat beltc annot protect as intended and
coul dresult in additiona linjury.
R Objects or loads in the boot/luggag ecom-
partment cannot be restrained by the seat
backrest. This poses an increased risk of injury.
Befor
eevery trip, make sure that the seat
backrest sand the rear bench seat/rear seat
are engaged before every trip.
X Fold the rear bench seat back.
The seat catche ngages audibly.
X Fold the backrest backwards (Y page 201).
X Fit the head restraints (Y page 70). Securing
aload
Important safety notes Distribute the load on the lashing eyelets evenly.
Do not tamper with or repair lashing points,
lashing eyelets or lashing mater ial.Hav emain-
tenance work as well as modifications, installa-
tions and conversions carrie doutataq uali fied
specialis tworkshop (Y page 23).
Observe the following note sonsecuring loads:
R Observe the loading guideline s(Ypage 198).
R Secure the load using the lashing eyelets.
R Distribute the load on the lashing eyelets
evenly.
R Do not us eelast ic straps or nets to secur ea
load .These ar eonlyi ntende dasanti-slip pro-
tection for light loads.
R Use onl ylas hing material with aminimum
tensil estrength of Fperm =600 da Nand an
elongation of approximately 7%.
R Do not route lashing material sacross sharp
edge sorc orners.
R Pa ds harp edge sfor protection.
R Onl yuselashing material tha thas been
checked in accordance with applicabl estand-
ards ,e.g.las hing nets or lashing straps.
R Fillthe space sbetween the load and the load
compartment wall sand the whee lmountings
in af orm-locking way. Onl yusedimensionally
stabl etransportatio naidsf or this, such as
chocks, wooden fixings or padding. 202
Stowag
eareasStowing and features
Page 210 of 261
could sli
porbef lung around and thereby
strike vehicle occupants. In addition, cup
holders, ope nstowag espaces and mobile
phone brackets may not always be able to
hol dthe objects place dinthem in the event of
an accident. There is ariskofi njury, particu-
larly in the event of sharp braking or sudden
changes of direction.
R Alway sstow objects in such awaythat they
cannot be tosse dabout in these or similar
situations.
R Alway smake sure that objects do not proj-
ect from stowag espaces, luggage nets or
stowag enets.
R Ensure that closable stowag espaces are
shu tbefore beginning your journey.
R Alway sstow and secure heavy, hard, poin-
ted, sharp-edged, fragil eoroutsize objects
in the loa dcompartment. G
WARNING
The cup holder cannot secure adrinks con-
tainer in place during ajourney .Ifyou use a
cup holder during ajourney ,the drinks con-
tainer coul dbeflung around and liquid could
be spilt. Vehicle occupants coul dcome into
contact with the liquid and, in particular, be
scalded by hot liquid.Y ou couldbedistracted
from the traffic situation and lose control of
the vehicle. There is arisk of an accident and
injury.
Only use the cup holder when the vehicl eis
stationary. Only place containers of asuitable
size in the cup holder. Seal the container, in
particular when it contains hot liquid.
! Only use the cup holders for containers of
the right size and which have lids. The drinks
coul dotherwise spill.
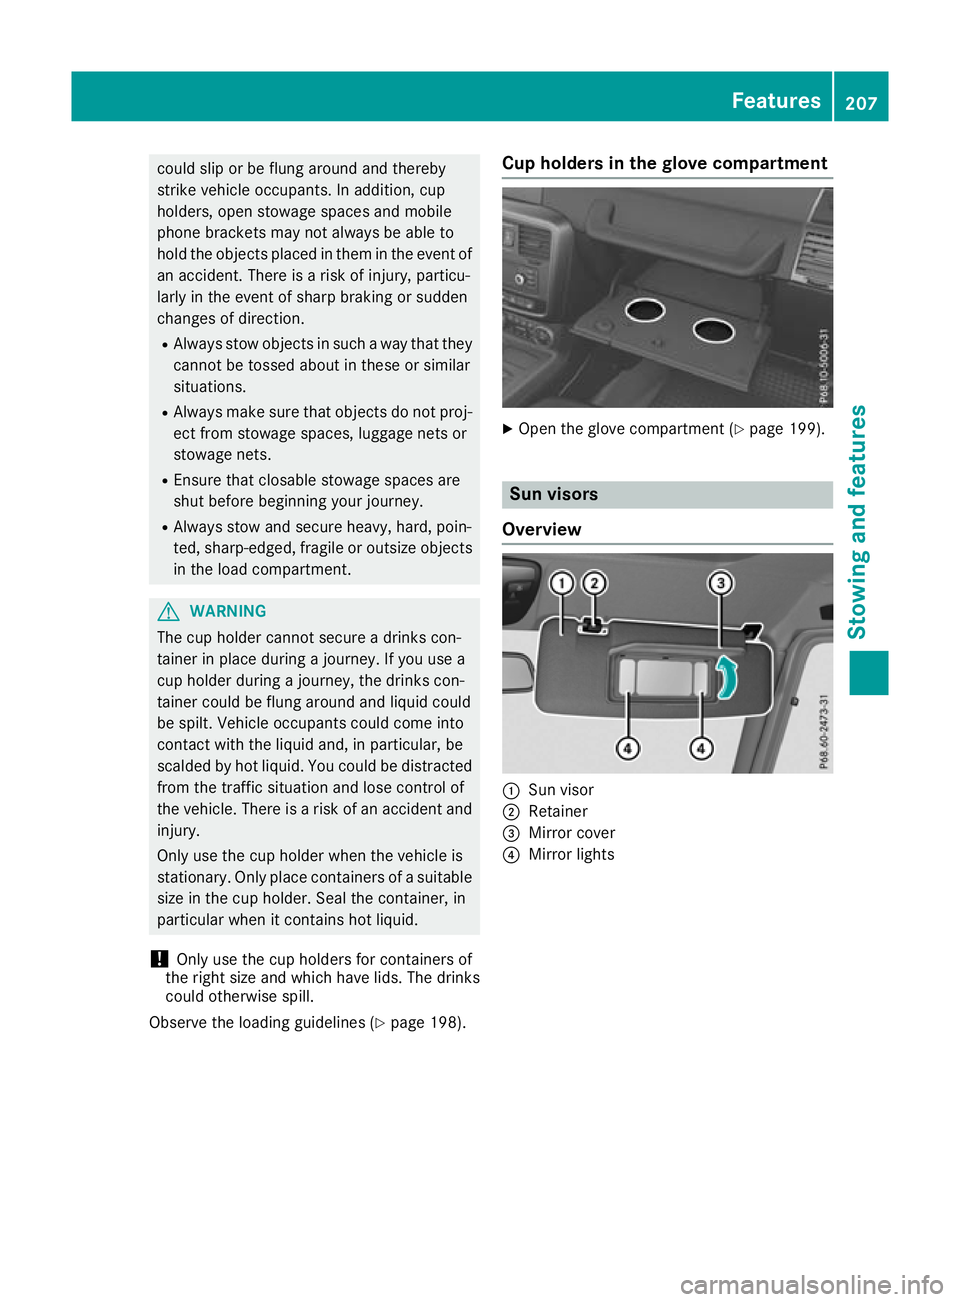
Observe the loading guidelines (Y page198). Cu
ph olders in th eglove compartment X
Ope nthe glove compartment (Y page 199). Sun visors
Overview :
Sun visor
; Retainer
= Mirror cover
? Mirror lights Features
207Stowing and features Z
Page 219 of 261
The ASSYST service interval display inform
syou
of the next service due date.
If as ervice due date has been exceeded, you
also hear awarning tone.
The multifunction display shows aservice mes-
sage for afew seconds, e.g.:
Service Ain999,999 km
Service Ain999,999 km
Service Ain..d ays
Service Ain..d ays
Service Adue
Service Adue
Service Aoverdue by 999,999 km
Service Aoverdue by 999,999 km
Service Aoverdue by .. days
Service Aoverdue by .. days
Maintaining the time-dependent service sched-
ule:
X Call up and noted own the service due date
before disconnectin gthe battery.
or X After reconnecting the battery, subtract the
battery disconnection periods from the ser-
vice date shown on the display.
The symbol and the letter indicate which type of service is due:
¯ Minor service A
A
± Major service B B
The ASSYST service interval display does not
take into account any periods of time during
which the battery is connected.
Hiding service messages X
To hide the service message, press the %
back button on the multifunction steering
wheel (Y page 132).
Displaying service messages Use the buttons on the multifunction steering
wheel.
X Switch the ignition on.
X Press =or; to select the standard
display menu on the steering wheel
(Y page 133).
X Press 9or: to select the ASSYST ser-
vice interval display.
The ¯ or± service symbol and the ser-
vice due date are displayed. Special service requirements The prescribed service interval is based on nor-
mal operation of the vehicle. Servic ework will
need to be performed more often if the vehicle is operated under arduous conditions or increased
loads, for example:
R regular city driving with frequent intermediate
stops
R if the vehicle is primarily used to travel short
distances
R for frequent operation in mountainous terrain
or on poor road surfaces
R if the engine is often left idling for long periods
In these or similar operating conditions, have,
for example, the air filter, engine oil and oil filter changed more frequently. The tyres must be
checked more frequently if the vehicle is oper-
ated under increased loads. Further information can be obtained at aqualified specialist work-
shop, e.g. aMercedes-Benz Servic eCentre. Fuel/water separator
! If you continue driving without having the
fuel/wate rseparato rserviced, this could
caus edamag etotheengine. An yresulting
damag eisnotcovered by th ewarranty. H
Environmenta
lnote
Dispose of servic eproduct sinane nviron-
mentally-responsible manner.
If th efuel/water separator needs servicing:
R the ! Clean
Clean the thefuel
fuel filter
filter message
is shown in th emultifunction display
R aw arning tone sounds
X Consult aqualifie dspecialist workshop. Care
General notes
! For cleaning your vehicle, do not use any of
the following:
R dry ,rough or hard cloths
R abrasive cleaning agents
R solvents
R cleaning agents containing solvents
Do not scrub. 216
CareMaintenanc
eand care
Page 220 of 261
Do not touch the surfaces or protective films
with hard objects ,e.g.ar ingori ce scraper.
Yo uc ould otherwis escratch or damage the
surfaces and protective film.
! Do not park up your vehicl
efor alon gp eriod
of time immediatel yafter cleaning, particu-
larly after cleaning the whee lrim with wheel
cleaner. Whee lcleane rmaylead to increased
corrosion of the brake discs and pads .You
shoul dtherefore drive for afew minute safter
cleaning. By heating up the brakes ,the brake
discs and pads dry .The vehicl ecan the nbe
parked up for alon gp eriodoft ime. H
Environmental note
Dispose of empty packaging an dcleaning
cloths in an environmentally responsible man- ner.
Regular car eofyour vehicle is acondition for
retainin gqualit yint helongterm.
Use car eproduct sand cleaning agents recom-
mended and approved by Mercedes-Benz. Washin
gthe vehiclea nd cleaning the
paintwork
Automatic car wash G
WARNING
Braking efficiency is reduced after the vehicle has been washed. There is arisk of an acci-
dent.
After washing the vehicle, brake carefully
while paying attention to the traffic conditions in order to restore full braking efficiency.
! When the HOLD function is activated, the
vehicl ebrakes automatically in certain situa-
tions.
To avoi ddamage to the vehicle, deactivate
the HOLD function in the following or similar
situations:
R when towing away
R in ac ar wash
! Make sure that the automatic car washis
suitable for the size of the vehicle. Fold in the exterior mirrors before the vehicl eiswashed.
The exterior mirrors coul dotherwise be dam-
aged. !
Make sure that the automatic transmission
is in position Nwhen washing your vehicle in
at ow-through car wash. The vehicle could be
damagedift he transmission is in another
position.
! Make sure:
R the side windows and sliding sunroof are
closed completely.
R the blower is switched off
R the windscreen wiper switch is at position
0
The vehicle could otherwise be damaged.
You can wash the vehicle in an automatic car
wash from the very start.
If the vehicle is very dirty, wash off excess dirt
before cleaning the vehicle in an automatic car
wash.
After using an automatic car wash, wipe off the
wax from the windscreen and the windscreen
wiper blades. This will prevent smears and
reduce wiping noises caused by residue on the
windscreen.
Washing by hand In some countries, washing by hand is only
allowed at specially equipped washing bays.
Observe the legal requirements for each indi-
vidual country.
When using the vehicle in winter, remove all
traces of road salt deposits carefully and as
soon as possible.
When washing the underside of the vehicle, also
clean the insides of the wheels.
X Do not use hot water and do not wash the
vehicle in direct sunlight.
X Use asoft sponge to clean.
X Use amild cleaning agent, such as acar
shampo oapproved by Mercedes-Benz.
X Thoroughly hose down the vehicle with agen-
tle jet of water.
X Do not point the water jet directly towards the
air inlet.
X Use plenty of water and rinse out the sponge
frequently.
X Rinse the vehicle with clean water and dry
thoroughl ywithachamois.
X Do not let the cleaning agent dry on the paint-
work. Ca
re
217Maintenance an dcare Z