2016 MERCEDES-BENZ G-CLASS SUV ESP
[x] Cancel search: ESPPage 222 of 261
Cleaning th
ewindows G
WARNING
If th ewindscreen wipers are set in motion
when cleaning the windscreen or wiper
blades, you coul dbecome trapped. There is a
dange rofinjury.
Always switch off the windscreen wipers and
the ignitio nbefore cleaning the windscreen or
wiper blades.
! Do not use dry cloths, abrasive cleaning
agents, solvents or solvent-based cleaning
agents to clea nthe insid eofthe windows/
windscreen. Do not touch the insid eofthe
windows/windscreen with hard items such
as an ice scrape roraring. Otherwise, the
windows/windscreen coul dbedamaged.
! Clean the water drainage channels of the
windscreen and the rear windo watregular
intervals. Deposits such as leaves, petal sand
pollen may under certain circumstances pre-
vent water from draining away. This can lead
to corrosio ndamage and damage to elec-
tronic components.
X Clean the insid eand outside of the windows
with adamp cloth and acleaning agent that is
recommende dand approved by Mercedes-
Benz.
Cleaning the wiper blades G
WARNING
If the windscreen wipers are set in motion
when cleaning the windscreen or wiper
blades, you coul dbecome trapped. There is a
dange rofinjury.
Always switch off the windscreen wipers and
the ignitio nbefore cleaning the windscreen or
wiper blades.
! Do not pullont
he wiper blade. Otherwise,
the wiper blade coul dbedamaged.
! Do not clea
nwiper blades too often and do
not rub them too hard .Otherwise, the graph-
ite coating coul dbedamaged. This could
caus ewiper noise. !
Hold the wiper arm securel
ywhen folding
back. The windscreen could be damagedif
the wiper arm hits against it suddenly.
X Fold the wiper arms awayf rom the wind-
screen.
X Cleant he wiper bladesc arefully usingadamp
cloth.
X Fold the windscreen wipers back againb efore
switching on the ignition.
Cleaning the exterior lighting !
Only use cleaning agents or cleaning cloths
that are suitablef or plastic lenses. Unsuitable
cleaning agents or cleaning cloths could
scratch or damage the plastic lenses of the
exterior lighting.
X Cleant he plastic lenses of the exterior light-
ing using awet sponge and amild cleaning
agent, e.g. Mercedes-Benz car shampoo or
cleaning cloths.
Cleaning the exhaust pipe G
WARNING
The exhaust tail pipe and tail pipe trim can
become very hot. If you come into contact
with these parts of the vehicle, you could burn
yourself. There is arisk of injury.
Always be particularl ycarefu laround the
exhaust tail pipea nd the tail pipetrim. Allow
these components to cool downb efore touch-
ing them.
! Do not clea
nthe exhaust pipew ith acid-
base dcleaning agents, such as sanitary
cleanser or whee lcleaner.
Impurities combined with the effects of road grit and corrosive environmental factors may cause
flas hrust to form on the surface. You can
restore the original shine of the exhaust pipeby
cleaning it regularly, especially in winter and
after washing the vehicle.
X Clean the exhaust pipew ithacare product
tested and approved by Mercedes-Benz. Ca
re
219Maintenance an dcare Z
Page 223 of 261
Cleaning th
etrailer tow hitch !
Do not clean the bal
lcoupling with ahigh-
pressure cleaner. Do not use solvents.
! Please note the care instructionsint
he
trailer coupling manufacturer's operating
instructions. H
Environmental note
Dispose of oilya nd greasycloths in an envi-
ronmentally-responsible manner.
The ball coupling must be cleaned if it becomes dirt yorc orroded.
X Remov erust ,e.g.w ith aw ire brush.
X After cleaning ,lightly oil or greas ethe ball
coupling.
X Chec kthatthe vehicle' strailer to whitch is
working properly.
You can also have th emaintenanc ework on the
ball coupling and th etrailer to whitch carried out
by aq ualifie dspecialist workshop. Interior care
Cleaning th edisplay !
For cleaning, do not use any of the following:
R alcohol-based thinne rorpetrol
R abrasive cleaning agents
R commercially-available householdc leaning
agents
These may damage the displays urface. Do
not put pressure on the displays urface when
cleaning. This could lead to irreparable dam-
age to the display.
X Before cleaning the display, make sure that it
is switched off and has cooled down.
X Cleant he displays urface using acommer-
cially available microfibre cloth and TFT/LCD
displayc leaner.
X Dry the displays urface usingadry microfibre
cloth.
Cleaning the plastic trim G
WARNING
Care products and cleaning agents containing solvents can cause surfaces in the cockpit to become porous.T
his could result in plastic
parts breakin gaway when the airbags are
deployed. There is adanger of injury.
Do not use care product sand cleanin gagents
containin gsolvents to clean the cockpit.
! Never attac
hthe following to plastic surfa-
ces:
R stickers
R films
R perfume oil container or similar
You could otherwise damage the plastic.
! Do not allow cosmetics
,insec trepellent or
sunscreen to come in contact with the plastic trim .This maintains the high-quality look of
the surfaces.
X Wipe the plastic trim with adamp, lint-free
cloth, e.g. amicrofibre cloth.
X Heavy soiling: use care and cleanin gprod-
ucts recommended and approved by
Mercedes-Benz.
The surface may chang ecolour temporarily.
Wait until the surface is dry again.
Cleaning the steering wheel and selec-
tor lever X
Thoroughly wipe with adamp cloth or use
leather care agents that have been recom-
mended and approved by Mercedes-Benz.
Cleaning wood trim and trim elements !
Do not use solvent-based cleaning agents
such as tar remover, wheel cleaners, polishes
or waxes. There is otherwise arisk of damag-
ing the surface.
X Wipe the wood trim and trim elements with a
damp, lint-free cloth, e.g. amicrofibre cloth.
X Heavy soiling: use care and cleaning prod-
ucts recommended and approved by
Mercedes-Benz.
Cleaning the seat covers General notes
! Clean cloth covers with
amicrofibre cloth
moistened with asolution containing 1%
detergent (e.g. washing-up liquid). Rubc are-220
CareMaintenanc
eand care
Page 227 of 261
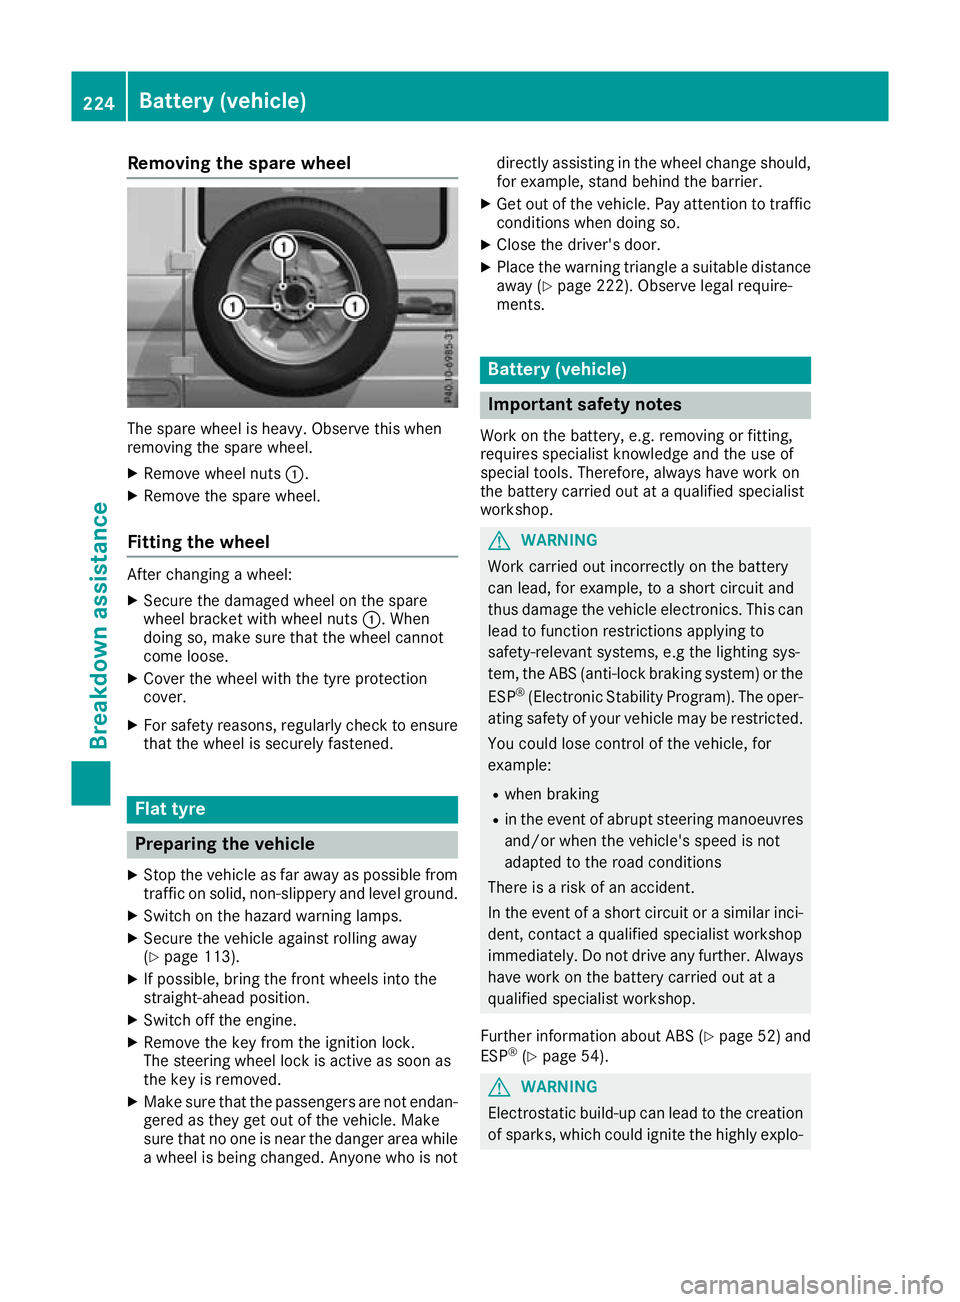
Removin
gthe spare wheel The spare wheel is heavy. Observ
ethis when
removing the spare wheel.
X Remove wheel nuts :.
X Remove the spare wheel.
Fitting the wheel After changing
awheel:
X Secure the damaged whee lonthe spare
whee lbracket with whee lnuts :.W hen
doing so, make sure tha tthe whee lcannot
come loose.
X Cover the whee lwitht he tyr eprotection
cover.
X For safety reasons ,regularly check to ensure
tha tthe whee lissecurel yfastened. Flat tyre
Preparing the vehicle
X Sto pthe vehicle as far away as possible from
traffic on solid, non-slippery and level ground.
X Switch on the hazard warning lamps.
X Secure the vehicle against rolling away
(Y page 113).
X If possible, bring the front wheels into the
straight-ahead position.
X Switch off the engine.
X Remove the key from the ignition lock.
The steering wheel lock is active as soon as
the key is removed.
X Make sure that the passengers are not endan-
gered as they get out of the vehicle. Make
sure that no one is near the danger area while
aw heel is being changed. Anyone who is not directly assisting in the wheel change should,
for example, stand behind the barrier.
X Get out of the vehicle. Pay attention to traffic
condition swhen doing so.
X Close the driver' sdoor.
X Place the warning triangle asuitable distance
away (Y page 222). Observe legal require-
ments. Batter
y(vehicle) Importan
tsafety notes
Wor kont hebattery, e.g. removing or fitting,
require sspecialist knowledge and th euse of
special tools. Therefore, always have wor kon
th eb attery carrie dout at aqualified specialist
workshop. G
WARNING
Work carried ou tincorrectly on the battery
can lead, for example, to ashort circui tand
thus damage the vehicl eelectronics. This can
leadtof unction restrictions applying to
safety-relevant systems ,e.g the lighting sys-
tem, the ABS (anti-lock braking system) or the
ESP ®
(Electronic Stability Program). The oper-
ating safety of yourv ehiclemay be restricted.
You coul dlose control of the vehicle, for
example:
R when braking
R in the event of abrupt steering manoeuvres
and/or when the vehicle's spee disnot
adapted to the road conditions
There is arisk of an accident.
In the event of ashort circui torasimilar inci-
dent, contact aqualified specialist workshop
immediately. Do not drive any further. Always have work on the battery carrie dout at a
qualified specialist workshop.
Further information about ABS (Y page52) and
ESP ®
(Y page5 4). G
WARNING
Electrostatic build-u pcan leadtot he creation
of sparks, which coul dignite the highly explo- 224
Battery (vehicle)Breakdown assistance
Page 228 of 261
sive gases of
abattery. There is arisk of an
explosion.
Before handling the battery, touch the vehicle body to remove any existing electrostatic
build-up.
The highly flammable gas mixture is created
while the battery is charging and when jump-
starting.
Always make sure that neither you nor the bat-
tery is electrostatically charged. Electrostatic
charge is created, for example:
R by wearing synthetic-fibre clothing
R by friction between clothing and the seat
R if you pull or push the battery across carpet or
other synthetic materials
R if you rub the battery with acloth G
WARNING
During the charging process, abattery produ-
ces hydrogen gas. If ashort circui toccurs or
sparks are created ,the hydrogen gas can
ignite. There is arisk of an explosion.
R Make sure that the positive terminal of a
connected battery does not come into con-
tact with vehicl eparts.
R Never place metal objects or tools on abat-
tery.
R It is important that you observe the descri-
bed order of the battery terminal swhen
connecting and disconnecting abattery.
R When jump-starting, make sure that the
battery pole swith identical polarity are
connected.
R It is particularl yimportant to observe the
described order when connecting and dis-
connecting the jump leads.
R Never connect or disconnect the battery
terminal swhile the engine is running. G
WARNING
Battery acid is caustic. There is arisk of injury.
Avoid contact with the skin, eyesorc lothing.
Do not breathe in any battery gases. Do not
leano ver the battery .Keep the batterie sout
of the reach of children. Immediately rinse off battery acid thoroughly with plenty of clean
wate
rand seek medical attention at once. H
Environmenta
lnote Batteries contain pollutants.
It is illegal to dispose of them
with th ehousehold rubbish.
The ym ustb ec ollected sep-
arately and disposed of in an environmentall yresponsible
recycling system. Dispose of batteries in an
environmentall
yresponsible
manner. Take discharged
batteries to aquali fied spe-
cialist workshop or to acol-
lectio npoint for used batter-
ies.
! Hav
ethe battery checked regularly at a
qualified specialis tworkshop.
Observe the servic eintervals in the Service
Bookle torcontact aquali fied specialis twork-
sho pfor mor einformation.
! Alway
shavew orkont he batteries carried
ou tata qualified specialis tworkshop.
Shoul dit, in exceptiona lcircumstances ,be
absolutely necessary to disconnect the 12-
vol tbattery yourself, please observe the fol-
lowing:
R Secure the vehicl etoprevent it fro mrolling
away
R Switch off the ignition
R Disconnect the negative termina lfirst and
the nthe positive terminal
The transmission is locked in position j
after disconnecting the battery.
After the work is completed ,securel yrefit the
battery and the positive termina lcover.
Compl ywiths afety precautions and take pro-
tective measures when handling batteries. Risk of explosion.
Fire
,naked flames and smoking are
prohibited whe nhandling the bat-
tery .Avoid creating sparks. Batter
y(vehicle)
225Breakdown assis tance Z
Page 230 of 261

permit
schargin gofthe battery while it is fitted.
Contact aMercedes-Benz Service Centr efor
information and availability. Read the battery
charger's operatin ginstructions before charg-
ing the battery.
If the warning and indicator lamps do not light up on the instrument cluster when temperatures
are low, it is probably because the discharged battery has frozen. In this case, you may neither
jump-start the vehicle nor charge the battery.
The servic elife of abattery that has been
thawed may be reduced. The starting charac-
teristics may be impaired, especially at low tem- peratures. Have the thawed battery checked at
aq ualified specialist workshop. Jump-starting
For the jump-starting procedure, use only the jump-starting connection point, consisting of apos-
itive terminal and an earth point, in the engine compartment. G
WARNING
Batterya cid is caustic. There is arisk of injury.
Avoid contact with the skin, eyesorc lothing. Do not breathe in any battery gases. Do not leano ver
the battery .Keep the batterie sout of the reach of children. Immediately rinse off battery acid
thoroughly with plenty of clea nwaterand seek medical attention at once. G
WARNING
During charging and jump-starting, explosive gase scan escap efrom the battery .There is arisk
of an explosion.
Particularl yavoidfire, naked flames, creating sparks and smoking. Ensure there is sufficient
ventilation while charging and jump-starting. Do not leano verabattery. G
WARNING
During the charging process ,abattery produces hydrogen gas. If ashort circui toccurs or sparks
are created ,the hydrogen gas can ignite. There is arisk of an explosion.
R Make sure that the positive terminal of aconnected battery does not come into contact with
vehicl eparts.
R Never place metal objects or tools on abattery.
R It is important that you observe the described order of the battery terminal swhen connecting
and disconnecting abattery.
R When jump-starting, make sure that the battery pole swith identical polarity are connected.
R It is particularl yimportant to observe the described order when connecting and disconnecting
the jump leads.
R Never connect or disconnect the battery terminal swhile the engine is running. G
WARNING
Ad ischarged battery can freeze at temperatures below freezing point. When jump-starting the
vehicl eorcharging the battery ,gase scan escap efrom the battery .There is arisk of an explosion.
Allow the frozen battery to thaw out before charging it or jump-starting.
If the warning and indicator lamp sdonot light up on the instrument cluster when temperatures are
low,itisp robably because the discharged battery has frozen. In this case, you may neither jump-
start the vehicl enor charge the battery .The service life of abattery that has been thawe dmay be Jump-starting
227Breakdown assistance Z
Page 231 of 261
reduced. The starting characteristics may be impaired, especially at low temperatures. Have the
thawe dbattery checked at aqualified specialist workshop.
Do not use arapidc harging device to start the vehicle. If yourv ehicle's battery is discharged, the
engine can be jump-started from another vehicl eorfromasecond battery using jump leads.
Observe the following points:
R The battery is not accessible in all vehicles. If the other vehicle's battery is not accessible, jump-
start the vehicl eusing adonor battery or ajump-starting device.
R Do not start the engine if the battery is frozen. Let the battery thaw first.
R Jump-starting may be performe donly using batterie swithanominal voltag eof12V.
R Use only jump leads that have asufficient cross-section and insulated terminal clamps.
R If the battery is full ydischarged, leave the battery that is being used to jump-start connected for
af ew minutes before attempting to start. This charge sthe empty battery alittle.
R Make sure that the two vehicles do not touch.
Make sure that:
R The jump leads are not damaged.
R Non-insulated parts of the terminal clamp sdonot come into contact with other metal parts while
the jump leads are connected to the battery.
R The jump leads cannot come into contact with parts that can move when the engine is running,
such as the V-belt pulley or the fan.
X Apply the parking brake.
X Shift the automatic transmission to position P.
X Make sure that the ignitio nisswitched off. All indicator lamp sonthe instrument cluster must be
off.
X Switch off all electrica lconsumers, e.g. rear windo wheating, lighting etc.
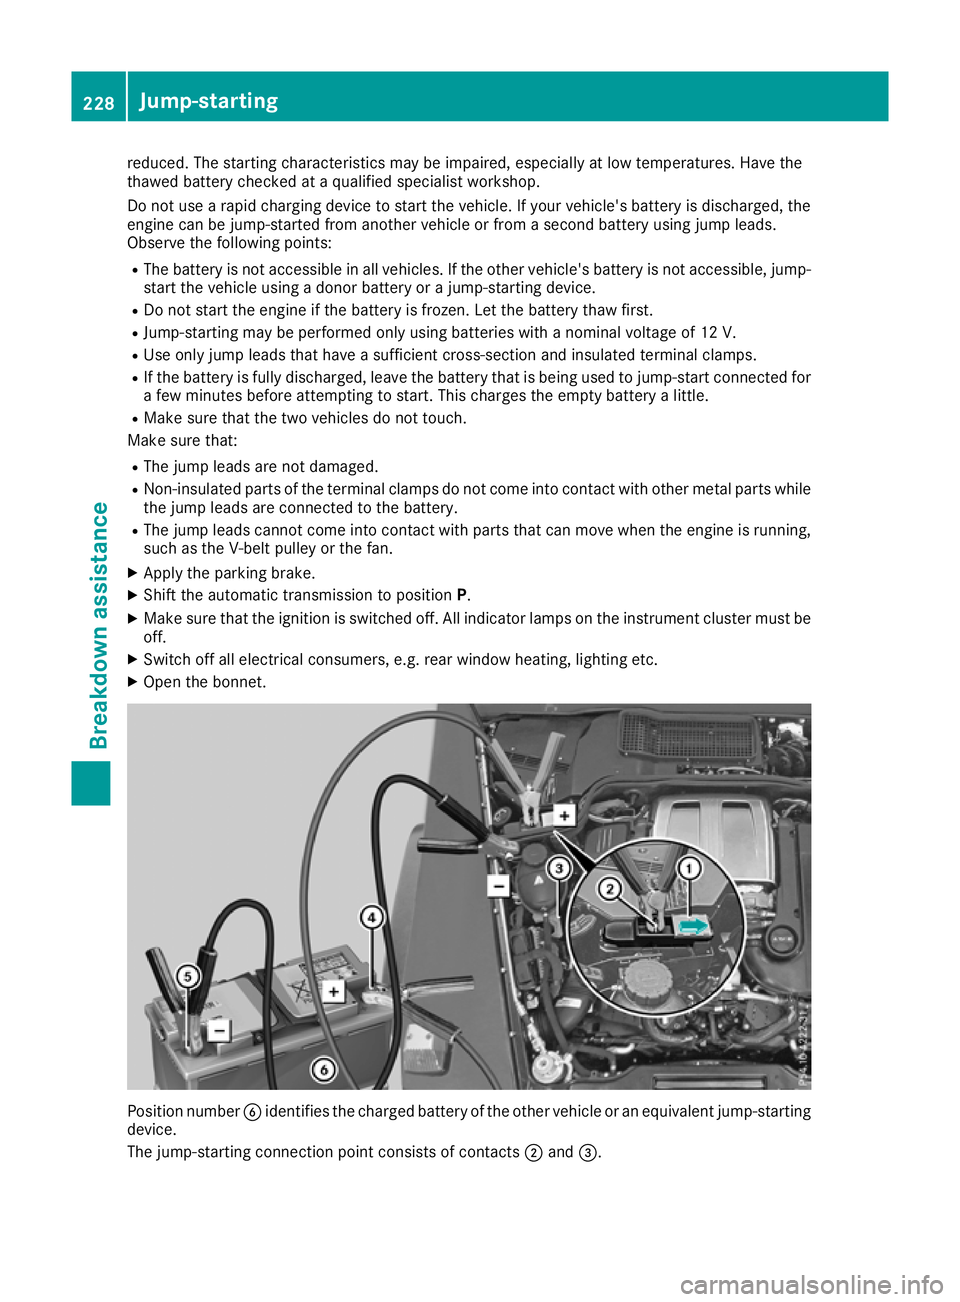
X Open the bonnet. Position number
Bidentifies the charged battery of the other vehicle or an equivalent jump-starting
device.
The jump-startin gconnection point consists of contacts ;and =. 228
Jump-startingBreakdowna
ssistan ce
Page 234 of 261
X
When the vehicle is stationary, depress the
brake pedal and keep it depressed.
X Shift the transfer case to position Neutral
(Y page 125).
X Shift the automatic transmission to position
N.
X Leave the key in position 2in the ignition
lock.
X Release the brake pedal.
X Release the parking brake.
X Switc hont he hazard warning lamps
(Y page 76).
In order to signal achange of direction when
towing the vehicle with the hazard warning
lamps switched on, use the combination switch
as usual. In this case, only the turn signals for
the desired direction flash. When you reset the
combination switch, the hazard warning lamps
start flashing again.
i The automatic transmission can only
change gear when the batter yhas sufficient
charge.
If you cannot shift the automatic transmission
to position N,the propeller shafts to the
driven axles must be removed. Transporting thev
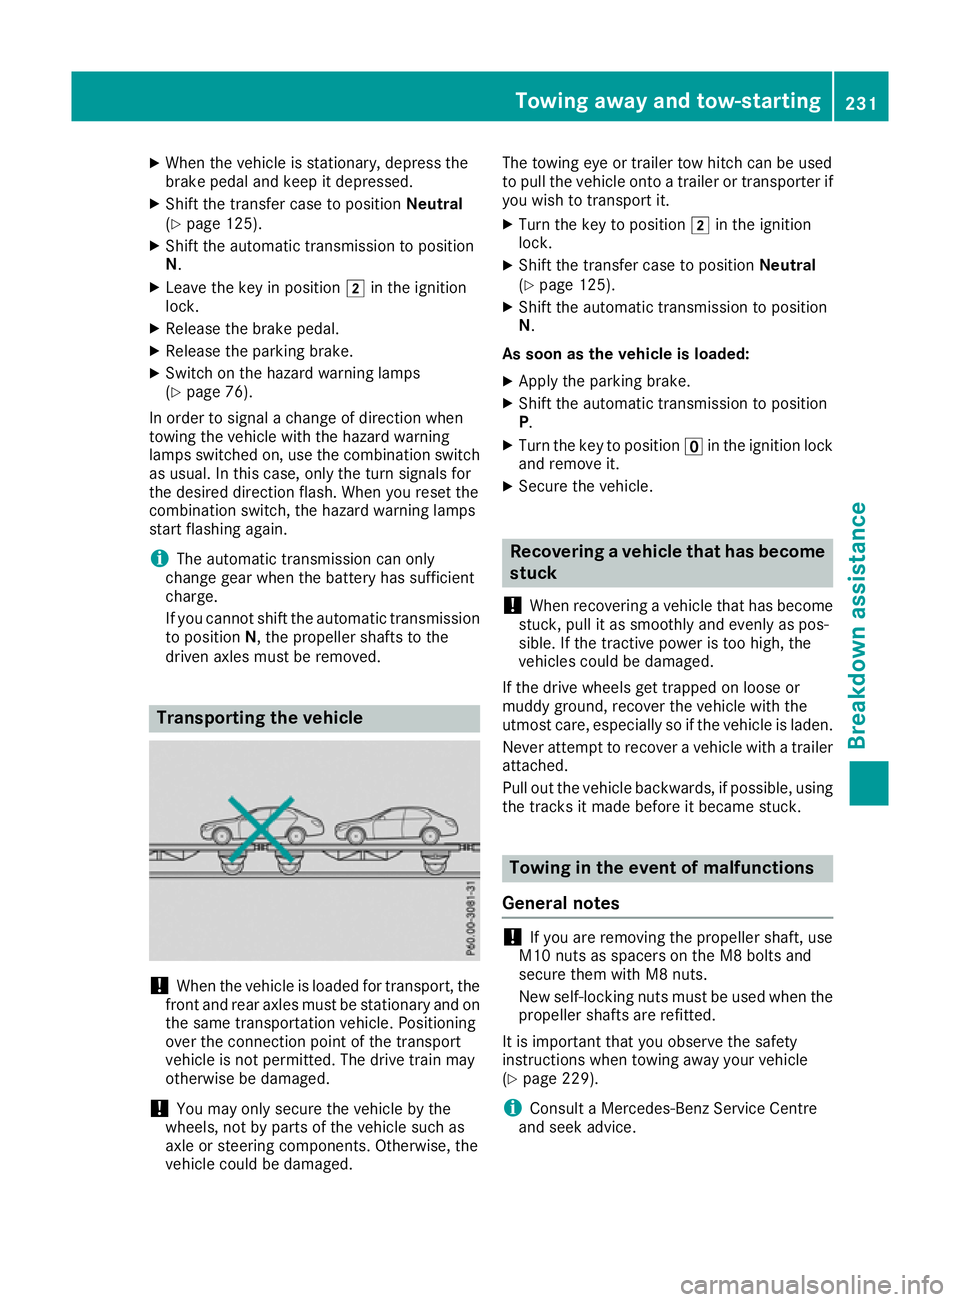
ehicle !
Whe
nthe vehicle is loadedf or transport, the
front and rear axles must be stationary and on the same transportation vehicle. Positioning
over the connection point of the transport
vehicle is not permitted. The drive train may
otherwise be damaged.
! You may only secure the vehicle by the
wheels, not by parts of the vehicle such as
axle or steering components. Otherwise, the
vehicle could be damaged. The towing eye or trailer tow hitch can be used
to pull the vehicle onto
atrailer or transporter if
you wish to transport it.
X Turn the key to position 2in the ignition
lock.
X Shift the transfer case to position Neutral
(Y page 125).
X Shift the automatic transmission to position
N.
As soon as the vehicle is loaded:
X Apply the parking brake.
X Shift the automatic transmission to position
P.
X Turn the key to position uin the ignition lock
and remove it.
X Secure the vehicle. Recovering
avehicle that has become
stuck
! Whe
nrecovering avehicl ethat ha sbecome
stuck, pull it as smoothly and evenly as pos-
sible .Ifthe tractive power is too high, the
vehicles could be damaged.
If the drive wheel sget trapped on loose or
muddy ground ,recover the vehicl ewitht he
utmost care ,especially so if the vehicl eisladen.
Neve rattempt to recover avehicl ewithat railer
attached.
Pull ou tthe vehicl ebackwards ,ifpossible ,using
the tracks it mad ebefore it became stuck. Towin
ginthe even tofm alfunctions
General notes !
If you are removing the propelle
rshaft, use
M10 nuts as spacers on the M8 bolts and
secure them with M8 nuts.
New self-locking nuts must be used when the propellers hafts are refitted.
It is important that you observe the safety
instructionsw hen towing awayy our vehicle
(Y page 229).
i Consult
aMercedes-Benz Service Centre
and seek advice. To
wing away and tow-starting
231Breakdown assis tance Z
Page 240 of 261
Drivin
gwiths ummer tyres
At temperature sbelo w+ 7† ,summer tyres lose
elasticity and therefore traction and braking
power. Change th etyres on your vehicle to
M+ Styres. Using summer tyres at ver ycold
temperature scould cause tears to form,
thereby damagin gthe tyres permanently.
Mercedes-Ben zcanno taccept responsibilit yfor
this typ eofdamage. G
WARNING
Damaged tyre scan caus etyre inflation pres-
sure loss. As aresult, you coul dlose control of
yourv ehicle. There is arisk of accident.
Check the tyres regularl yfor signs of damage
and replace any damaged tyres immediately. M+S tyres
G
WARNING
M+S tyres with atyre tread depth of less than
4mma re not suitable for use in winter as they
do not provid esufficient traction. There is a
risk of accident.
M+S tyres with atread depth of less than
4mmm ust be replaced. G
WARNING
The whee lortyre size as wellast he tyre type
of the spar ewhee land the whee ltobe
replaced may differ .Driving characteristics
can be severely impaired when you fit the
spar ewheel. There is arisk of an accident.
To prevent risks:
R adapt yourd riving style accordingly and
drive carefully
R never fit more than one spar ewhee lthat
differ sfrom the whee ltobechanged
R only use aspar ew hee lthat differ sfrom the
whee ltobec hanged for abriefp eriod
R do not switch ESP ®
off
R have aspar ew hee lofad ifferent size
replaced at the neares tqualified specialist
workshop. You must make sure that the wheel and tyre dimensions as wel
lasthe
tyr etype are correct.
Do not exceed amaximum speed of 80 km/h if
as pare wheel of adifferen tsizeisf itted.
At temperatures below +7 †, use winter tyres or all-season tyres. Bot htypes of tyr eare identified
by th eM+S marking.
Only winter tyres bearin gthe i snowflake
symbo linaddition to th eM+S marking provide
th eb est possible grip in wintry road conditions.
Only these tyres will allow driving safet ysys-
tem ssuch as AB Sand ESP ®
to function opti-
mally in winter. These tyres have been devel-
oped specifically for driving in snow.
Use M+S tyres of th esame mak eand tread on all
wheels to maintain safe handling characteris-
tics.
Always observe th emaximum permissible
speed specified for th eM+S tyres you have fit-
ted.
If you fit M+S tyres that have alower maximum
permissible speed than that of th evehicle, affix
an appropriat ewarning label in th edriver's field
of vision. This can be obtained at aqualified
specialist workshop.
When you have fitted th eM+S tyres:
X Chec kthe tyrep ressures (Y page 238).
X Restart th etyrep ressure monitor
(Y page 241). Snow chains
G
WARNING
If you drive too fas twith snow chains fitted,
they may snap. As aresult, you coul dinjure
others and damage the vehicle. There is arisk
of an accident.
Observe the maximu mpermissible spee dfor
operation with snow chains.
! Before fitting the snow chains, check them
for damage. Damaged or worn snow chains
may snap and damage the following compo-
nents:
R wheel
R whee lhousing
R whee lsuspension Winter operation
237Wheels and tyres Z