2016 MERCEDES-BENZ G-CLASS SUV remove seats
[x] Cancel search: remove seatsPage 23 of 261

Environmental protection
General notes
H
Environmenta
lnote
Daimler' sdeclared polic yisone of compre-
hensive environmental protection.
Our objectives are to use th enatural resour-
ces whic hformt hebasis of our existence on
this plane tsparingl yand in amanner which
takes th erequirements of bot hnature and
humanity int oconsideration.
You to ocan help to protect th eenvironment
by operatin gyour vehicle in an environmen-
tally-responsible manner.
Fuel consumption and th erateofe ngine,
transmission ,brak eand tyr ewear depen don
th ef ollowing factors:
R operatin gcondition sofyour vehicle
R your personal driving style
You can influenc ebothf actors. Therefore,
please bear th efollowing in mind:
Operatin gconditions:
R avoid shor ttrips, as these increase fuel
consumption.
R observe th ecorrec ttyrep ressure.
R do not carry any unnecessar yweight in the
vehicle.
R remove th eroof rac koncey ou no longer
nee dit.
R ar egularly serviced vehicle will contribute
to environmental protection .You should
therefore adher etotheservic eintervals.
R all maintenanc ework should be carried out
at aq ualifie dspecialist workshop.
Personal driving style:
R do not depress th eaccelerator pedal when
starting th eengine.
R do not warm up th eengine when th evehicle
is stationary.
R driv ecarefully and maintain asafe distance
fro mt hevehicle in front.
R avoid frequent, sudden acceleration and
braking. R
change gear in good time an duseeach gear
only up to Ôof its maximum engine speed.
R switch off the engine in stationar ytraffic.
R monitor the vehicle's fue lconsumption. Returnin
ganend-of-life vehicle
EU countrie sonly:
Mercedes-Benz will take back your end-of-life
vehicl efor environmentally friendl ydisposa lin
accordance with the Europea nUnion(EU) End-
Of-Life Vehicles Directive.
An etwork of return points and disassembly
plants ha sbeene stablished for yo utoreturn
your vehicle. Yo ucan leave it at any of these
points free of charge .Thism akesani mportant
contribution to closing the recycling circl eand
conserving resources.
For further information abou tthe recycling and
disposa lofend-of-life vehicles, and the take-
back conditions ,pleas evisit the national
Mercedes-Benz website for your country. Genuine Mercedes-Benz parts
H
Environmental note
Daimle rAGalso supplies reconditioned
assemblies and part swhicha re of th esame
qualit yasnew parts. For these, th esame war-
ranty applies as for new parts.
! Airbags and seat belt tensioners
,aswell as
control unit sand sensor sfor these restraint
systems, may be installe dinthefollowing
areas of your vehicle:
R doors
R door pillars
R door sills
R seats
R dashboard
R instrumen tcluster
R centr econsole
Do not install accessories such as audio sys-
tem sint hese areas. Do not carry out repairs
or welding. You could impair th eoperating
efficiency of th erestraint systems. 20
Introduction
Page 49 of 261
Problems with automatic child seat recognition
Problem
Possible causes/consequences and
M
MSolutions The PASSENGER AIR
BAG OFF indicator lamp
on the centre console is
lit. As
pecia lMercedes-Benz child restraint system with atransponde rfor
automatic child sea trecognitio nhasbeen fitte dtothe front-
passenge rseat. The front-passenger front airba ghastherefore been
disabled as desired. G
WARNING
There is no child restraint syste mfitted to the front-passenge rseat.
Automatic child seat recognitio nismalfunctioning, for exampl edue to
electronic devices on the front-passenge rseat.
There is arisk of injury.
X Remove electroni cequipment from the front-passenge rseat, e.g.:
R laptop
R mobil ephone
R ac ard with atransponder, such as aski pass or access pass
If the PASSENGER AIR BAG OFF indicator lamp remains lit, the front- passenger seat may not be used.
X Consult aqualified specialist workshop. When you switch the
ignition on, the
6
restraint system warning lamp lights up and/or
the PASSENGER AIR
BAG OFF indicato rlamp
does not light up briefly. G
WARNING
Automati cchild seat recognitio nismalfunctioning.
Do not install achild restraint system on the front-passenge rseat.
It is recommende dthat you fit the child restraint system to asuitable
rear seat.
X Consult aqualified specialist workshop.
X Please alsor efer to the notes about the restraint system warning
lamp (Y page161). Suitable positioningoft
he child
restraint system
Introduction Only child restraint systems that are approved in
accordance with ECE standard ECE R44 are per-
mitted for use in the vehicle.
"Universal" category child restraint systems can
be recognised by their orange approval label and
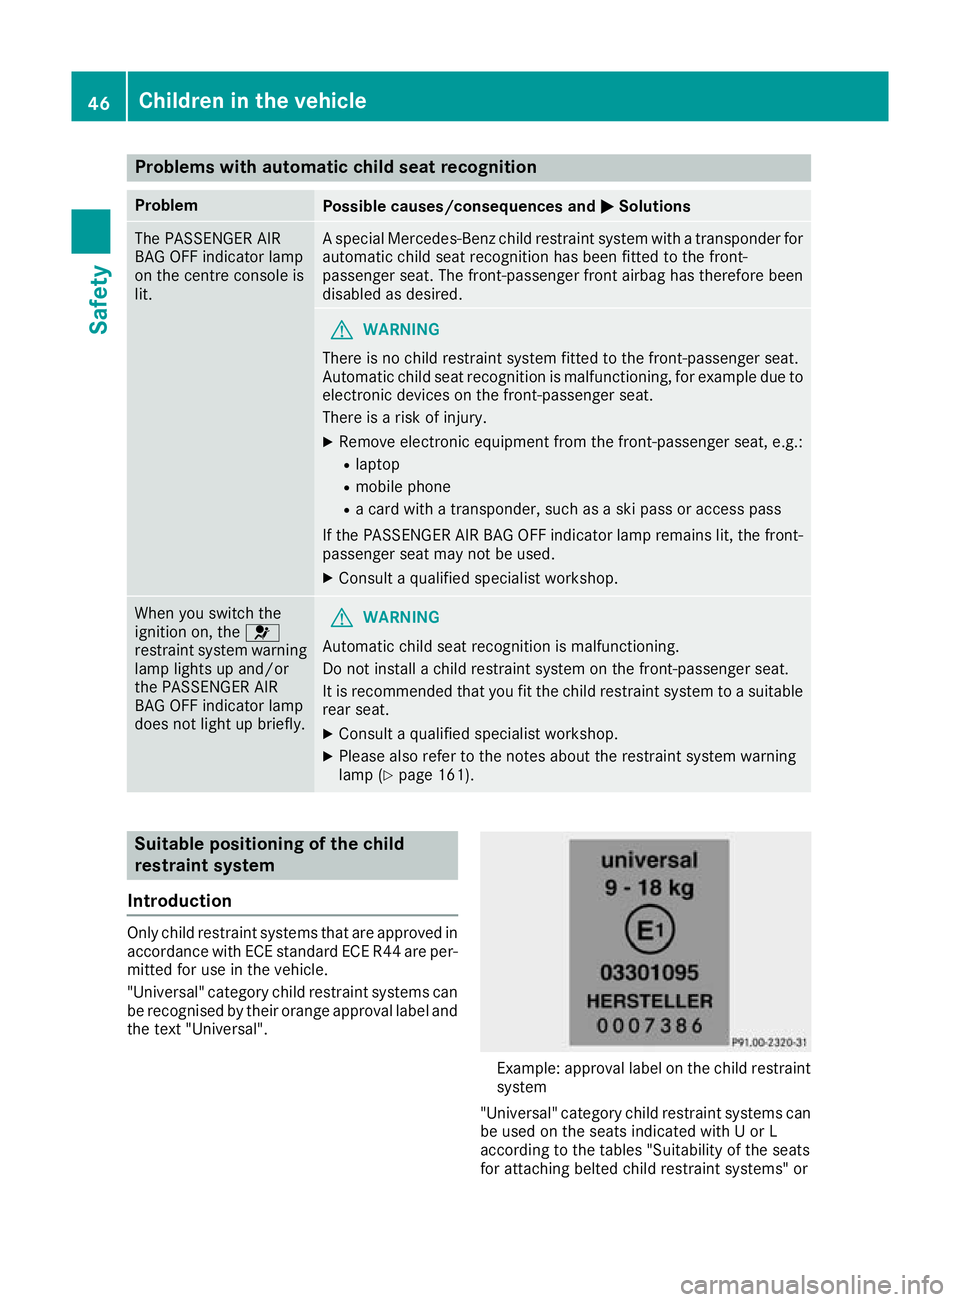
the text "Universal". Example: approval label on the child restraint
system
"Universal "category child restraint system scan
be used on the seats indicated with UorL
according to the table s"Suitability of the seats
for attaching belte dchild restraint systems" or 46
Children in the vehicleSafety
Page 50 of 261

"Suitabilit
yoftheseat sfor attaching an ISOFIX
child restraint system".
Semi-universal child restraint systems are indi-
cated by th etext"semi-universal" on the
approval label. Thes ecan be used if th evehicle
and th eseat are listed in th echild restraint sys-
te mm anufacturer' svehicle model list .For more
information, contact th echild restraint system
manufacturer or visit their website.
Child restrain tsystem on th efront-
passenger seat – if it is absolutely necessary to
secure achild in achild restraint system on the
front-passenger seat:
X Always pay attentio ntotheinstruction sunder
"Child restraint system on th efront-
passenger seat "(Ypage 43).
Ther eyou will fin dinstruction sonhow to cor-
rectly rout ethe shoulder belt strap from the belt sash guide to the shoulder belt guide on
the child restraint syste
m(Ypage 45).
X Move the front-passenger seat as far back as
possible and int othe lowest position.
X Move the backrest to an almost vertical posi-
tion.
The entire base of the child restraint system
must always rest on the seat cushion of the
front-passenger seat. The backrest of a
forward-facin gchild restraint system must, as
far as possible, rest flat against the backrest
of the front-passenger seat. The child
restraint system must not touch the roof or be
put under strain by the head restraint .Adjust
the angle of the seat backrest and the head
restraint position accordingly. Also observe
the child restraint system manufacturer's
installation instructions.
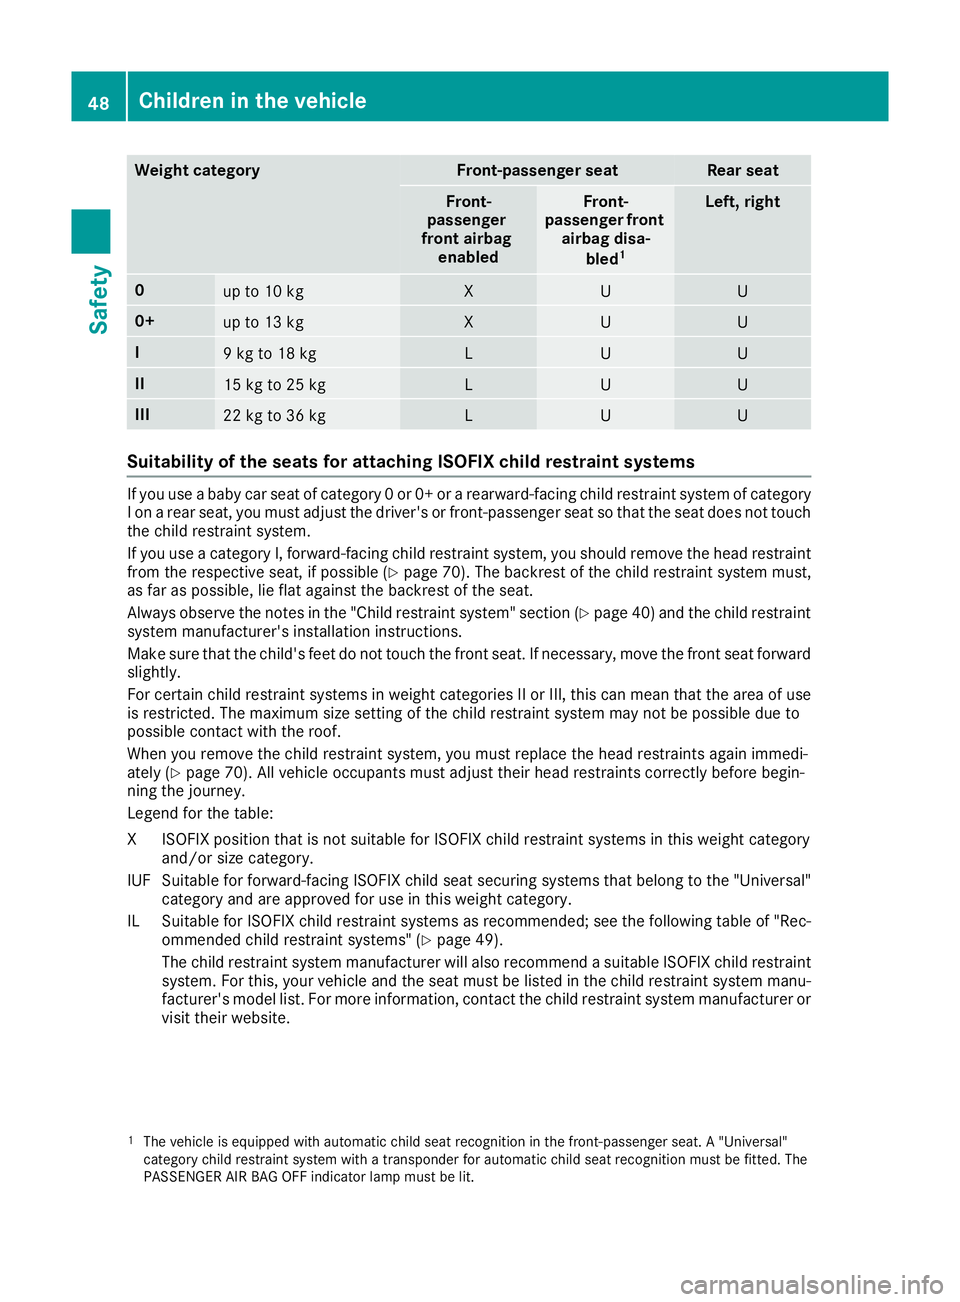
Suitability of the seats for attaching belt-secured child restraint systems If you use
ababy car seat of category 0or0+orarearward-facing child restraint system of category
Ionar ear seat, you must adjust the driver's or front-passenger seat so that the seat does not touch
the child restraint system.
If you use acategory I, forward-facing child restraint system, you shouldr emove the head restraint
from the respective seat, if possible (Y page 70). The backrest of the child restraint system must,
as far as possible, lie flat against the backrest of the seat.
Make sure that the child's feet do not touch the front seat. If necessary ,move the front seat forward
slightly.
For certain child restraint systems in weight categories II or III, this can mean that the area of use
is restricted. The maximum size setting of the child restraint system may not be possible due to
possible contact with the roof.
Alwayso bserve the notes in the "Child restraint system" section (Y page 40) and the child restraint
system manufacturer's installation instructions.
When you remove the child restraint system, you must replace the head restraints again immedi-
ately (Y page 70). All vehicle occupants must adjust their head restraints correctly before begin-
ning the journey.
Legend for the table:
XS eat that is unsuitable for children in this weight category.
US uitable for child restraint systems in th e"Universal" categor ytha ta re approve dfor use in this
weigh tcategory.
LS uitable for child restraint systems as recommended; see th e"Recommended child restraint
systems "table (Y page 49). Children in th
evehicle
47Safety Z
Page 51 of 261
Weight category Front-passenger seat Rear seat
Front-
passenger
front airbag enabled Front-
passenger front airbag disa-
bled 1 Left, right
0
up to 10 kg X U U
0+
up to 13 kg X U U
I
9kgto18kg L U U
II
15 kg to 25 kg L U U
III
22 kg to 36 kg L U U
Suitability of the seat
sfor attaching ISOFIXc hild restraint systemsIf you use
ababy car seat of category 0or0+orarearward-facing child restraint system of category
Ionar ear seat, you must adjust the driver's or front-passenger seat so that the seat does not touch
the child restraint system.
If you use acategory I, forward-facing child restraint system, you shouldr emove the head restraint
from the respective seat, if possible (Y page 70). The backrest of the child restraint system must,
as far as possible, lie flat against the backrest of the seat.
Alwayso bserve the notes in the "Child restraint system" section (Y page 40) and the child restraint
system manufacturer's installation instructions.
Make sure that the child's feet do not touch the front seat. If necessary ,move the front seat forward
slightly.
For certain child restraint systems in weight categories II or III, this can mean that the area of use
is restricted. The maximum size setting of the child restraint system may not be possible due to
possible contact with the roof.
When you remove the child restraint system, you must replace the head restraints again immedi-
ately (Y page 70). All vehicle occupants must adjust their head restraints correctly before begin-
ning the journey.
Legend for the table:
XI SOFIX position that is not suitabl efor ISOFIX chil drestraint systems in this weight category
and/or size category.
IUF Suitable for forward-facing ISOFIX chil dseats ecuring systems that belong to the "Universal"
categor yand are approved for us einthis weight category.
IL Suitable for ISOFIX chil drestraint systems as recommended; see the following table of "Rec-
ommended chil drestraint systems "(Y page 49).
The chil drestraint system manufacturer will also recommend asuitabl eISOFIX chil drestraint
system. For this ,you rvehicl eand the sea tmustb elisted in the chil drestraint system manu-
facturer' smodel list. For more information, contac tthe chil drestraint system manufacturer or
visit thei rwebsite.
1 The vehicl eisequipped with automatic child seat recognition in the front-passenger seat. A"Universal"
category child restraint system with atransponder for automatic child seat recognition must be fitted. The
PASSENGER AIR BAG OFF indicator lamp must be lit. 48
Children in the vehicleSafety
Page 72 of 261
their rearmost position. Yo
ucould otherwise
damage the seats and the rea rbench seat.
! Make sure tha
tthe su nvisor is folde dup
befor eadjusting the backrest and head
restraint height. The head restraint and sun
visor could otherwis ecollide when the head
restraint is full yextended.
i If the front door is open, the seats can be
adjusted for up to 30 minute safter the igni-
tio nh asbeen switched off.
i The rea
rseath eadr estraints can be
remove d(Ypage 70).
For mor einformation, contact aquali fied spe-
cialist workshop.
i Furthe
rinformation abou tenlarging the lug-
gage compartment (folding the rea rbench
seat forwards )(Ypage 202). Adjustin
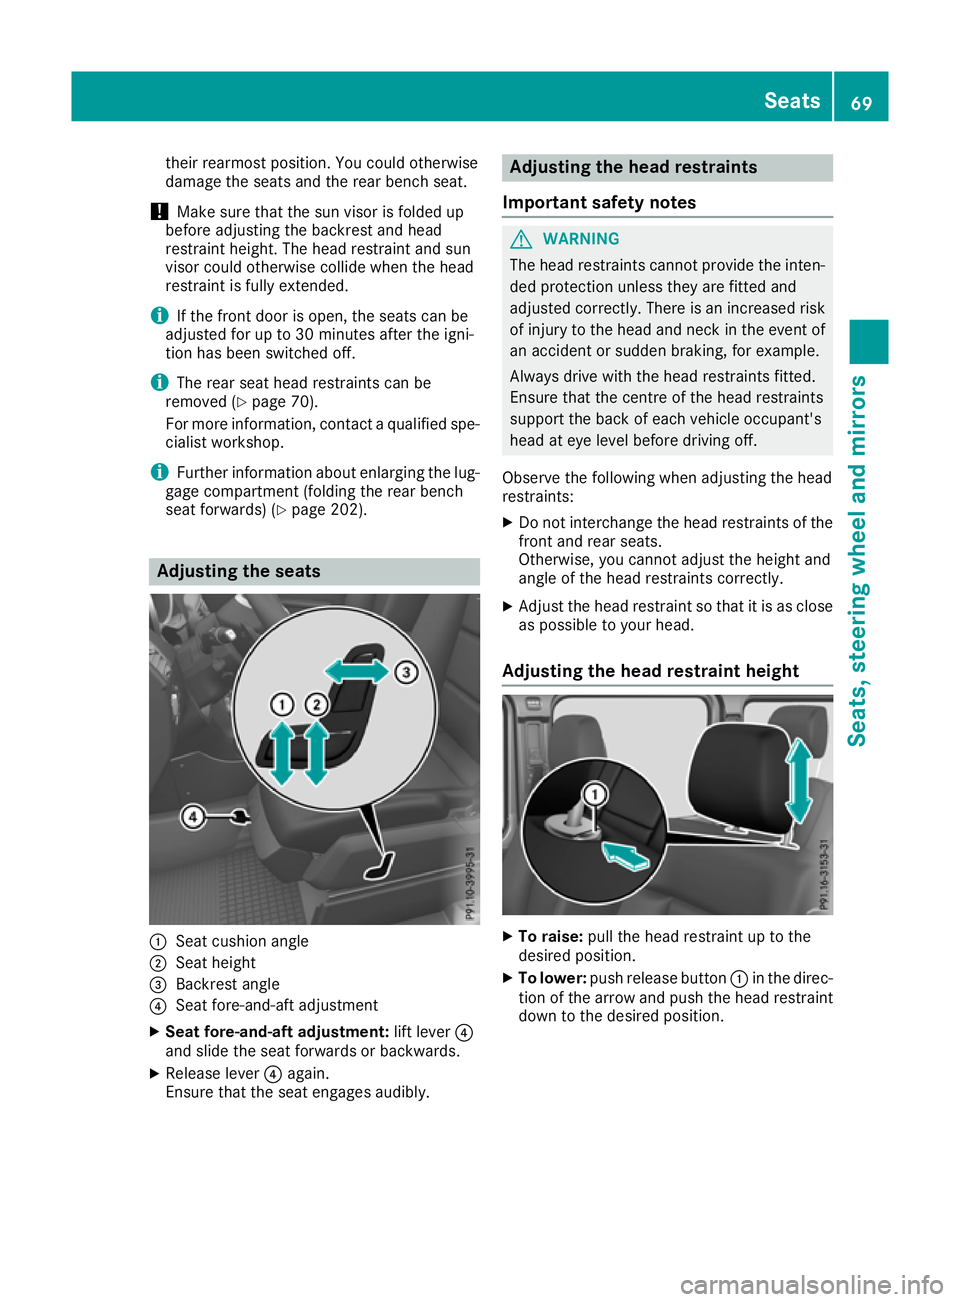
gthe seats :
Seat cushion angle
; Seat height
= Backrest angle
? Seat fore-and-aft adjustment
X Sea tfore-and-aft adjustment: lift lever?
and slide the sea tforward sorbackwards.
X Releas elever ? again.
Ensur ethat the sea tengages audibly. Adjustin
gthe hea drestraints
Important safety notes G
WARNING
Th eh ead restraints cannot provid ethe inten-
ded protection unless they are fitted and
adjusted correctly. There is an increased risk of injury to the head and neck in the event of
an accident or sudden braking, for example.
Always drive with the head restraints fitted.
Ensure that the centre of the head restraints
support the back of each vehicl eoccupant's
head at eye leve lbefore driving off.
Observe the following when adjusting the head
restraints:
X Do not interchange the head restraints of the
front and rear seats.
Otherwise, you cannot adjust the height and
angle of the head restraints correctly.
X Adjust the head restraint so that it is as close
as possible to yourh ead.
Adjusting the head restraint height X
To raise: pull the head restraint up to the
desired position.
X To lower: push release button :in the direc-
tion of the arrow and push the head restraint down to the desired position. Seats
69Seats,steering wheela nd mirrors Z
Page 73 of 261
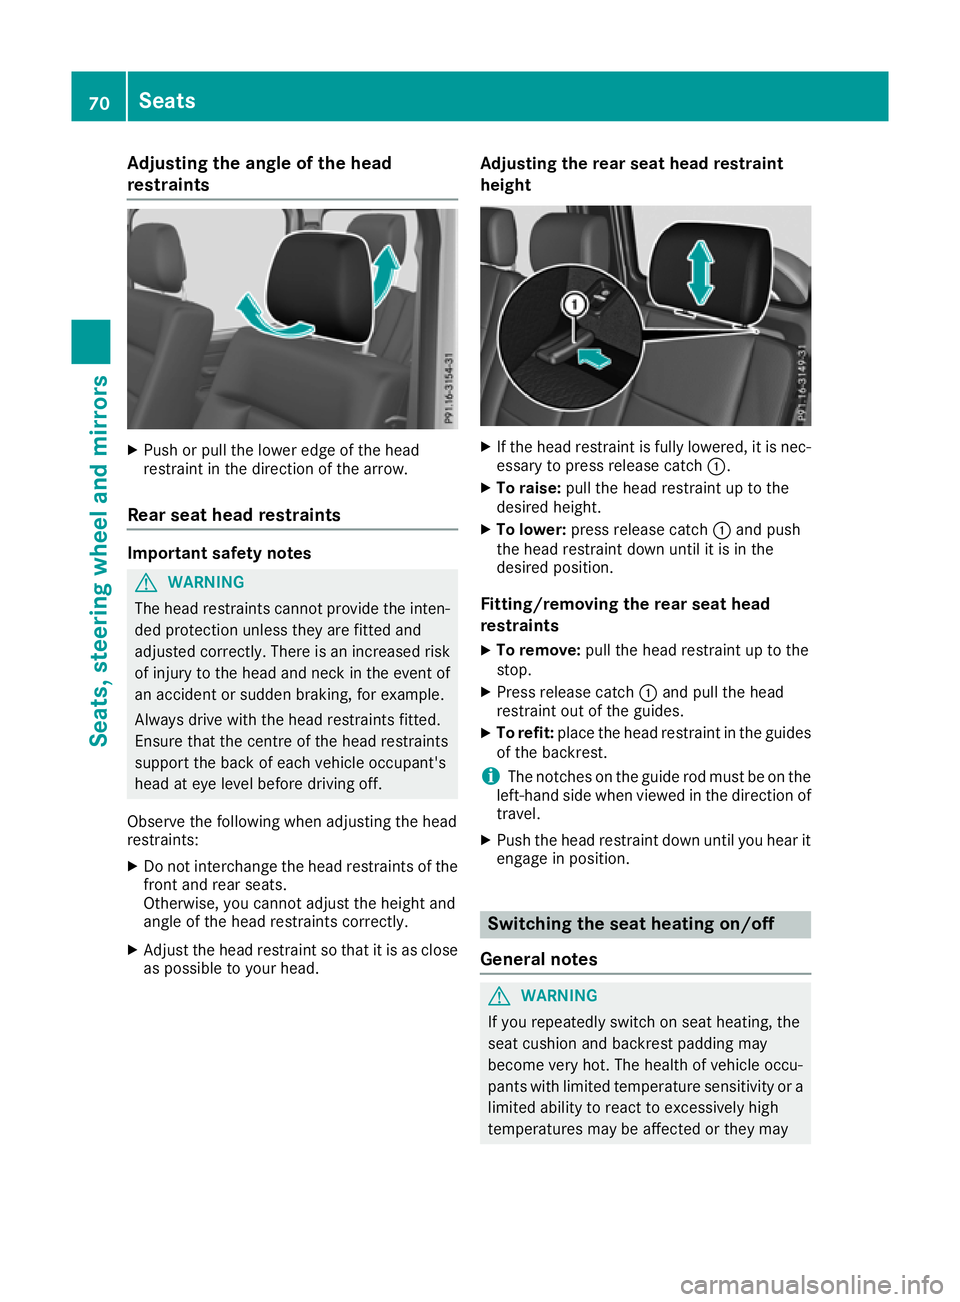
Adjusting th
eangle of th ehead
restraints X
Push or pull the lowe redge of the head
restraint in the direction of the arrow.
Rear seat head restraints Important safety notes
G
WARNING
The head restraints cannot provide the inten-
ded protection unless they are fitted and
adjusted correctly. Ther eisanincreased risk
of injury to the heada nd neck in the event of
an accident or sudden braking, for example.
Always drive with the headr estraints fitted.
Ensure that the centre of the headr estraints
support the back of each vehicl eoccupant's
headate ye levelbefore driving off.
Observe the following when adjusting the head
restraints:
X Do not interchange the headr estraints of the
front and rear seats.
Otherwise, you cannot adjust the height and
angle of the headr estraints correctly.
X Adjust the headr estraint so that it is as close
as possible to yourh ead. Ad
justing th erears eat hea drestraint
height X
If th ehead restraint is fullyl owered, it is nec-
essary to press release catch :.
X To raise: pullthe head restraint up to the
desire dheight.
X To lower: press release catch :and push
the head restraint down until it is in the
desire dposition.
Fitting/removin gthe rear seat head
restraints
X To remove: pullthe head restraint up to the
stop.
X Press release catch :and pullt he head
restraint out of the guides.
X To refit: place the head restraint in the guides
of the backrest.
i The notches on the guide rod must be on the
left-hand side when viewedint he direction of
travel.
X Push the head restraint down until you hear it
engage in position. Switching the seat heating on/off
General notes G
WARNING
If you repeatedly switch on seat heating, the
seat cushion and backrest padding may
become very hot. The health of vehicle occu-
pants with limited temperature sensitivity or a limited ability to react to excessively high
temperatures may be affected or they may 70
SeatsSeats, steerin
gwheela nd mirrors
Page 204 of 261
Befor
eevery trip ,make sur ethat the seat
backrests and the rea rbench seat/rea rseat
are engaged before every trip. G
WARNING
Combustio nengines emit poisonous exhaust
gase ssuch as carbon monoxide .Ifthe rear
door is open when the engine is running, par- ticularly if the vehicl eismoving, exhaust
fumes coul denter the passenger compart-
ment. There is arisk of poisoning.
Turn off the engine before opening the rear
door. Never drive with the rear door open.
Observe the loading guidelines (Y page198).
The left-hand and right-hand rear bench seats
can be folde dforward to increas ethe capacity
of the rear compartment. You can:
R fold the seat backrests forward
R fold the rear bench seat completely forward
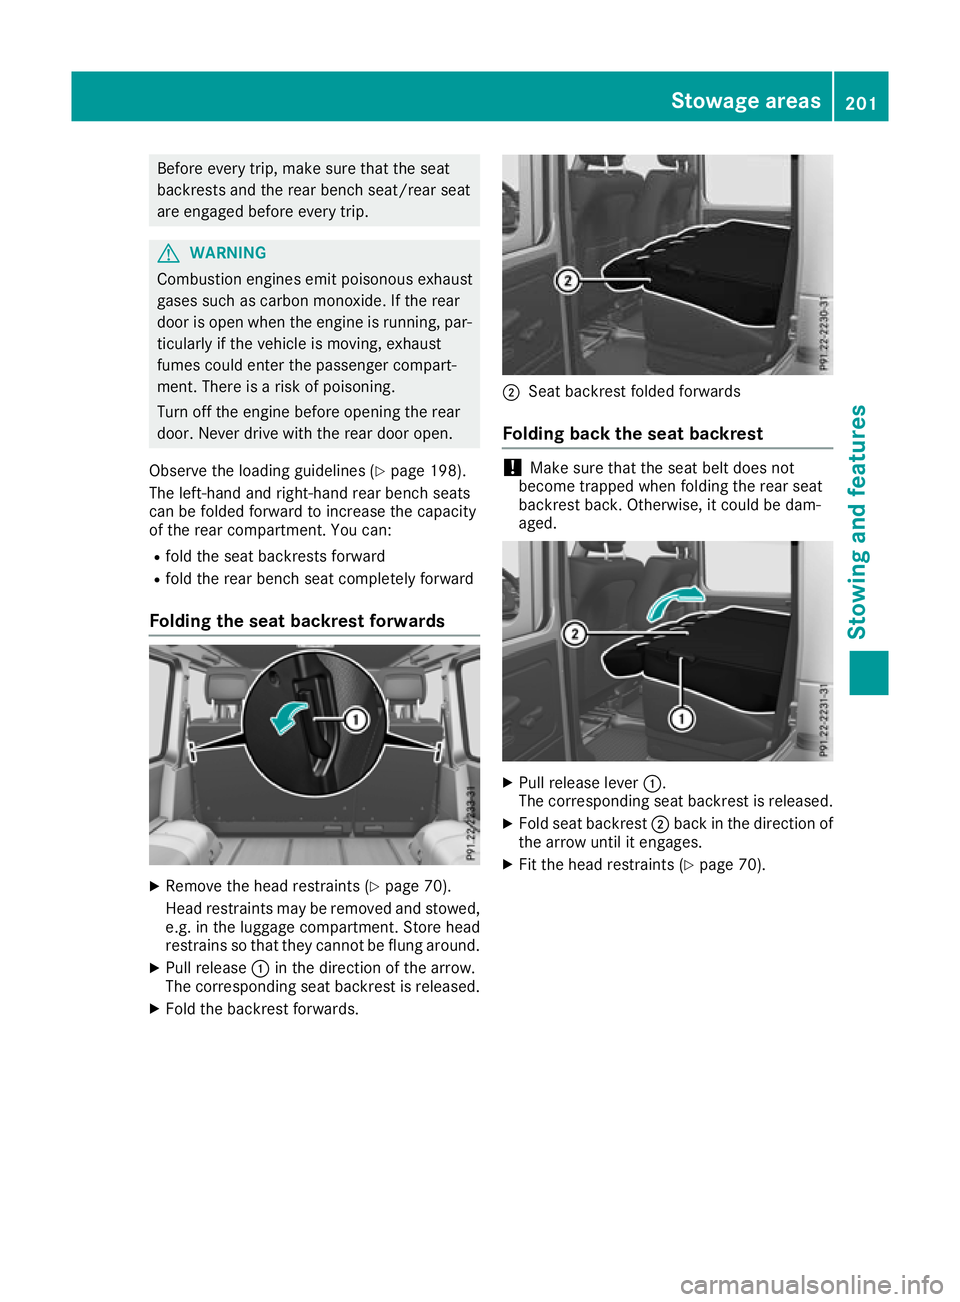
Folding the seat backrest forwards X
Remove the head restraints (Y page 70).
Head restraints ma yberemove dand stowed,
e.g. in th eluggag ecom partment. Store head
restrain ssothatthe yc anno tbeflungaround.
X Pull release :in th edirection of th earrow.
The corresponding seat backrest is released.
X Fold th ebackrest forwards. ;
Seat backres tfolded forwards
Folding bac kthe seat backrest !
Make sure that the seat belt does not
become trapped when folding the rear seat
backrest back .Otherwise, it could be dam-
aged. X
Pull release lever :.
The corresponding seat backrest is released.
X Fold seat backrest ;back in the direction of
the arrow until it engages.
X Fit the head restraints (Y page 70). Stowage areas
201Stowing and features Z