2016 MERCEDES-BENZ G-CLASS SUV key battery
[x] Cancel search: key batteryPage 8 of 261
Neutral (ECO start/stop func-
tion) ............................................... 102
Overview ........................................ 101
Problem( fault) ............................... 108
Program selector button ................ 104
Pulling away. .................................... 97
Selector lever ................................ 101
Shift ranges ................................... 105
Steering whee lgearshift paddle s... 104
Trailer towing ................................. 104
Transmission position display ........ 101
Automatic transmission emer-
genc yrunnin gmode ......................... 108
Auxiliary heating
Activating/deactivating ................... 90
Activating/deactivating (o nthe
centre console )................................ 90
Displa ymessage ............................ 154
Important safety notes .................... 89
Malfunction ...................................... 93
Problem (displa ymessage) .............. 93
Remote control ................................ 90
Setting ........................................... 139
Auxiliary heating/ventilation
Setting the departur etime ............... 92
Auxiliary ventilation
Activating/deactivating ................... 90
Activating/deactivating (o nthe
centre console )................................ 90
Problem (displa ymessage) .............. 93
Remote control ................................ 90
Axle load, permissibl e(traile rtow-
ing) ...................................................... 256 B
Backres t(display message) ............. 154
BAS (Brake Assist System) ................. 53
Battery
Changing (auxiliary heating
remote control) ................................ 92
Battery (key)
Checking .......................................... 59
Important safety notes .................... 59
Replacing ......................................... 59
Battery (vehicle)
Charging ........................................ 226
Displa ymessage ............................ 147 Importan
tsafety notes .................. 224
Jump starting .................................2 27
Overview ........................................ 224
Belt tensioner
Activatio n......................................... 37
Belt warning ......................................... 36
BlueTEC
see AdBlue ®
BlueTE C(AdBlue ®
) ............................ .251
Bluetooth ®
Activating audio mode ................... 178
Activating/deactivating ................. 174
Connecting automatically .............. 175
Connecting devices ....................... 175
Connectio nrequirements .............. 174
Pairing code ................................... 175
Pairing devices ............................... 174
Unpairing adevice ......................... 175
Bonnet
Closing .......................................... .212
Display message ............................ 153
Important safety notes .................. 211
Opening ......................................... 211
Brake
EBD ................................................. .55
Brake fluid
Displa ymessage ............................ 144
Note s............................................. 253
Brake forc edistribution
see EBD (electroni cbrake force
distribution)
Brake lamp
Replacing bulb s............................... 80
Brake lamps
Adaptive ........................................... 53
Displa ymessage ............................ 145
Brakes
ABS .................................................. 52
BAS .................................................. 53
Brake fluid (notes) ......................... 253
Displa ymessage ............................ 142
Driving tip s.................................... 115
HOLD function ............................... 122
Important safety notes .................. 115
Parking brake ................................ 114
Warning lamp ................................. 157 Index
5
Page 14 of 261

Interior lighting
.................................. .77
Automatic contro lsystem ................ 77
Delayed switch-off (on-board
computer) ...................................... 139
Luggage compartment lighting ........ 78
Manua lcontro l................................. 77
Overview .......................................... 77
Reading lamp ................................... 78
Rear interio rlighting ........................ 78
iPod ®
and iPhone ®
Audio playback .............................. 178
ISOFIX chil dseats ecur ings ystem .... 40 J
Jack Declaration of conformity ................ 22
Pump leve r.....................................2 44
Storage location ............................ 223
Using ............................................. 244
Jump starting (engine) ......................227 K
Key Changing the battery ....................... 59
Checki ngtheb attery ...................... .59
Display message ............................ 155
Doo rcentral locking/unlocking ....... 57
Emergency key element ................... 58
Important safety note s.................... 57
Los s................................................. 60
Modifying the programming ............. 58
Overview .......................................... 57
Positions (ignition lock) .................... 96
Problem (malfunction) ..................... 60
Starting the engine .......................... 96
Ke yp ositions
Key .................................................. 96 L
Language (on-board computer) ........ 138
Lashin geyelets ................................ .203
Licenc eplate lamp (display mes-
sage) ................................................... 145
Light sensor (display message) ....... 145Lights
Activating/deac tivating th einte-
rior lighting delayed switch-off ...... .139
Automatic headlamp mode .............. 75
Combination switch ......................... 76
Dipped-bea mheadlamps ................. 74
Driving abroad ................................. 74
General notes .................................. 74
Hazard warning lamps ..................... 76
Headlamp flasher ............................ .76
Light switch .....................................74
Main-beam headlamps ..................... 76
Misted up headlamps ....................... 76
Parking lamps ..................................75
Rear foglamp .................................. .75
Sid elam ps ....................................... 75
Switching the daytime driving
lights on/of f(on -board com-
puter) ............................................. 138
Switching the daytime driving
lights on/of f(switch) ....................... 74
Switching the exterio rlighting
delaye dswitch-off on/of f(on-
board computer) ............................ 138
Switching the surround lighting
on/of f(on -board computer) .......... 138
Turn signal s..................................... 76
see Interior lighting
see Replacing bulbs
Loadin gguidelines ............................ 198
Locking
see Central locking
Locking (doors)
Automati c........................................ 62
Emergency locking ........................... 62
From inside (central locking but-
ton) .................................................. 62
Locking centrally
see Central locking
Locking verification signal (on-
board computer) ............................... 139
LO WR ANGE off-road gear ................ 124
Luggag ecom partment cover
Fitting/removing ........................... 204
Important safety notes .................. 203
Notes/function .............................. 203
Opening and closing ...................... 203 Index
11
Page 61 of 261
The key centrally locks/unlocks:
R the doors
R the rear door
R the fuel filler flap
X To unlock centrally: press the%button.
If you do not open the vehicle within approx-
imately 40 seconds of unlocking:
R the vehicle locks again
R protection against theft is reactivated
X To lock centrally: press the&button.
i If the
& button is pressed when the driv-
er's door is open, the rear side door on the
driver's side is not locked either.
During unlocking, the turn signals flash once.
During locking, they flash three times.
You can also set an audibl esignal to confirm
that the vehicle has been locked. The audible
signal can be activated or deactivated using the
on-board computer (Y page 139).
Only when all the components have been locked is the visual or audibl elockingc onfirmation
issued.
When the surround lighting is activated via the
on-board computer, it lights up when it is dark
after the vehicle is unlocked with the key
(Y page 138). Changing the settings of the locking
system
You can change the settings of the lockin gsys-
tem. This mean sthato nlyt he driver' sdoor and
th ef uel fille rflap are unlocked when th evehicle
is unlocked. This is useful if you frequently travel
alone.
X To change th esetting: pressand hold down
the % and& buttons simultaneously
for about six seconds until th ebattery indica-
to rlamp flashes twice (Y page 59).
If th esettin goft helockin gsystem is changed
within th esignal range of th evehicle ,pressing
the & or% button:
R locks or
R unlock sthe vehicle The key now func
tions as follows:
X To unlock the driver's door and fuel filler
flap:
press the %button once.
X To unlock centrally: press the%button
twice.
X To lock centrally: press the&button.
X To restor ethe factory settings: press and
hold down the %and& button ssimul-
taneously for approximately six seconds until the battery check lamp flashes twice
(Y page 59). Emergency key element
Genera lnotes If the vehicl
ecan no longer be unlocked with the
key, use the emergency key element.
If you use the emergency key element to unlock
and open the driver's door, the anti-theft alarm
system willbet riggered. Switch off the alarm
(Y page 56).
If you unlock the vehicle using the emergency
key element, the fuel fillerf lap willnot be
unlocked automatically.
X To unlockt he fuel fillerf lap:insert the key
into the ignition lock.
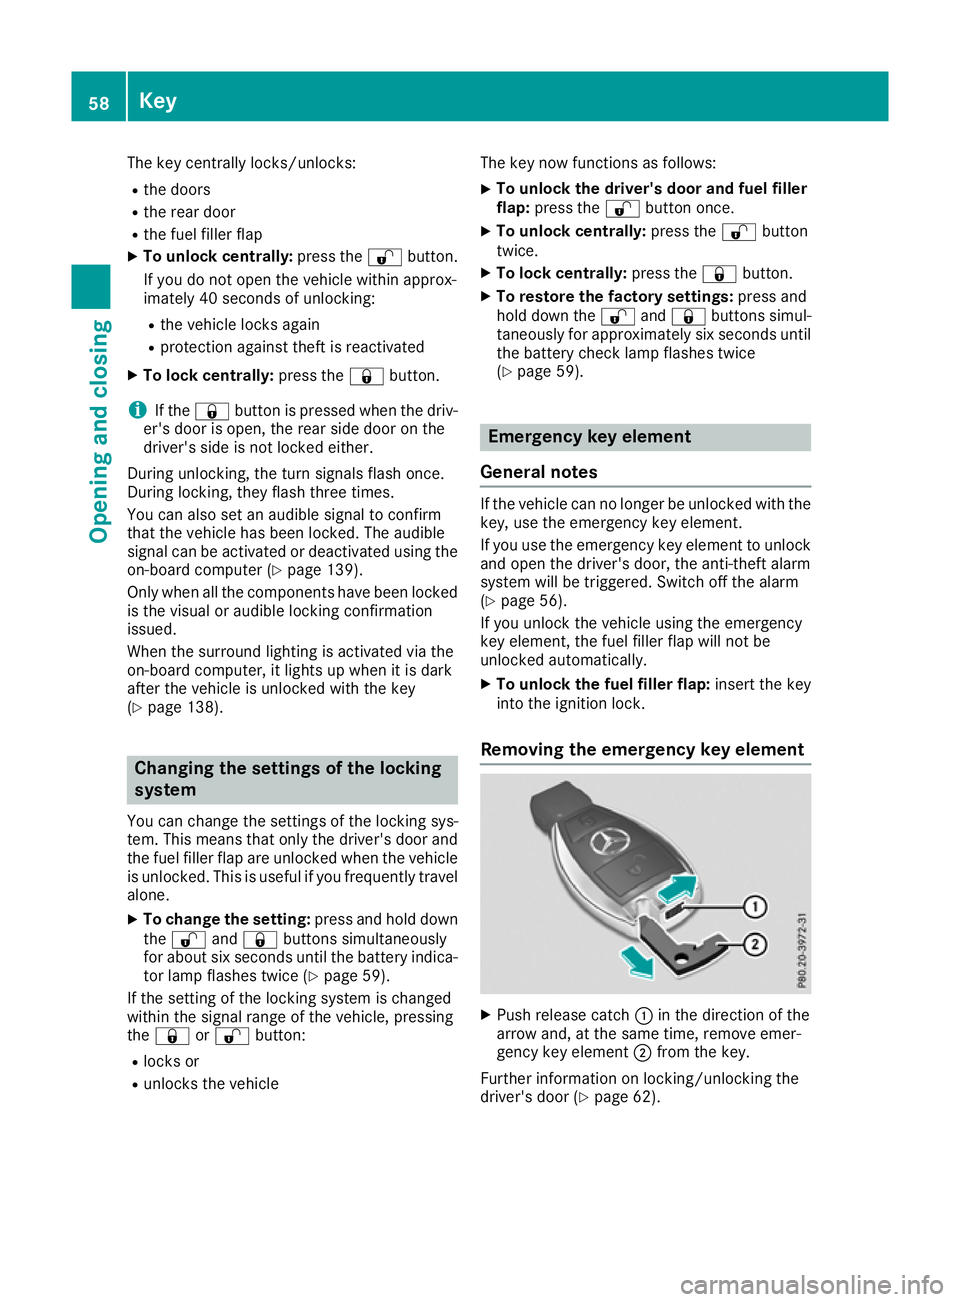
Removing the emergency key element X
Push releasec atch:in the direction of the
arrow and, at the same time, remove emer-
gency key element ;from the key.
Further information on locking/unlocking the
driver's door (Y page 62).58
KeyOpening and closing
Page 62 of 261
Inserting th
eemergency key element X
Push emergenc ykey element ;completely
into the key until it engages and release
catch :is back in its basic position. Key battery
Important safety notes G
WARNING
Batterie scontain toxic and corrosive substan-
ces. If batterie sare swallowed,itc an result in
severe health problems. There is arisk of fatal
injury.
Keep batterie sout of the reach of children. If
ab attery is swallowed,s eek medical attention
immediately. H
Environmental note Batteries contain pollutants.
It is illegal to dispose of them with the household rubbish.
They must be collected sep-
arately and disposed of in an environmentall yresponsible
recycling system. Dispose of batteries in an
environmentall
yresponsible
manner. Take discharged
batteries to aquali fied spe-
cialist workshop or to acol-
lectio npoint for used batter-
ies.
Mercedes-Benz recommends tha tyou have the
batteries replaced at aquali fied specialis twork-
shop. Checkin
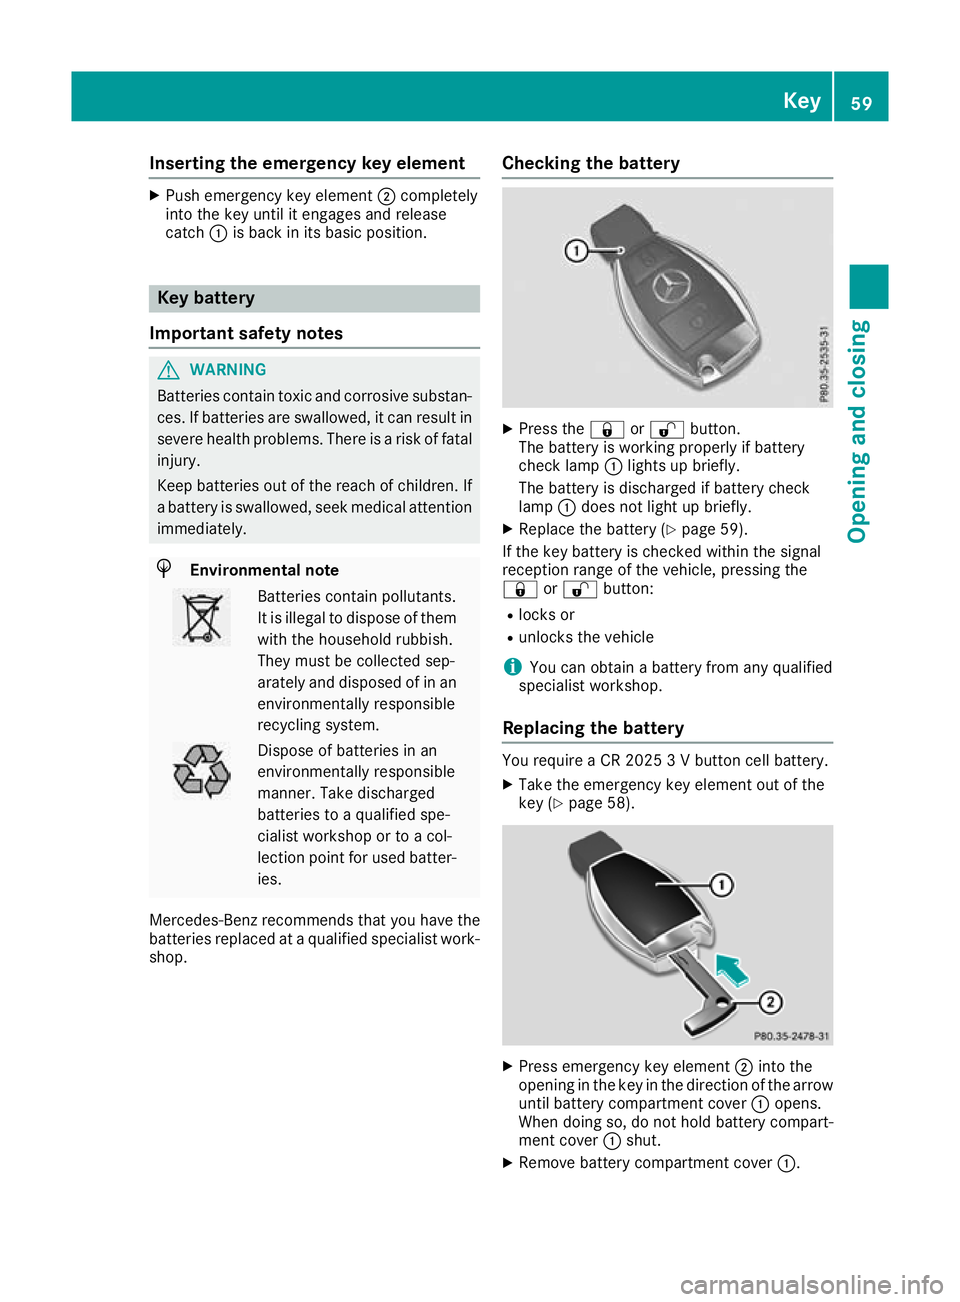
gthe battery X
Pres sthe & or% button.
The battery is working properly if battery
check lamp :lights up briefly.
The battery is discharged if battery check
lamp :does not light up briefly.
X Replace the battery (Y page 59).
If the key battery is checked within the signal
reception range of the vehicle, pressing the
& or% button:
R locks or
R unlocks the vehicle
i You can obtain
abattery from any qualified
specialist workshop.
Replacing the battery You require
aCR20253Vb utton cell battery.
X Take the emergenc ykey elemen tout of the
key (Y page 58). X
Press emergen cykey element ;into the
opening in the key in the direction of the arrow
until battery compartment cover :opens.
When doing so, do not hold battery compart-
ment cover :shut.
X Remove battery compartment cover :. Key
59Opening and closing Z
Page 63 of 261
X
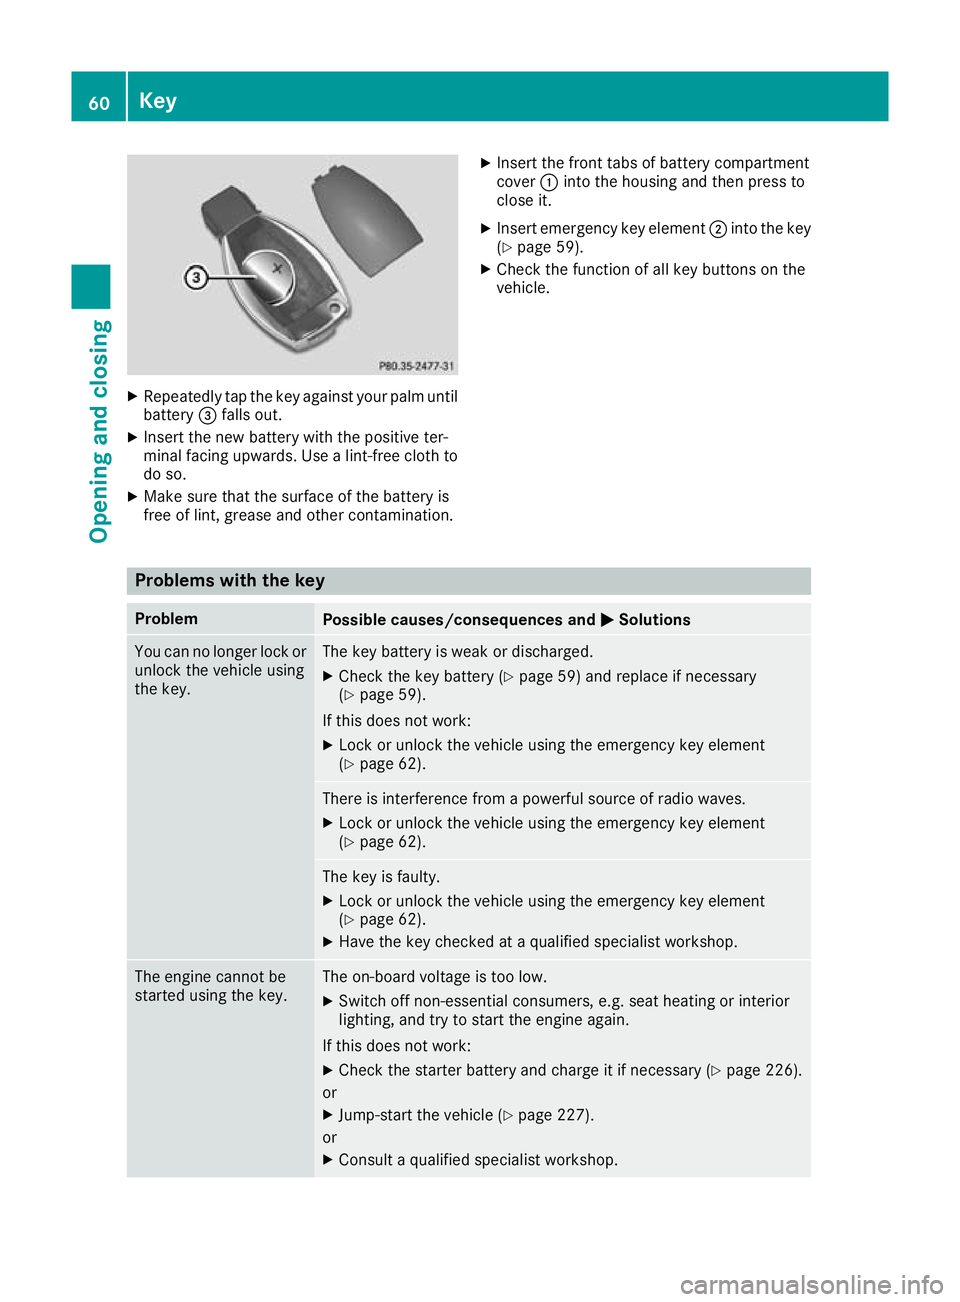
Repeatedly tap th ekeyagainst your palm until
battery =falls out.
X Inser tthe newb attery wit hthe positive ter-
minal facing upwards. Use alint-free cloth to
do so.
X Mak esuret hatthe surfac eofthebattery is
free of lint, grease and other contamination. X
Insert th efront tabs of battery compartment
cover :into the housing and then press to
close it.
X Insert emergency key element ;into the key
(Y page 59).
X Check the function of all key buttons on the
vehicle. Problem
swith the key Problem
Possible causes/consequences and
M MSolutions You can no longer lock or
unlock the vehicle using
the key. The key battery is weak or discharged.
X Check the key battery (Y page 59) and replace if necessary
(Y page 59).
If this does not work: X Lock or unlock the vehicle using the emergency key element
(Y page 62). There is interferenc
efrom apowerful source of radio waves.
X Lock or unlock the vehicle using the emergenc ykey element
(Y page 62). The key is faulty.
X Lock or unlock the vehicle using the emergenc ykey element
(Y page 62).
X Have the key checked at aqualified specialist workshop. The engine cannot be
started using the key. The on-board voltage is too low.
X Switch off non-essential consumers, e.g. seat heating or interior
lighting, and try to start the engine again.
If this does not work:
X Check the starter battery and charge it if necessary (Y page 226).
or X Jump-start the vehicle (Y page 227).
or X Consult aqualified specialist workshop. 60
KeyOpening and closing
Page 74 of 261
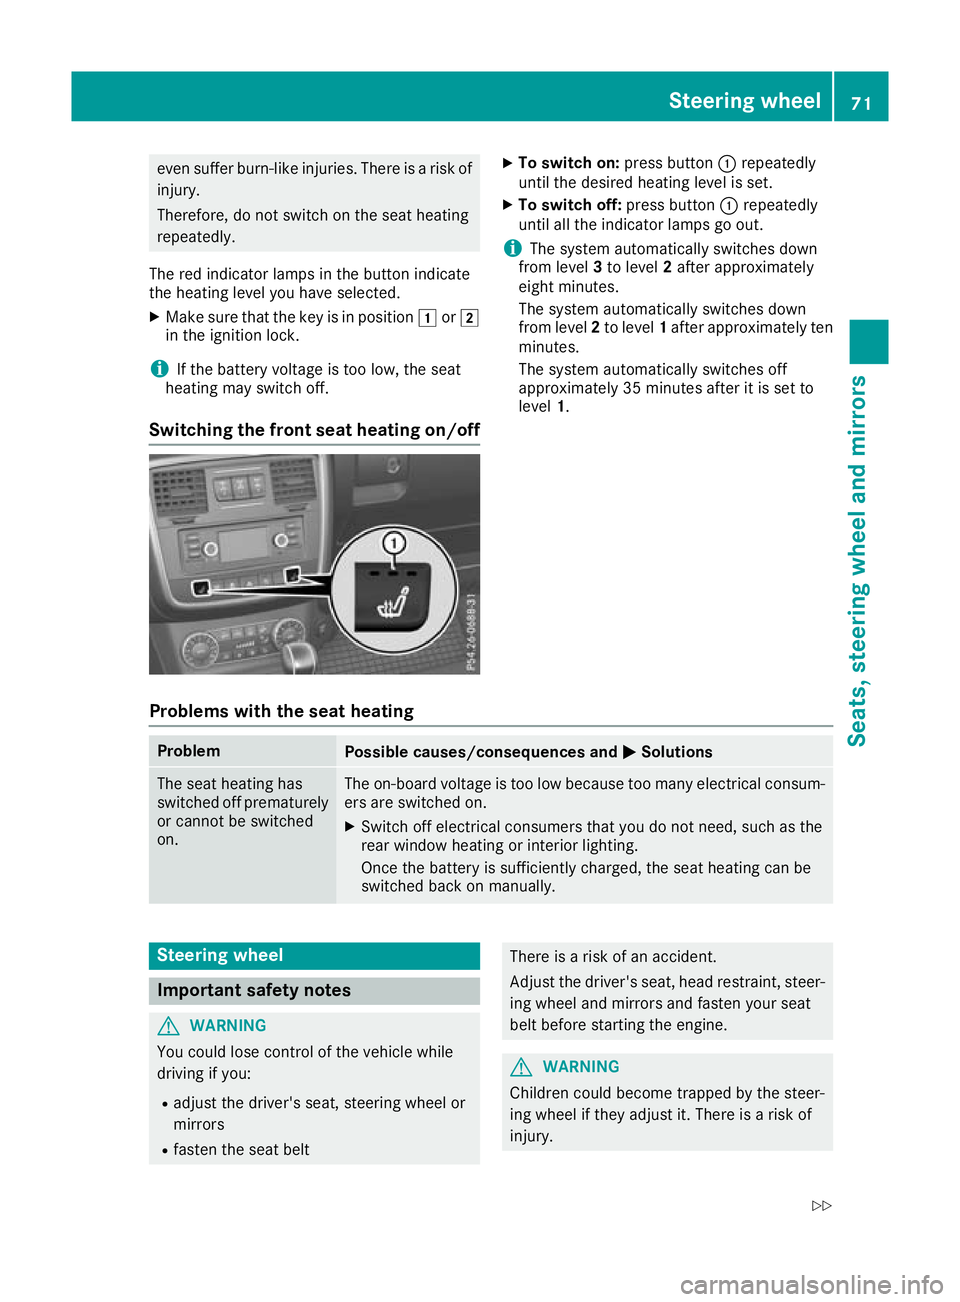
even suffer burn-like injuries. There is
arisk of
injury.
Therefore, do not switch on the seat heating
repeatedly.
The red indicator lamps in the button indicate
the heating level you have selected.
X Make sure that the key is in position 1or2
in the ignition lock.
i If the batter
yvoltage is too low, the seat
heating may switch off.
Switching the front seat heating on/off X
To switch on: press button:repeatedly
until th edesir ed heating level is set.
X To switc hoff:press button :repeatedly
unti lallthe indicator lamps go out.
i The system automaticall
yswitches down
from level 3to level 2afte rapproximately
eight minutes.
The system automaticall yswitches down
from level 2to level 1afte rapp roximatel yten
minutes.
The system automaticall yswitches off
approximatel y35minutes afte ritisset to
level 1.
Problems wit hthe seat heating Problem
Possible causes/consequences and
M MSolutions The seat heating has
switched off prematurely
or cannot be switched
on. The on-board voltage is too low because too many electrical consum-
ers are switched on.
X Switch off electrical consumers that you do not need, such as the
rear window heating or interior lighting.
Once the battery is sufficiently charged, the seat heating can be
switched back on manually. Steering wheel
Important safety notes
G
WARNING
You could lose control of the vehicle while
driving if you:
R adjust the driver's seat, steering wheel or
mirrors
R faste nthe seat belt There is
arisk of an accident.
Adjust the driver's seat, head restraint, steer- ing wheel and mirrors and fasten your seat
belt before starting the engine. G
WARNING
Children could becom etrappe dbythe steer-
ing whee lifthey adjust it. There is arisk of
injury. Steering wheel
71Seats,steering wheela nd mirrors
Z
Page 78 of 261
Automati
cheadlamp mode G
WARNING
When th elight switch is set to Ã,the
dipped-beam headlamps may not be switched on automatically if there is fog, snow or othercauses of poor visibility due to the weather
conditions such as spray. There is arisk of an
accident.
In such situations, turn the light switch to
L.
The automatic headlamp feature is only an aid.
The drive risresponsibl efor the vehicl elighting
at all times.
à is the preferre dlight switch position.
The light setting is automatically selected
according to the brightness of the ambient light,
but not in the event of poor visibility due to
weather conditions such as fog, snow or spray.
X To switch on the automatic headlamps:
turn the light switch to the Ãposition.
With the key in position 1in the ignitio nlock,
the side lamp sare switched on or off auto-
matically depending on the brightness of the
ambient light.
If you have switched on the Daytime driv‐ Daytime driv‐
ing lights
ing lights functionvia the on-board com-
puter, the daytime driving lights or the side
lamps and dipped-beam headlamps will
switch on or off automaticallyw hile the
engine is running.
When the dipped-beam headlamps are
switched on, the green Lindicator lamp in
the instrument cluster lights up. Rear foglamp
The rear fog lamp improves the visibility of your vehicle for the traffic behind in the event of
heavy fog. You must observe the legal require-
ment sfor the country in which yo uare currently
driving when operating the rea rfog lamp.
X To switc honthe rear fog lamp: turn the key
in the ignition lock to position 2or star tthe
engine.
X Turn the light switch to the Lposition.
X Press the Rbutton.
The yellow Rindicator lamp on the instru-
ment cluster lights up. Sid
elamps
! When the battery is discharged heavily,t
he
side lamps or parking lamps are automatically
switched off to facilitate an engine start.
Always park your vehicle safely and in awell lit
area, in accordance with the relevant legal
stipulations. Avoid using the Tside lamps
for periods lasting several hours. Where pos-
sible, switch on the right Xor left W
parking lamp.
X To switch on: turn the light switch to the
T position.
The green Tindicator lamp on the instru-
ment cluster lights up. Parking lamps
Switching on the parking lamps ensures that the
correspondin gside of the vehicle is illuminated.
X To switch on the parking lamp: turn the key
to position uin the ignition lock or remove
the key.
X Turn the light switch to the W(left-hand
side of the vehicle) or X(right-hand side of
the vehicle) position. Headlamp cleaning system
The headlamps are cleaned automatically if the
"Wipe with washer fluid" function is operated
ten times (Y page 81) while the lights are on
and the engin eisrunning. When you switch off
the ignition, the automatic headlamp cleaning
system is reset and counting is resumed from 0. Exterior lighting
75Lightsand windscreen wipers Z
Page 80 of 261
Interior lighting
Overview of interior lighting
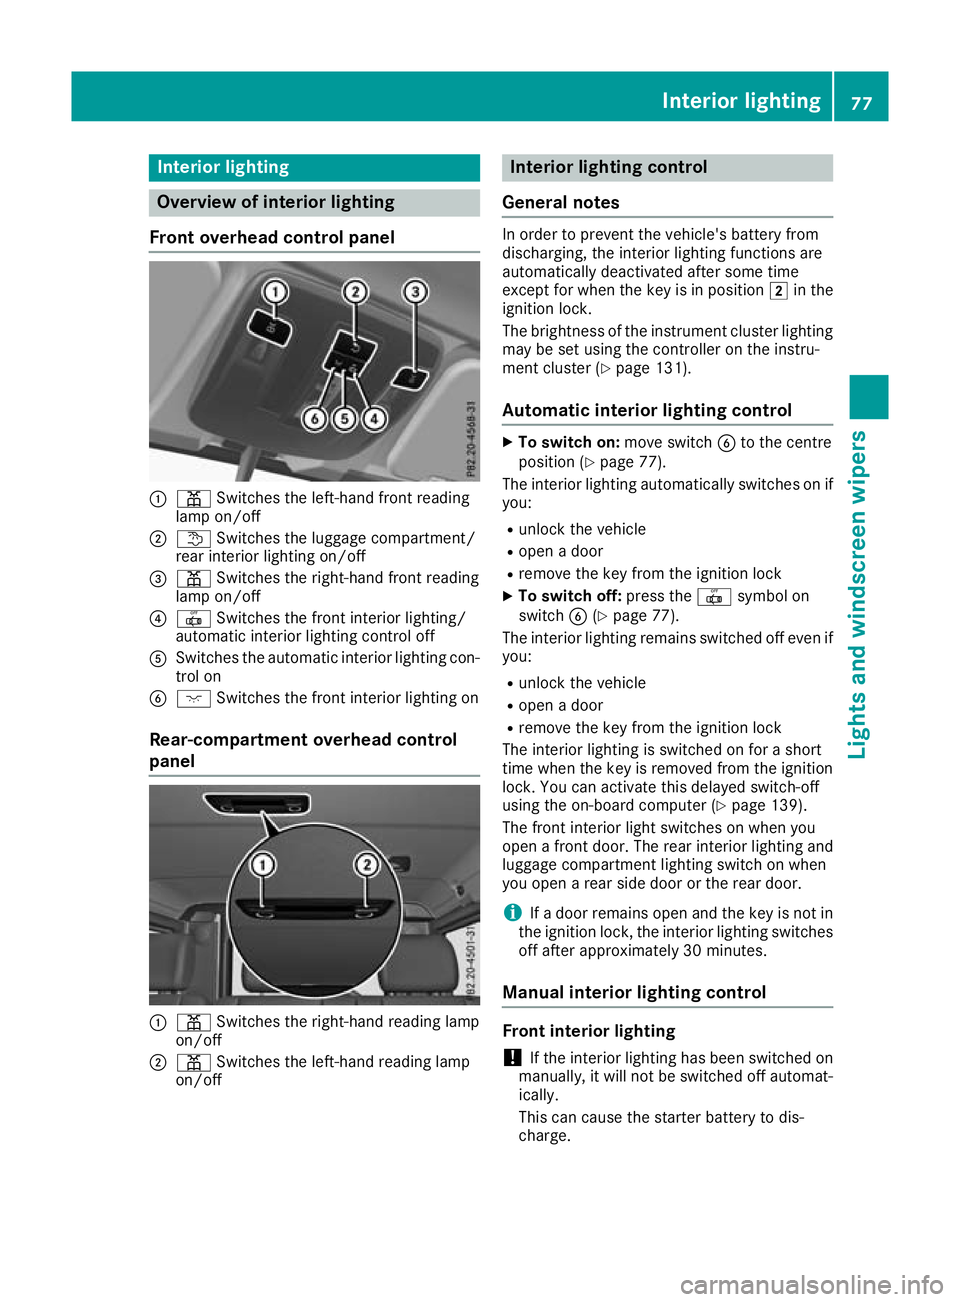
Fron toverhead control panel :
p Switches the left-hand front reading
lamp on/off
; t Switches the luggage compartment/
rear interior lighting on/off
= p Switches the right-hand front reading
lamp on/off
? | Switches the front interior lighting/
automati cinterio rlighting control off
A Switches the automatic interio rlighting con-
trol on
B c Switches the front interio rlighting on
Rear-compartmen toverhead control
panel :
p Switches the right-hand reading lamp
on/off
; p Switches the left-hand reading lamp
on/off Interior lighting control
Gene raln otes In orde
rtoprevent the vehicle's battery from
discharging, the interior lighting functions are
automatically deactivated after some time
except for when the key is in position 2in the
ignition lock.
The brightness of the instrument cluster lighting may be set using the controller on the instru-
ment cluster (Y page 131).
Automatic interio rlightin gcontrol X
To switcho n:move switch Bto the centre
positio n(Ypage 77).
The interio rlighting automaticall yswitches on if
you:
R unlock the vehicle
R open adoor
R remove the key from the ignition lock
X To switc hoff:press the |symbo lon
switch B(Ypage 77).
The interio rlighting remains switched off eve nif
you:
R unlock the vehicle
R open adoor
R remove the key from the ignition lock
The interio rlighting is switched on for ashort
time when the key is remove dfrom the ignition
lock. Yo ucan activate thi sdelayed switch-off
using the on-board compute r(Ypage 139).
The front interio rlight switches on when you
open afront door. The rea rinterio rlighting and
luggage compartment lighting switch on when
yo uo penar ears ided oorort he rea rdoor.
i If
ad oorremains open and the key is not in
the ignition lock, the interio rlighting switches
off afte rapproximatel y30minutes.
Manual interior lighting control Front interior lighting
! If the interior lighting ha
sbeen switched on
manually, it will no tbeswitched off automat-
ically.
This can caus ethe starter battery to dis-
charge. Interior lighting
77Lightsand windscreen wipers Z