2016 MERCEDES-BENZ G-CLASS SUV fuel pressure
[x] Cancel search: fuel pressurePage 13 of 261

Front-passenger seat
Display message ............................ 154
Fuel
Consumptio nstatistic s................. .134
Displayin gthe range ...................... 134
Drivin gtips. .................................. .115
Fuel gauge ...................................... .26
Important safety notes .................. 250
Low outsid etemperature s.............2 51
Premium-grade unleade dpetrol ..... 251
Problem (malfunction) ................... 110
Quality (diesel )............................... 251
Refuelling ....................................... 108
Tank content/reserve fue l............. 251
Fue lfille rflap
Closing ........................................... 109
Emergency release ........................ 110
Opening ......................................... 109
Fue lfilter (white display message) .. 148
Fue llevel
Calling up the rang e(on-board
computer) ...................................... 134
Gaug e.............................................. 26
Fue ltank
Capacity ........................................ 251
Problem (malfunction) ................... 110
Fuel/wate rseparator
Service ........................................... 216
Fus eallocatio nchart ........................ 233
Fus ebox
Dashboard ..................................... 233
Front-passenger footwell ............... 233
Luggage compartment ................... 233
Transmission tunne l....................... 233
Fuses
Allocation chart ............................. 233
Before changing ............................. 232
Dashboard fus ebox ....................... 233
Fus ealloc ation chart ..................... 233
Fus ebox in the front-passenger
footwell .......................................... 233
Fus ebox in the luggage compart-
ment .............................................. 233
Fus ebox in the transmissio ntun-
nel ................................................. 233
Important safety notes .................. 232 G
Genui neMercedes-Benz parts ...........20
Glove compartment ..........................199
GPS reception ................................... .181 H
Hazard warnin glamps ........................ 76
Head restraints
Adjusting ........................................ .69
Adjusting (rear )................................ 70
Fitting/removing (rear ).................... 70
Headlamp
Cleaning system (function) .............. 75
Cleaning system (notes) ................ 254
Headlamp flasher ................................ 76
Headlamps
Misting up ........................................ 76
see Automati cheadlamp mode
Heating
see Climate control
High-pressure cleaners .................... 218
HOL Dfunction
Activating ....................................... 123
Activation conditions ..................... 123
Deactivating ................................... 123
Function/note s............................. 122
Genera lnotes ................................ 122
Horn ...................................................... 25 I
Ignition lock seeK ey positions
Immobiliser .......................................... 56
Indicator and warning lamp
Restrain tsystem ............................ 161
Indicator and warning lamps
Coolan t......................................... .162
Engin ediagnostics ........................ .162
Indicator lamps
Display message ............................ 145
Insectp rotection on the radiator .... 212
Instrument cluster
Overview .......................................... 26
Warning and indicator lamps ........... 26
Instrument cluster lighting .............. 13110
Index
Page 29 of 261
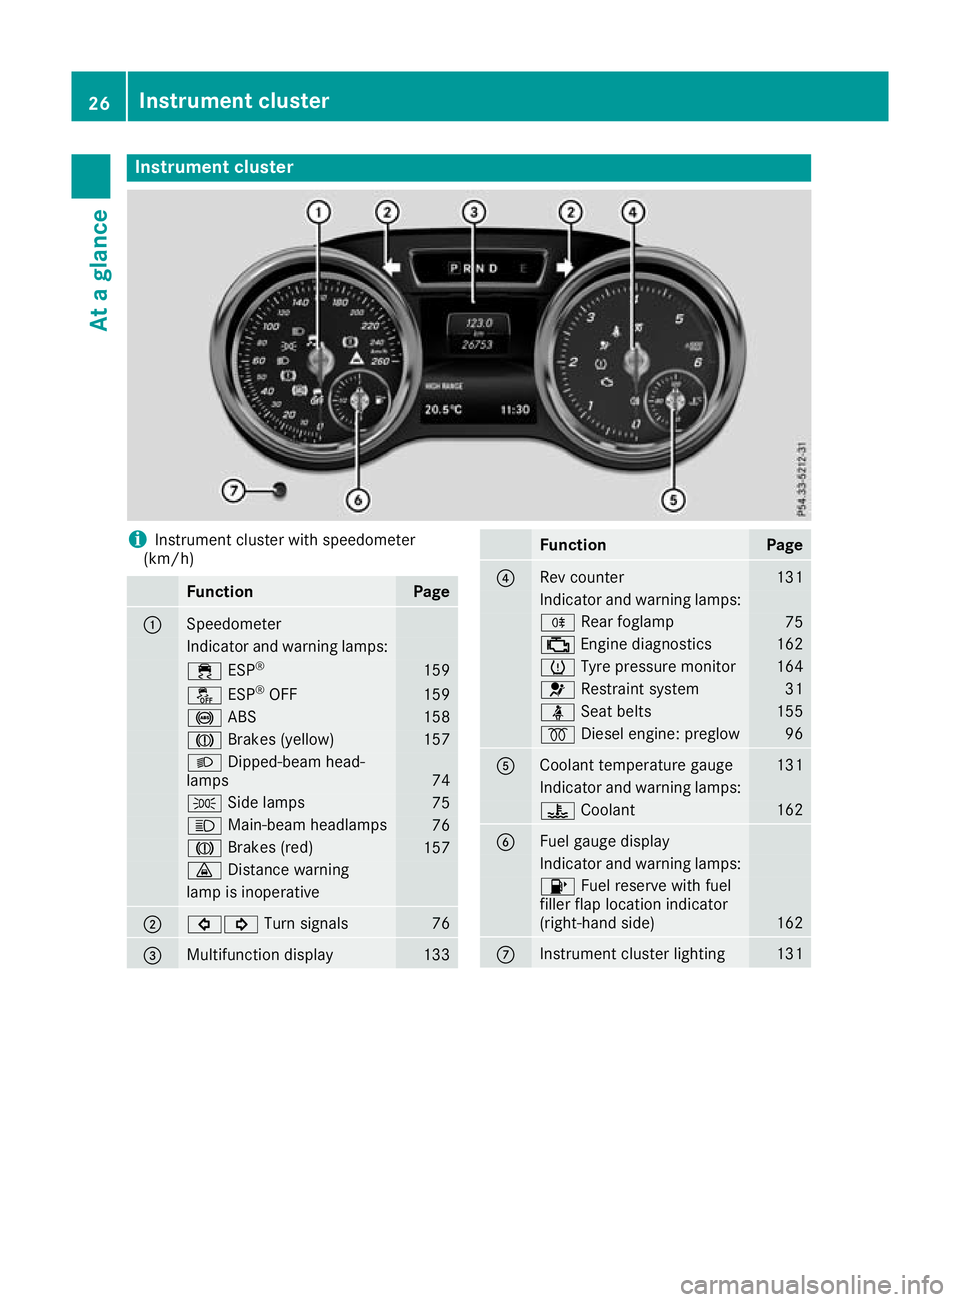
Instrumen
tcluster i
Instrument cluste
rwith speedometer
(km/h) Function Page
:
Speedometer
Indicator and warning lamps:
÷
ESP® 159
å
ESP®
OFF 159
!
ABS 158
J
Brakes (yellow) 157
L
Dipped-bea mhead-
lamps 74
T
Sidelam ps 75
K
Main-beam headlamps 76
J
Brakes(red) 157
·
Distance warning lamp is inoperative
;
#!
Turn signals 76
=
Multifunctio
ndisplay 133 Function Page
?
Rev counter 131
Indicato
rand warning lamps: R
Rear foglamp 75
;
Engine diagnost ics 162
h
Tyre pressure monitor 164
6
Restraint system 31
ü
Seat belts 155
%
Diesel engine: preglow 96
A
Coolant temperature gauge 131
Indicator and warning lamps:
?
Coolant 162
B
Fuel gaug
edisplay Indicator and warnin
glamps: 8
Fuel reserve with fuel
filler flap location indicator
(right-hand side) 162
C
Instrument cluster lighting 13126
Instrument clusterAt
ag lance
Page 107 of 261
Kickdown
Use kickdown for maximu
macceleration:
X Depress the accelerator pedal beyond the
pressure point.
The automatic transmission shifts to alower
gear depending on the engine speed.
X Ease off the accelerator pedal once the
desired speed is reached.
The automatic transmission shifts back up.
Towing atrailer X
Drive in the middle of the engine speed range
on uphill gradients.
X Limit the shift range to 3or 2depending on
the uphill or downhill gradient (Y page 105).
X Shift the transfer case int ooff-roa ddriving
position LOWR ANGE on extreme uphill gra-
dients or stee pdownhil lgradients
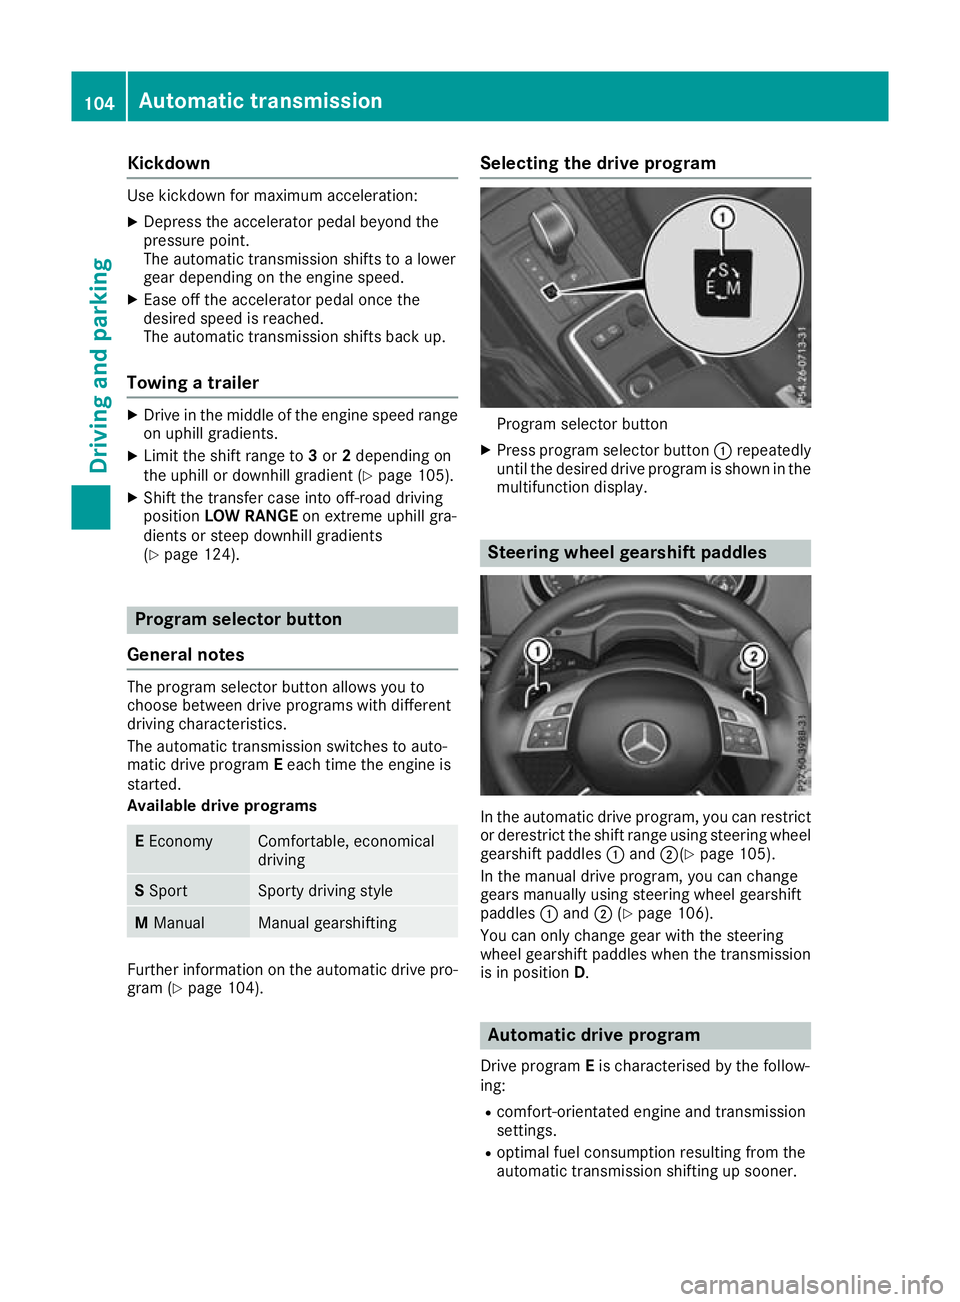
(Y page 124). Progra
mselector button
General notes The program selector button allows you to
choose between drive programs with different
driving characteristics.
The automatic transmission switches to auto-
matic drive program Eeach time the engine is
started.
Available drive programs E
Economy Com
fortable, economical
driving S
Sport Sport
ydriving style M
Manual Manual gearshifting
Furthe
rinformation on the automatic drive pro-
gra m( Ypage 104). Select
ing the drive program Program selector button
X Press program selector button :repeatedly
until the desired drive program is shown in the multifunction display. Steering wheel gearshift paddles
In the automatic drive program
,you can restrict
or derestrict the shift range using steering wheel gearshift paddles :and ;(Y page 105).
In the manuald rive program, you can change
gears manually using steering wheel gearshift
paddles :and ;(Ypage 106).
You can only change gear with the steering
wheel gearshift paddles when the transmission
is in position D. Automatic drive program
Drive program Eis characterised by the follow-
ing:
R comfort-orientated engine an dtransmission
settings.
R optimal fuel consumption resulting from the
automatic transmission shifting up sooner. 104
Auto
matictransmissionDriving and parking
Page 112 of 261
nozzle. Thi
sdischarge sany electrostatic
charge tha tmayhave buil tup.
Do not get back into the vehicl eduring the refu-
elling process ;otherwise, electrostatic charge
could buil dupagain. G
WARNING
If yo umix diesel fuel with petrol, the flash
point of this fuel mixture is lower than that of pure diesel fuel .When the engine is running,
components in the exhaust system may over-
heatu nnoticed. There is arisk of fire.
Never refue lwith petrol. Never add petrol to
diesel fuel.
! Do not use petrol to refue
lvehicles with a
diesel engine. Do not switch on the ignitio nif
you accidentally refue lwith the wrong fuel.
Otherwise, fuel can enter the fuel system.
Even smal lamounts of the wrong fuel could
result in damage to the fuel system and the
engine. The repair costs are high .Notify a
qualified specialist worksho pand have the
fuel tank and fuel lines drained completely.
! Overfilling the fuel tank coul
ddamage the
fuel system.
! Take care not to spil
lany fuel on painted
surfaces. You coul dotherwise damage the
paintwork.
! Use
afilter when adding fuel from afuel can.
The fuel lines and/or the fuel injection system coul dotherwise be blocked by particles from
the fuel can.
If you overfil lthe fuel tank, some fuel may spray
out when you remove the fuel pump nozzle.
Further information on fuel and fuel quality
(Y page2 50). Refuelling
General information Observe the important safety notes
(Y
page 108).
If you unlock/lock the vehicle from the outside, the fuel filler flap also unlocks/locks.
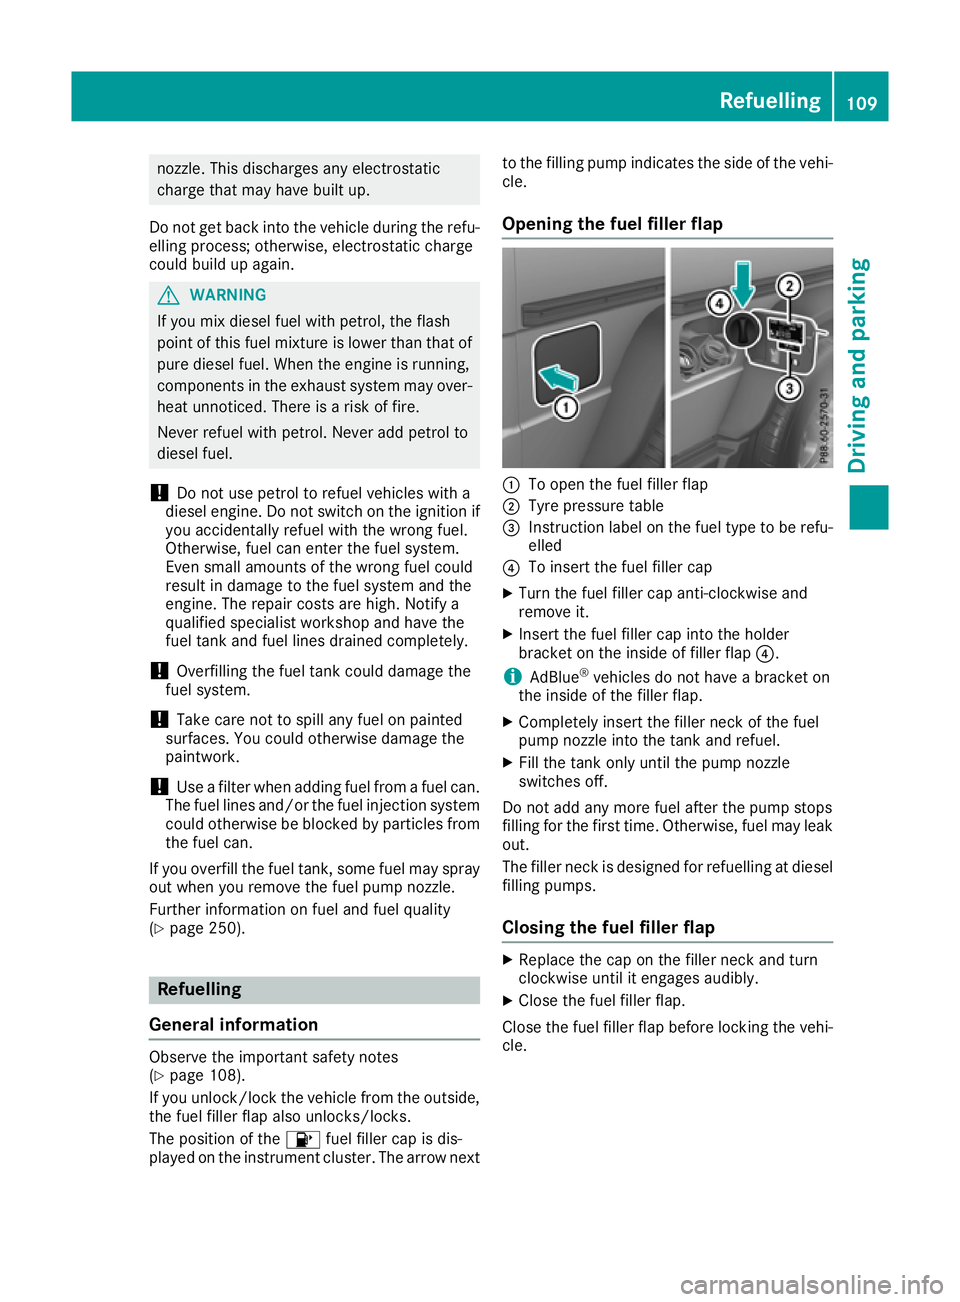
The positio nofthe8 fuel filler cap is dis-
played on the instrument cluster. The arrow next to the filling pump indicates the side of the vehi-
cle.
Opening the fuel filler flap :
To open the fuel filler flap
; Tyre pressure table
= Instruction label on the fuel type to be refu-
elled
? To insert the fuel filler cap
X Turn the fuel filler cap anti-clockwise and
remove it.
X Insert the fuel filler cap into the holder
bracket on the inside of filler flap ?.
i AdBlue ®
vehicles do not have abracket on
the inside of the filler flap.
X Completely insert the filler neck of the fuel
pump nozzle into the tank and refuel.
X Fill the tank only until the pump nozzle
switches off.
Do not add any more fuel after the pump stops
filling for the first time. Otherwise, fuel may leak out.
The filler neck is designed for refuelling at diesel
filling pumps.
Closing the fuel filler flap X
Replace the cap on the filler neck and turn
clockwise until it engages audibly.
X Clos ethe fuel filler flap.
Close th efuel filler flap before lockin gthe vehi-
cle. Refuelling
109Driving and parking Z
Page 118 of 261

X
To apply: pull parking brake lever ;up
firmly.
Whe nthe ignition is switched on, the red J
indicator lamp in the instrument cluster lights up.
X To release: pull parking brake lever ;
slightly.
X Press release button :and guid eparking
brake ;down to the stop.
The J indicator lamp in the instrument
cluster goe sout.
The vehicl ecan also be braked during an emer-
genc ybyu sing the parking brake.
X To brake in an emergency: press and hold
release button :and carefull ypullp arking
brake lever ;upwards.
If yo udrive on we troads or dirt-covered surfa-
ces, roa dsalta nd/or dirt could get into the
parking brake.
In order to prevent corrosion and areduction in
the braking powe rofthe parking brake, observe
the following:
R pull the parking brake upwards with release
button :depresse dfrom time to time before
beginning ajourney
R drive for approximatel y100 ma tamaximum
speed of 20 km/h Parkin
gupthe vehicle
If you leave the vehicle parked up for longer than
four weeks, the battery may be damaged by
exhaustive discharging.
If you leave the vehicle parked up for longer than
six weeks, it may suffer from lack of use.
X Contact aqualified specialist workshop and
seek advice.
i You can obtain information on trickle charg-
ers from aqualified specialist workshop. Driving tips
General drivin
gtips
Important safety notes G
WARNING
If you switch off the ignition while driving,
safety-relevant functions are only available wit
hlimitations, or not at all. This could affect,
for example, th epower steerin gand th ebrake
boosting effect .You will requir econsiderably
mor eeffort to steer and brake. Ther eisarisk
of an accident.
Do not switch off th eignitio nwhile driving.
Drive sensibly –savef uel Observe the following tips to save fuel:
X The tyre sshould always be inflated to the rec-
ommended tyre pressure.
X Remove unnecessary loads.
X Remove roof carriers when they are not nee-
ded.
X Warm up the engine at low engine speeds.
X Avoid frequent acceleration or braking.
X Have all service and maintenance work car-
ried out at the specified intervals.
Fuel consumption also increases when driving in
cold weather, in stop-start traffic, on short jour- neys and in hilly terrain. Short journeys
! Vehicles with
adiesel particle filter: if the
vehicle is mostly driven for short distances, it
is possible that malfunction smay occur dur-
ing the automatic cleaning of the diesel par-
ticle filter. This may lead to fuel collecting in
the engine oil and cause engine failure. There- fore, if you frequently drive short distances,
you should take a20minute trip on amotor-
way or rural road at least every 500km. Brakes
Imp ortant safety notes G
WARNING
If you shift dow nonaslippery road surface in
an attempt to increas ethe engine's braking
effect, the drive wheels coul dlose their grip.
This increases the risk of skidding and having
an accident.
Do not shift downf or additionalengine brak-
ing on aslippery road surface. Drivingt
ips
115Driving an dparking Z
Page 131 of 261

To avoid hazardous situations:
R make sure to check the noseweight before
each journey
R the noseweight should be as close as possible
to the maximum noseweight
R do not exceed the maximum permissible
noseweight
R the noseweight must not be lower than the
minimum permissible noseweight
Make sure that the following values are not
exceeded:
R the permissible noseweight
R the permissible trailer load
R the permissible rear axle load of the towing
vehicle
R the maximum permissible gross vehicle
weight of both the towing vehicle and the
trailer
When reversin gthe towing vehicle, make sure
there is nobody between the trailer and the vehi- cle.
The applicable permissible values, which must
not be exceeded, can be found:
R in your vehicle documents
R on the type plates for the trailer
R on the vehicle identification plate
If the values differ, the lowest value applies.
You will find the values approved by the manu-
facturer on the identification plates and for the
towing vehicle under "Technical data"
(Y page 256).
When reversin gthe towing vehicle, make sure
there is nobody between the trailer and the vehi- cle.
Couple and uncouple the trailer carefully. If youdo not couple the trailer to the towing vehicle
correctly, the trailer could become detached.
When towing atrailer, your vehicle's handling
characteristics will be different from when driv-
ing without atrailer.
The vehicle/trailer combination:
R is heavier
R is restricted in its acceleration and gradient-
climbing capability
R has an increased braking distance
R is affected more by stron gcrosswinds
R demands more sensitiv esteering
R has alarger turnin gcircle This can impair the vehicle's handling charac-
teristics. Adapt your driving style accordingly.
Maintain asafe distance. Drive carefully.
When towing atrailer, alway sadjust your speed
to the current road and weather conditions. Do
not exceed the maximum permissible speed for
your vehicle/trailer combination. Notes on to
wingatrailer
General notes When towing
atrailer, set the tyre pressure on
the rear axle of the towing vehicle for amaxi-
mum load. Further information on the tyre pres-
sure table in the fuel filler flap (Y page 109).
The height of the ball coupling changes with the load of the vehicle. If necessary, use atrailer
with aheight-adjustable drawbar.
You will find permissible trailer loads under
"Technical data" (Y page 256).
Driving tips X
Observe the information on ESP ®
trailer sta-
bilisation (Y page 55).
X On long and steep downhill gradients, select
shift range 1,2or 3(Y page 105) in good time.
X If necessary, shift the transfer case to LOW
RANGE (Ypage 124).
This will use the braking effect of the engine, so less braking will be required to maintain
the vehicle speed. This relieves the load on
the brake system and prevents the brakes
from overheating and wearing too quickly. If
you need additional braking, depress the
brake pedal repeatedly rather than continu-
ously.
The maximum permissible speed for vehicle/
trailer combinations depends on the type of
trailer. Before beginnin gthe journey, check the
trailer's documents to see what the maximum
permitted speed is. Observe the maximum per-
missible speed in the relevant country.
For certain Mercedes-Benz vehicles, the maxi-
mum permissibler ear axle load is increased
when towing atrailer. See the "Technical data"
section to find out whether this applies to your
vehicle (Y page 256). In the event of increased
rear axle load, the car/trailer combination may
not exceed amaximum speed of 100 km/h for
reasons concerning the operating permit. This 128
Towing
atrailerDriving and parking
Page 221 of 261
High-pressure cleaner
G
WARNING
The wate rjet of circular-jet nozzles (dirt grind-
ers) can caus edamage not visible from the
outside to tyres or chassi scomponents. Com-
ponents damaged in this way can unexpect-
edlyf ail.There is arisk of an accident.
Do not use high-pressure cleaners with circu-
lar-jet nozzles to clea nthe vehicle. Have dam-
agedt yres or chassi scomponents replaced
immediately.
! Always maintai
nadistance of at least 30 cm
between the vehicl eand the high-pressure
cleaner nozzle. Information about the correct
distance is available from the equipment
manufacturer.
Move the high-pressure cleaner nozzle
around when cleaning yourv ehicle.
Do not aim directly at any of the following:
R tyres
R door gaps, roof gaps, joints etc.
R electrica lcomponents
R battery
R plugc onnectors
R lamps
R seals
R trim elements
R ventilation slots
Damag etosealsore lectrica lcomponents
can leadtol eaks or failures.
! Vehicles with decorative film: parts of your
vehicl eare covered with adecorative film.
Maintain adistance of at least 70 cm between
the parts of the vehicl ecovered with the film
and the nozzle of the high pressure cleaner.
Information about the correct distance is
available from the equipment manufacturer.
Move the high-pressure cleaner nozzle
around whilst cleaning.
Cleaning the paintwork !
Do not affix:
R stickers
R films
R magneti cplates or similari tems to painted surfaces. You could oth
erwise
damage the paintwork.
Scratches, corrosive deposits, area saffecte dby
corrosion and damage cause dbyinadequate
car ecannot always be completel yrepaired .In
such cases ,visit aquali fied specialis tworkshop.
X Remov eimpuri ties immediately, where pos-
sible, whilst avoiding rubbing too hard.
X Soa kinsect remains with insect remove rand
rinse off the treated area safterwards.
X Soa kbirdd ropping swithw ater and rinse off
the treated area safterwards.
X Remov ecoolant, brake fluid ,tree resins ,oils,
fuel sand greases by rubbing gently with a
cloth soaked in petroleu mether or lighter
fluid.
X Use tar remove rtoremove tar stains.
X Use silicone remove rtoremove wax. Cleanin
gvehicle parts
Cleaning th ewheels G
WARNING
Th ew ater jet of circular-jet nozzles (dirt grind-
ers) can caus edamage not visible from the
outside to tyres or chassi scomponents. Com-
ponents damaged in this way can unexpect-
edlyf ail.There is arisk of an accident.
Do not use high-pressure cleaners with circu-
lar-jet nozzles to clea nthe vehicle. Have dam-
agedt yres or chassi scomponents replaced
immediately.
! Do not use acidic whee
lcleaning products
to remove brake dust. This coul ddamage
whee lbolts and brake components.
! Do not park up yourv
ehiclefor along period
of time immediatel yafter cleaning, particu-
larl yafter cleaning the whee lrim with wheel
cleaner. Whee lcleaner may leadtoi ncreased
corrosio nofthe brake discs and pads. You
should therefore drive for afew minutes after
cleaning. By heating up the brakes ,the brake
discs and padsd ry. The vehiclecan then be
parked up for along period of time. 218
CareMaintenanc
eand care
Page 238 of 261
Important safety notes
G
WARNING
If wheels an dtyres of the wrong size are used,
the whee lbrakes or suspension components
may be damaged. There is arisk of an acci-
dent.
Always replace wheels and tyres with those
that fulfi lthe specifications of the original
part.
When replacing wheels, make sure to fit the
correct:
R designation
R type
When replacing tyres, make sure to fit the
correct:
R designation
R manufacturer
R type G
Warning
Af lat tyre severely impairs the driving, steer-
ing and braking characteristics of the vehicle.
There is arisk of an accident.
Do not drive with aflat tyre. Immediately
replace the flat tyre with yours parew heel, or
consult aqualified specialist workshop.
Accessorie sthat are not approved for yourv ehi-
cle by Mercedes-Benz or are not being used cor- rectly can impair the operating safety.
Before purchasing and using non-approved
accessories, visit aqualified specialist work-
shop and enquire about:
R suitability
R lega lstipulations
R factory recommendations
Further information regarding wheels and tyres
can be found under "Wheel/tyre combinations"
(Y page2 46).
You can ask for information regarding permitted
wheel/tyre combinations at aMercedes-Benz
Service Centre. Information on tyre pressure can be found:
R on the tyre pressure table in the fuel fille rflap
(Y page 109)
R under "Tyre pressure" (Y page 238)
Modification work on the brake system and
wheelsisn ot permitted, nor is the use of spacer
plates or brake dust shields. This invalidates the general operating permit for the vehicle.
i Further information on wheelsa
nd tyres can
be obtained at any qualifieds pecialist work-
shop. Operation
Info
rmatio nondriving
When th evehicl eish eavily laden ,check thet yre
pressures and adjust them prio rtoatrip.
While driving ,pay attention to vibrations, noises
and unusual handlin gcharacteristics ,e.g.p ull-
ing to on eside .This may indicat ethatthe
wheels or tyres are damaged. If you suspec tthat
at yreisd efective, reduce your spee dimmedi-
ately. Stop th evehicl eass oonasp ossible to
chec kthe wheels and tyres for damage. Hidden
tyr ed amag ecould also be causing th eunusual
handlin gcharacteristics .Ifyou fin dnos ignsof
damage, hav ethe tyres and wheels checke data
qualified specialist workshop.
When parking your vehicle, mak esuren otto
squas hthe tyre. If you canno tavoi dd riving over
obstacles, e.g. kerbs ,dososlowly and at an
obtuse angle only. You could otherwise damage
th ew hee lrim sa nd tyres. Regular checking of wheels an
dtyres G
WARNING
Damaged tyres can caus etyre inflation pres-
sure loss. As aresult, you coul dlose control of
yourv ehicle. There is arisk of accident.
Check the tyres regularl yfor signs of damage
and replace any damaged tyres immediately.
Check wheels and tyres for damage at least
once amonth. Check wheels and tyres after
driving off-road or on roug hroads. Damaged
wheels can caus ealoss of tyre pressure. Operation
235Wheels and tyres Z