2016 MERCEDES-BENZ G-CLASS SUV ESP
[x] Cancel search: ESPPage 241 of 261
Therefore, only use snow chains that are in
perfect condition. Observe the manufactur-
er's installation instructions.
For safety reasons, Mercedes-Benz recom-
mends that you use only snow chains that have been approved for Mercedes-Benz or that are of
an equivalent standard of quality. For more
information, please contact aqualified special-
ist workshop.
If you wish to fit snow chains, please bear the
following points in mind:
R snow chains cannot be fitted to all wheel/tyre
combinations. Observe the information
regarding permitted wheel/tyre combina-
tions (Y page 246)
R fit the snow chains on all four wheels for max-
imum tractive power and driving stability.
Snow chains must alway sbefitted in pairs; if
you only have two snow chains, fit these on
the rear wheels. The vehicle then remains
more stable under braking
R use snow chains only if the road surface is
completely snow-covered. Remove the snow
chains as soon as possible when you come to ar oad that is not snow-covered
R local regulations may restrict the use of snow
chains. Observe the appropriate regulations if you wish to fit snow chains
R do not exceed the maximum permissible
speed of 50 km/h
You may wish to deactivate ESP ®
when pulling
away with snow chains fitted (Y page 54). This
allows the wheels to spin in acontrolled manner,
achieving increased propulsive force (cut). Tyre pressure
Tyre pressur
especifications
Important safety notes G
WARNING
Underinf lated or overinflated tyres pose the
following risks:
R the tyres may burst, especially as the load
and vehicl espee dincrease.
R the tyres may weare xcessively and/or
unevenly, which may greatly impair tyre
traction.
R the driving characteristics, as wellass teer-
ing and braking, may be greatly impaired.
There is arisk of an accident.
Observe the recommende dtyre pressure and
check the tyre pressure of all the tyres includ-
ing the spar ewheel:
R at least every two weeks
R when the loadc hanges
R before embarking on alonger journey
R for changed operating conditions, e.g. off-
road driving
If necessary, correct the tyre pressure. G
WARNING
If you fit unsuitabl eaccessories onto tyre
valves, the tyre valve smay be overloadeda nd
malfunction, which can caus etyre pressure
loss. Due to their design, retrofitted tyre pres-
sure monitors keep the tyre valve open. This
can alsor esult in tyre pressure loss. There is a
risk of accident.
Only screw standar dvalve caps or valve caps
specifically provided by Mercedes-Benz for
yourv ehicleonto the tyre valve. G
WARNING
If the tyre pressure drops repeatedly ,the
wheel, valve or tyre may be damaged. Tyre
pressure that is too low may result in atyre
blow-out. There is arisk of accident. 238
Tyre pressureWheels and tyres
Page 242 of 261

R
Chec kthe tyrefor foreign objects.
R Chec kwhether th ewheel is losin gair or the
valv eisl eaking.
If you are unable to rectif ythe damage, con-
tac taq ualified specialist workshop. H
Environmenta
lnote
Chec kthe tyrep ressure regularly, at least
ever y14d ays.
The recommended tyr epressures for various
operatin gcondition scan be foun donthetyre
pressure table on th efuel filler flap
(Y page 109).
Operation with atrailer: thea pplicable value
for th erear axle is th emaximum value stated in
th et yrep ressure table.
The tyr epressure table may also state tyr epres-
sures for differen tload conditions. Thes eare
defined in th etable as differen tnumbers of pas-
sengers and amounts of luggage. The actual
number of seat smay differ fro mthis.
If tyr esizes are not specified ,the tyrep ressures
stated on th etyrep ressure informatio nlabel
apply for all tyres approved for this vehicle. If one or mor
etyre sizes precedes atyre pres-
sure, the following tyre pressure information is
valido nly for that tyre size.
Use asuitable pressure gauge to check the tyre
pressure. The outer appearance of atyre does
not give any reliable indicatio nofthe tyre pres-
sure.
You can also check the tyre pressure using the
on-board computer.
If possible, correct tyre pressures only when the
tyres are cold. The tyres are cold:
R if the vehicl ehas been parked with the tyres
out of direct sunlight for at least three hours
and
R if the vehicle has not been driven further than
1.6 km
Dependin gonthe outside temperature, the
vehicle speed and the load on the tyres, the tyre temperature and thus the tyre pressure changes by approximately 10 kPa (0.1 bar/1.5 psi )per
10 †. Take this into account when checking the
pressure of warm tyres. Correct the tyre pres-
sure only if it is too low for the current operating
condition.
Drivin gwithatyre pressure that is too high or
too low can:
R shorten the service life of the tyres
R cause increased tyre damage
R have anegative effect on handling character-
istics and thus driving safety (e.g. aquaplan-
ing)
The tyre pressure values given for low loads are minimum values that offer you good driving
comfor tcharacteristics.
However, you can also use the values given for
higher loads. These are permissible and will not
adversely affect the runnin gofthe vehicle. Tyre pressur
emonitor
General notes If
at yre pressure monitor is fitted, the vehicle's
wheelsh ave sensors fitted that monitor the tyre
pressures in all four tyres. The tyre pressure
monitor warns you if the pressure drops in one
or more of the tyres. The tyre pressure monitor
functions only if the corresponding sensors are
fitted to all wheels.
Information on tyre pressures is shown on the
multifunction display. After afew minutes of
driving, the current tyre pressure of each wheel
is shown in the Serv.
Serv. menu. Tyrep
ressure
239Wheels and tyres Z
Page 243 of 261

For further information on displaying this mes-
sage, refe rtothe "Checking the tyre pressure
electronically" section (Y page 240).
Important safety notes It is the driver's responsibility to set the tyre
pressure to the recommended cold tyre pres-
sure suitable for the operating situation
(Y page 238). Note that the correc ttyre pres-
sure for the current operating situation must
first be learnt by the tyre pressure monitor. If a
substantial loss of pressure occurs, the warning threshold for the warning message is aligned to
the learnt reference values. Restart the tyre
pressure monitor after adjusting to the cold tyre pressure (Y page 241). The current pressures
are saved as new reference values. This ensures that awarning message appears only if the tyre
pressure drops significantly.
The tyre pressure monitor does not warn you of
an incorrectly set tyre pressure. Observe the
notes on the recommended tyre pressure
(Y page 238).
The tyre pressure monitor is not abletow arn
you of asudden loss of pressure, e.g. if the tyre
is penetrated by aforeign object. In this event,
bring the vehicle to ahalt by braking carefully.
Avoid abrupt steering manoeuvres.
The tyre pressure monitor has ayellow h
warning lamp on the instrument cluster for indi-
cating apressure loss or malfunction. Depend-
ing on how the warning lamp flashe sorlights up,
at yre pressure that is too low or amalfunction in
the tyre pressure monitor is indicated:
R if the h warning lamp is lit continuously,
the tyre pressure on one or more tyres is sig-
nificantly too low. The tyre pressure monitor
is not malfunctioning.
R if the h warning lamp flashe sfor around a
minute and then remains lit constantly, the
tyre pressure monitor is malfunctioning.
In addition to the hwarning lamp,am essage
appears in the multifunction display. Observe
the information on display messages
(Y page 150).
It may take up to ten minutes for amalfunction
of the tyre pressure monitor to be indicated .A
malfunction willbei ndicated by thehtyre
pressure warning lamp flashing for approx-
imatel yone minute and then remaining lit. When
the faulth as been rectified, the htyre pres-
sure warning lamp goes out after driving for a
few minutes. The tyre pressure values indicated by the on-
board computer may differ from those meas-
ured at
afilling station using apressure gauge.
The tyre pressures shown by the on-board com-
puter refer to those measured at sea level. At
high altitudes, the tyre pressure values indica-
ted by apressure gauge are higher than those
shown by the on-board computer. In this case,
do not reduce the tyre pressures.
The operation of the tyre pressure monitor can
be affected by interferenc efrom radio transmit-
ting equipment (e.g. cordless headphones, two- way radios) that may be being operated in or
near the vehicle.
Checking the tyrep ressureelectroni-
cally X
Make sure that the key is in position 2in the
ignition lock.
X Press the =or; button on the steering
wheel to select the Serv.
Serv. menu.
X Press the 9or: button to select
Tyre pressure
Tyre pressure.
X Press the abutton.
The multifunction display shows the current
tyre pressure of each wheel.
If the vehicle has been parked for over
20 minutes, the Tyre pressures will be Tyre pressures will be
displayed
displayed after a
after afew
fewminutes
minutes of
ofdriv‐
driv‐
ing
ing message appears.
After ateach-in period, the tyre pressure moni-
tor automaticallyd etects new wheels or new
sensors. As long as aclear allocation of the tyre
pressure valuestot he individual wheels is not
possible,t heTyre
Tyre pressure
pressure monitor
monitoractive
active
displaym essage is shown instead of the tyre
pressure display. The tyre pressures are already being monitored.
If as pare wheel is fitted, the system may con-
tinue to show the tyre pressure of the wheel that has been removed for afew minutes. Please
note that in this case, the value displayed for the
replaced wheel does not indicate the current
tyre pressure of the spare wheel.
Warning messages of the tyre pressure monitor If the tyre pressure monitor detects
apressure
loss in one or more tyres, awarning messag eis
shown on the multifunction display. The yellow
h tyre pressure warning lamp then lights up. 240
Tyre pressureWheels and tyres
Page 246 of 261
Brazil
Este equipamento opera em caráte
rsecundário,
isto é, não tem direito àproteçã ocontra inter-
ferênci aprejudicial ,mesmo de estaçõe sdo
mesmo tipo, enão pode causa rinterferência a
sistemas operando em caráte rprimário. Changin
gawheel Flat tyre
You can fin dinformation on what to do in the
event of aflat tyr eunder "Breakdown assis-
tance" (Y page 224). Interchanging th
ewheels G
WARNING
Interchangin gthe front and rear wheels may
severely impair the driving characteristics if
the wheels or tyres have different dimensions. The whee lbrakes or suspension components
may alsobed amaged. There is arisk of acci-
dent.
Interchange front and rear wheels only if the
wheels and tyres are of the same dimensions.
! On vehicles fitted with
atyre pressure mon-
itor, electronic components are located in the wheel.
Tyre-fitting tools should not be appliedint he
area of the valve ,asthis coul ddamage the
electronic components.
Only have tyres changed at aqualified spe-
cialist workshop.
Interchanging front and rear wheels of differing
dimensions can render the genera loperating
permi tinvalid.
Always pay attention to the instructions and
safety notes under "Changing awheel"
(Y page2 43). The wear patterns on the front and rear tyres
diffe
rdepending on the operating conditions.
Interchange the wheels before aclear wear pat-
tern has formed on the tyres. Frontt yres typi-
cally wear more on the shoulders, while rear
tyres wear more in the centre.
On vehicles that have front and rear wheels of
the same size, you can interchange the wheels
every 5,000 to 10,00 0kmd epending on the
degree of tyre wear. Ensure that the direction of
rotation is maintained.
Clean the contact surfaces of the wheel and the
brake disc thoroughly every time awheel is
interchanged. Check the tyre pressure and reac-
tivate the tyre pressure monitor if necessary
(Y page 241). Direction of rotation
Tyres with aspecifie ddirection of rotation have
additional benefits, e.g. if there is ariskofa qua-
planing. You will only gain these benefit sifthe
correc tdirection of rotation is observed.
An arrow on th esidewall of th etyrei nd icates its
correc tdirection of rotation.
You may fit th espar ewhee lagainst th edirection
of rotation .Observ ethe time restriction on use
as well as th espeed limitation specifie donthe
spar ewheel. Storin
gwheels
Storet yres that are not being used in acool, dry
and preferably dark place. Protect the tyres
against oil, grease, petrol and diesel. Fitting
awheel
Preparing th evehicle G
WARNING
If yo uremove the spar ewhee lfrom the spare
whee lbracket, the weight distributio nofthe
vehicl echanges .Ifyou have already raised
the vehicle, the jack coul dtip over. There is a
risk of injury.
Remove the spar ewhee lfrom the spar ewheel
bracket before raising the vehicle. Changing
awheel
243Wheels an dtyres Z
Page 249 of 261

for Mercedes-Benz vehicles and the respective
wheel.
X Clean the whee land whee lhub contact sur-
faces.
X Place the new whee lonthe whee lhub and
pus hito n.
X Tighten the whee lbolts until they are finger-
tight.
Lowering the vehicle G
WARNING
The wheels coul dwork loos eifthe whee lnuts
and bolts are not tightened to the specified
tightening torque .There is arisk of accident.
Have the tightening torque immediately
checked at aqualified specialist workshop
after awhee lisc hanged.
X Slowl yopen the pressure release screw on
the jack using the pump leve rbyapprox-
imatel yone full turn and carefully lower the
vehicl e(Ypage2 44).
X You can put the jack aside. X
Tighten the wheel bolts evenl yinacrosswise
pattern in the sequence indicated (: toA).
The specified tightening torque is 130 Nm.
X Dismantle the pump lever.
X Push the jack piston back in and close the
drain plug.
X Use the nuts to secure the faulty wheel to the
spare wheel bracket (Y page 223).
X Stow the jack and the vehicle tools in the
vehicle again.
X Check the tyre pressure of the newly fitted
wheel and adjust it if necessary.
Observe the recommended tyre pressure
(Y page 238). If you are drivin
gwith the emergency spare
wheel fitted, the tyre pressure monitor cannot
function reliably.R estart the tyre pressure mon-
itor only once the defective wheel has been
replaced with anew wheel.
All fitted wheelsm ust be equipped with func-
tioning sensors for the tyre pressure monitor. Wheel and tyre combinations
You can ask for information regarding permitted
wheel/tyre combinations at aMercedes-Benz
Service Centre.
! For safety reasons, Mercedes-Benz recom-
mends that you only use tyres, wheels and
accessories which have been approved by
Mercedes-Benz for you rvehicle. These are
speciall yadapted to the various driving safety
systems, such as ABS or ESP ®
.
Only use the tyres, wheels and accessories
tested and recommende dbyMercedes-Benz.
Certain characteristics, such as handling,
vehicl enoise emissions, fuel consumption,
etc. may otherwise be adversely affected.
Other wheel sizes may caus ethe tyres to
come into contact with the vehicl ebody and
axle components, whe nunder load. This may
result in damage to the tyre or the vehicle.
Mercedes-Benz is not responsibl efor any
damage caused by using tyres, wheels or
accessories other than those recommended.
Informatio nontyres, wheels and permissible
combinations can be obtained at aqualified
specialist workshop.
! Retreaded tyres are neither tested nor rec-
ommende dbyMercedes-Benz, since previ-
ous damage cannot alwaysbed etected on
retreaded tyres. As aresult, Mercedes-Benz
cannot guarantee vehicl esafety if retreaded
tyres are fitted. Do not fit use dtyres if you
have no information about their previous
usage.
! Large wheels: the lower the section width
for acertain wheel size, the lower the ride
comfort is on poor road surfaces. Rol lcomfort
and suspension comfort are reduced and the risk of damage to the wheels and tyres as a
result of driving over obstacles increases.
The recommende dtyre pressures for various
operating conditions can be found on the tyre 246
Wheel and tyre combinationsWheels and tyres
Page 252 of 261
nections intende
dfor us ewitht he basi cfittings.
Be sure to observe the manufacturer' saddi-
tional instructions when installing.
Deviations in respect of wavebands, maximum
transmission outputs or aeria lpositions must be
approved by Mercedes-Benz.
The maximu mtransmission outpu t(PE AK) at the
base of the aeria lmustn ot exceed the following
values: Waveband Maximum
transmissi on
output Short wave
3-54M
Hz 100 W
4mw
aveband
68 -87.5 MHz 30 W
2mw
aveband
144 -174 MHz 50 W
Trunked radio/Tetra
380
-460 MHz 10 W
70 cm waveband
400
-460 MHz 35 W
Mobilec
ommunications
(2G/3G/4G) 10 W
The following can be used in the vehicle without
restrictions:
R RF transmitters with amaximum transmis-
sion output of up to 100 mW
R RF transmitters with transmitter frequencies
in the 380 –410 MHz waveband and amaxi-
mum transmission output of up to 2W
(trunked radio/Tetra)
R Mobile phones (2G/3G/4G)
There are no restriction swhen positionin gthe
aerial on the outside of the vehicle for the fol-
lowing wavebands:
R Trunked radio/Tetra
R 70 cm waveband
R 2G/3G/4G Identification plates
Veh
icle identificatio nplate with vehi-
cl ei dentificatio nnumber (VIN) X
Ope nthe front left-hand door.
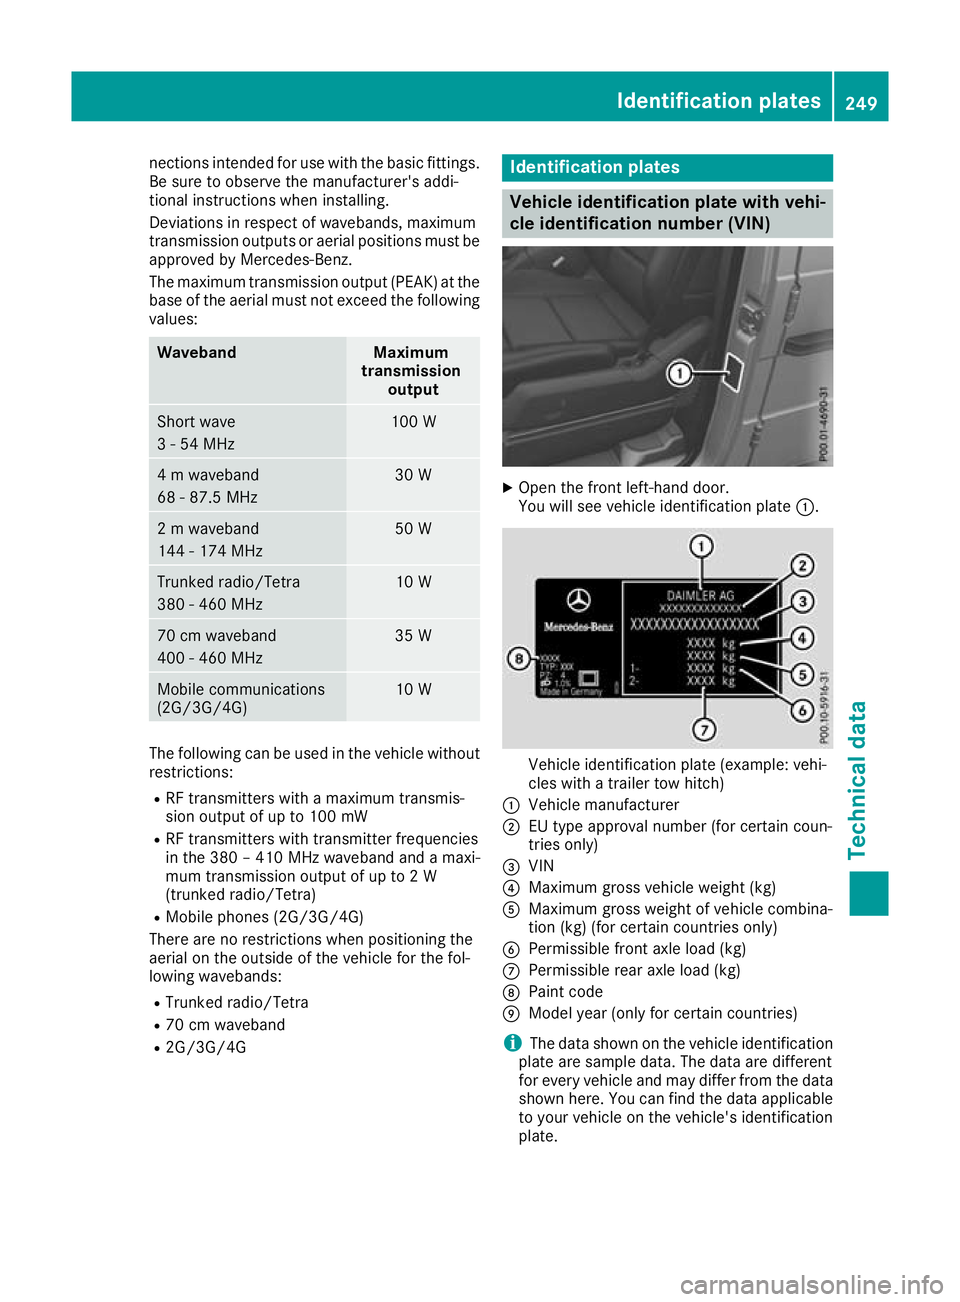
You will see vehicle identification plate :. Vehicle identification plate (example: vehi-
cles with
atrailer tow hitch)
: Vehicle manufacturer
; EU type approvaln umber (for certain coun-
tries only)
= VIN
? Maximum gross vehicle weight( kg)
A Maximum gross weightofv ehicle combina-
tion (kg) (for certain countries only)
B Permissiblef ront axle load (kg)
C Permissibler ear axle load (kg)
D Paint code
E Model year( only for certain countries)
i The data shown on the vehicle identification
plate are sample data. The data are different
for every vehicle and may differ from the data shown here. You can find the data applicable
to yourv ehicle on the vehicle's identification
plate. Identification plates
249Technical data Z
Page 253 of 261
Vehicl
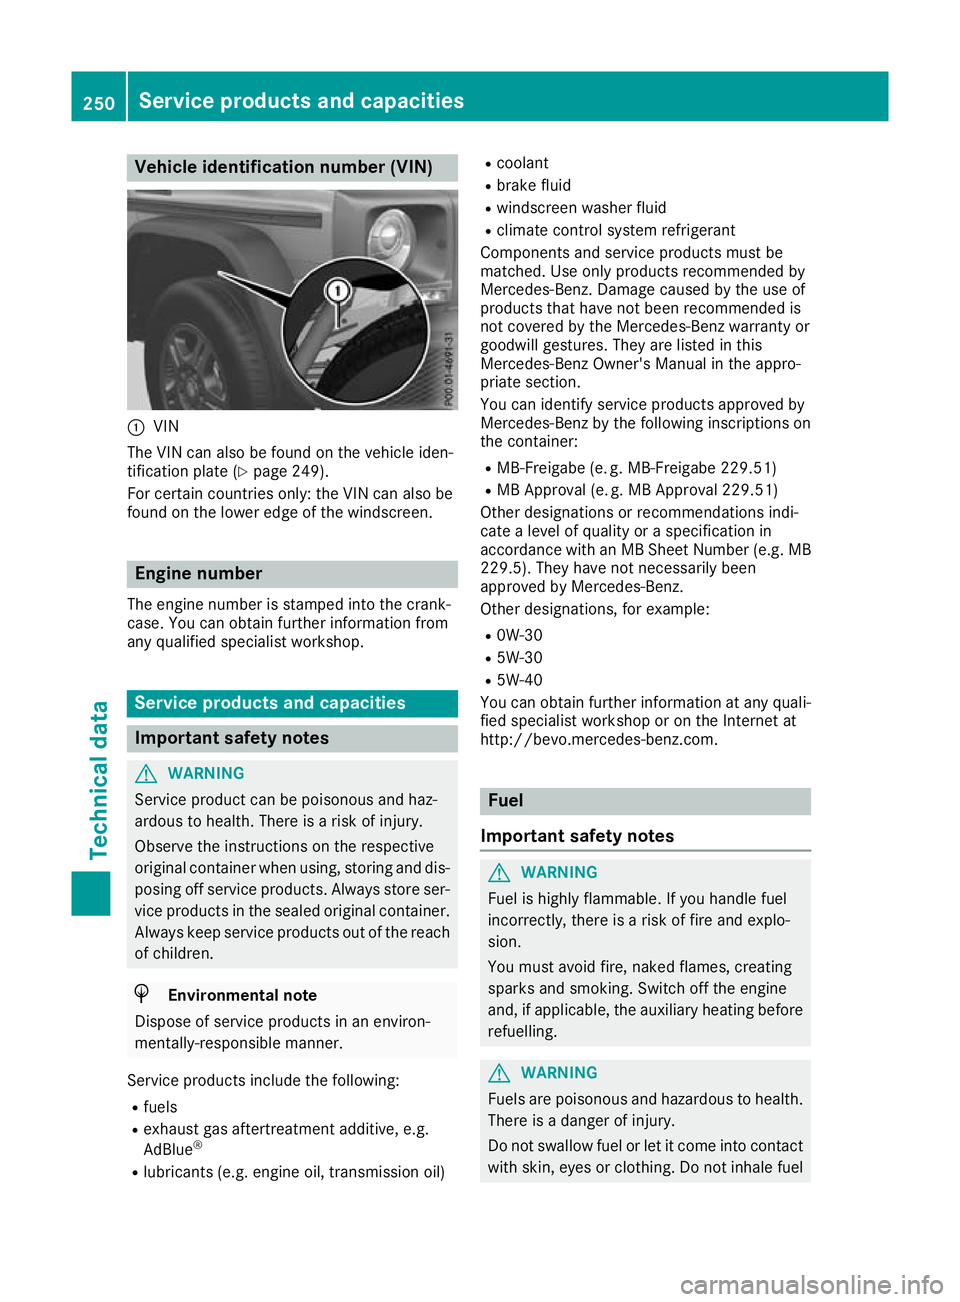
eidentificatio nnumber (VIN) :
VIN
The VIN can alsobef ound on the vehicle iden-
tification plate (Y page 249).
For certain countries only: the VIN can also be
found on the lower edge of the windscreen. Engine number
The engine number is stampe dintot he crank-
case. You can obtain further informatio nfrom
any qualified specialist workshop. Service products and capacities
Important safety notes
G
WARNING
Servic eproduct can be poisonous and haz-
ardous to health. There is arisk of injury.
Observe the instructions on the respective
original container when using, storing and dis- posing off service products. Always store ser-
vice products in the sealed original container. Always keep service products out of the reach
of children. H
Environmental note
Dispose of service products in an environ-
mentally -responsible manner.
Servic eproduct sinclude th efollowing:
R fuels
R exhaust gas aftertreatmen tadditive, e.g.
AdBlue ®
R lubricant s(e.g .engine oil, transmission oil) R
coolant
R brake fluid
R windscreen washer fluid
R climat econtrol system refrigerant
Components and service products mus tbe
matched. Use only products recommended by
Mercedes-Benz. Damage caused by the us eof
products that have not bee nrecommended is
not covered by the Mercedes-Benz warranty or
goodwil lgestures. The yare listed in this
Mercedes-Benz Owner's Manua linthe appro-
priate section.
You can identify service products approved by
Mercedes-Benz by the following inscriptions on
the container:
R MB-Freigabe (e. g. MB-Freigabe 229.51)
R MB Approva l(e. g. MB Approva l229.51)
Other designations or recommendations indi-
cate alevel of quality or aspecification in
accordance with an MB Shee tNumber (e.g .MB
229.5). The yhaven ot necessaril ybeen
approved by Mercedes-Benz.
Other designations ,for example:
R 0W-30
R 5W-30
R 5W-40
You can obtain further information at any quali-
fie ds pecialist worksho poronthe Internet at
http://bevo.mercedes-benz.com. Fuel
Important safety notes G
WARNING
Fuel is highly flammable .Ifyou handl efuel
incorrectly ,there is arisk of fire and explo-
sion.
You must avoi dfire, naked flames, creating
sparks and smoking. Switch off the engine
and, if applicable,t he auxiliary heating before
refuelling. G
WARNING
Fuel sare poisonous and hazardous to health.
There is adange rofinjury.
Do not swallowf uel or let it come into contact
with skin, eyesorc lothing. Do not inhal efuel 250
Service products and capacitiesTechnical data
Page 254 of 261
vapours. Keep fuel
sout of the reach of chil-
dren.
If you or others come into contact with fuel,
observe the following:
R Wash the fuel off any affected area sofskin
with water and soap immediately.
R If you get fuel in youre yes, rinse them thor-
oughly with clea nwater immediately. Seek
immediate medical attention.
R If fuel is swallowed,s eek immediate medi-
cal attention. Do not induce vomiting.
R Change any clothing that has come into
contact with fuel immediately.
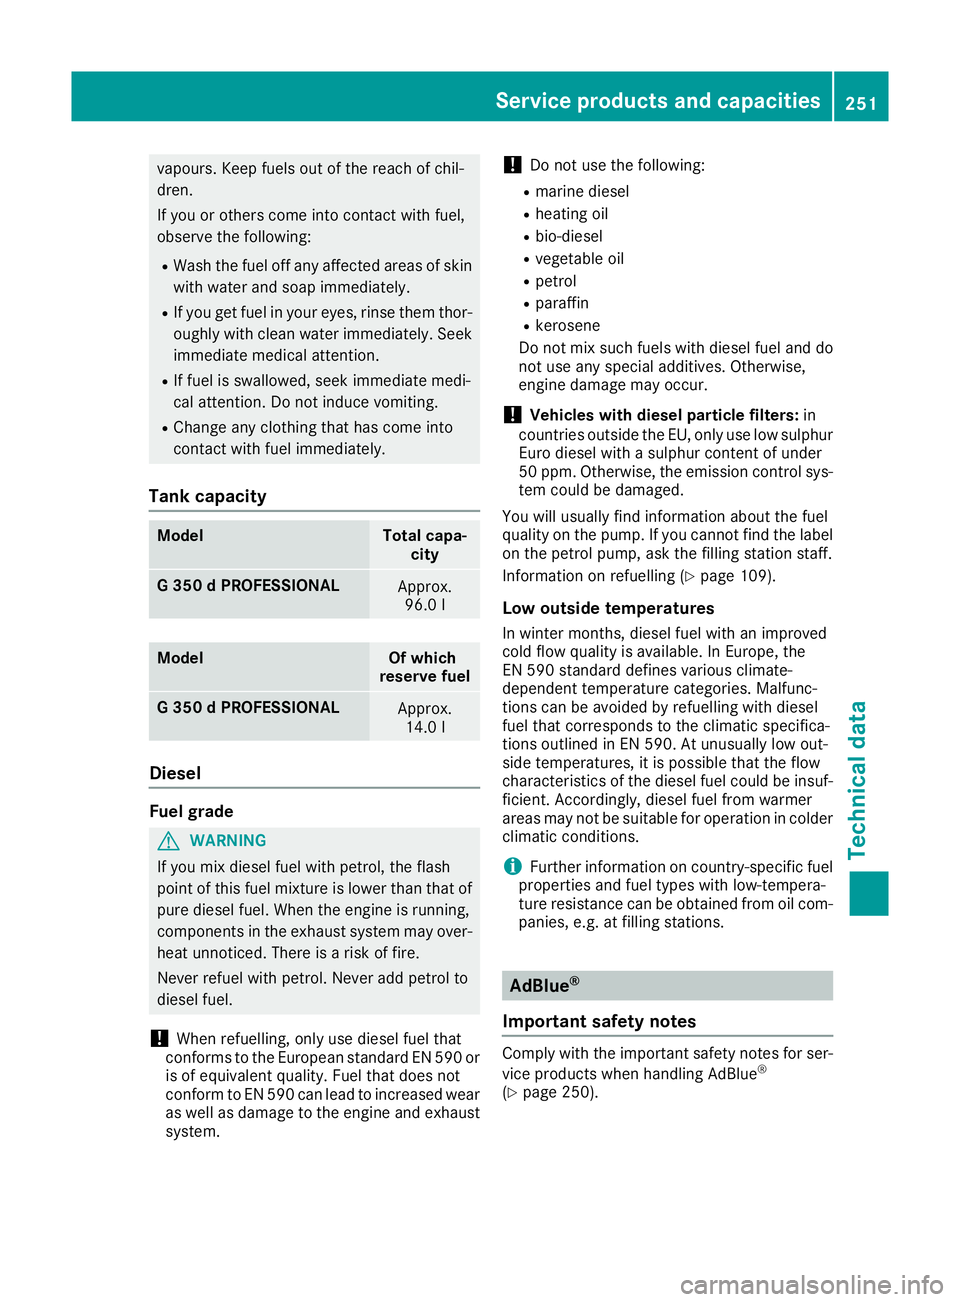
Tank capacity Model Total capa-
city G3
50dPROFESSIONAL Approx.
96.0 l Model Of which
reserve fuel G3
50dPROFESSIONAL Approx.
14.0 l Diesel
Fuel grade
G
WARNING
If you mix diesel fuel with petrol, the flash
point of this fuel mixture is lower than that of pure diesel fuel.W hen the engine is running,
components in the exhaust system may over-
heatu nnoticed. There is arisk of fire.
Never refue lwith petrol. Never add petrol to
diesel fuel.
! When refuelling, only use diesel fuel that
conforms to the European standard EN 590 or is of equivalent quality .Fuel that does not
conform to EN 590 can leadtoi ncreased wear
as wellasd amage to the engine and exhaust
system. !
Do not use the following:
R marine diesel
R heating oil
R bio-diesel
R vegetable oil
R petrol
R paraffin
R kerosene
Do not mix such fuels with diesel fuel and do
not use any special additives. Otherwise,
engine damage may occur.
! Vehiclesw
ith diesel particle filters: in
countries outside the EU, only use low sulphur
Euro diesel with asulphurc ontent of under
50 ppm. Otherwise, the emission control sys- tem could be damaged.
You will usually find information aboutt he fuel
quality on the pump. If you cannot find the label
on the petrol pump, ask the filling station staff.
Information on refuelling (Y page 109).
Low outside temperatures In winter months, diesel fuel with an improved
cold flow quality is available. In Europe, the
EN 590 standard defines various climate-
dependent temperature categories. Malfunc-
tions can be avoided by refuelling with diesel
fuel that corresponds to the climatic specifica-
tions outlined in EN 590. At unusually low out-
side temperatures, it is possible that the flow
characteristics of the diesel fuel could be insuf- ficient. Accordingly, diesel fuel from warmer
areas may not be suitablef or operation in colder
climatic conditions.
i Further information on country-specific fuel
properties and fuel types with low-tempera-
ture resistance can be obtained from oil com- panies, e.g. at filling stations. AdBlue
®
Important safety notes Comply with the important safety notes for ser-
vice produc tswhen handlin gAdBlue ®
(Y page 250). Service products and capacities
251Technical data Z