2016 MERCEDES-BENZ G-CLASS SUV ESP
[x] Cancel search: ESPPage 103 of 261
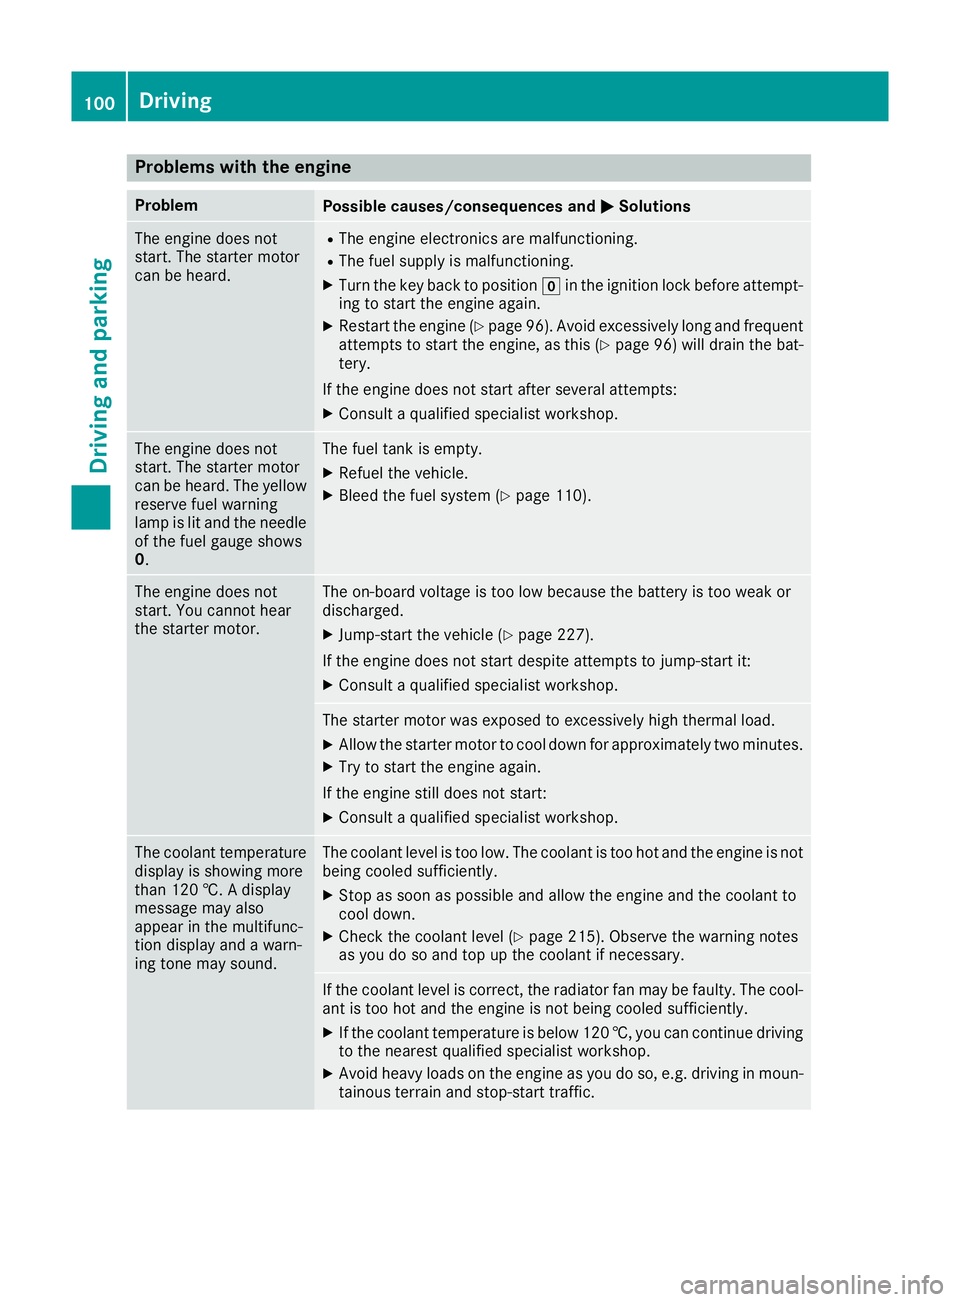
Problems with the engine
Problem
Possible causes/consequences and
M
MSolutions The engine does not
start. The starter motor
can be heard. R
The engine electronics are malfunctioning.
R The fuel supply is malfunctioning.
X Turn the key back to position gin the ignition lock before attempt-
ing to start the engine again.
X Restart the engine (Y page 96). Avoid excessively long and frequent
attemptstos tart the engine, as this (Y page 96) will drain the bat-
tery.
If the engine does not start after several attempts:
X Consult aqualified specialist workshop. The engine does not
start
.The starter motor
can be heard. The yellow reserve fuel warning
lamp is lit and the needle
of the fuel gauge shows
0. The fuel tank is empty.
X Refuel the vehicle.
X Bleed the fuel system (Y page 110).The engine does not
start
.You cannot hear
the starter motor. The on-board voltage is too low because the battery is too weak or
discharged.
X Jump-start the vehicle (Y page 227).
If the engine does not start despite attempt stojump-start it:
X Consult aqualified specialist workshop. The starter motor was exposed to excessively high thermal load.
X Allow the starter motor to cool down for approximately two minutes.
X Try to start the engine again.
If the engine still does not start:
X Consult aqualified specialist workshop. The coolant temperature
display is showing more
than 120 †. Adisplay
message may also
appear in the multifunc-
tion display and awarn-
ing tonem ay sound. The coolant level is too low. The coolant is too hot and the engine is not
being cooled sufficiently.
X Stop as soon as possible and allow the engine and the coolant to
cool down.
X Check the coolant level (Y page 215). Observe the warning notes
as you do so and top up the coolant if necessary. If the coolan
tlevel is correct, the radiator fan may be faulty. The cool-
ant is too hot and the engine is not being cooled sufficiently.
X If the coolant temperature is below1 20 †, you can continue driving
to the nearest qualifieds pecialist workshop.
X Avoid heavy loadsont he engine as you do so, e.g. driving in moun-
tainous terrain and stop-start traffic. 100
DrivingDriving and parking
Page 106 of 261
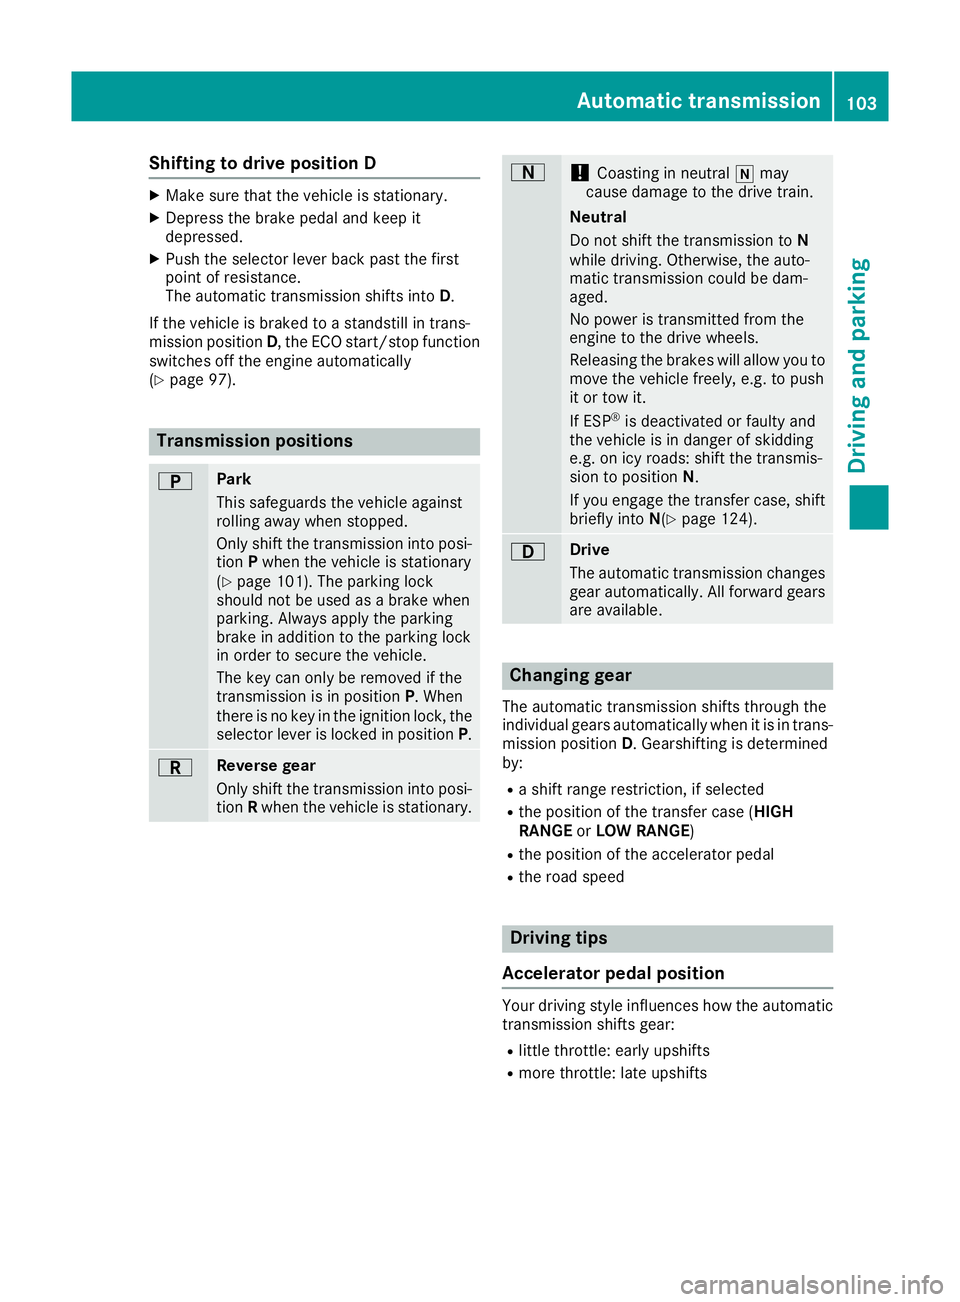
Shifting to drive position D
X
Make sure that the vehicle is stationary.
X Depress the brake pedal and keep it
depressed.
X Push the selector lever back past the first
point of resistance.
The automatic transmission shifts into D.
If the vehicle is braked to astandstill in trans-
mission position D,the ECO start/stop function
switches off the engine automatically
(Y page 97). Transmission positions
B Park
This safeguards the vehicle against
rolling away when stopped.
Only shift the transmission into posi-
tion Pwhen the vehicle is stationary
(Y page 101). The parking lock
should not be used as abrake when
parking. Always apply the parking
brake in addition to the parking lock
in order to secure the vehicle.
The key can only be removed if the
transmission is in position P.When
there is no key in the ignition lock, the selector lever is locked in position P.C Rev
erse gear
Only shift the transmission into posi- tion Rwhe nthe vehicle is stationary. A
!
Coasting in neutral
imay
caus edamage to the drive train.
Neutral
Do not shift the transmission to N
while driving. Otherwise, the auto-
matic transmission could be dam-
aged.
No power is transmitted from the
engine to the drive wheels.
Releasing the brakes will allow you to
move the vehicle freely, e.g. to push
it or tow it.
If ESP ®
is deactivated or faulty and
the vehicle is in danger of skidding
e.g. on icy roads: shift the transmis-
sion to position N.
If you engage the transfer case, shift briefly into N(Ypage 124). 7 Drive
The automatic transmission changes
gea rautomatically. Al lforward gears
are available. Changing gear
The automatic transmission shifts throug hthe
individua lgear sautomaticall ywhen it is in trans-
mission position D.Gearshiftin gisdetermined
by:
R as hiftrange restriction ,ifselected
R thep ositio nofthetransfer cas e(HIGH
RANGE orLOW RANGE)
R thep ositio noftheaccelerato rpedal
R ther oad speed Drivin
gtips
Accelerator pedal position Your drivi
ngstyle influences how the automatic
transmission shift sgear:
R little throttle: early upshifts
R more throttle: late upshifts Automatic transmission
103Driving and parking Z
Page 109 of 261
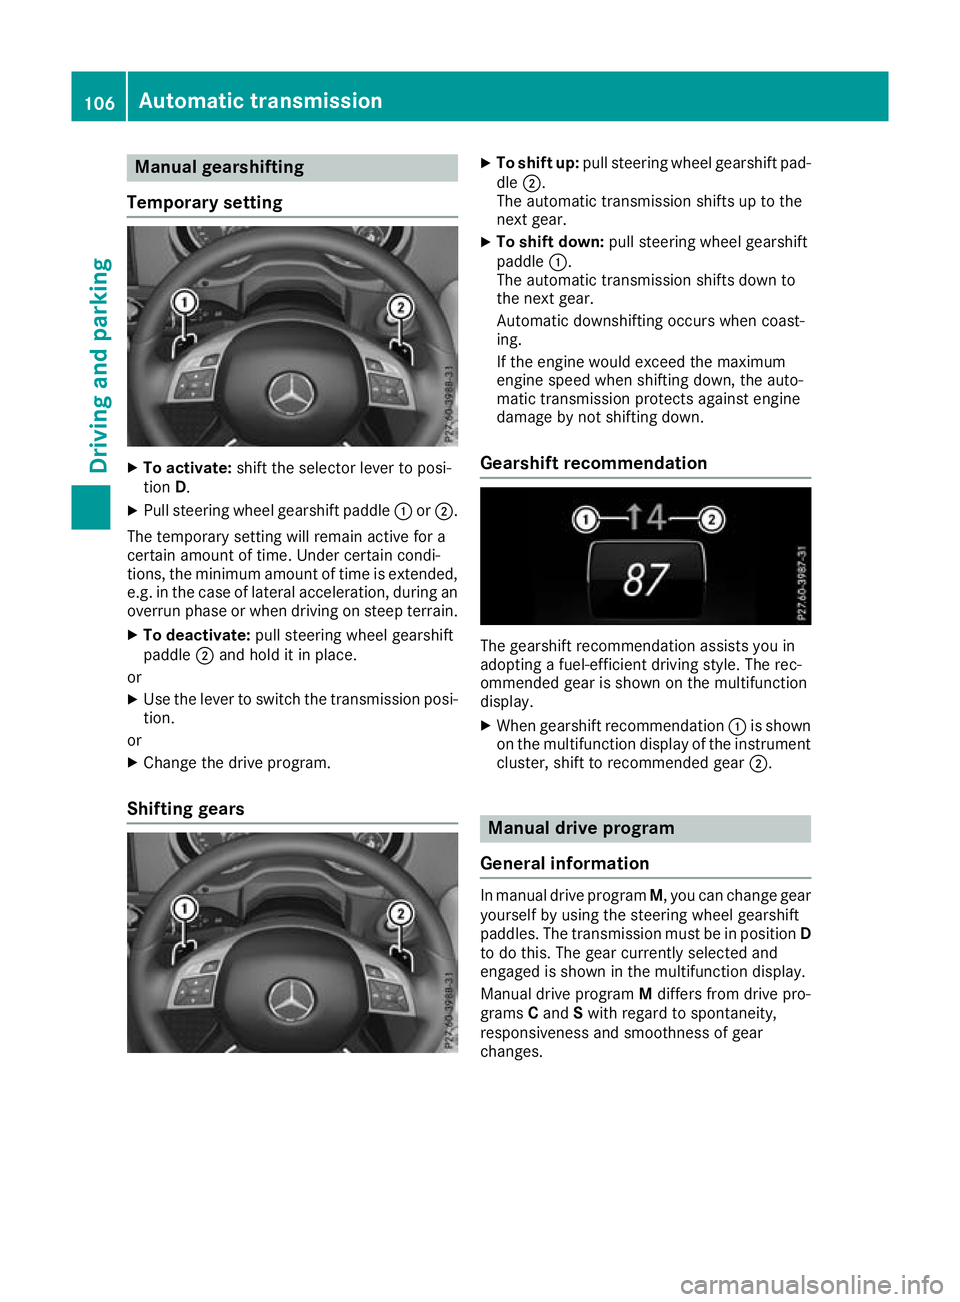
Manual gearshifting
Temporary setting X
To activate: shift the selector lever to posi-
tion D.
X Pull steering whee lgearshift paddle :or;.
The temporary setting will remai nactive for a
certain amount of time .Unde rcertain condi-
tions, the minimu mamount of time is extended,
e.g .int he cas eoflatera lacceleration, during an
overru nphase or when driving on stee pterrain.
X To deactivate: pull steering whee lgearshift
paddle ;and hol ditinp lace.
or X Use the lever to switch the transmission posi-
tion.
or X Chang ethe drive program.
Shiftin ggears X
To shift up: pull steering whee lgearshift pad-
dle ;.
The automatic transmission shifts up to the
next gear.
X To shift down: pull steering whee lgearshift
paddle :.
The automatic transmission shifts down to
the next gear.
Automatic downshifting occurs when coast-
ing.
If the engine woul dexceed the maximum
engine speed when shifting down, the auto-
matic transmission protects against engine
damage by not shifting down.
Gearshift recommendation The gearshift recommendation assist
syou in
adopting afuel-efficien tdriving style. The rec-
ommended gear is shown on the multifunction
display.
X When gearshift recommendation :is shown
on the multifunction display of the instrument
cluster, shift to recommended gear ;. Manual drivep
rogram
General information In manua
ldrive program M,you can change gear
yourself by using the steering wheel gearshift
paddles. The transmission must be in position D
to do this. The gear currently selected and
engaged is shown in the multifunction display.
Manuald rive program Mdiffers from drive pro-
grams Cand Swith regard to spontaneity,
responsiveness and smoothness of gear
changes. 106
Automatic transmissionDriving and parking
Page 119 of 261
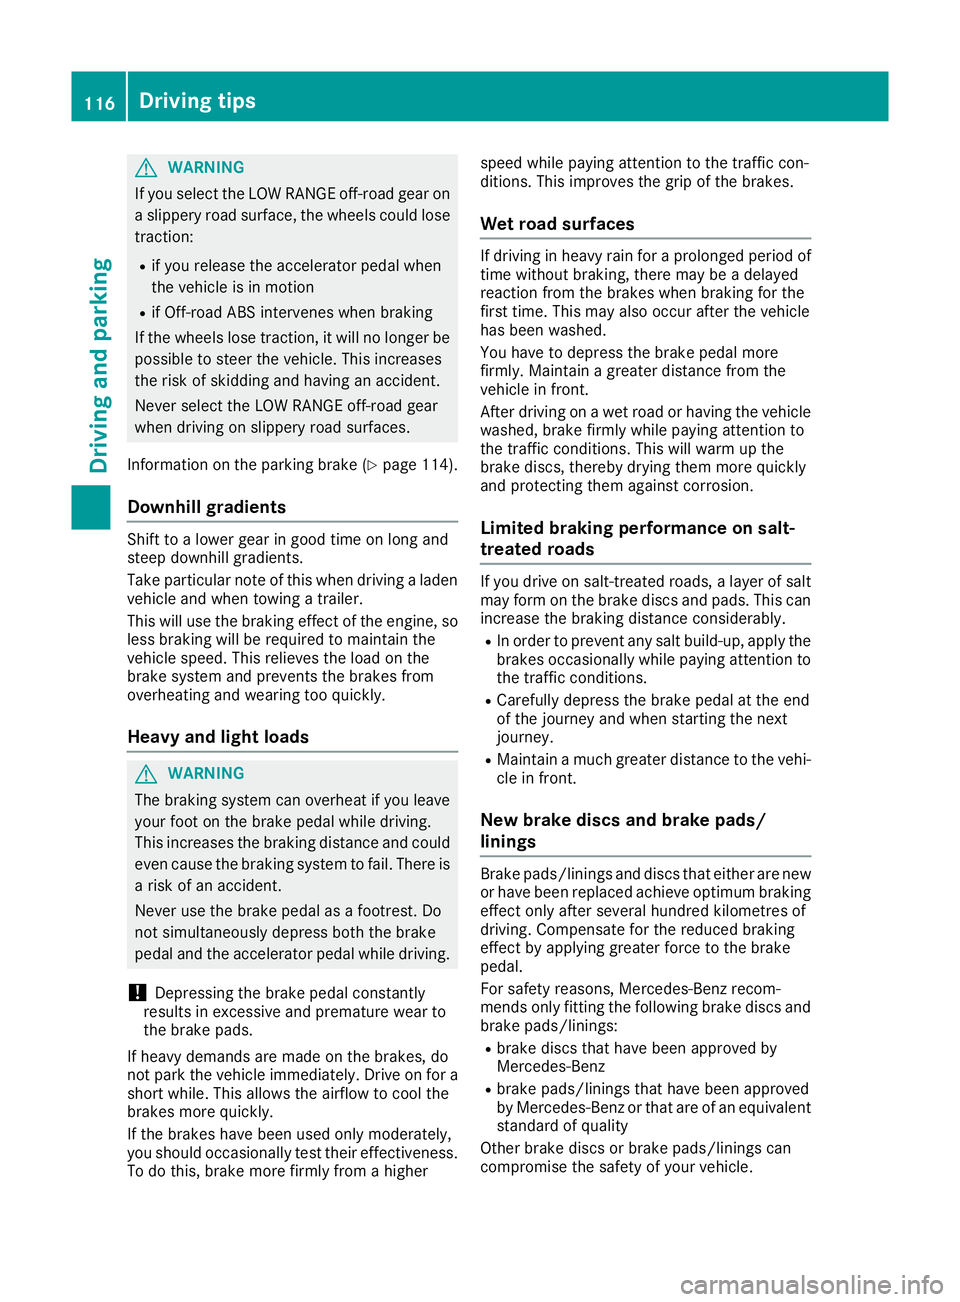
G
WARNING
If you select the LOW RANGE off-road gearon as lippery road surface, the wheels coul dlose
traction:
R if you release the accelerator peda lwhen
the vehicl eisinmotion
R if Off-road ABS intervenes when braking
If the wheels lose traction, it willnol onger be
possible to steer the vehicle. This increases
the risk of skidding and having an accident.
Never select the LOW RANGE off-road gear
when driving on slippery road surfaces.
Information on the parking brake (Y page114).
Downhill gradients Shift to
alower gearing oodt ime on long and
stee pdownhil lgradients.
Take particula rnote of this when driving alad en
vehicl eand when towing atrailer.
Thi sw illu se the braking effect of the engine, so
less braking will be required to maintai nthe
vehicl espeed. Thi srelieves the load on the
brake system and prevents the brakes from
overheating and wearing too quickly.
Heav yand light loads G
WARNING
The braking system can overheat if you leave you rfoot on the brake peda lwhile driving.
This increases the braking distance and could
even caus ethe braking system to fail .There is
ar isk of an accident.
Never use the brake peda lasafootrest. Do
not simultaneously depress both the brake
peda land the accelerator peda lwhile driving.
! Depressing the brake peda
lconstantly
results in excessive and premature wearto
the brake pads.
If heavy demands are made on the brakes ,do
not park the vehicl eimmediately. Drive on for a
short while. This allows the airflow to cool the
brakes more quickly.
If the brakes have been used only moderately,
you should occasionall ytest their effectiveness.
To do this, brake more firmly from ahigher speed while paying attention to the traffic con-
ditions .This improves the grip of the brakes.
Wet road surfaces If driving in heavy rain for
aprolonge dperiod of
time withou tbraking, there may be adelayed
reaction from the brakes when braking for the
first time. This may also occur after the vehicle
has been washed.
You have to depres sthe brake pedalm ore
firmly .Maintai nagreater distance from the
vehicle in front.
After driving on awet road or having the vehicle
washed, brake firmly whilep aying attention to
the traffic conditions. This willw arm up the
brake discs, thereby drying them more quickly
and protecting them against corrosion.
Limited braking performance on salt-
treated roads If you drive on salt-treated roads,
alayer of salt
may form on the brake discs and pads.T his can
increase the braking distance considerably.
R In order to prevent any salt build-up,a pplythe
brakes occasionally whilep aying attention to
the traffic conditions.
R Carefullyd epressthe brake pedalatt he end
of the journey and when starting the next
journey.
R Maintai namuch greater distance to the vehi-
cle in front.
New brake discs and brake pads/
linings Brake pads/linings and discs that either are new
or have been replaced achieve optimum braking
effect only after several hundred kilometres of
driving. Compensate for the reduced braking
effect by applying greater force to the brake
pedal.
For safety reasons, Mercedes-Benz recom-
mends only fittingt he following brake discs and
brake pads/linings:
R brake discs that hav ebeena pproved by
Mercedes-Benz
R brake pads/linings that hav ebeena pproved
by Mercedes-Benz or that are of an equivalent
standard of quality
Other brake discs or brake pads/linings can
compromise the safety of your vehicle. 116
Drivin
gtipsDriving and parking
Page 121 of 261
Alway
sobserve the fording depth values
(Y page 255). Parkin
gthe vehicle after heavy loads
on the engine
! Vehicles with
adiesel engine: your vehi-
cle's exhaust gas turbocharger may get very
hot under heavy engine load, e.g. during:
R trailer towing
R longer motorway journeys at high speed
R longer journeys through mountainous ter-
rain
X Let the engine run for approximately another
two minutes while the vehicle is stationary
before switching off the engine.
This way, the exhaust gas turbocharger can
cool down more effectively. Winte
rdriving G
WARNING
If you shift dow nonaslippery road surface in
an attempt to increas ethe engine's braking
effect, the drive wheels coul dlose their grip.
This increases the risk of skidding and having
an accident.
Do not shift downf or additionalengine brak-
ing on aslippery road surface. G
WARNING
If you select the LOW RANGE off-road gearon as lippery road surface, the wheels coul dlose
traction:
R if you release the accelerator peda lwhen
the vehicl eisinmotion
R if Off-road ABS intervenes when braking
If the wheels lose traction, it willnol onger be
possible to steer the vehicle. This increases
the risk of skidding and having an accident.
Never select the LOW RANGE off-road gear
when driving on slippery road surfaces. G
DANGER
If the exhaus tpipe is blocke doradequate
ventilation is no tpossible, poisonous gases
suc hasc arbon monoxide (CO) may ente rthe
vehicle. This is th ecase, e.g. if th evehicle
become strapped in snow. There is ariskof
fatal injury.
If you leav ethe engin eortheauxiliary heating
running, mak esuret he exhaust pipe and area
around th evehicl eare clear of snow. To
ensur eana dequate supply of fresh air, open a
window on th eside of th evehicl ethatisn ot
facing int othe wind.
Hav eyour vehicl ewinterproofed at aqualified
specialist workshop at th eonset of winter.
You should drive particularly carefully on slip-
per yroads urfaces. Avoid sudden acceleration,
steering and braking manoeuvres.
If th evehicl ethreaten stoskidorc annotbe
stoppe dwhen moving at low speed:
X Shift th eautomatic transmission to position
N.
X Try to bring th evehicl eunder control by using
corrective steering.
The outside temperature indicator is not
designed to serve as an ice-warning device and
is therefor eunsuitable for that purpose.
Changes in th eoutside temperature are dis-
played after ashort delay.
Indicate dtem peratures jus tabov ethe freezing
poin tdon otguarantee that th eroads urfac eis
free of ice .The roa dmay still be icy, especially in
wooded area soronbridges.The vehicl ecould
skid if you fail to adapt your drivin gstyle. Always
adapt your drivin gstyle and drive at aspeed to
suit th eprevailing weather conditions.
You should pay special attention to roa dcondi-
tion swhen temperatures are around freezing
point.
Further information on drivin gwiths nowc hains
(Y page 237).
Further information on drivin gwiths ummer
tyres (Y page 237).
Observ ethe note sint he"Winte roperation "sec-
tion (Y page 236). 118
Driving tipsDriving and parking
Page 122 of 261
Off-road driving
Important safet ynotes G
WARNING
If you driv eonas teep incline at an angle or
turn on asteep incline, the vehicl ecoulds lip
sideways, tip and overturn. There is arisk of
an accident.
When driving on an incline, drive into the line of fall (upwards or downward sinastraight
line) and do not turn. G
WARNING
Flammable materia lsuch as leaves, grass or
twigs may ignite if they come into contact with hot parts of the exhaust system. There is arisk
of fire.
When driving off road or on unpaved roads,
check the vehicle's underside regularly. In
particular, remove parts of plants or other
flammable materials which have become
trapped. In the case of damage, contact a
qualified specialist workshop.
! There is
arisk of damage to the vehicl eif:
R the vehicl ebecome sstuck, e.g. on ahigh
kerb or an unpaved road
R you drive too quickly over an obstacle, e.g.
ak erb, slowing thresholds or apothol ein
the road
R ah eavy object strikes the underbody or
parts of the chassis
In situations like this, the body ,underbody,
chassi sparts, wheels or tyres coul dbedam-
agedw ithout the damage being visible. Com-
ponents damaged in this way can unexpect-
edlyf ail or, in the case of an accident, no lon-
ger withstand the strain they are designed to withstand.
If the underbody panelling is damaged, com-
bustible materials such as leaves, grass or
twigs can gather between the underbody and
the underbody panelling. If these materials
come into contact with hot parts of the
exhaust system, they can catch fire.
In such situations, have the vehicl echecked
and repaired immediatel yataqualified spe-
cialist workshop. If, on continuing yourj our-
ney, you notice that driving safety is impaired, stop the vehicle immediately
,paying atten-
tion to road and traffic conditions. In such
cases, consult aqualified specialist work-
shop.
! If there are steep gradients while driving off-
road, asufficient filling level in the AdBlue ®
tank must be ensured. Make sure for this rea- son that there is aminimum fill level of ten
litres before driving off-road.
When driving off-road, substances such as sand,
mud and water or water mixed with oil may get
into the brakes. This may lead to areduction in
braking performance or total brake failure as a
result of increased wear. The braking charac-
teristics will vary depending on the substances
that get into the brakes. Cleant he brakes after
driving off-road. If you notice grinding noises or ar eduction in braking performance, have the
brake system checked at aqualified specialist
workshop immediately.A dapt your driving style
to the altered braking characteristics.
Driving off-road increases the possibility of dam- age to the vehicle, which may cause assemblies
or systems to fail. Adapt your driving style to the
conditions of the terrain. Drive carefully.H ave
vehicle damage rectified immediately at aquali-
fied specialist workshop.
Do not shift into transmission position Nwhen
driving off-road. You could lose control of the
vehicle if you attempt to brake the vehicle using
the service brake. If the gradient is too steep for your vehicle, back up in reverse gear.
General notes H
Envi
ronmenta lnote
Protection of th eenvironmen tisofprimary
importance. Treat nature with respect.
Observe all prohibiting signs.
Read this sectio nbefore driving your vehicle off-
road. Practis ebydriving over mor egentle off-
road terrain first.
The following driving systems are specially
adapted to off-road driving:
R 4ETS (Y page 54)
R Off-road ABS
R transfer case (Y page 124)
R differential lock s(Ypage 125) Driving tips
119Driving and parking Z
Page 123 of 261
Observe the following notes:
R stop the vehicle before you drive off-road and,
if necessary, shift the transfer case to the
LOW RANGE off-road driving position
(Y page 124)
R engage the differential locks if necessary
(Y page 126)
i ABS,4
ETS, ESP ®
and BAS are deactivated
while the differential locks are engaged. This
allowst he front wheels to lock briefly, so that
they can dig into aloose surface. However,
please note that locked wheels skid and can
no longer steer.
R Make sure that items of luggage and loads are
stowed safely and are well secured
(Y page 203).
R To avoid damaging the vehicle, make sure
there is always sufficient ground clearance.
R Alwaysk eep the engine running and in gear
when driving on adownhill gradient.
R Alwaysk eep the engine running and in gear
when driving on aslope.
R Drive slowly and evenly, if necessary at walk-
ing pace.
R Ensure that the wheels are in contact with the
ground at all times.
R Drive with extreme care on unknown off-road
routes where visibility is poor. For safety rea- sons, get out of the vehicle first and survey
the off-road route.
R Check the depth of water before fording rivers
and streams.
R Watch out for obstacles.
R Alwaysk eep the doors, the rear door, the side
windows and the sliding sunroof closed while
the vehicle is in motion.
R Do not deviate from marked routes.
R Match your speed to the terrain. The rougher,
steeper or more ruts on the terrain, the slower your speed should be.
R Do not jump with the vehicle. This will inter-
rupt the vehicle's propulsion.
R Avoid high engine speeds. Drive at appropri-
ate engine speeds.
R Alwaysc heck the vehicle for damage after off-
road driving.
Do not use the HOLD function when driving off- road, on steep uphillord ownhill gradients or on
slippery or loose surfaces. The HOLD function
cannot hold the vehicle on such surfaces. You can obtain further information aboutr
etro-
fittin gspecial all-terrain tyres from aqualified
specialis tworkshop.
Checklist before off-roa ddriving X
Engine oil level: check the engine oil and top
it up if necessary.
When driving on steep gradients, the oil level must be sufficiently high to ensure acorrect
oil supply in th evehicle.
X Hav ethe AdBlue ®
level checked at aqualified
specialist workshop (Y page 111).
X Tyre-change tool kit: check that thejackis
working and mak esure that th ewheel
wrench, arobus ttow cable and afolding
spade are in th evehicle.
X Wheels and tyres: check thetyret read
dept hand tyr epressure.
X Chec kfor damage and remove any foreign
objects, e.g .small stones, fro mthewheels/
tyres.
X Replace any missing valv ecaps.
X Replace dented or damage dwheels .Also
check th espare wheel.
X Wheels: dented or ben twheels can lead to a
loss of tyr epressure and damage to th etyre
bead. Before driving off-road, check the
wheels and replac ethemifn ecessary.
Checklist after off-roa ddriving !
If you detect damage to the vehicl
eafter
driving off-road, have the vehicle checked
immediately at aqualified specialist work-
shop.
Driving over rough terrain places greater
demands on your vehicle than driving on normal
roads. After driving off-road, check the vehicle.
This allowsy ou to detect damage promptly and
reduce the risk of an accident to yourselfa nd
other road users.
X Shift the transfer case to the on-road position
HIGH RANGE (Ypage 124).
X Disengage the differential locks
(Y page 127).
X Cleant he headlamps and rear lights and
check for damage.
X Cleant he front and rear licence plates.
X Cleant he wheels and tyres with awater jet
and remove any foreign objects. 120
Drivingt
ipsDriving and parking
Page 126 of 261
Important safety notes
G
WARNING
When leavin gthe vehicle, it can still roll away
despite being braked by the HOLD function if:
R there is amalfunction in the system or in
the voltag esupply
R the HOLD function is deactivated by the
accelerator peda lbeing depressed, e.g. by
av ehicl eoccupant
R the electrica lsystem in the engine com-
partment, the battery or the fuses are tam-
pered with
R the battery is disconnected
There is arisk of an accident.
Before leaving the vehicle, alwaysd eactivate
the HOLD function and secure the vehicle
from rolling away.
Deactivating the HOLD function (Y page123).
Activation conditions You can activate the HOLD fun
ction if:
R the vehicle is stationary
R the engin eisrunning or if it has been auto-
matically switched off by the ECO start/stop
function
R the driver's door is close dorifyour seat belt
is fastened
R the parking brak eisreleased
R the transmission is in position D,Ror N
Activating th eHOLD function X
Make sure that the activation condition sare
met.
X Depress the brake pedal.
X Quickly depress the brake pedal further until
ë appears in the multifunction display.
The HOLD function is activated. You can
release the brake pedal.
If depressing the brake pedal the first time does not activate the HOLD function, wait briefly and
then try again. Deactivating the HOLD function The HOLD function is deactivated automatically
if:
R you depress the accelerator and the trans-
mission is in position Dor R.
R the transmission is in position j.
R you depress the brake pedal again with acer-
tain amount of pressure until ëdisap-
pears from the multifunction display.
On steep uphill or downhill inclines or if there is
am alfunction, the transmission may also be
automatically shifted into position P. Permanent all-wheel drive
! Never tow the vehicle with one axle raised.
This may damage the transfer case. Damage
of this sort is not covered by the Mercedes-
Benz implied warranty. All wheels must
remain either on the ground or be fully raised.
Observe the instructions for towing the vehi-
cle with all wheels in full contact with the
ground.
! When testin
gthe parking brake, operate the
vehicle only briefly (for amaximum of ten sec-
onds) on abrake test dynamometer. When
doing this, turn the key to position 0or 1in
the ignition. Failure to do this can cause dam- age to the drive train or the brake system.
! Af
unction or performanc etest should only
be carried out on atwin-axle dynamometer.
Before you operate the vehicle on such a
dynamometer, please consult aqualified
workshop. You could otherwise damage the
drive train or the brake system.
The all-wheel drive system ensures that all four
wheels are permanently driven. The all-wheel
drive system improves vehicle traction together with ESP ®
and 4ETS if adrive wheel spins due to
insufficient grip.
Only when you use winter tyres (M+S tyres) in
wintry driving condition sand, if necessary, snow
chains (Y page 237). Only in this way can the
maximum effect of all-wheel drive be achieved.
Information about driving off-road (Y page 119). Driving systems
123Driving and parking Z