2016 MERCEDES-BENZ G-CLASS SUV tow
[x] Cancel search: towPage 211 of 261
Vanity mirro
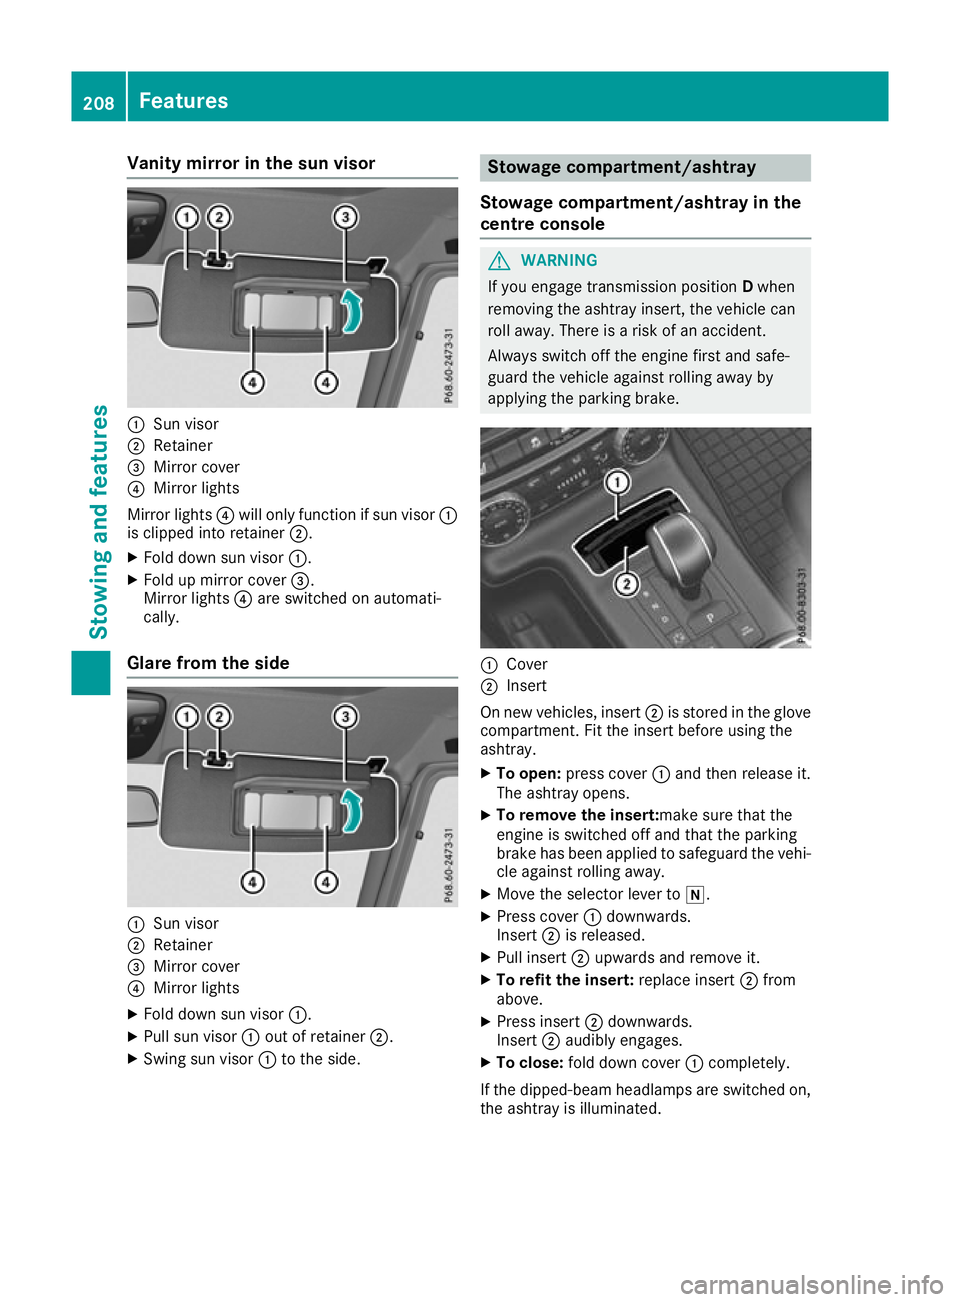
rint he sun visor :
Sun visor
; Retainer
= Mirror cover
? Mirror lights
Mirror lights ?will only function if su nvisor :
is clippe dinto retainer ;.
X Fol dd owns un visor :.
X Fol dupm irror cover =.
Mirror lights ?are switched on automati-
cally.
Glare from the side :
Sun visor
; Retainer
= Mirror cover
? Mirror lights
X Fol dd owns un visor :.
X Pull su nvisor :outofr etainer ;.
X Swing su nvisor :to the side. Stowag
ecompartment/ashtray
Stowage compartment/ashtray in the
centre console G
WARNING
If you engage transmission position Dwhen
removing the ashtray insert, the vehicle can
roll away. There is arisk of an accident.
Always switch off the engine first and safe-
guard the vehicl eagainst rolling awayby
applying the parking brake. :
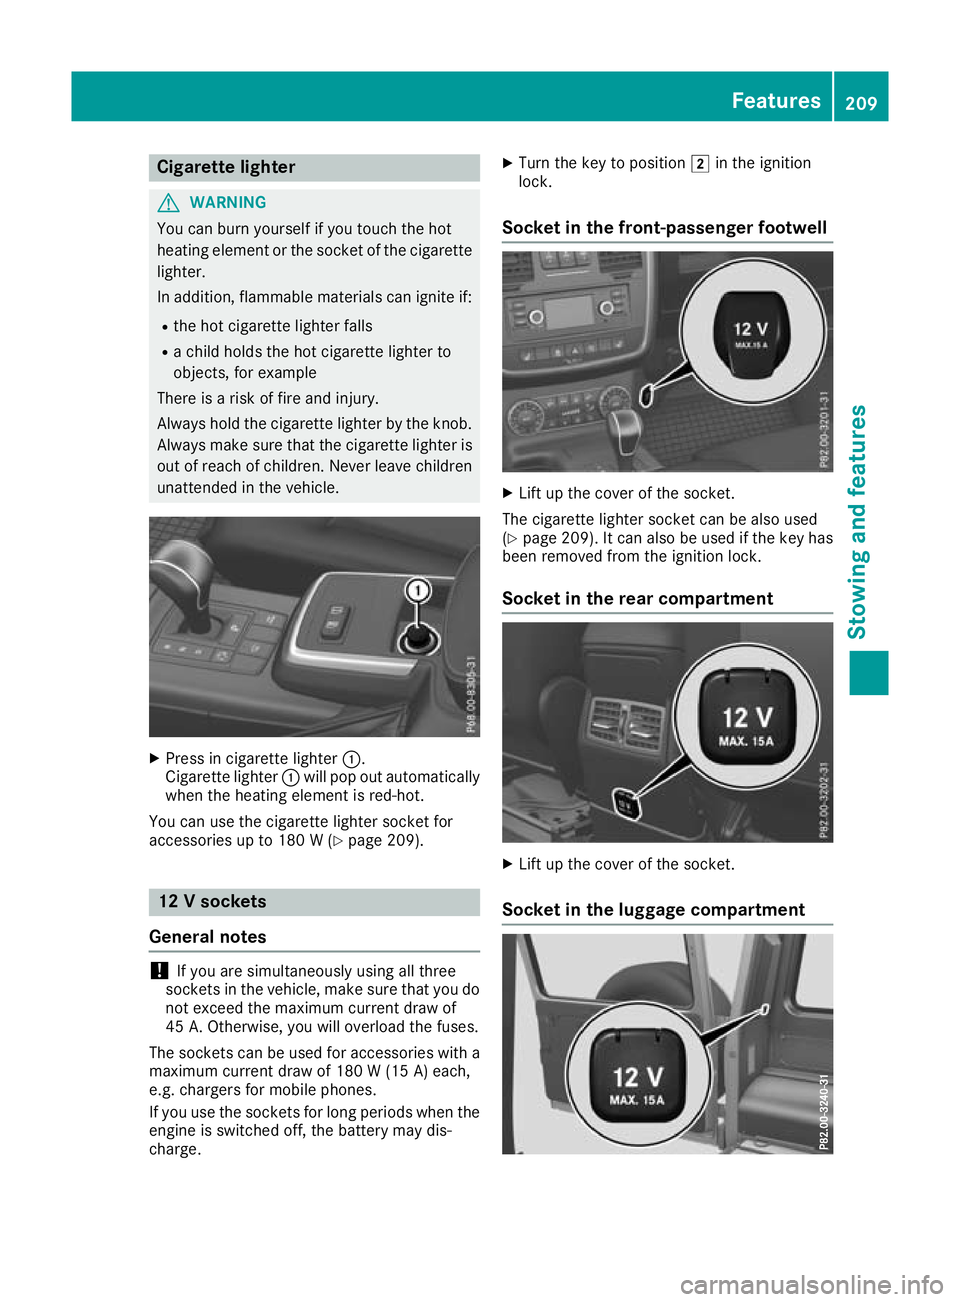
Cover
; Insert
On new vehicles, insert ;is stored in the glove
compartment. Fi tthe insert before usin gthe
ashtray.
X To open: press cover :and then release it.
The ashtray opens.
X To remove th einsert:ma ke sure that the
engin eisswitched off and that th eparking
brak ehas been applied to safeguard th evehi-
cle against rolling away.
X Mov ethe selector leve rtoi.
X Press cover :downwards.
Insert ;is released.
X Pull insert ;upward sand remove it.
X To refit th einsert: replace insert ;from
above.
X Press insert ;downwards.
Insert ;audibly engages.
X To close: fold down cover :completely.
If th edipped-beam headlamps are switched on,
th ea shtray is illuminated. 208
Featu
resStowing and features
Page 212 of 261
Cigarett
elighter G
WARNING
Yo uc an burn yourself if you touch the hot
heating element or the socket of the cigarette lighter.
In addition, flammable materials can ignite if:
R the hot cigarette lighter falls
R ac hild hold sthe hot cigarette lighter to
objects, for example
There is arisk of fire and injury.
Always hold the cigarette lighter by the knob.
Always make sure that the cigarette lighter is
out of reach of children. Never leave children unattended in the vehicle. X
Pres sinc igarett elighter :.
Cigarette lighter :will pop out automatically
when the heating element is red-hot.
You can use the cigarett elighter socket for
accessories up to 180 W(Ypage 209). 12
Vsockets
General notes !
If you are simultaneously using all three
socketsint he vehicle, make sure that you do
not exceed the maximum current draw of
45 A. Otherwise, you will overload the fuses.
The sockets can be used for accessories with a maximum current draw of 180 W(15 A) each,
e.g. chargers fo rmobile phones.
If you use the sockets for long periods whe nthe
engine is switched off, the battery may dis-
charge. X
Turn the key to position 2in the ignition
lock.
Socket in the front-passenger footwell X
Lift up the cover of the socket.
The cigarette lighter socket can be also used
(Y page 209). It can also be used if the key has
been removed from the ignition lock.
Socket in the rear compartment X
Lift up the cover of the socket.
Socket in the luggag ecompartment Features
209Stowing and features Z
Page 213 of 261
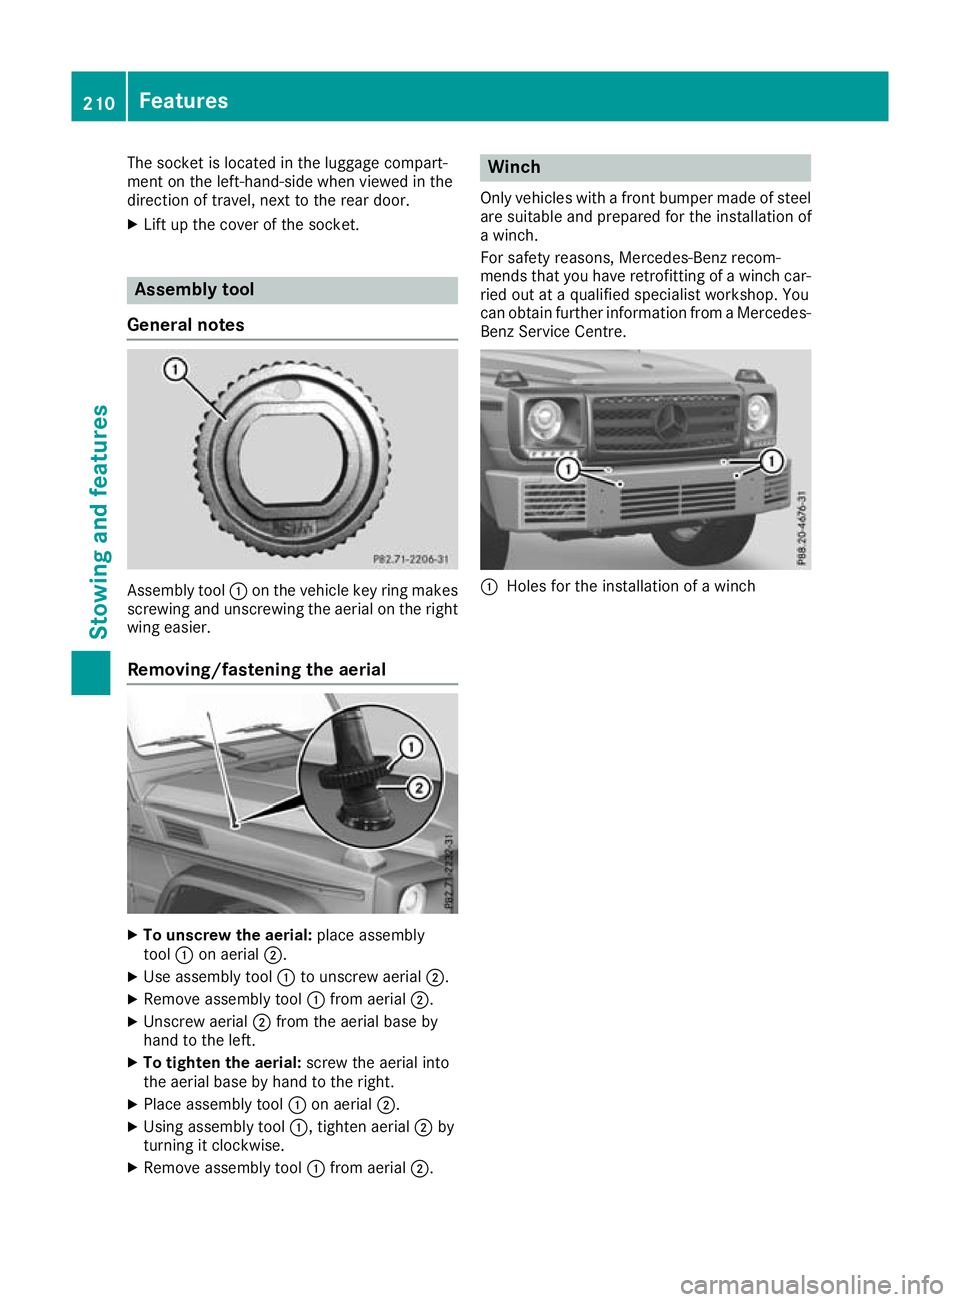
The socket is located in the luggage compart-
ment on the left-hand-side when viewed in the
direction of travel, next to the rear door.
X Lift up the cover of the socket. Assembly tool
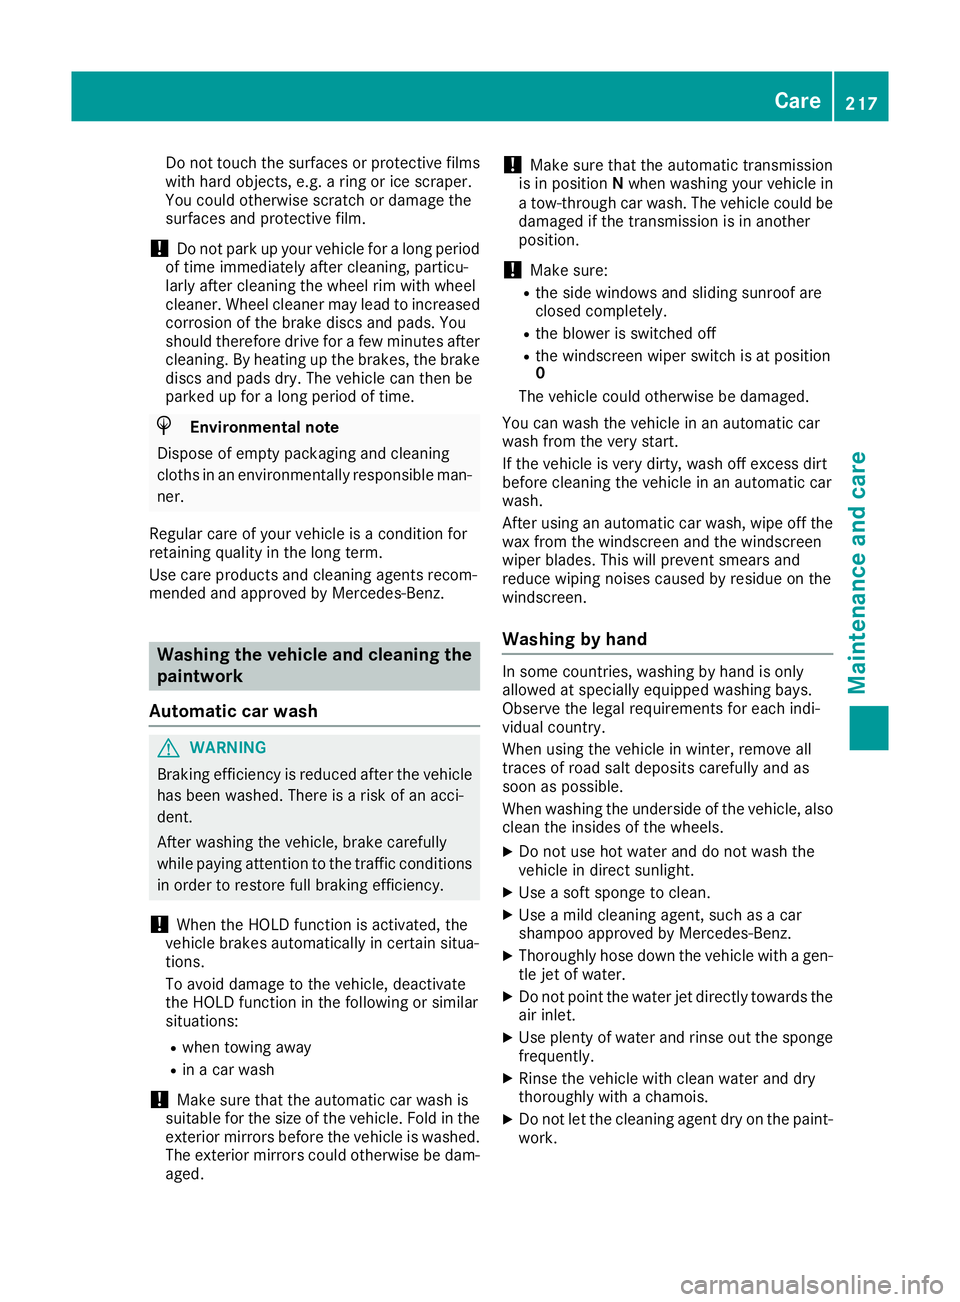
Genera lnotes Assembly tool
:on th evehicl ekey ring makes
screwing and unscrewing the aeria lonthe right
wing easier.
Removing/fastening the aerial X
To unscre wthe aerial: place assembly
tool :on aerial ;.
X Use assembl ytool :to unscrew aerial ;.
X Remove assembl ytool :from aerial ;.
X Unscrew aerial ;from the aeria lbaseby
hand to the left.
X To tighten the aerial: screwthe aeria linto
the aeria lbasebyh andtot he right.
X Place assembl ytool :on aerial ;.
X Using assembl ytool :,t ighten aerial ;by
turning it clockwise.
X Remove assembl ytool :from aerial ;. Winch
Only vehic lesw ithafront bumper made of steel
are suitabl eand prepared for the installation of
aw inch.
For safety reasons, Mercedes-Benz recom-
mends that you have retrofitting of awinch car-
ried out at aqualified specialist workshop. You
can obtai nfurther information from aMercedes-
Benz Service Centre. :
Holes for the installation of awinch 210
FeaturesStowing and features
Page 220 of 261
Do not touch the surfaces or protective films
with hard objects ,e.g.ar ingori ce scraper.
Yo uc ould otherwis escratch or damage the
surfaces and protective film.
! Do not park up your vehicl
efor alon gp eriod
of time immediatel yafter cleaning, particu-
larly after cleaning the whee lrim with wheel
cleaner. Whee lcleane rmaylead to increased
corrosion of the brake discs and pads .You
shoul dtherefore drive for afew minute safter
cleaning. By heating up the brakes ,the brake
discs and pads dry .The vehicl ecan the nbe
parked up for alon gp eriodoft ime. H
Environmental note
Dispose of empty packaging an dcleaning
cloths in an environmentally responsible man- ner.
Regular car eofyour vehicle is acondition for
retainin gqualit yint helongterm.
Use car eproduct sand cleaning agents recom-
mended and approved by Mercedes-Benz. Washin
gthe vehiclea nd cleaning the
paintwork
Automatic car wash G
WARNING
Braking efficiency is reduced after the vehicle has been washed. There is arisk of an acci-
dent.
After washing the vehicle, brake carefully
while paying attention to the traffic conditions in order to restore full braking efficiency.
! When the HOLD function is activated, the
vehicl ebrakes automatically in certain situa-
tions.
To avoi ddamage to the vehicle, deactivate
the HOLD function in the following or similar
situations:
R when towing away
R in ac ar wash
! Make sure that the automatic car washis
suitable for the size of the vehicle. Fold in the exterior mirrors before the vehicl eiswashed.
The exterior mirrors coul dotherwise be dam-
aged. !
Make sure that the automatic transmission
is in position Nwhen washing your vehicle in
at ow-through car wash. The vehicle could be
damagedift he transmission is in another
position.
! Make sure:
R the side windows and sliding sunroof are
closed completely.
R the blower is switched off
R the windscreen wiper switch is at position
0
The vehicle could otherwise be damaged.
You can wash the vehicle in an automatic car
wash from the very start.
If the vehicle is very dirty, wash off excess dirt
before cleaning the vehicle in an automatic car
wash.
After using an automatic car wash, wipe off the
wax from the windscreen and the windscreen
wiper blades. This will prevent smears and
reduce wiping noises caused by residue on the
windscreen.
Washing by hand In some countries, washing by hand is only
allowed at specially equipped washing bays.
Observe the legal requirements for each indi-
vidual country.
When using the vehicle in winter, remove all
traces of road salt deposits carefully and as
soon as possible.
When washing the underside of the vehicle, also
clean the insides of the wheels.
X Do not use hot water and do not wash the
vehicle in direct sunlight.
X Use asoft sponge to clean.
X Use amild cleaning agent, such as acar
shampo oapproved by Mercedes-Benz.
X Thoroughly hose down the vehicle with agen-
tle jet of water.
X Do not point the water jet directly towards the
air inlet.
X Use plenty of water and rinse out the sponge
frequently.
X Rinse the vehicle with clean water and dry
thoroughl ywithachamois.
X Do not let the cleaning agent dry on the paint-
work. Ca
re
217Maintenance an dcare Z
Page 223 of 261
Cleaning th
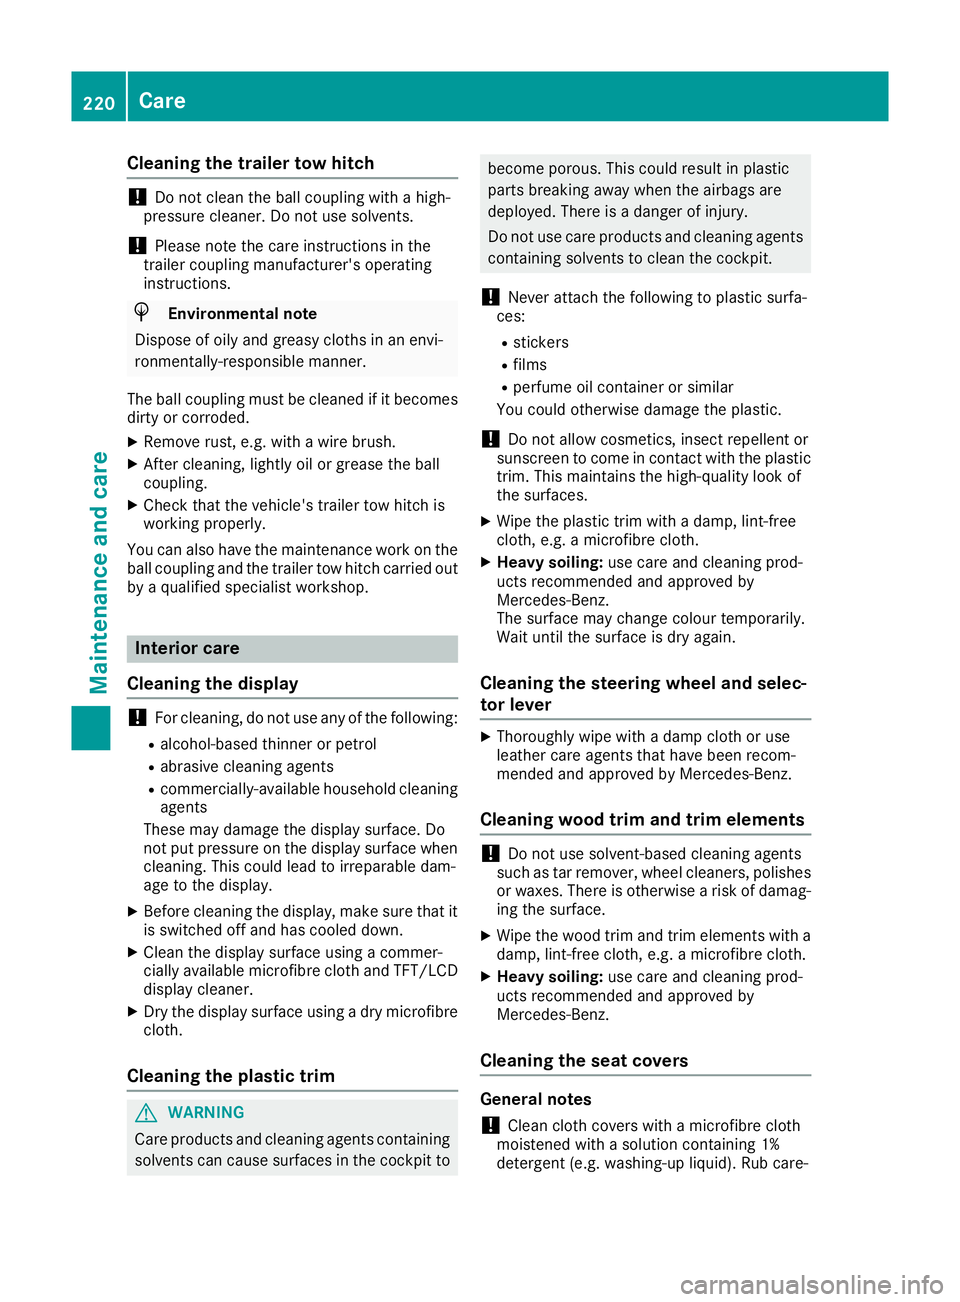
etrailer tow hitch !
Do not clean the bal
lcoupling with ahigh-
pressure cleaner. Do not use solvents.
! Please note the care instructionsint
he
trailer coupling manufacturer's operating
instructions. H
Environmental note
Dispose of oilya nd greasycloths in an envi-
ronmentally-responsible manner.
The ball coupling must be cleaned if it becomes dirt yorc orroded.
X Remov erust ,e.g.w ith aw ire brush.
X After cleaning ,lightly oil or greas ethe ball
coupling.
X Chec kthatthe vehicle' strailer to whitch is
working properly.
You can also have th emaintenanc ework on the
ball coupling and th etrailer to whitch carried out
by aq ualifie dspecialist workshop. Interior care
Cleaning th edisplay !
For cleaning, do not use any of the following:
R alcohol-based thinne rorpetrol
R abrasive cleaning agents
R commercially-available householdc leaning
agents
These may damage the displays urface. Do
not put pressure on the displays urface when
cleaning. This could lead to irreparable dam-
age to the display.
X Before cleaning the display, make sure that it
is switched off and has cooled down.
X Cleant he displays urface using acommer-
cially available microfibre cloth and TFT/LCD
displayc leaner.
X Dry the displays urface usingadry microfibre
cloth.
Cleaning the plastic trim G
WARNING
Care products and cleaning agents containing solvents can cause surfaces in the cockpit to become porous.T
his could result in plastic
parts breakin gaway when the airbags are
deployed. There is adanger of injury.
Do not use care product sand cleanin gagents
containin gsolvents to clean the cockpit.
! Never attac
hthe following to plastic surfa-
ces:
R stickers
R films
R perfume oil container or similar
You could otherwise damage the plastic.
! Do not allow cosmetics
,insec trepellent or
sunscreen to come in contact with the plastic trim .This maintains the high-quality look of
the surfaces.
X Wipe the plastic trim with adamp, lint-free
cloth, e.g. amicrofibre cloth.
X Heavy soiling: use care and cleanin gprod-
ucts recommended and approved by
Mercedes-Benz.
The surface may chang ecolour temporarily.
Wait until the surface is dry again.
Cleaning the steering wheel and selec-
tor lever X
Thoroughly wipe with adamp cloth or use
leather care agents that have been recom-
mended and approved by Mercedes-Benz.
Cleaning wood trim and trim elements !
Do not use solvent-based cleaning agents
such as tar remover, wheel cleaners, polishes
or waxes. There is otherwise arisk of damag-
ing the surface.
X Wipe the wood trim and trim elements with a
damp, lint-free cloth, e.g. amicrofibre cloth.
X Heavy soiling: use care and cleaning prod-
ucts recommended and approved by
Mercedes-Benz.
Cleaning the seat covers General notes
! Clean cloth covers with
amicrofibre cloth
moistened with asolution containing 1%
detergent (e.g. washing-up liquid). Rubc are-220
CareMaintenanc
eand care
Page 225 of 261
Where will
Ifind...? Warning triangle
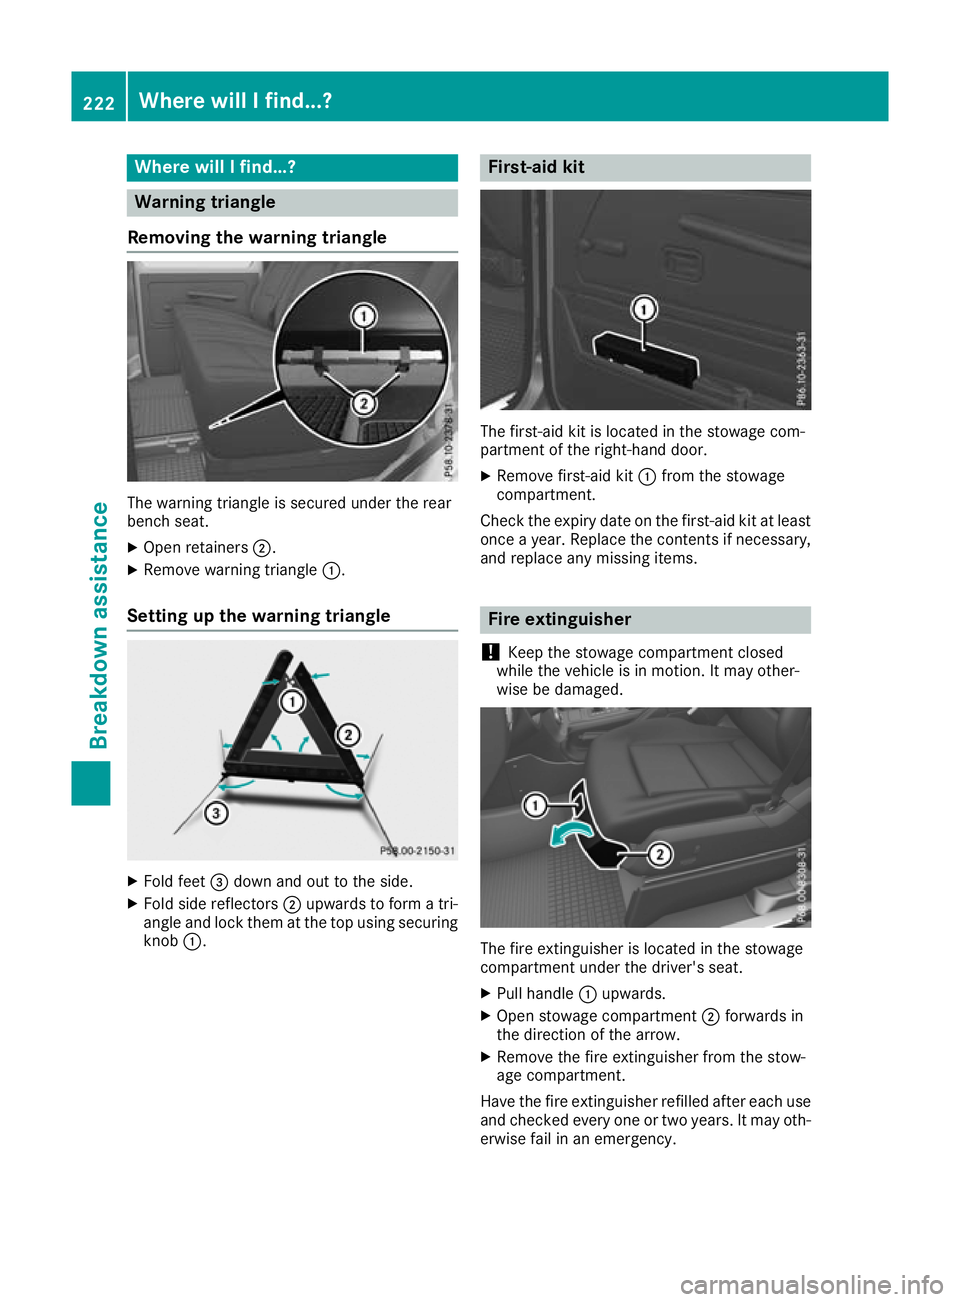
Removing the warning triangle The warning triangle is secured unde
rthe rear
bench seat.
X Open retainers ;.
X Remove warning triangle :.
Setting up the warning triangle X
Fol dfeet =dow nand ou ttothe side.
X Fold sid ereflectors ;upwards to form atri-
angl eand lock them at the top using securing
knob :. First-aid kit
The first-aid kit is locate
dinthe stowage com-
partmen tofthe right-hand door.
X Remove first-aid kit :from the stowage
compartment.
Check the expiry date on the first-aid kit at least
once ayear. Replace the contents if necessary,
and replace any missing items. Fire extinguisher
! Keep the stowage compartment closed
whilet hevehicl eisinm otion.Itm ay other-
wise be damaged. The fire exti
nguisher is located in the stowage
compartment under the driver's seat.
X Pull handle :upwards.
X Open stowage compartment ;forwards in
the direction of the arrow.
X Remove the fire extinguisher from the stow-
age compartment.
Have the fire extinguisher refilled after each use and checked every one or two years. It may oth-
erwise fail in an emergency. 222
Where will
Ifind...?Breakdowna ssistan ce
Page 232 of 261

X
Lift up cover :of positive terminal ;in the direction of the arrow.
X Connect positive terminal ;on yourv ehicle to positive terminal ?of donor battery Busing the
jump lead, Alwaysb eginw ith positive terminal ;on youro wn vehicle first.
X Start the engine of the donor vehicle and run it at idling speed.
X Connect negative terminal Aof donor battery Bto earth point =of yourv ehicle using the jump
lead, connecting the jump leadtod onor batteryBfirst.
X Start the engine.
X Before disconnecting the jump leads, let the engines run for several minutes.
X First, remove the jump leads from earth point =and negative terminal A,then from positive
terminal ;and positive terminal ?.Each time, beginatt he contacts on youro wn vehicle.
X Close cover :of positive terminal ;after removing the jump leads.
X Have the battery checked at aqualifieds pecialist workshop.
Jump-starting is not considered to be anormal operating condition.
i Jump-starting cablesa
nd further information regarding jump-starting can be obtained at any
qualifieds pecialist workshop. Towinga
wayand tow-starting Importan
tsafety notes G
WARNING
Safety-relevant function sare restricted or not
available if:
R the engine is not running.
R the brake system or the power steering is
malfunctioning
R the voltag esupply or the vehicle's electrical
system is malfunctioning.
If yourv ehicleist owed,s ignificantly greater
force may be required to steer the vehicl eor
to brake. There is arisk of an accident.
In such circumstances, use atowing bar.
Make sure that the steering is moving freely
before towing. G
WARNING
If the steering whee llock is engaged, the vehi-
cle can no longer be steered .There is arisk of
an accident.
Always switch on the ignitio nwhen towing
with atow rope or atowing bar. G
WARNING
When towing or tow-starting another vehicle
and its weight is greater than the permissible gross weight of yourv ehicle, the:
R towing eye may be torn off
R car/trailer combination may swerve or
even overturn
There is arisk of an accident.
When towing or tow-starting another vehicle,
its weight should not be greater than the per- missible gross weight of yourv ehicle.
Detail sonthe permissible gross vehicl eweight
of yourv ehiclecan be found on the vehicl eiden-
tification plate (Y page249).
! You may tow the vehicl
efor am aximu mof
50km. Atowing spee dof50km/h must not
be exceeded.
For towing distances over 50 km, the entire
vehicl emust be lifted up and transported.
! Only secure the tow cabl
eortowing bar to
the towing eyes. You coul dotherwise damage
the vehicle.
! Observe the following points when towing
with atow rope:
R Secure the tow rope on the same side on
both vehicles.
R Make sure that the tow rope is not longer
than legally permitted. Mark the tow rope in the middle, e.g. with awhite cloth Towin
gawayand tow-starting
229Breakdown assis tance Z
Page 233 of 261
(30
x30c m). This will make othe rroad
users aware that avehicle is being towed.
R Only secure the tow cable to the towing
eyes or, if available, to the trailer tow hitch.
R Observ ethe brake lamps of the towing
vehicle while driving. Always maintain adis-
tance adistance so that the tow rope does
not sag.
R Do not use steel cables or chain stotow
your vehicle. You could otherwise damage
the vehicle.
! Do not use the trailer tow hitc
hfor recovery
or towing. Do not use the towin geye for
recovery. This could damage the vehicle. If in
doubt, have the vehicle recovered using a
crane.
! When towing, pull away slowly and
smoothly. If the tractive power is too high, the
vehicles could be damaged.
! Your vehicles is equipped with an automatic
transmission .Therefore, you must not have
the vehicle tow-started. The transmission
may otherwise be damaged.
Observ ethe legal requirementsine ach individ-
ual country when towing.
It is better to have the vehicle transported than
to have it towed.
If the transfer case can be shifted int othe Neu-
tral position, you can tow away the vehicle.
If the transfer case cannot be shifted int othe
Neutral position, you can tow away the vehicle
with one axle raised. Please bear the following in
mind:
R remov ethe propeller shaft from between the
transfer case and the rolling axle.
R turn the key to position 1in the ignition lock.
The battery must be connected and charged.
Otherwise, you:
R cannot turn the key to position 2in the igni-
tion lock
R cannot shift the automatic transmission to
position i To
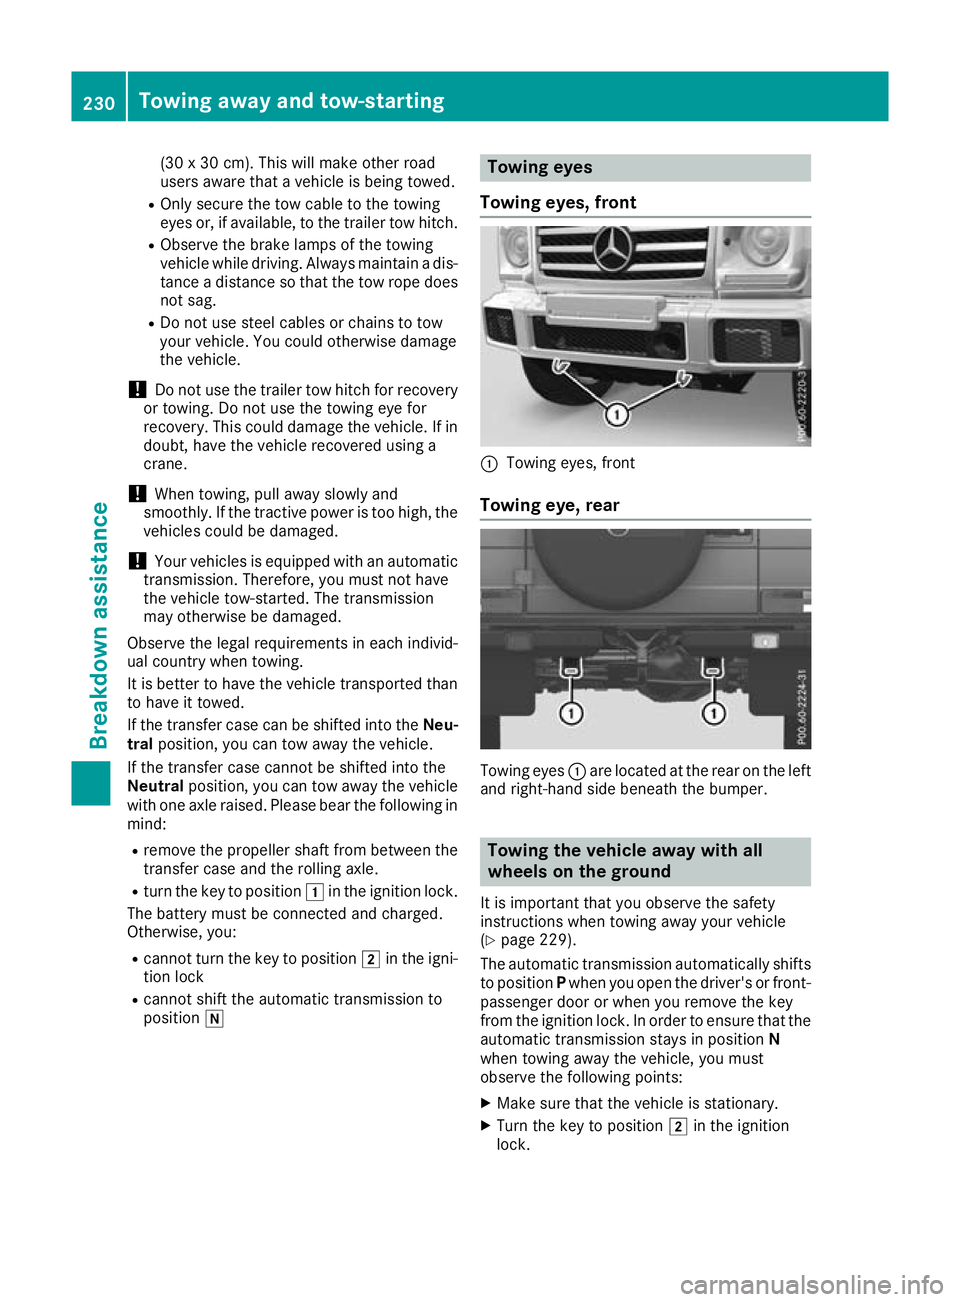
wing eyes
Towin geyes, front :
Towing eyes ,front
Towing eye, rear Towing eyes
:are located at the rear on the left
and right-hand side beneath the bumper. To
wing the vehicle away with all
wheels on the ground
It is important tha tyou observe the safety
instructions when towing away your vehicle
(Y page 229).
The automatic transmission automaticall yshifts
to position Pwhen yo uopenthe driver's or front-
passenge rdoororw heny ou remove the key
fro mt he ignition lock. In order to ensur etha tthe
automatic transmission stays in position N
when towing away the vehicle, yo umust
observe the following points:
X Make sure tha tthe vehicl eisstationary.
X Turn the key to position 2in the ignition
lock. 230
Towing away an
dtow-startingBreakdowna ssistan ce