2016 MERCEDES-BENZ G-CLASS SUV tow
[x] Cancel search: towPage 123 of 261
Observe the following notes:
R stop the vehicle before you drive off-road and,
if necessary, shift the transfer case to the
LOW RANGE off-road driving position
(Y page 124)
R engage the differential locks if necessary
(Y page 126)
i ABS,4
ETS, ESP ®
and BAS are deactivated
while the differential locks are engaged. This
allowst he front wheels to lock briefly, so that
they can dig into aloose surface. However,
please note that locked wheels skid and can
no longer steer.
R Make sure that items of luggage and loads are
stowed safely and are well secured
(Y page 203).
R To avoid damaging the vehicle, make sure
there is always sufficient ground clearance.
R Alwaysk eep the engine running and in gear
when driving on adownhill gradient.
R Alwaysk eep the engine running and in gear
when driving on aslope.
R Drive slowly and evenly, if necessary at walk-
ing pace.
R Ensure that the wheels are in contact with the
ground at all times.
R Drive with extreme care on unknown off-road
routes where visibility is poor. For safety rea- sons, get out of the vehicle first and survey
the off-road route.
R Check the depth of water before fording rivers
and streams.
R Watch out for obstacles.
R Alwaysk eep the doors, the rear door, the side
windows and the sliding sunroof closed while
the vehicle is in motion.
R Do not deviate from marked routes.
R Match your speed to the terrain. The rougher,
steeper or more ruts on the terrain, the slower your speed should be.
R Do not jump with the vehicle. This will inter-
rupt the vehicle's propulsion.
R Avoid high engine speeds. Drive at appropri-
ate engine speeds.
R Alwaysc heck the vehicle for damage after off-
road driving.
Do not use the HOLD function when driving off- road, on steep uphillord ownhill gradients or on
slippery or loose surfaces. The HOLD function
cannot hold the vehicle on such surfaces. You can obtain further information aboutr
etro-
fittin gspecial all-terrain tyres from aqualified
specialis tworkshop.
Checklist before off-roa ddriving X
Engine oil level: check the engine oil and top
it up if necessary.
When driving on steep gradients, the oil level must be sufficiently high to ensure acorrect
oil supply in th evehicle.
X Hav ethe AdBlue ®
level checked at aqualified
specialist workshop (Y page 111).
X Tyre-change tool kit: check that thejackis
working and mak esure that th ewheel
wrench, arobus ttow cable and afolding
spade are in th evehicle.
X Wheels and tyres: check thetyret read
dept hand tyr epressure.
X Chec kfor damage and remove any foreign
objects, e.g .small stones, fro mthewheels/
tyres.
X Replace any missing valv ecaps.
X Replace dented or damage dwheels .Also
check th espare wheel.
X Wheels: dented or ben twheels can lead to a
loss of tyr epressure and damage to th etyre
bead. Before driving off-road, check the
wheels and replac ethemifn ecessary.
Checklist after off-roa ddriving !
If you detect damage to the vehicl
eafter
driving off-road, have the vehicle checked
immediately at aqualified specialist work-
shop.
Driving over rough terrain places greater
demands on your vehicle than driving on normal
roads. After driving off-road, check the vehicle.
This allowsy ou to detect damage promptly and
reduce the risk of an accident to yourselfa nd
other road users.
X Shift the transfer case to the on-road position
HIGH RANGE (Ypage 124).
X Disengage the differential locks
(Y page 127).
X Cleant he headlamps and rear lights and
check for damage.
X Cleant he front and rear licence plates.
X Cleant he wheels and tyres with awater jet
and remove any foreign objects. 120
Drivingt
ipsDriving and parking
Page 126 of 261
Important safety notes
G
WARNING
When leavin gthe vehicle, it can still roll away
despite being braked by the HOLD function if:
R there is amalfunction in the system or in
the voltag esupply
R the HOLD function is deactivated by the
accelerator peda lbeing depressed, e.g. by
av ehicl eoccupant
R the electrica lsystem in the engine com-
partment, the battery or the fuses are tam-
pered with
R the battery is disconnected
There is arisk of an accident.
Before leaving the vehicle, alwaysd eactivate
the HOLD function and secure the vehicle
from rolling away.
Deactivating the HOLD function (Y page123).
Activation conditions You can activate the HOLD fun
ction if:
R the vehicle is stationary
R the engin eisrunning or if it has been auto-
matically switched off by the ECO start/stop
function
R the driver's door is close dorifyour seat belt
is fastened
R the parking brak eisreleased
R the transmission is in position D,Ror N
Activating th eHOLD function X
Make sure that the activation condition sare
met.
X Depress the brake pedal.
X Quickly depress the brake pedal further until
ë appears in the multifunction display.
The HOLD function is activated. You can
release the brake pedal.
If depressing the brake pedal the first time does not activate the HOLD function, wait briefly and
then try again. Deactivating the HOLD function The HOLD function is deactivated automatically
if:
R you depress the accelerator and the trans-
mission is in position Dor R.
R the transmission is in position j.
R you depress the brake pedal again with acer-
tain amount of pressure until ëdisap-
pears from the multifunction display.
On steep uphill or downhill inclines or if there is
am alfunction, the transmission may also be
automatically shifted into position P. Permanent all-wheel drive
! Never tow the vehicle with one axle raised.
This may damage the transfer case. Damage
of this sort is not covered by the Mercedes-
Benz implied warranty. All wheels must
remain either on the ground or be fully raised.
Observe the instructions for towing the vehi-
cle with all wheels in full contact with the
ground.
! When testin
gthe parking brake, operate the
vehicle only briefly (for amaximum of ten sec-
onds) on abrake test dynamometer. When
doing this, turn the key to position 0or 1in
the ignition. Failure to do this can cause dam- age to the drive train or the brake system.
! Af
unction or performanc etest should only
be carried out on atwin-axle dynamometer.
Before you operate the vehicle on such a
dynamometer, please consult aqualified
workshop. You could otherwise damage the
drive train or the brake system.
The all-wheel drive system ensures that all four
wheels are permanently driven. The all-wheel
drive system improves vehicle traction together with ESP ®
and 4ETS if adrive wheel spins due to
insufficient grip.
Only when you use winter tyres (M+S tyres) in
wintry driving condition sand, if necessary, snow
chains (Y page 237). Only in this way can the
maximum effect of all-wheel drive be achieved.
Information about driving off-road (Y page 119). Driving systems
123Driving and parking Z
Page 127 of 261
Off-road driving systems
Transfer case
General notes The vehicle has permanent all-wheel drive. The
front and rear axles are constantly driven.
Further information on driving off-road
(Y page 119).
Shift ranges HIGH
RANGE
Position for all normal on-
road driving conditions.
LOW RANGE
Low-range position for driving
off-road.
Also for use on steep uphill or downhill gradients, especially
when towin gatrailer.
The vehicle travels around
half the speed of on-road driv-
ing range HIGH RANGE.T he
tractive powerisc orrespond-
ingly higher. Shiftin
gthe transfer case General notes
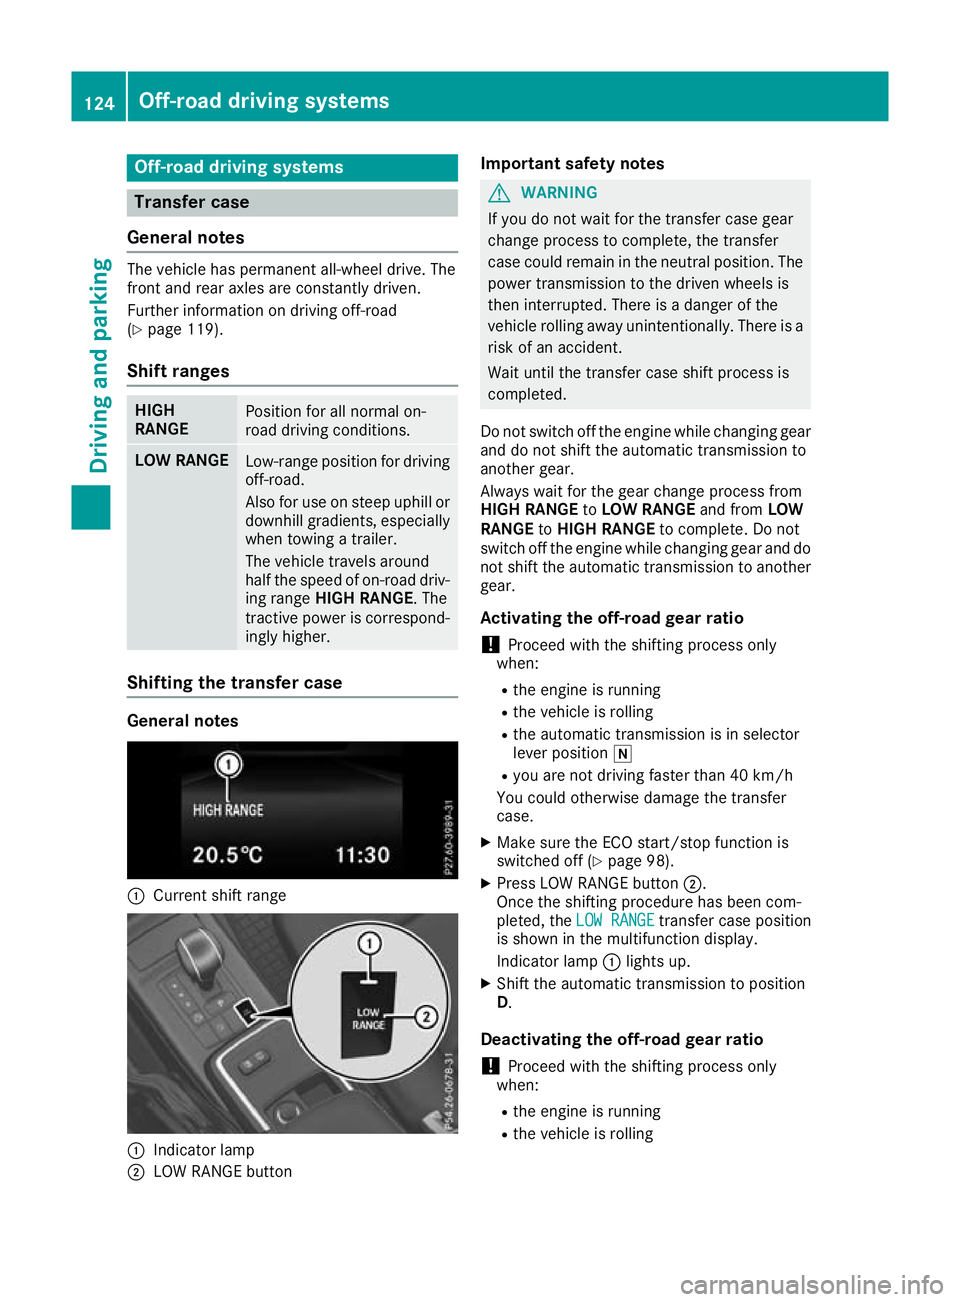
:
Curren tshif trange :
Indicator lamp
; LOW RANGE button Important safety notes G
WARNING
If yo udon ot waitf or the transfer case gear
change process to complete, the transfer
case coul dremai ninthe neutral position. The
power transmission to the drive nwheels is
then interrupted. There is adange rofthe
vehicl erolling awayu nintentionally.T here is a
risk of an accident.
Waitu ntil the transfer case shift process is
completed.
Do not switch off the engine while changing gear and do not shift the automatic transmission to
another gear.
Always waitf or the gearchange process from
HIGH RANGE toLOW RANGE and fromLOW
RANGE toHIGH RANGE to complete. Do not
switch off the engine while changing geara nd do
not shift the automatic transmission to another gear.
Activating the off-road gear ratio ! Proceed with the shifting process only
when:
R the engine is running
R the vehicl eisrolling
R the automatic transmission is in selector
leve rposition i
R you are not driving faster than 40 km/h
You coul dotherwise damage the transfer
case.
X Make sure the ECO start/stop function is
switched off (Y page98).
X Press LOW RANGE button ;.
Once the shifting procedure has been com-
pleted, the LOW RANGE LOW RANGE transfer case position
is show ninthe multifunction display.
Indicator lamp :lights up.
X Shift the automatic transmission to position
D.
Deactivatin gthe off-road gear ratio
! Proceed with the shifting process only
when:
R the engine is running
R the vehicl eisrolling 124
Off-roa
ddriving systemsDriving and parking
Page 130 of 261

Disengaging th
ediffere ntial locks You can disengage the differential lock
sinthe
followin gorder: ;,?, =.
X To simultaneously disengage all differen-
tia
llocks: press switch =.
Yellow activatio nindicator lamps Aand red
function indicator lamps :go out.
After approximately three seconds of normal
driving, ABS, 4ETS, ESP ®
and BA Sare activa-
ted.
The Differential lock sactive ABS
Differential lock sactive ABS
and ESP not available
and ESP not available message disap-
pear sint he multifunction displaya nd the
å!÷warnin glamps in th einstru-
men tcluster go out.
X Shif tthe transfer case to the HIGH RANGE
on-road position (Y page 124).
If red function indicator lamps :do not go out
when disengagin gthe differential locks:
X Observe th etraffic situation.
X Make slight steerin gmovements while the
vehicle is in motion.
Red function indicator lamps :go out when
th ed ifferential lock sare disengaged. Towing
atrailer Importan
tsafety notes G
WARNING
Th eb raking system can overheat if you leave
yourf oot on the brake peda lwhile driving.
This increases the braking distance and could
even caus ethe braking system to fail .There is
ar isk of an accident.
Never use the brake peda lasafootrest. Do
not simultaneously depress both the brake
peda land the accelerator peda lwhile driving. G
WARNING
You coul dlose control of the vehicle/trailer
combination if it begins to swerve .The vehi-
cle/trailer combination coul deven overturn.
There is arisk of an accident.
On no account should you attempt to
straighten out the vehicle/trailer combina-
tion by increasing speed. Decrease your speed and do not countersteer. Brake if nec-
essary.
G
WARNING
If the ballc oupling is not fitted correctly and
the bolts supplied are not tightened to the
specified tightening torque ,the trailer could
come loose. There is arisk of an accident.
Always fit the ballc oupling as described.
Observe the specified tightening torque when fitting the coupling. G
WARNING
If the maximu mpermissible loadf orac arrier
system is exceeded, the carrie rcouldc ome
loos efrom the vehicl eand endange rother
road users. There is arisk of an accident and
injury.
Never exceed the maximu mpermissible load
when using acarrier.
! If you have
atrailer tow hitch retrofitted,
changes to the engine cooling system may be necessary, depending on the vehicl etype.
If you have atrailer tow hitch retrofitted,
observe the anchorage points on the chassis.
Retrofitting atrailer tow hitch is only permissible
if at railer loadiss pecified in yourv ehicledocu-
ments. If this is not the case, then the vehicl eis
not approved for towing atrailer.
For more information, please contact aqualified
specialist workshop.
Exceeding the maximu mpermissible nose-
weight of the trailer drawbar on the ballc oupling
may caus edamage.
Damag emay be caused to the following:
R towing vehicle
R trailer
R ballc oupling
R trailer tow hitch
The vehicle/trailer combination coul dbecome
unstable.
The vehicle/trailer combination coul dalso
become unstable if the noseweight used is lower
than the minimu mpermissible noseweight. Towin
gatrailer
127Driving an dparking Z
Page 131 of 261

To avoid hazardous situations:
R make sure to check the noseweight before
each journey
R the noseweight should be as close as possible
to the maximum noseweight
R do not exceed the maximum permissible
noseweight
R the noseweight must not be lower than the
minimum permissible noseweight
Make sure that the following values are not
exceeded:
R the permissible noseweight
R the permissible trailer load
R the permissible rear axle load of the towing
vehicle
R the maximum permissible gross vehicle
weight of both the towing vehicle and the
trailer
When reversin gthe towing vehicle, make sure
there is nobody between the trailer and the vehi- cle.
The applicable permissible values, which must
not be exceeded, can be found:
R in your vehicle documents
R on the type plates for the trailer
R on the vehicle identification plate
If the values differ, the lowest value applies.
You will find the values approved by the manu-
facturer on the identification plates and for the
towing vehicle under "Technical data"
(Y page 256).
When reversin gthe towing vehicle, make sure
there is nobody between the trailer and the vehi- cle.
Couple and uncouple the trailer carefully. If youdo not couple the trailer to the towing vehicle
correctly, the trailer could become detached.
When towing atrailer, your vehicle's handling
characteristics will be different from when driv-
ing without atrailer.
The vehicle/trailer combination:
R is heavier
R is restricted in its acceleration and gradient-
climbing capability
R has an increased braking distance
R is affected more by stron gcrosswinds
R demands more sensitiv esteering
R has alarger turnin gcircle This can impair the vehicle's handling charac-
teristics. Adapt your driving style accordingly.
Maintain asafe distance. Drive carefully.
When towing atrailer, alway sadjust your speed
to the current road and weather conditions. Do
not exceed the maximum permissible speed for
your vehicle/trailer combination. Notes on to
wingatrailer
General notes When towing
atrailer, set the tyre pressure on
the rear axle of the towing vehicle for amaxi-
mum load. Further information on the tyre pres-
sure table in the fuel filler flap (Y page 109).
The height of the ball coupling changes with the load of the vehicle. If necessary, use atrailer
with aheight-adjustable drawbar.
You will find permissible trailer loads under
"Technical data" (Y page 256).
Driving tips X
Observe the information on ESP ®
trailer sta-
bilisation (Y page 55).
X On long and steep downhill gradients, select
shift range 1,2or 3(Y page 105) in good time.
X If necessary, shift the transfer case to LOW
RANGE (Ypage 124).
This will use the braking effect of the engine, so less braking will be required to maintain
the vehicle speed. This relieves the load on
the brake system and prevents the brakes
from overheating and wearing too quickly. If
you need additional braking, depress the
brake pedal repeatedly rather than continu-
ously.
The maximum permissible speed for vehicle/
trailer combinations depends on the type of
trailer. Before beginnin gthe journey, check the
trailer's documents to see what the maximum
permitted speed is. Observe the maximum per-
missible speed in the relevant country.
For certain Mercedes-Benz vehicles, the maxi-
mum permissibler ear axle load is increased
when towing atrailer. See the "Technical data"
section to find out whether this applies to your
vehicle (Y page 256). In the event of increased
rear axle load, the car/trailer combination may
not exceed amaximum speed of 100 km/h for
reasons concerning the operating permit. This 128
Towing
atrailerDriving and parking
Page 132 of 261

also applies in countries in whic
hthe maximum
permissible spee dfor car/trailer combinations
is greate rtha n1 00 km/h.
When towing atrailer, your vehicle's handling
characteristics will be differen ttowhen driving
without atrailer and th evehicle will consume
mor efuel.
Driving tips R
Maintain agreater distance to the vehicle in
front than when driving without atrailer.
R Avoid braking abruptly. If possible, brake gen-
tly at first to allow the trailer to run on. Then,
increase the braking force rapidly.
R The values given for gradient-climbing capa-
bilities from astandstill refer to sea level.
When driving in mountainous areas, note that
the power output of the engine, and conse-
quently the vehicle's gradient-climbing capa-
bility from astandstill, decrease with increas-
ing altitude.
If the trailer swings from side to side:
X Do not accelerate under any circumstances.
X Do not countersteer.
X Brake, if necessary. Coupling up
atrailer
! Do no
tconnect th etrailer brak esystem (if
th et railer is fitte dwitho ne)d irectly to the
towing vehicle's hydraulic brak esystem,
since this is equipped wit hananti-lock brak-
ing system. Otherwise, neither th ebrakes on
th et ow ing vehicle no rthe brakes on the
trailer will work.
Observ ethe maximum permissible trailer
dimension s(widt hand length).
X Apply th evehicle's parking brake.
X Mak esure that th eautomatic transmission is
in transmission position P.
X Positio nthe trailer on aleve lsurface behind
th ev ehicle.
X Couple up th etrailer.
X Establish th eelectrical connection between
th ev ehicle and th etrailer.
X Chec kthatthe trailer lighting system is work-
ing.
X Push th ecombinatio nswitch upward sand
downwards and check whether th ecorre- sponding tur
nsignal indicator on the trailer is
flashing.
Ac onnected trailer is only detected when the
electrical connection is established correctly
and when the lighting system is working prop-
erly. The function of other systems, such as
ESP ®
also depends on this. Uncoupling
atrailer G
WARNING
If you uncouple atrailer with an engaged over-
run brake, you coul dtrap yourh and between
the vehicl eand the trailer drawbar. This poses
ar isk of injury.
Do not uncouple atrailer with an engaged
overru nbrake.
! Do not disconnect
atrailer with an engaged
overru nbrake. Otherwise, yourv ehiclecould
be damaged by the rebounding of the overrun brake.
X Apply the parking brake.
X Make sure that the automatic transmission is
in transmission position P.
X Secure the vehicl eand trailer against rolling
away.
X Close all doors, including the rear door.
X Remove the trailer cable.
X Uncoupl ethe trailer. Traile
rpower supply
! Yo
uc an connect accessories with amaxi-
mu mp ower consumption of 180 Wtothe
permanent powe rsupply.
Yo um ustn ot charge atrailer battery using the
powe rsupply.
The trailer socket of your vehicl eisequippe dat
the factory with apermanent powe rsupply.
The permanent powe rsuppl yiss upplie dvia
trailer socket pi n9.
Yo uc an find mor einformatio nabout installing
the trailer electrics at aquali fied specialis twork-
shop. Towin
gatrailer
129Driving an dparking Z
Page 133 of 261
Trailer with 7-pi
nconnect or
General notes Trailer with 7-pi
nconnect or:youc an connect
to the 13-pi nsocke tont he ball coupling using
an adapter or, if necessary ,anadapter cable.
Both can be obtained at aquali fied specialist
workshop.
Fittin gthe adapter !
Mak
esure that there is sufficient cable play
so that the cable cannot become detached
when cornering. X
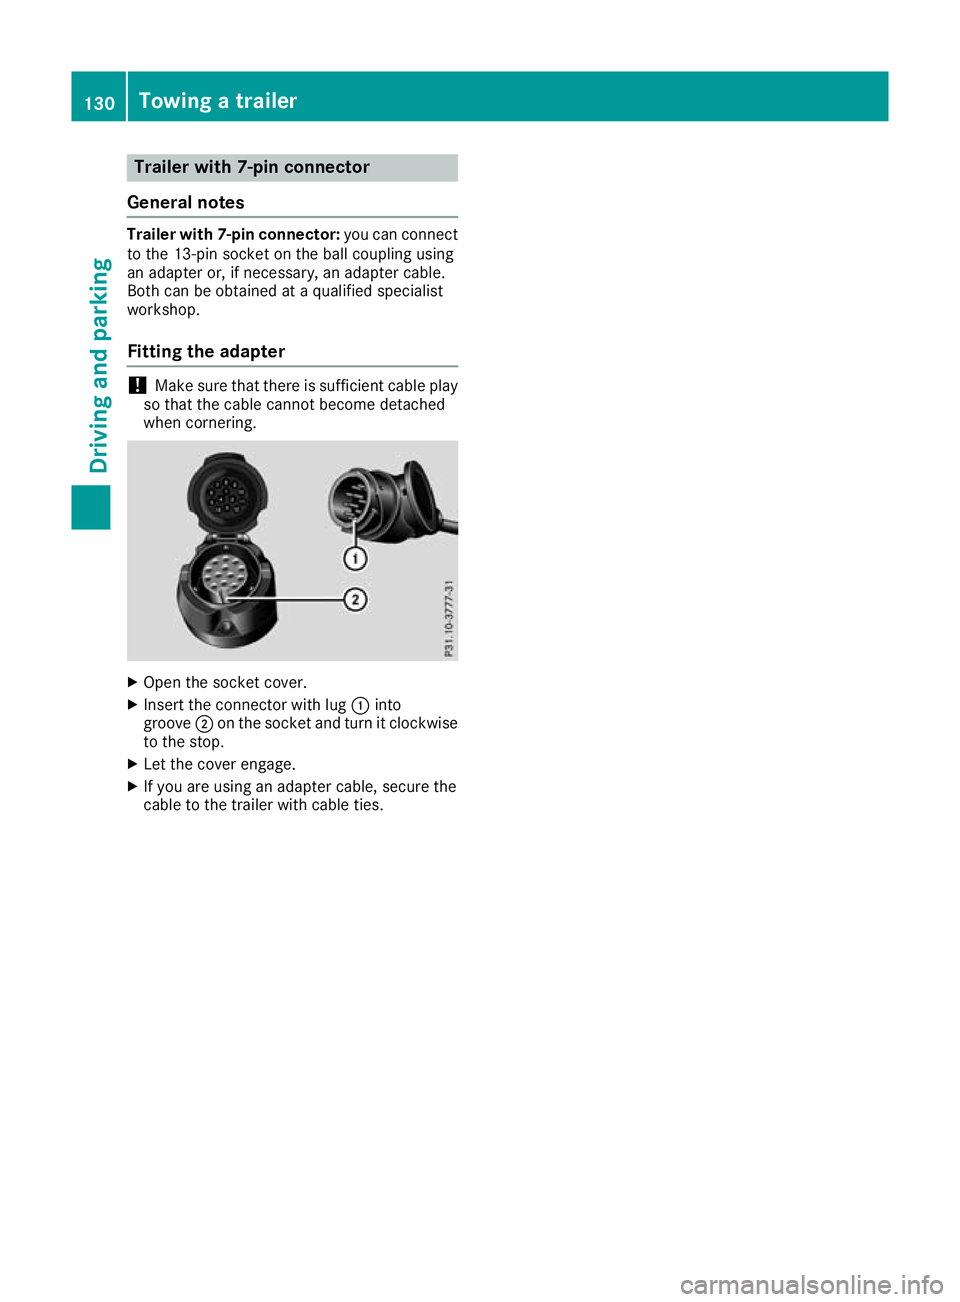
Open the socket cover.
X Insert the connector with lug :into
groove ;on the socket and turn it clockwise
to the stop.
X Let the cover engage.
X If you are using an adapter cable, secure the
cable to the trailer with cable ties. 130
Towing
atrailerDriving and parking
Page 138 of 261
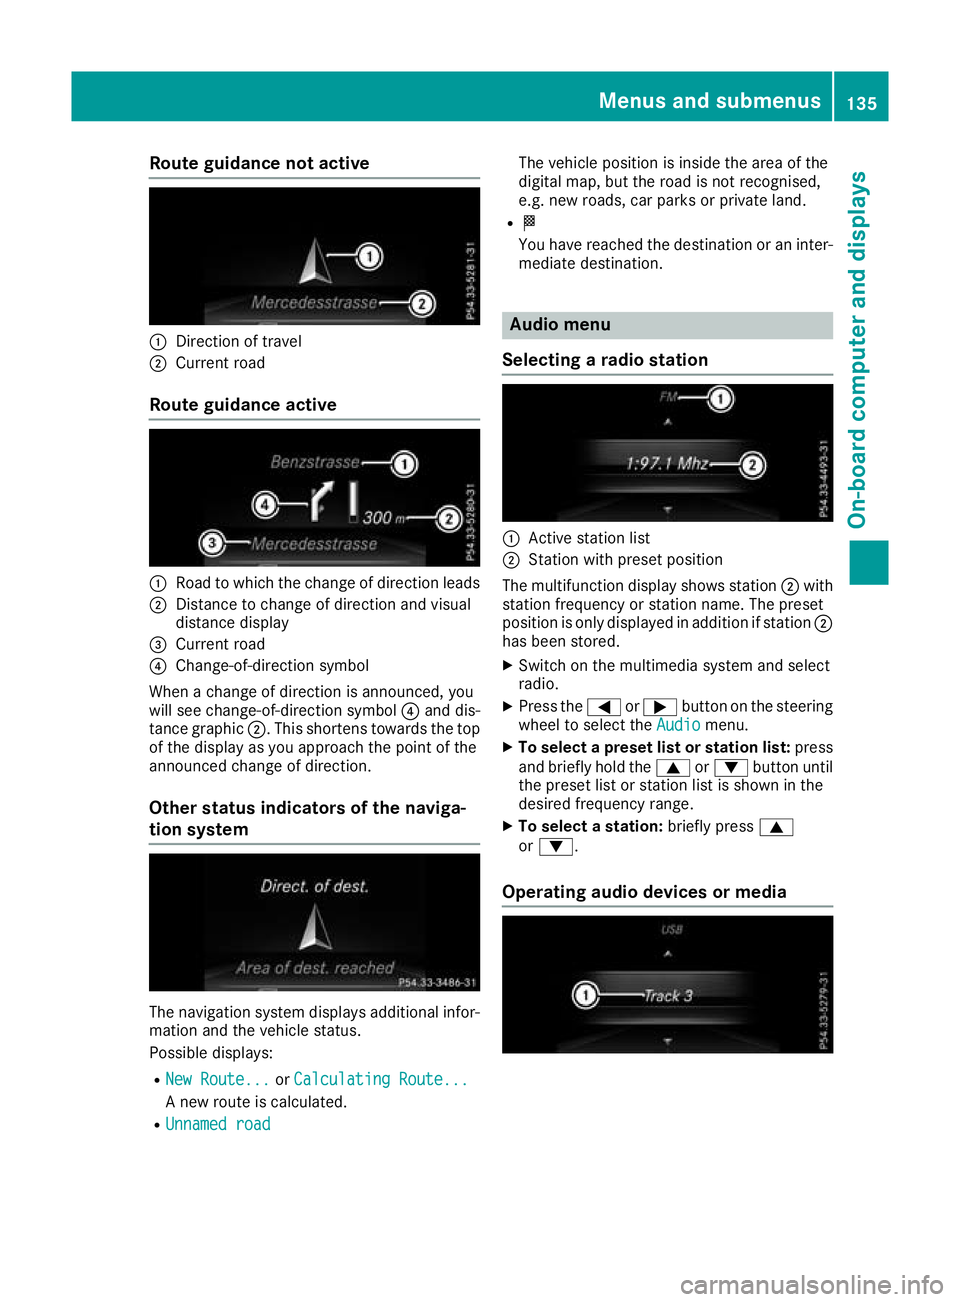
Route guidanc
enotactive :
Direction of travel
; Current road
Route guidanc eactive :
Road to which the change of direction leads
; Distance to change of direction an dvisual
distanc edisplay
= Curren troad
? Change-of-direction symbol
When achang eofd irection is announced, you
will see change-of-direction symbol ?and dis-
tance graphic ;.This shorten stow ards th etop
of th edisplay as you approac hthe poin toft he
announce dchang eofd irection.
Other status indicators of th enaviga-
tion system The navigation system displays additional infor-
mation and the vehicle status.
Possible displays:
R New Route... New Route... orCalculating Route...
Calculating Route...
An ew route is calculated.
R Unnamed road
Unnamed road The vehicle position is inside the area of the
digital map, but the road is not recognised,
e.g. new roads, car parks or private land.
R O
You have reached the destination or an inter-
mediate destination. Audio menu
Selecting aradio station :
Active station list
; Station wit hpreset position
The multifunctio ndisplay shows station ;with
statio nfrequency or statio nname. The preset
positio niso nlyd isplayed in additio nifstation ;
ha sb eens tored.
X Switch on the multimedia system and select
radio.
X Press the =or; button on the steering
whee ltoselect the Audio
Audio menu.
X To select apreset list or station list: press
and briefl yholdt he 9 or: button until
the preset list or statio nlistiss hown in the
desired frequency range.
X To select astation: brieflypress 9
or :.
Operatin gaudi odevices or media Menus and subme
nus
135On-boa rdcomputer and displays Z