2016 MERCEDES-BENZ G-CLASS SUV tow
[x] Cancel search: towPage 21 of 261
Unlocking
Emergenc yunlocking .......................62
From inside the vehicle (central
unlocking button) ............................. 62
Updatin gthe digital map .................. 197
USB (audio)
Connecting adevice ...................... 177
Selecting ........................................ 177 V
Vanity mirror Sun visor ........................................ 208
Vehicle
Correct us e...................................... 23
Data acquisition ............................... 24
Displa ymessage ............................ 153
Electronics ..................................... 248
Equipment ....................................... 21
Implied warranty .............................. 23
Individua lsettings .......................... 137
Leaving parked up ......................... 115
Locking (i nanemergency) ............... 62
Locking (key) ................................... 57
Lowering ........................................ 246
Parking .......................................... 113
Pulling away ..................................... 97
Raising ........................................... 244
Registration ..................................... 23
Securing from rolling away ............ 244
Tow-starting ................................... 232
Towing ........................................... 229
Transporting .................................. 231
Unlocking (i nanemergency) ........... 62
Unlocking (key) ................................ 57
Vehicl edata. .................................. 254
Vehicl edata ....................................... 254
Vehicl edata (off-road driving)
Approach/departure angle ............ 255
Fording depth ................................ 255
Maximu mgradient climbing abil-
ity .................................................. 255
Vehicl edimensions ........................... 254
Vehicl eemergenc yloc king ................ 62
Vehicl eidentificatio nnumber
see VIN
Vehicl eidentificatio nplate .............. 249
Vehicl etoolkit.................................. 223 Vehicl
etoolkit pocket ...................... 223
Vehicl eweigh ts................................. 254
Ventilation
Setting the airflow ........................... 87
VIN
Type plate ...................................... 249
Volume
Adjusting ....................................... 170 W
Warning and indicator lamps ABS ................................................ 158
Brake s.......................................... .157
ESP ®
.............................................. 159
ESP ®
OFF ....................................... 160
Fuel tank ........................................ 162
General notes ................................ 155
Overview .......................................... 26
Parking brake ................................ 157
PASSENGER AIR BAG OFF .............. .32
Reserv efuel .................................. .162
Seat bel t........................................ 155
Tyr ep ressure monitor ................... 164
Warning triangle ................................ 222
Washer fluid
Display message ............................ 154
Whee land tyre combinations
Tyres .............................................. 246
Whee lboltt ightening torque ........... 246
Wheels
Changing awheel .......................... 243
Changing/replacing ....................... 243
Checking ........................................ 235
Cleaning ......................................... 218
Fitting anew wheel ........................ 245
Fitting awheel ............................... 243
Important safety notes .................. 235
Information on driving .................... 235
Removing awheel .......................... 245
Snow chains .................................. 237
Storing .......................................... .243
Tightening torqu e........................... 246
Whee lsize/tyre size ..................... .246
Winch ................................................. 210
Windscreen
Demisting ........................................ 87
Windscreen heating ............................ 8818
Index
Page 26 of 261
Heilbronne
rStraße 30 —74363 Güglingen Diagnos
tics connection
The diagnostic sconnectio nisused fo rconnect-
in gd iagnostic equipmen tataqualified special-
ist workshop. G
WARNING
If yo uconnect equipment to adiagnostics
connection in the vehicle, it may affect the
operation of vehicl esystems .Asaresult, the
operating safety of the vehicl ecouldbea ffec-
ted. There is arisk of an accident.
Only connect equipment to adiagnostics con-
nection in the vehicle, which is approved for
yourv ehiclebyM ercedes-Benz. G
WARNING
Objects in the driver's footwel lcan impede
peda ltravel or block apeda lwhich is
depressed. This jeopardise ssafe operation of
the vehicle. There is arisk of an accident.
Stow all objects in the vehicl esafely, so that
they cannot reach the driver's footwell. Make sure the floormats and carpets are properly
secure dsothat they cannot slip and obstruct
the pedals. Do not lay severa lfloormats or
carpets on top of one another.
! If the engine is switched off and equipment
on the diagnostics connection is used ,the
starter battery may discharge.
Connecting equipment to the diagnostics con-
nection can leadtoe missions monitoring infor-
mation being reset, for example. This may lead
to the vehicl efailing to meet the requirements of
the next emissions test during the main inspec-
tion. Qualifieds
pecialist workshop
Aq ualified specialist workshop has the neces-
sary special skills, tools and qualifications to
correctly carry out any necessary work on your
vehicle. This particularly applies to work rele-
vant to safety. Alwaysh
avet he following work carrie doutat a
qualified specialist workshop:
R work relevant to safety
R service and maintenance work
R repai rwork
R modifications, installations and conversions
R work on electronic components
Mercedes-Benz recommends tha tyou usea
Mercedes-Benz Service Centre. Vehicl
eregistration
Mercedes-Benz ma yask its Service Centres to
carry ou ttechnical inspections on certain vehi-
cles. The quality or safety of the vehicl eis
improve dasaresultoft he inspection.
Mercedes-Benz can inform yo uabout vehicle
inspections onl yifithasyour registration data.
It is possibl ethaty ou rv ehicl ehasnot ye tbeen
registere dinyourn am eint he following cases:
R if your vehicl ewasnot purchased at an
authorised specialist dealer.
R if your vehicl ehasnot ye tbeeninspected at a
Mercedes-Benz Service Centre.
It is advisable to register your vehicl ewitha
Mercedes-Benz Service Centre.
Infor mMercedes-Benz as soo naspossible
abou tany change in address or vehicl eowner-
ship. Yo ucan do thi sataMercedes-Benz Ser-
vice Centre, for example. Correc
tuse
If you remove any warning stickers ,you or oth-
ers coul dfail to recognise certain dangers.
Leav ewarning stickers in position.
Observ ethe followin ginformatio nwhen driving
your vehicle:
R thes afety note sinthism anual
R technical dat afor th evehicle
R traffic rules and regulations
R laws and safety standards pertaining to motor
vehicles Implied warranty
! Follow th
einstruction sinthism anual about
th ep roper operation of your vehicl easwell as Introduction
23 Z
Page 32 of 261
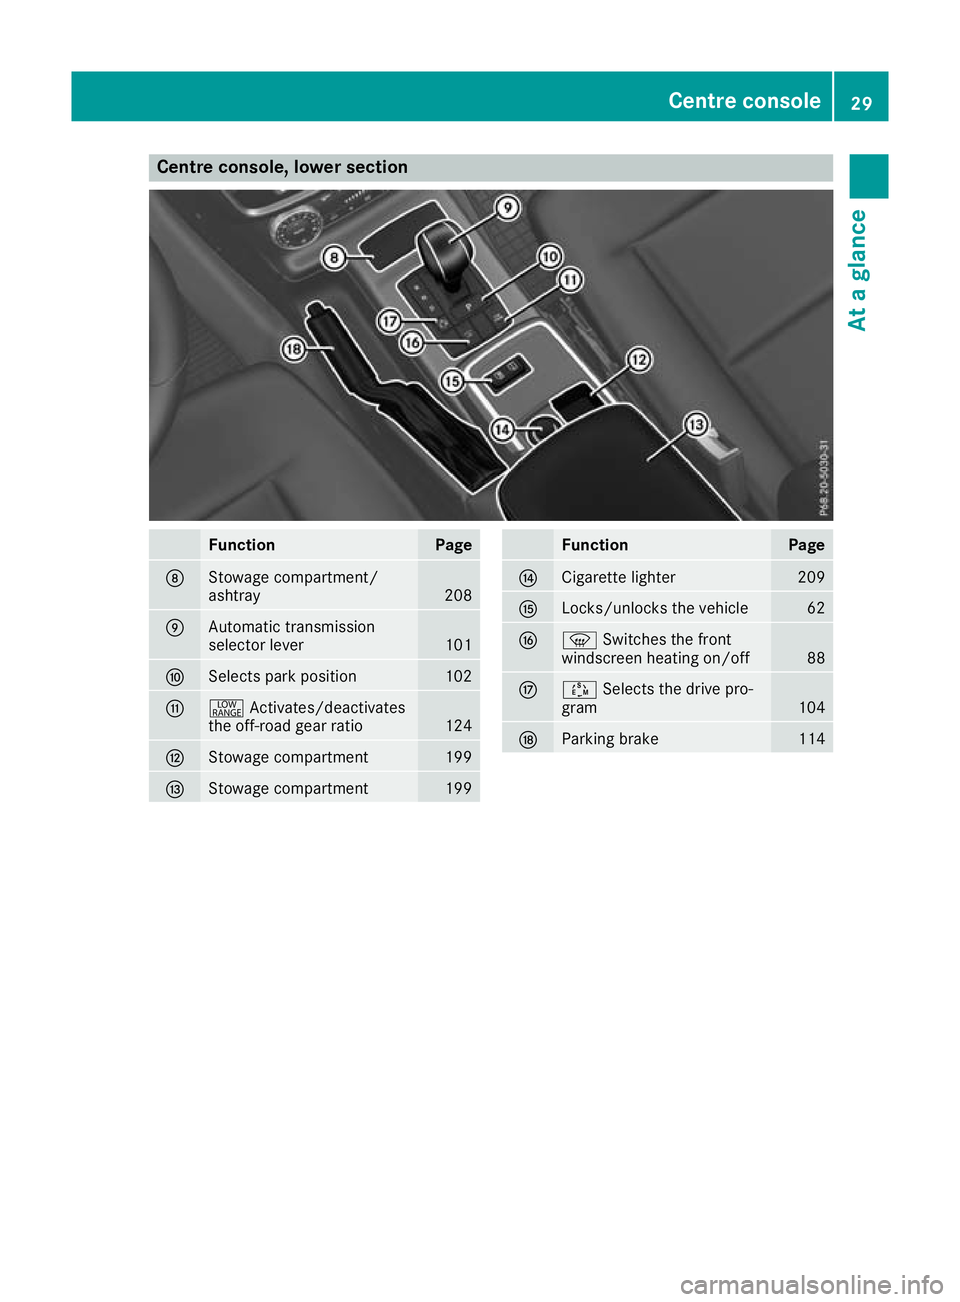
Centre console, lower section
Function Page
D
Stowage compartment/
ashtray
208
E
Automati
ctransmission
selecto rlev er 101
F
Selects park position 102
G
+
Activates/deactivates
the off-roa dgearratio 124
H
Stowage compartment 199
I
Stowage compartment 199 Function Page
J
Cigarette lighter 209
K
Locks/unlock
sthe vehicle 62
L
z
Switches the front
windscreen heating on/off 88
M
Ú
Selects the drive pro-
gram 104
N
Parkin
gbrake 114Centrec
onsole
29Atag lance
Page 40 of 261
er's operatin
gand installation instructions for
the child restraint system.
Objects in the vehicle interior may prevent
the airba gfrom functioning correctly. Before
starting your journey and to avoid risks resulting from the speed of the airbag as it deploys, make
sure that:
R there are no people, animals or objects
between the vehicle occupant sand an airbag
R no accessories, such as cup holders, are
attached to the vehicle within the deployment
area of an airbag, e.g. to the steerin gwheel or
doors
R no heavy, sharp-edged or fragile objects are in
the pockets of your clothing. Store such
objects in asuitable place. G
WARNING
If you modify an airbag cove roraffix objects
such as stickers to it, the airbag can no longer function correctly. There is an increased risk
of injury.
Never modify an airbag cover or affix objects
to it.
Fron tairbags !
Do not place heavy objects on the front-
passenger seat. This could cause the system
to identif ythe seat as being occupied. In the
event of an accident, the restraint systems on the front-passenger side may be triggered
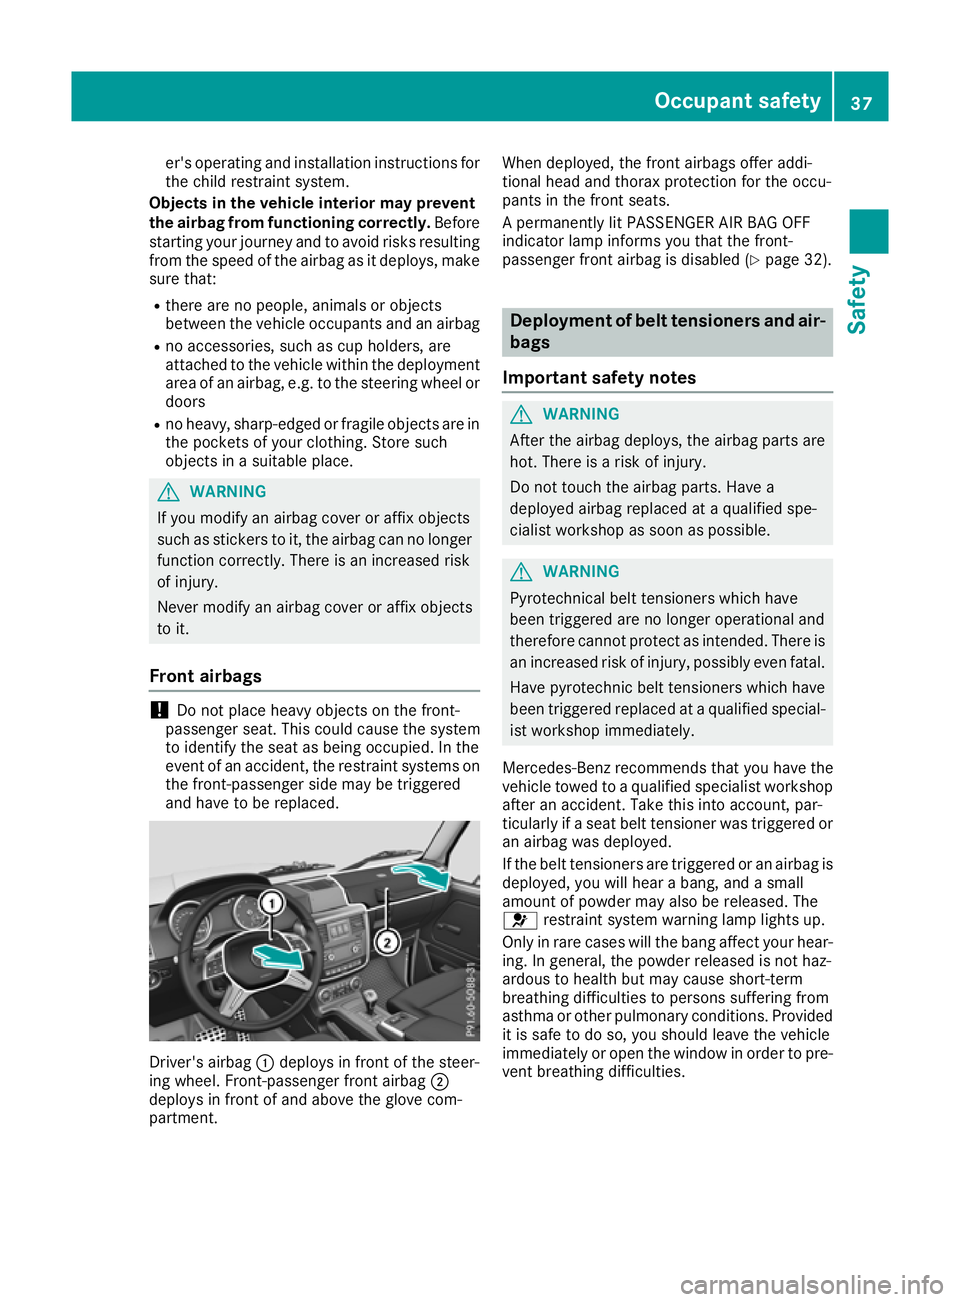
and have to be replaced. Driver's airbag
:deploysinf ront of the steer-
ing wheel. Front-passenge rfront airbag ;
deploy sinfront of and above the glove com-
partment. When deployed
,the fron tairbags offer addi-
tional head and thorax protection for the occu-
pants in the fron tseats.
Ap ermanently lit PASSENGE RAIR BAG OFF
indicator lamp inform syou that the front-
passenger fron tairbag is disabled (Y page 32). Deployment of beltt
ensioner sand air-
bags
Important safet ynotes G
WARNING
Afte rthe airbag deploys, the airbag parts are
hot. There is arisk of injury.
Do not touch the airbag parts. Have a
deployeda irbag replaced at aqualified spe-
cialist worksho passoon as possible. G
WARNING
Pyrotechnical beltt ensioners which have
been triggere dare no longer operational and
therefore cannot protect as intended. There is an increased risk of injury ,possibly even fatal.
Have pyrotechnic beltt ensioners which have
been triggere dreplaced at aqualified special-
ist worksho pimmediately.
Mercedes-Benz recommends that you have the
vehicl etowed to aqualified specialist workshop
after an accident. Take this into account, par-
ticularly if aseat beltt ensioner was triggere dor
an airbag was deployed.
If the beltt ensioners are triggere doranairbag is
deployed, you willh earabang, and asmall
amount of powder may alsober eleased.The
6 restraint system warning lamp lights up.
Only in rare cases willt he bang affect yourhear-
ing. In general, the powder released is not haz-
ardous to health but may caus eshort-term
breathing difficultie stopersons suffering from
asthma or other pulmonary conditions. Provided it is safe to do so, you should leave the vehicle
immediatel yoropen the windo winorder to pre-
vent breathing difficulties. Occupant safety
37Safety Z
Page 43 of 261
Removin
gachild restrain tsystem and deacti-
vating th echild seat lock:
X Always comply wit hthe child restrain tsystem
manufacturer' sinstallation instructions.
X Press th erelease butto nofthebelt buckle,
hold th ebelt tongue firmly and guide it back
towards th ebelt sash guide.
The child seat loc kfunction is deactivated. Child restraint system
Observ ethe instruction sfor correc tuse of the
child restraint system (Y page 46).
For safety reasons, Mercedes-Ben zrecom-
mends that you use only achild restraint system
recommended by Mercedes-Benz
(Y page 49). G
WARNING
If th echild restraint system is incorrectly fit-
ted on the seat position suitable for this pur-
pose ,itcannot perform its intended protec-
tive function. In the event of an accident,
sharp braking or asudden change in direction,
the child may not be held securely.T here is an
increased risk of serious or even fatal injuries.
Observe the manufacturer's installation
instructions and the correct use for the child
restraint system. Make sure that the entire
surface of the child restraint system is resting
on the seat surface. Never place objects
under or behind the child restraint system,
e.g. cushions. Only use child restraint sys-
tems with the original cover designed for
them. Only replace damaged covers with gen- uine covers. G
WARNING
If the child restraint system is fitted incor-
rectly or is not secured, it can come loos ein
the event of an accident, heavy braking or a
sudden change in direction. The child
restraint system coul dbethrown about, strik-
ing vehicl eoccupants. There is an increased
risk of injury ,possibly even fatal.
Always fit child restraint systems properly,
even if they are not being used .Make sure that you observe the child restraint system
manufacturer's installation instructions.
Further information on stowing objects, luggage and load ssecurel ycan be found under "Loading
guidelines" (Y page 198). G
WARNING
Child restraint systems or thei rsecuring sys-
tems that have been damaged or subjected to al oa dinana ccident cannot perform their
intended protective function. In the event of
an accident, sharp braking or asudden
change in direction, the child may not be held securely.T here is an increased risk of serious
or even fatal injuries.
Immediately replace child restraint systems
that have been damaged or subjected to a
loadinana ccident. Have the child restraint
securing systems checked in aqualified spe-
cialist worksho pbefore fitting achild restraint
system again.
The securing systems of child restraint systems
are:
R the seat belts ystem
R the ISOFIX securing rings
R the Top Tether anchorages
If circumstances require you to fit achild
restraint system to the front-passenge rseat, be
sure to observe the information on "Child
restraint systems on the front-passenge rseat"
(Y page4 3). Information on disabling the
front-passenge rfront airbag can alsobef ound
there.
Observe the warning labels in the vehicl einte-
rior and on the child restraint system.
i It is advisabl
etouse Mercedes-Benz care
products to clea nchild restraint systems rec-
ommended by Mercedes-Benz. Information
can be obtained at aqualified specialist work-
shop. ISOFIX chil
dseat securing system G
WARNING
ISOFIX chil drestraint systems do not offer
sufficient protective effect for children whose 40
Children in the vehicleSafety
Page 65 of 261

Centrally lockin
gand unlocking the
vehicle from th einside
You can centrally loc korunlock th evehicle from
th ei nside.
The butto nfor th ecentral lockin gdoes no tlock
or unlock th efuel fille rflap.
The switch for th ecentral lockin gisonthelower
sectio nofthecentr econsole. X
To unlock: press button :.
X To lock: press button ;.
United Kingdom only: if thevehicl ehasbeen
locked with the key ,the double lock functio nis
activate dasstandard. It is then not possibl eto
open the doors from insid ethe vehicle. Yo ucan
deactivate the double lock functio nbydeacti-
vating the interio rmotion sensor (se eDigital
Owner' sManual) .Opening/closing doors is
then possibl easfollows :the doors can be
opene dfrom inside. Yo ucan onl yopent he rear
side doors from insid ethe vehicl eifthey are not
secured by the child-proof locks (Y page 51).
i It is onl
ypossibl etol ockt he vehicl ecen-
trally if the driver's door is closed.
i The doors unlock automaticall
yinthe event
of an accident if the force of the impact
exceed sapredetermined level. Automatic locking feature
X
To deactivate: press and holdbutton :for
approximatel yfives econds unti latone
sounds.
X To activate: press and hol dbutton ;for
approximatel yfives econds unti latone
sounds.
If yo upress one of the two buttons and do not
hea rat one, the relevant setting ha salready
been selected.
The vehicl eislocked automaticall ywhent he
ignition is switched on and the wheels are turn-
ing.
Therefore, yo ucould be locked ou tif:
R the vehicl eisbeing pushed
R the vehicl eisbeing towed
R the vehicl eisbeing teste donadynamometer
Yo uc an also activate and deactivate the auto-
matic locking functio nusing the on-board com-
puter (Y page 139). Locking/unlocking the driver's door
with the emergenc
ykey 62
DoorsOpening and closing
Page 66 of 261
X
Insert the emergency key element into the
lock of the driver's door as far as it willg o.
X To unlock: turn the emergency key element
anti-clockwise as far as it willgotop osition
1.
X To lock: turn the emergency key element
clockwise as far as it willgotop osition2.
Right-hand-drive vehicle: turn the emergency
key element in the opposite direction in both
cases.
If you use the emergency key element to unlock
and open the driver's door, the anti-theft alarm
system willbet riggered. Switch off the alarm
(Y page 56). Rear door
Im
portant safety notes G
WARNING
Combustion engine semit poisonous exhaust
gase ssuch as carbon monoxide .Ifthe rear
door is open when the engine is running, par- ticularly if the vehicl eismoving, exhaust
fumes coul denter the passenger compart-
ment. There is arisk of poisoning.
Turn off the engine before opening the rear
door. Never drive with the rear door open. G
WARNING
If objects, luggage or loads are not secure dor
not secure dsufficiently ,they coul dslip,tip
over or be flung around and thereby hit vehicle
occupants. There is arisk of injury ,especially
when braking or abruptly changing directions.
Always store objects so that they cannot be
flung around. Secure objects, luggage or
loads against slipping or tipping before the
journey. G
WARNING
Do not leave children unsupervised in the
vehicle. They coul dopen the rear door from
insid ethe vehicl eand endange rthemselves
and others. !
The tailgat
eswings out to the side when
opened. Therefore, make sure that there is
sufficient clearance.
Do not leave the key in the luggage compart-
ment. You may otherwise be inadvertently
locked out.
Stow luggage or loads preferably in the luggage
compartment.O bserve the loading guidelines
(Y page 198). Opening from the outside
The rear door must be unlocked before it can be
opened.
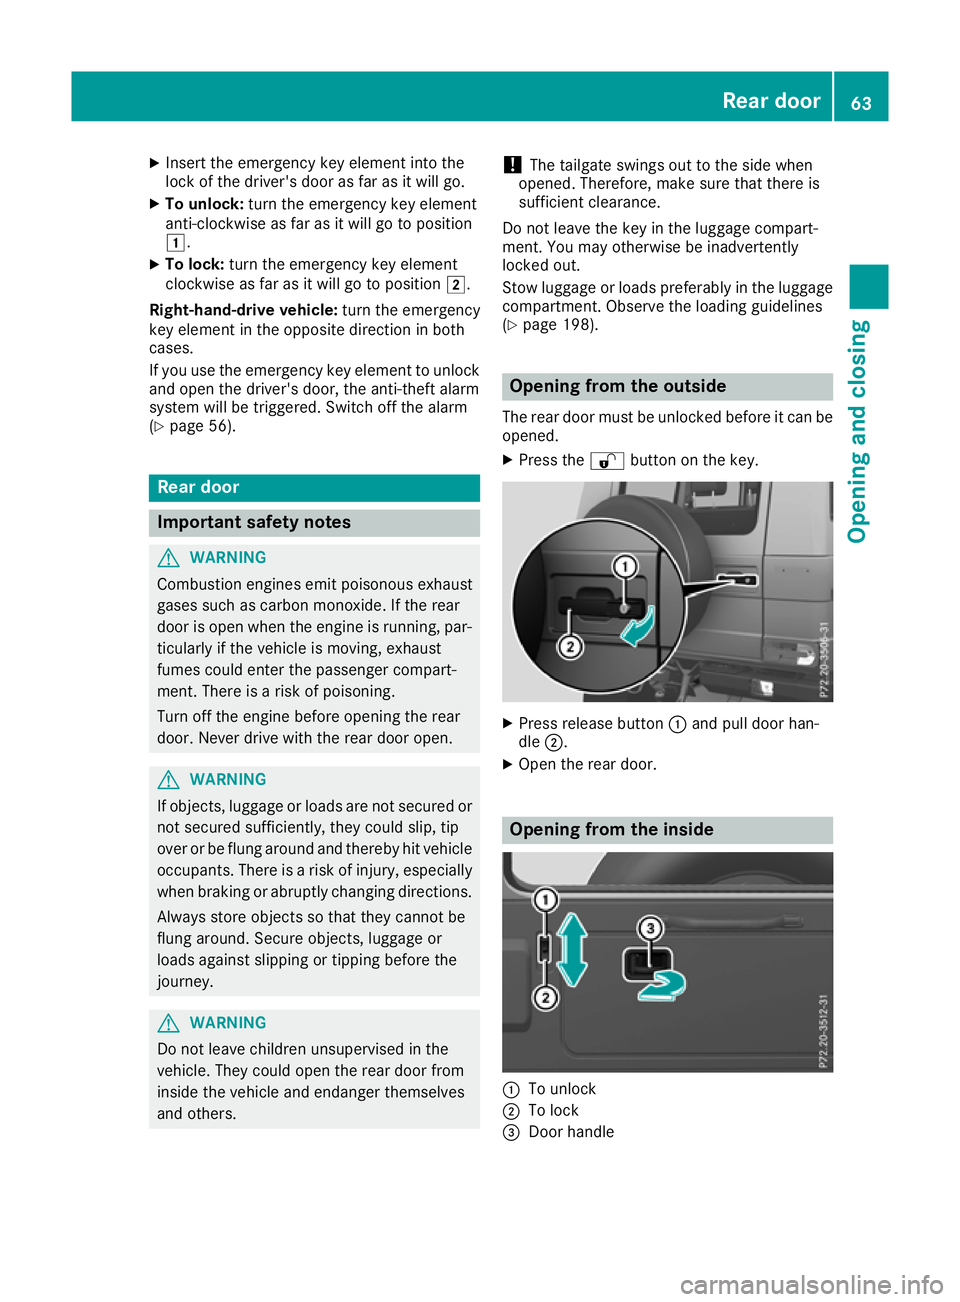
X Press the %button on the key. X
Press release button :and pull door han-
dle ;.
X Open the rear door. Opening from the inside
:
To unlock
; To lock
= Door handle Rea
rdoor
63Openinga nd closing Z
Page 75 of 261
When leaving the vehicle, alway
stake the key
with you and lock the vehicle. Never leave
children unattended in the vehicle.
The electrically adjustable steerin gwheel can
still be adjusted when there is no key in the igni-
tion lock. Adjust
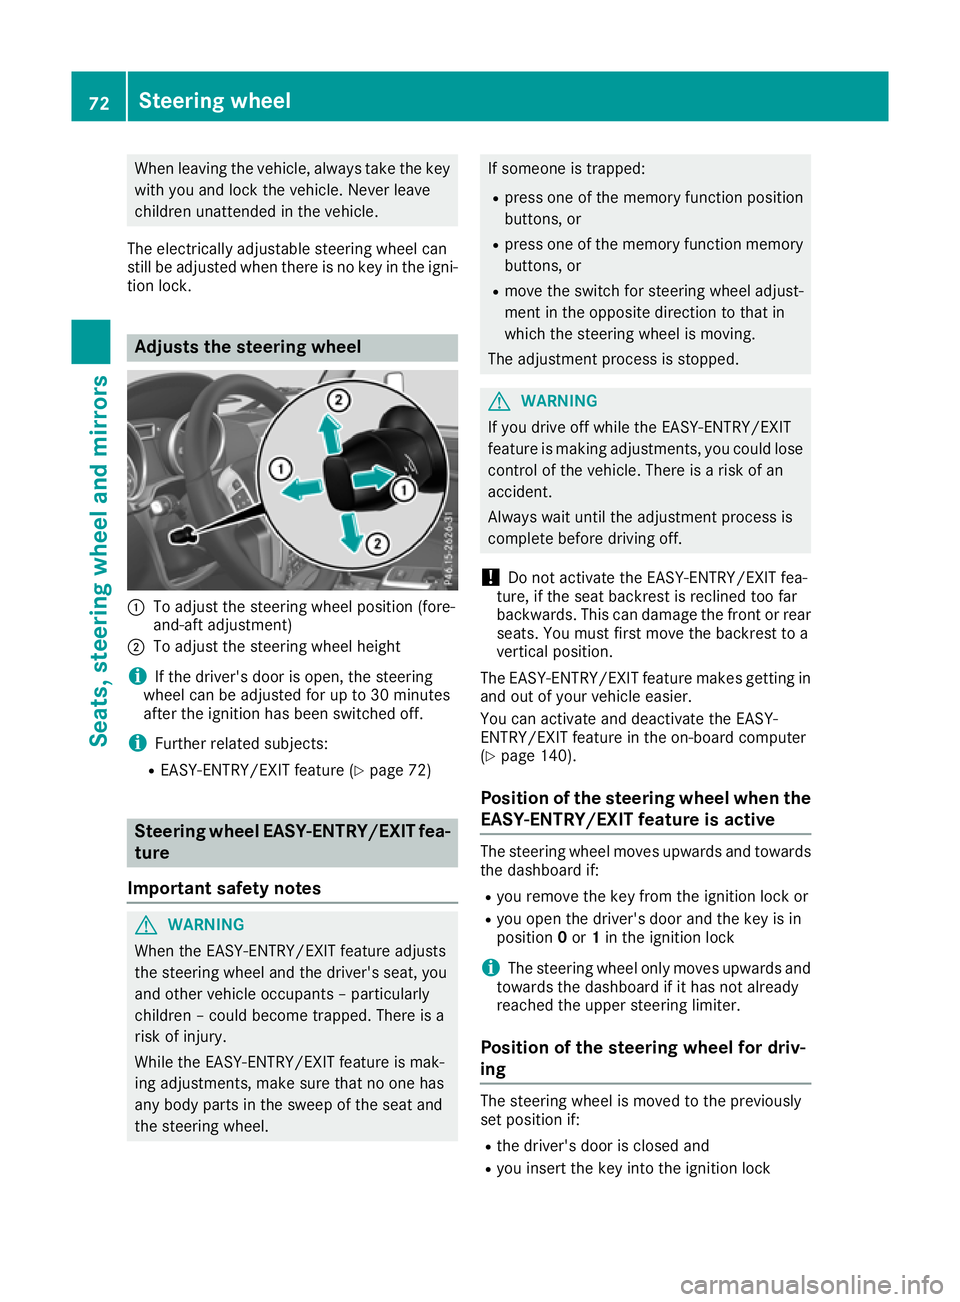
sthe steering wheel :
To adjust the steeri ngwheel position (fore-
and-aft adjustment)
; To adjust the steerin gwheel height
i If the driver's door is open, the steering
wheel can be adjusted for up to 30 minutes
after the ignition has been switched off.
i Further related subjects:
R EASY-ENTRY/EXIT feature (Y page 72)Steering wheel EASY-ENTRY/EXIT fea-
ture
Important safety notes G
WARNING
When the EASY-ENTRY/EXIT feature adjusts
the steering wheel and the driver's seat, you
and other vehicle occup ants –p articularly
children –couldb ecome trapped. There is a
risk of injury.
Whil ethe EASY-ENTRY/EXIT feature is mak-
ing adjustments, make sure that no one has
any body parts in the swee pofthe seat and
the steering wheel. If someone is trapped:
R press one of the memory function position
buttons, or
R press one of the memory function memory
buttons, or
R move the switch for steering wheel adjust-
ment in the opposite direction to that in
which the steering wheel is moving.
The adjustment process is stopped. G
WARNING
If you drive off while the EASY-ENTRY/EXIT
feature is making adjustments, you coul dlose
control of the vehicle. There is arisk of an
accident.
Always waitu ntil the adjustment process is
complete before driving off.
! Do not activate the EASY-ENTRY/EXIT fea-
ture, if the seat backrest is recline dtoo far
backwards. This can damage the front or rear seats. You must first move the backrest to a
vertical position.
The EASY-ENTRY/EXIT feature makes getting in
and out of yourv ehicleeasier.
You can activate and deactivate the EASY-
ENTRY/EXIT feature in the on-board computer
(Y page1 40).
Position of the steering wheel whent he
EASY-ENTRY/EXIT feature is active The steering wheel moves upwards and towards
the dashboard if:
R you remov ethe key from the ignition lock or
R you open the driver's door and the key is in
position 0or 1in the ignition lock
i The steerin
gwheel only moves upwards and
towards the dashboard if it has not already
reached the upper steerin glimiter.
Position of the steering wheel for driv-
ing The steerin
gwheel is moved to the previously
set position if:
R the driver's door is closed and
R you insert the key into the ignition lock 72
Steering wheelSeats, steering wheel and mirrors