2016 MERCEDES-BENZ G-CLASS SUV tow
[x] Cancel search: towPage 159 of 261
Warning/
indicator
lamp
N N
Signa ltype
Possible causes/consequences and M
MSolutions ü
N
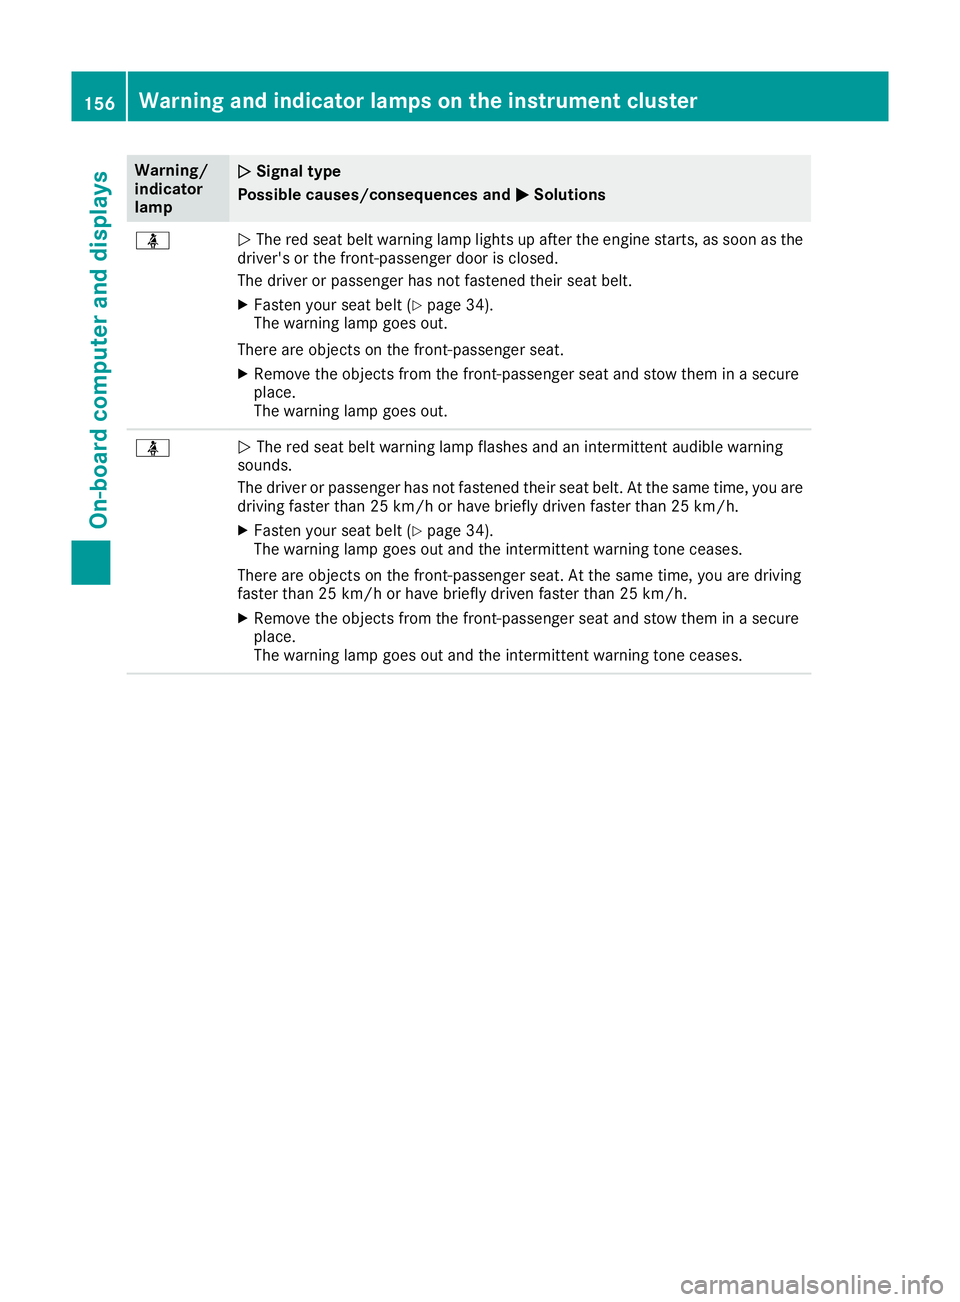
The red seat belt warning lamp lights up after the engine starts, as soon as the
driver's or the front-passenger door is closed.
The driver or passenger has not fastened their seat belt.
X Fasten your seat belt (Y page 34).
The warning lamp goes out.
There are objectsont he front-passenger seat.
X Remove the object sfrom the front-passenger seat and stow them in asecure
place.
The warning lamp goes out. ü
N
The red seat belt warning lamp flashes and an intermittent audibl ewarning
sounds.
The driver or passenger has not fastened their seat belt. At the same time, you are
driving faster than 25 km/ho rhave briefly driven faster than 25 km/h.
X Fasten your seat belt (Y page 34).
The warning lamp goes out and the intermittentw arning tone ceases.
There are object sonthe front-passenger seat. At the same time, you are driving
faster than 25 km/ho rhave briefly driven faster than 25 km/h.
X Remove th eobjects from th efront-pa ssenger seat and stow them in asecure
place.
The warning lamp goes out and th eintermittent warning tone ceases. 156
Warning and indicator lamps on th
einstrument clusterOn-boar dcomputer and displays
Page 185 of 261
Switching to navigation mode
X Press the NAVI button.
The main menu appears. Entering the destination
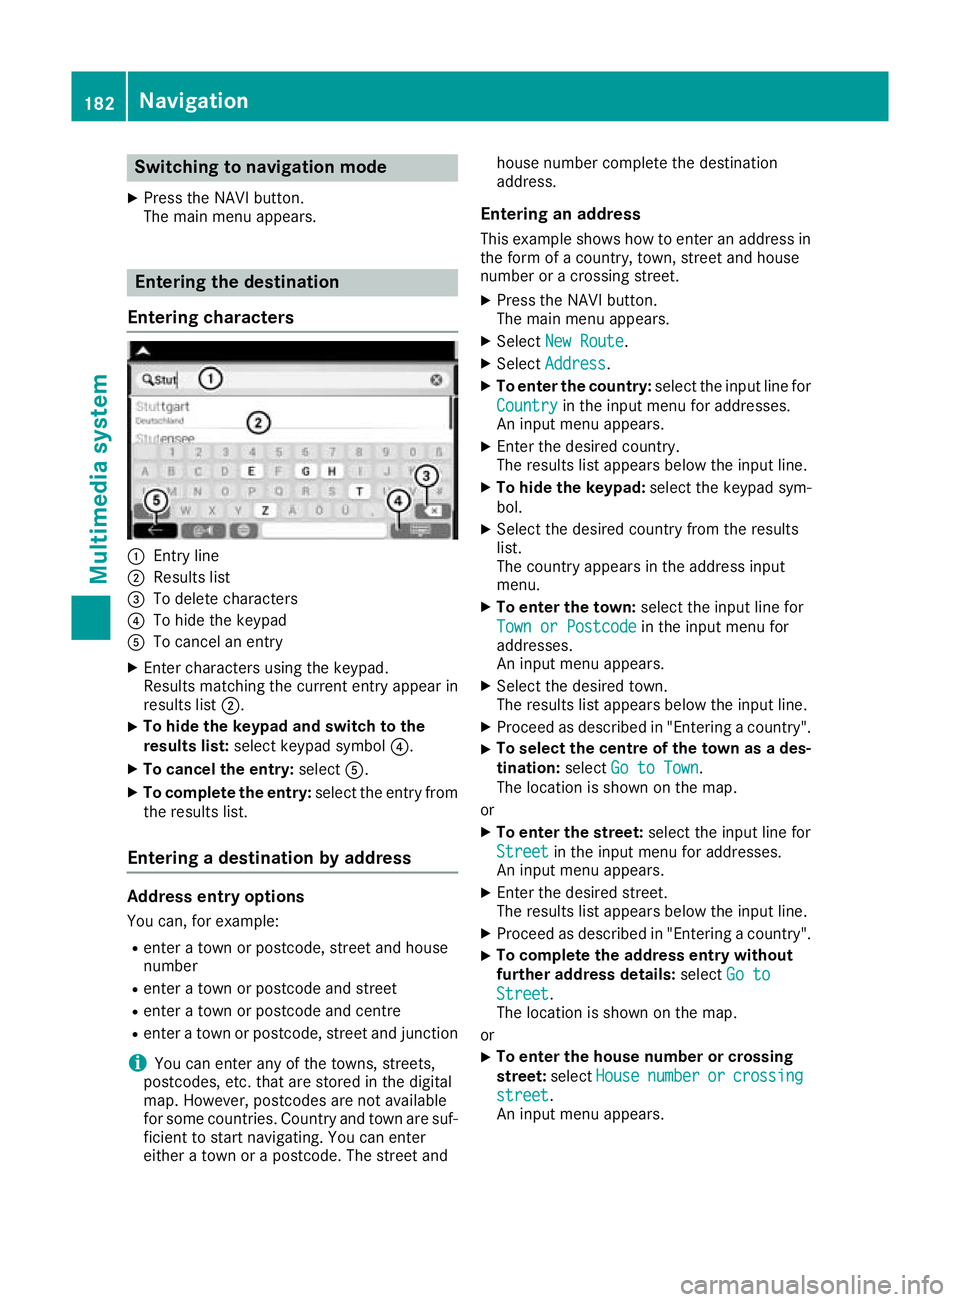
Entering characters :
Entry line
; Results list
= To delete characters
? To hide the keypad
A To cancel an entry
X Enter characters using the keypad.
Results matching the current entry appear in
results list ;.
X To hide the keypa
dand switc htothe
results list: select keypadsym bol ?.
X To cancel the entry: selectA.
X To complete the entry: select the entry from
the results list.
Entering adestinatio nbyaddress Address entry options
Yo uc an,for example:
R ente ratownorp ostcode, stree tand house
number
R ente ratownorp ostcode and street
R ente ratownorp ostcode and centre
R ente ratownorp ostcode, stree tand junction
i You can ente
rany of th etow ns,streets,
postcodes, etc. that are store dinthedigital
map. However, postcodes are no tavailable
for som ecountries .Countr yand town are suf-
ficien ttostart navigating .You can enter
either atow norap ostcode. The stree tand house number complete the destination
address.
Entering an addre ss
This example shows how to enter an address in the form of acountry, town, street and house
number or acrossing street.
X Press the NAVI button.
The main menu appears.
X Select New Route New Route.
X Select Address
Address.
X To enter the country: select the input line for
Country
Country in the input menu for addresses.
An input menu appears.
X Enter the desired country.
The results list appears below the input line.
X To hide the keypad: select the keypad sym-
bol.
X Select the desired countryf rom the results
list.
The countrya ppears in the address input
menu.
X To enter the town: select the input line for
Town or Postcode Town or Postcode in the input menu for
addresses.
An input menu appears.
X Select the desired town.
The results list appears below the input line.
X Proceed as described in "Entering acountry".
X To selectt
he centre of the town as ades-
tination: selectGo to Town Go to Town.
The location is shown on the map.
or
X To enter the street: select the input line for
Street
Street in the input menu for addresses.
An input menu appears.
X Enter the desired street.
The results list appears below the input line.
X Proceed as described in "Entering acountry".
X To complete the address entry without
further address details:
selectGo to
Go to
Street Street.
The location is shown on the map.
or X To enter the house number or crossing
street:
selectHouse House number
number or
orcrossing
crossing
street
street.
An input menu appears. 182
NavigationMultimedia system
Page 186 of 261
X
Enter the desired house numbe rorcrossing
street.
The results list appear sbelow the input line.
X To complete the address entry: select the
address in the results list.
The location is shown on the map.
X Select Select as Destination Select as Destination.
The route is being calculated.
X To start rout eguidance: selectStart
Start Nav‐
Nav‐
igation
igation.
Selecting adestinatio nfromp oints of
interest (POI) X
Pres sthe NAVI button.
The main menu appears.
X Select New Route
New Route.
X Select Places
Places.
Al ist with preset categories appears.
X Select the desired category.
Al ist of points of interest appears.
or X Select Search by Name or Category Search by Name or Category.
X Select Around Here
Around Here.
X Select the area in which the point of interest is
to be found.
If ad estination is selected, Along AlongRoute
Routeand
Around Destination
Around Destination can be selected.
X IfIn aTown
In aTown has been selected: enter the
town.
X Select the desired main category.
X Select the desired subcategory.
Al ist of points of interest appears.
X Select the desired POI.
The location is shown on the map.
X Select Select as Destination Select as Destination.
The route is being calculated.
X To start route guidance: selectStart
Start Nav‐
Nav‐
igation
igation.
Selecting adestination from the desti-
nation memory At least one location must be saved in "Saved
Loc ation".
X Press the NAVI button.
The main menu appears.
X Select New Route
New Route.
X Select Saved Location
Saved Location.
The list of saved locations appears. or
X Select ★.
The lis tofsaved locations appears.
X Select the desired location.
The location is shown on the map.
X Select Select as Destination Select as Destination.
The route is being calculated.
X To startr oute guidance: selectStart Start Nav‐
Nav‐
igation
igation.
Selecting adestination from the list of
last destinations X
Press the NAVI button.
The main menu appears.
X Select New Route
New Route.
X Select Last Destinations Last Destinations.
The list of your last destinations appears.
X Select the desired destination.
The location is shown on the map.
X Select Select as Destination Select as Destination.
The route is being calculated.
X To startr outeguidance: selectStart
Start Nav‐
Nav‐
igation
igation.
Selecting adestination from the saved
routes Requirement
:atleast on erout em ustbes aved
in "Saved Routes".
X Press th eNAVIbutton.
The main men uappears.
X Select New Route
New Route.
X Select Saved Routes
Saved Routes .
The list of saved routes appears.
X Selec tthe desired route.
The rout elist appears.
X To star troute calculation:select Calcu‐
Calcu‐
lat eR oute
lat eR oute.
X To star troute guidance: selectStart
Start Nav‐
Nav‐
igation
igation.
Entering adestination using coordi-
nates X
Pres sthe NAVI button.
The main menu appears.
X Select New Route
New Route.
X Select Coordinates
Coordinates.
X Enter the desired latitude. Navigati
on
183Multimedi asystem Z
Page 190 of 261
X
Select OK OK.
X Enter the desire dstarting point.
The location is shown on the map.
X Select Select as Destination
Select as Destination.
The route list appears.
X If desired, enter the destination as well as
intermediate destinations.
X Select Calculat eRoute
Calculat eRoute.
The route appears on the map.
X To start route guidance: selectStart Start Nav‐
Nav‐
igation
igation.
X To resume standard route guidance: select
the starting point.
X Select Delete
Delete.
Am essage appears.
X Select OK
OK.
The current vehicl eposition is restored as the
starting point for route guidance.
Startin groute simulation Ar
oute can be simulated using thi sfun ction.
X Create the route.
X To start route calculation: selectCalcu‐
Calcu‐
lat eRoute
lat eRoute.
The route overview appears.
X Select 4.
X Select Simulation
Simulation.
The simulatio nbegin s.
X To ski
pbacktot he previous chang eof
direction: selectC.
X To ski
pforward to the next chang eof
direction: selectD.
X To interrupt the simulation: selectË.
X To increase the simulatio nspeed: select
1x.
The simulatio nspeed is increased 4-fold, 8-
fol dor1 6-fold.
X To en dthe simulation: selectX. Saving the destination
X Enter the desire ddestination.
The location is shown on the map.
X Select 4.
X Select Save Location Save Location.
X Select Y.
The destination is saved in Saved
Saved Location
Location. During route guidance
Navigation announceme nts Navigatio
nmessagess houldguideyou during
the journey withoutd istracting you from traffic
conditions or driving. Alwaysu se this function
as ag uidei nstead of the map display. The sym-
bols or the map display could distract you from traffic conditions and driving.
Repeating navigation announcements X
Press the MAP button.
The map view appears.
X Press the MAP button again.
The multimedia system repeat sthe previous
navigation message.
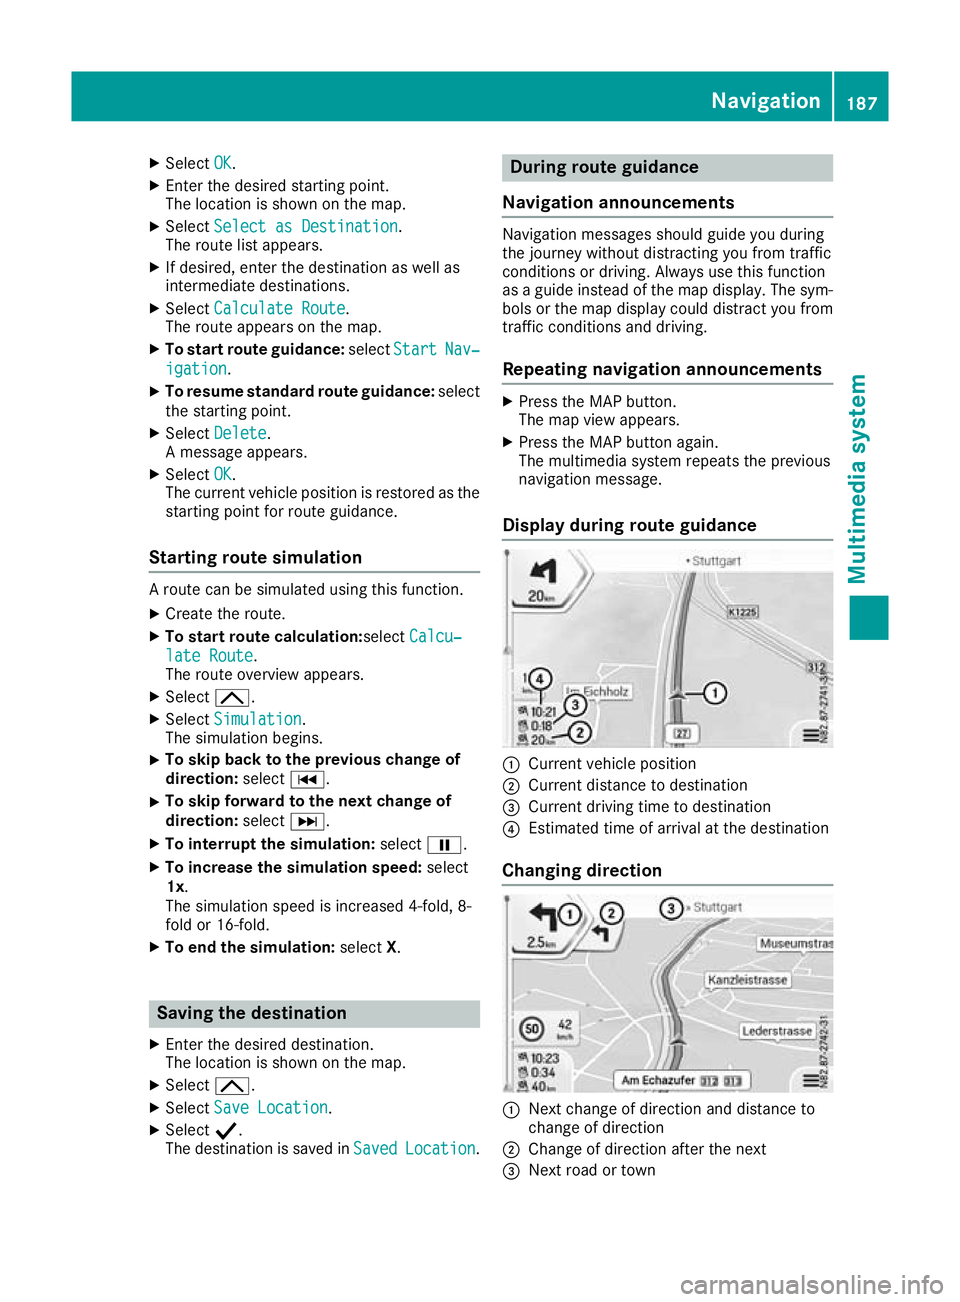
Display during routeg uidance :
Current vehicle position
; Current distanc etodestination
= Curren tdriving tim etodestination
? Estimate dtimeofa rrival at th edestination
Changing direction :
Nex tchange of direction and distance to
change of direction
; Change of direction after the next
= Next road or town Nav
igation
187Multimedi asystem Z
Page 194 of 261
Setting warnings for speed limits
The following functions are available:
R Warn When Speeding Warn When Speeding:
- Audio and Visual Audio and Visual:ift he vehicle speed
exceeds the maximum permissible speed,
the multimedia system issues an audible
and avisual warning
- Display Display:ift he vehicle speed exceeds the
maximum permissible speed, the multime- dia system issues avisual warning
- Disabled
Disabled:t he multimedia system does not
issue awarning
R Speed Limit Always Visible
Speed Limit Always Visible :ifthis func-
tion is activated, the maximum permissible
speed appears in the multimedia system
R Outside Towns: %d%% of the Speed Outside Towns: %d%% of the Speed
Limit Limit:ift he vehicle speed increases up to
the set percentage of the permissiblem axi-
mum speed, the multimedia system issues a
warning
R Within Towns: %d%% of the Speed Within Towns: %d%% of the Speed
Limit Limit:ift he vehicle speed increases up to
the set percentage of the permissiblem axi-
mum speed, the multimedia system issues a
warning
X Press the NAVI button.
The main menu appears.
X Select Settings Settings.
X Select Warnings
Warnings.
X Select Speed Limit
Speed Limit.
X To set the warning type: selectWarn
WarnWhen
When
Speeding
Speeding.
Am enu appears.
X Select the desired function.
The Ytick indicates the activated function.
X To switch the speed limit display on or off:
select Speed Limit Always Visible Speed Limit Always Visible.
The function is activated or deactivated.
X To define how far the speed limit may be
exceeded: selectOutside Towns: %d%%
Outside Towns: %d%%
of
of the
the Speed
Speed Limit
LimitorWithin
Within Towns:
Towns:%d
%d
%% of the Speed Limit
%% of the Speed Limit.
Am enu appears.
X Set the desired percentage.
Setting warnings for alert points
If this function is activated and the vehicle is
approaching an alert point, the multimedia sys-
tem issues awarning. An alert point is an area
requiring the driver to be especially attentive,
e.g. arailway crossing or aschool. i
This function is not permitted in all countries
and regions. Observe the legal requirements
for the country you are in.
The following functions are available:
R Warning Type
Warning Type:
- Audio and Visual Audio and Visual:ift he vehicle is
approaching an alert point, the multimedia
system issues an audibl eand avisual warn-
ing
- Visual
Visual:ift he vehicle is approaching an
alert point, the multimedia system issues a
visual warning
R Audio Warning
Audio Warning:
- Only When Speeding
Only When Speeding:i fthe vehicle is
approaching an alert point and exceeds the maximum permissible speed in the proc-
ess, the multimedia system issues an audi-ble warning
- When Approaching When Approaching :ifthe vehicle is
approaching an alert point, the multimedia
system issues an audibl ewarning. If the
vehicle exceeds the maximum permissible
speed, the multimedia system issues adif-
ferent audibl ewarning
X Press the NAVI button.
The main menu appears.
X Select Settings
Settings.
X Select Warnings Warnings.
X Select Alert Points
Alert Points.
X Select Alert Point Warnings Alert Point Warnings.
The function is activated or deactivated.
If the function is activated, amessage
appears.
X To activat ethe function: selectActivate Activate.
X If you do not wish to activat
ethe function:
select Cancel
Cancel.
X To set awarning: selectAlert Types
Alert Types.
Am enu appears.
X Select the desired alert point.
X Select Warning Type
Warning Type orAudio Warning
Audio Warning.
X Select the desired function.
The Ytick indicates the activated function.
i The digital map may include
apermissible or
expected maximum speed for some alert
points. In this case, the audibl ewarning may
differ when you exceed or drop below the
maximum permissible speed. Navigati
on
191Multimedi asystem Z
Page 195 of 261
Setting warnings on the map
When the function is activated, warnings appear on the map.
X Press the NAVI button.
The main menu appears.
X Select Settings
Settings.
X Select Warnings
Warnings.
X Select Road Signs
Road Signs.
The function is activated or deactivated.
X Select the desired alert point.
X To set awarning: selectWarning Type Warning Type.
Am enu appears.
X Select the desired function.
The Ytick indicates the activated function.
X To set the distance: selectDistance
Distance.
Am enu appears.
X Set the desired distance from the alert point.
Defining the settings the navigation
view Setting the map display
Setting zoom and degree of inclination X Press the NAVI button.
The main menu appears.
X Select Settings
Settings.
X Select Navigation View
Navigation View.
X Select Map Appearance
Map Appearance.
X Select Viewpoint
Viewpoint.
Am enu appears.
X Select the desired setting.
The Ytick indicates the active function.
Setting the display colours
The multimedia system includes an optimised
display design for day and night mode.
X Press the NAVI button.
The main menu appears.
X Select Settings
Settings.
X Select Navigation View
Navigation View.
X Select Map Appearance
Map Appearance.
X Select Colour mode Colour mode.
X Select the desired setting.
The Ytick indicates the activated function.
With the Auto Autosetting, the display design is
automatically adapted to the brightness of
the ambient light. Setting the map colours
X Press the NAVI button.
The main menu appears.
X Select Settings Settings.
X Select Navigation View
Navigation View.
X Select Map Appearance
Map Appearance.
X Select Day Map Colours
Day Map Colours orNight Map
Night Map
Colours
Colours.
X Select the desired map colour using the
arrows.
Activating or deactivating 3D display of
objects on the map
The following types of 3D objects are available:
R Landmarks Landmarks:3Dd isplayofprominent or
known objects
R Buildings
Buildings:3Dd isplayofthe buildings in a
town
R 3D Terrain
3D Terrain:3Dd isplayofthe surrounding
area
X Press the NAVI button.
The main menu appears.
X Select Settings Settings.
X Select Navigation View Navigation View.
X Select Map Appearance Map Appearance.
X Select Landmarks
Landmarks, Buildings
Buildingsor3D Ter‐
3D Ter‐
rain
rain.
The function is activated or deactivated.
Activating or deactivating route recording
If this function is activated, the towns through
which the vehicle is driven are recorded.
X Press the NAVI button.
The main menu appears.
X Select Settings Settings.
X Select Navigation View
Navigation View.
X Select Map Appearance
Map Appearance.
X Select Track logs
Track logs.
The function is activated or deactivated.
Activating or deactivating the display of
POI symbols on the map
X Press the NAVI button.
The main menu appears.
X Select Settings Settings.
X Select Navigation View Navigation View.
X Select Map Appearance
Map Appearance. 192
NavigationMultimedia system
Page 201 of 261
Loading guidelines
G
WARNING
If objects, luggage or loads are not secured or not secured sufficiently, the ycoulds lip,tip
over or be flung around and thereby hit vehicle
occupants. There is arisk of injury ,especially
when braking or abruptly changing directions.
Always store objects so that they cannot be
flung around. Secure objects, luggage or
loads against slipping or tipping before the
journey. G
WARNING
If you loadt he vehicleunevenly, driving char-
acteristics such as steering and braking
behaviou rmay be severely impaired .There is
ar isk of an accident.
Load the vehicl eevenly .Secure the loadso
that it cannot slip. G
WARNING
The exhaust tail pipea nd tail pipetrim can
become very hot. If you come into contact
with these parts of the vehicle, you coul dburn
yourself. There is arisk of injury.
Always be particularl ycarefu laround the
exhaust tail pipea nd the tail pipetrim. Allow
these components to cool downb efore touch-
ing them. G
WARNING
Combustio nengines emit poisonous exhaust
gase ssuch as carbon monoxide .Ifthe rear
door is open when the engine is running, par- ticularly if the vehicl eismoving, exhaust
fumes coul denter the passenger compart-
ment. There is arisk of poisoning.
Turn off the engine before opening the rear
door. Never drive with the rear door open. Driving, braking and steering characteris
tics
change depending on:
R typ eofl oad
R weight
R the centre of gravity of the load
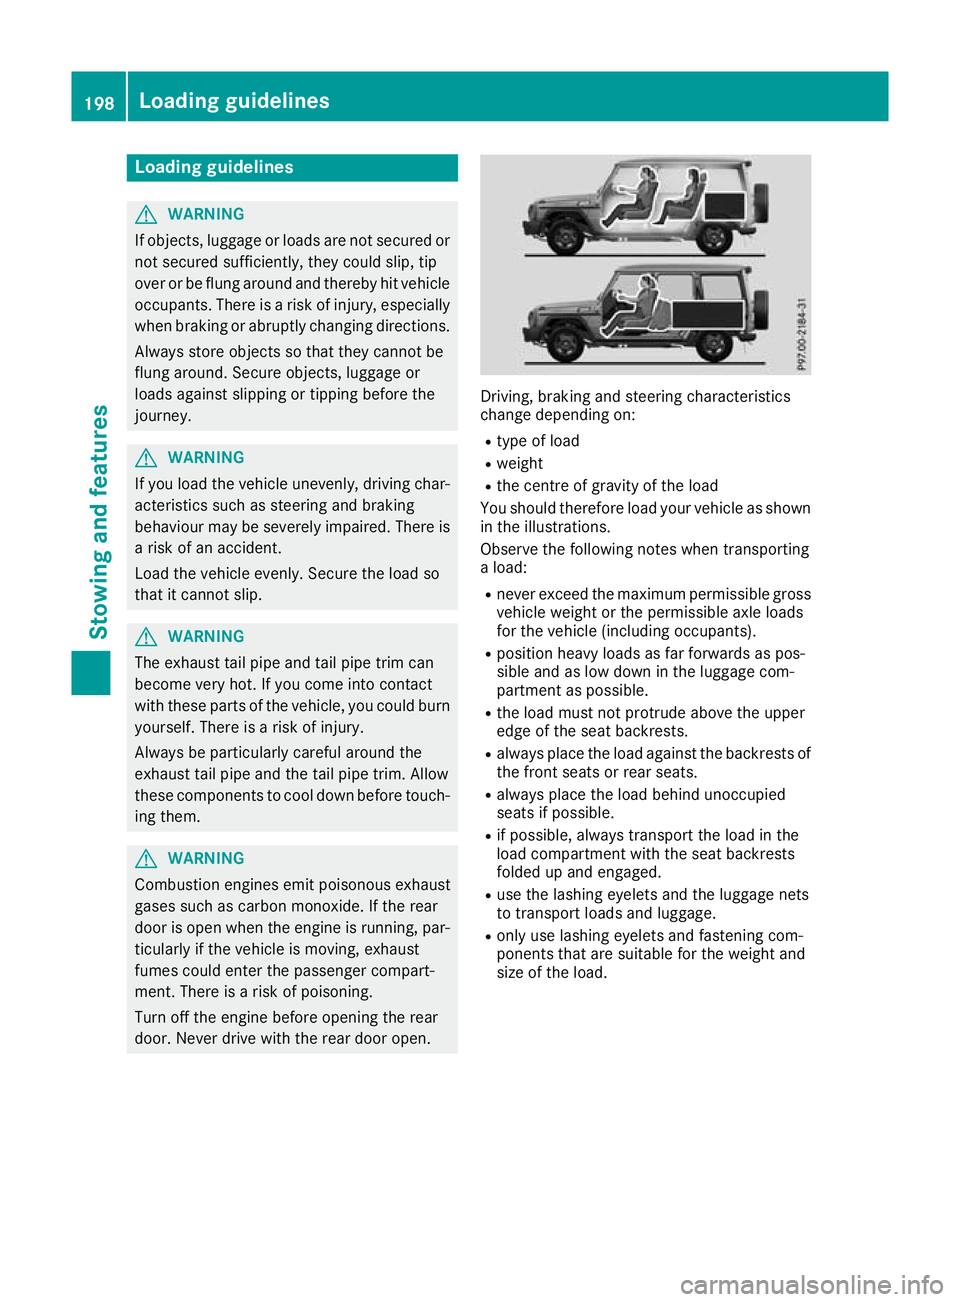
Yo us houl dtherefore load your vehicl easshown
in the illustrations.
Observe the following note swhent ransporting
al oad:
R neve rexceed the maximum permissibl egross
vehicl eweigh tort he permissibl eaxlel oads
for the vehicl e(including occupants).
R positio nheavy loadsasf arforwards as pos-
sibl eand as lo wdownint he luggage com-
partment as possible.
R the load must not protrude above the upper
edge of the sea tbackrests.
R always place the load against the backrests of
the front seats or rea rseats.
R always place the load behind unoccupied
seats if possible.
R if possible, always transport the load in the
load compartment with the sea tbackrests
folde dupa nd engaged.
R uset he lashing eyelets and the luggage nets
to transport load sand luggage.
R onl yuselashing eyelets and fastening com-
ponents tha tare suitabl efor the weight and
size of the load. 198
Loadin
gguidelinesStowing and features
Page 202 of 261
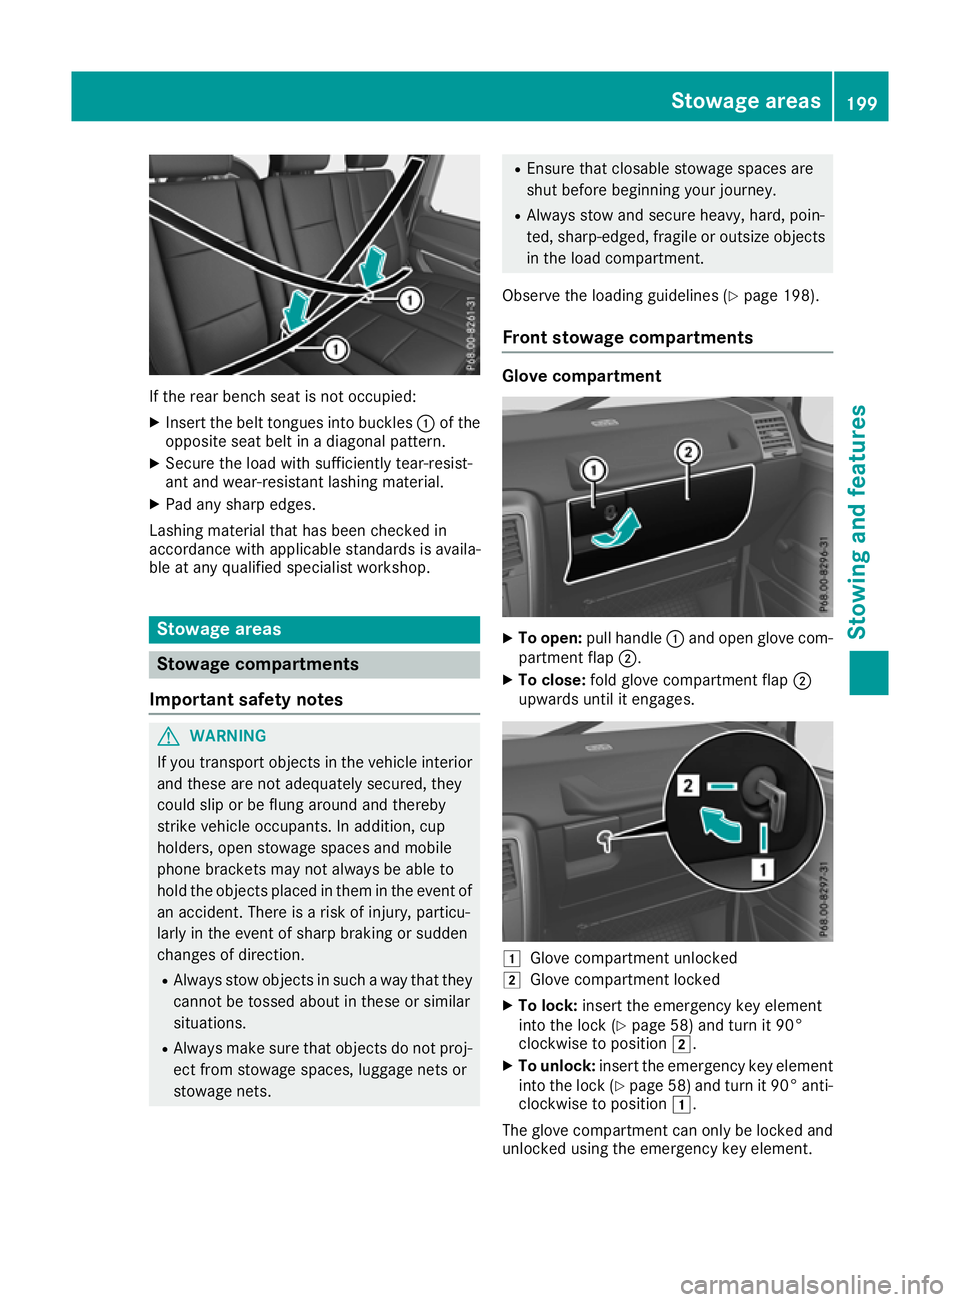
If the rear bench seat is not occupied:
X Insert the belt tongues into buckles :of the
opposite seat belt in adiagonal pattern.
X Secure the load with sufficiently tear-resist-
ant and wear-resistant lashing material.
X Pad any sharp edges.
Lashing materia lthat has been checked in
accordance with applicables tandards is availa-
ble at any qualifieds pecialist workshop. Stowage areas
Stowage compartments
Important safety notes G
WARNING
If you transport objects in the vehicle interior and these are not adequately secured, they
could slip or be flung around and thereby
strike vehicle occupants. In addition, cup
holders, open stowage spaces and mobile
phone brackets may not always be ableto
hold the objects placed in them in the event of an accident. There is arisk of injury ,particu-
larl yint he event of sharp braking or sudden
changes of direction.
R Always stow objects in such away that they
cannot be tossed about in these or similar
situations.
R Always make sure that objects do not proj-
ect from stowage spaces, luggage nets or
stowage nets. R
Ensure that closable stowag espacesa re
shu tbefor eb egin ning your journey.
R Alway sstow and secur eheavy, hard, poin-
ted ,sharp-edged ,fragile or outsize objects
in the load compartment.
Observe the loading guideline s(Ypage 198).
Front stowage compartments Glov
ecompartment X
To open: pull handle :and open glove com-
partment flap ;.
X To close: fold glove compartment flap ;
upwards until it engages. 1
Glove compar tmentu nlocked
2 Glove compartmen tlocked
X To lock: insert theemergency ke yelement
int ot he lock(Ypage 58) and tur nit90°
clockwise to position 2.
X To unlock: insert theemergency ke yelement
int othe lock(Ypage 58 )and tur nit90°anti-
clockwise to position 1.
The glov ecompartmen tcan only be locke dand
unlocked usin gthe emergency ke yelement. Stowage areas
199Stowing and feat ures Z