2016 MERCEDES-BENZ G-CLASS SUV service
[x] Cancel search: servicePage 139 of 261
Audio files from various audi
oplayer sorm edia
can be played ,depen ding on the equipment fit-
ted in the vehicle.
X Switch on the multimedia system and select
media mode.
X Press the =or; button on the steering
whee ltoselect the Audio
Audio menu.
X Press the =or; button to select next
or previous track :.
If trac kinformatio niss aved on the audio
player or media ,the multifunctio ndisplay will
sho wthe titl eofthe track. Telephon
emenu
Introduction G
WARNING
Oper ating the integrated information systems
and communications equipment in the vehicle
while driving willd istract you from traffic con-
ditions. You coul dthen lose control of the
vehicle. There is arisk of an accident.
Only operate these devices if road traffic con-
ditions permit. If you are unsure about the
surrounding conditions, pullo ver toasafe
location and make entries only while the vehi-
cle is stationary.
When using the phone, you must observe the
lega lrequirements for the country in which you
are currently driving.
X Switch on the mobil ephone (see the manu-
facturer' soperating instructions).
X Switch on the multimedi asystem
(Y page1 70).
X Establish aBluetooth ®
connection to the mul-
timedi asystem (Y page175).
The multifunction display show sthe name of
the telephone and the mobil ephone network
provider.
X Press the =or; button on the steering
whee ltoselect the Tel Telmenu.
You can obtai nfurther information about suita-
ble mobil ephones and connecting mobile
phones via Bluetooth ®
:
R on the internet at http://www.mercedes-
benz.com/connect
R at any Mercedes-Benz Service Centre Accepting
acall If someon
ecalls you when you are in the Tel
Tel
menu, adisplay messag eappears in the multi-
function display.
You can accept acall at any time irrespective of
the selected menu.
X Press the 6button on the steering wheel
to accept an incoming call.
Rejecting or ending acall X
Press the ~button on the steering wheel.
You can end or reject acall even if you are not in
the Tel Tel menu.
Dialling anumber from the phone book X
Press the =or; button on the steering
wheel to select the Tel
Tel menu.
X Press the 9,:ora button to
switch to the phone book.
X Authorise access to the phone book on the
phone.
X Press the 9or: button to select the
desired name.
X If only one telephone number is stored for
an ame: press the 6ora button to
start dialling.
or X If more thano
ne number is stored for a
name:press the 6ora button to dis-
play the numbers.
X Press the 9or: button to select the
number you want to dial.
X Press the 6ora button to start dial-
ling.
or X To exit the telephone book: press the%
button.
Redialling The on-board computer saves the last names or
numbers dialled in the redial memory.
X Press the =or; button on the steering
wheel to select the Tel Telmenu.
X Press the 6button to switch to the redial
memory.
X Press the 9or: button to select the
desired name or number. 136
Menus and submenusOn-board computer and displays
Page 140 of 261
X
Press the 6ora button to start dial-
ling.
or X To exit the redial memory: press the%
button. Assistance menu
Introduction In the
Assist.
Assist. menu, you have the following
options:
R Showin gthe assistance graphic
(Y page 137)
Showing the assistanc egraphic X
Press the =or; button on the steering
wheel to select the Assist.
Assist. menu.
X Press 9or: to select Assistance
Assistance
graphic
graphic.
X Press a.
The displa yisinoperative. Service menu
In the Serv.
Serv. menu, you have the following
options:
R Calling up display messages (Y page 141)
R Checking the tyre pressure electronically
(Y page 240)
R Calling up the service due date
(Y page 216)
R Checking the engine oil level (Y page 213)Settings menu
Introduction In the
Settings
Settings menu, you have the following
options:
R Changing the instrument cluster settings
(Y page 137)
R Changing the time/date settings
(Y page 138)
R Changing the light settings (Y page 138)
R Changing the vehicle settings (Y page 139)
R Changing the auxiliary heating settings
(Y page 139) R
Changing the convenience settings
(Y pag e140)
R Restorin gthe factory settings (Y page 141)
Instrumen tcluster Selecting the uni
tofmeasurement for dis-
tance
The Display unit Speed-/odometer: Display unit Speed-/odometer: func-
tion allowsy ou to choose whether certain dis-
playsa ppear in kilometres or miles in the mul-
tifunction display.
You can determine whether the multifunction
display shows certain messages in miles or kil-
ometres.
X Press the =or; button on the steering
wheel to select the Settings Settingsmenu.
X Press the :or9 button to select the
Instrument cluster
Instrument cluster submenu.
X Press ato confirm.
X Press the :or9 button to select the
Display unit Speed-/odometer
Display unit Speed-/odometer function.
You will see the selected setting: km
kmorMiles
Miles.
X Press ato save the setting.
The selected unit of measurement for distance
applies to the following:
R digital speedometer in the Trip Tripmenu
R the total distance recorder and the trip meter
R trip computer
R current consumption and the range
R the navigation instruction sintheNavi
Navi menu
R ASSYST service interval display
Selecting permanent display You can determine whether the multifunction
displayp ermanently shows your speed or the
outside temperature.
X Press the =or; button on the steering
wheel to select the Settings
Settingsmenu.
X Press the :or9 button to select the
Instrument cluster
Instrument cluster submenu.
X Press ato confirm.
X Press the :or9 button to select the
Permanent display:
Permanent display: function.
You will see the selected setting: outside
outside
temperature
temperature orDig. speedo [mph]
Dig. speedo [mph].
X Press ato save the setting.
i The speed is displayed in mph. Menus and submenus
137On-boardcomputer and displays Z
Page 182 of 261
Call disconnected while th
evehicle is
in motion
The followin gcoul dbet hecaus eofc all discon-
nection:
R theG SM7
network coverag eisinsufficient
R thev ehicle has moved int oaGSM cel lwithno
free channels
R theS IMcar dused is no tcompatible wit hthe
network available
R you are usin gamobile phon ewith" Twincard"
and th emobile phon ewitht he secon dSIM
car disa lreadylogged on to th enetwork 999 or 112 emergency call
Makin gemergency calls without entering aPIN
is only possible using the mobile phone.
The 999 or112 emergency call number is a
public service. Anym isuse is punishable by law. Telephone op
eration
Requirements Th
ef ollowing conditions must be fulfilled in
order to make calls using the multimedia sys-
tem:
R the Bluetooth ®
function of the multimedia
system is activated
R the Bluetooth ®
function of the mobile phone
is activated
R the mobile phone is paired and connected to
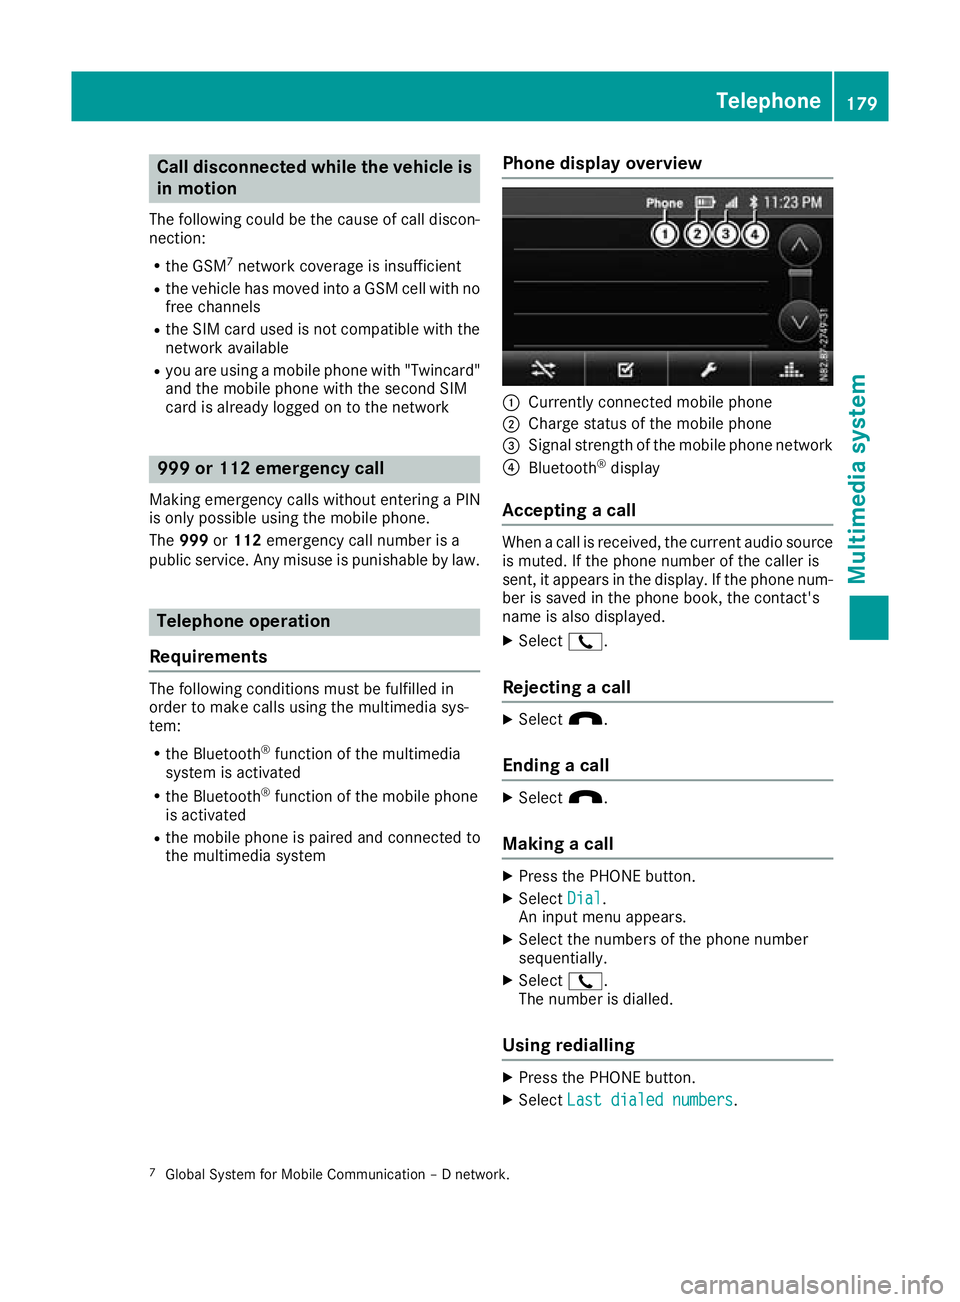
the multimedia system Phone display overview :
Currently connected mobile phone
; Charge status of the mobile phone
= Signal strength of the mobile phone network
? Bluetooth ®
display
Accepting acall When
acall is received, the curren taudio source
is muted. If the phone number of the caller is
sent ,itappears in the display. If the phone num-
ber is saved in the phone book, the contact's
name is also displayed.
X Select 2.
Rejecting acall X
Select x.
Ending acall X
Select x.
Making acall X
Press the PHONE button.
X Select Dial Dial.
An input men uappears.
X Select the numbers of the phone number
sequentially.
X Select 2.
The number is dialled.
Using redialling X
Press the PHONE button.
X Select Last dialed numbers
Last dialed numbers.
7 GlobalS ystem for Mobile Communicatio n–Dnetwork. Telephone
179Multimedia system Z
Page 196 of 261
X
Select PlaceMarkers
Plac eMarkers.
X Select the desire dPOI.
Am enu appears.
X Select View on Map
View on Map.
The Ytick indicates the activate dfunction.
or X Select Select Subcategories
Select Subcategories.
The subcategorie sare displayed.
X Select the desire dsubcategory.
If the subcategory symbo lisblue,it is dis-
played on the map.
Setting data fields on the map You can set which detail sare displayed on the
map during active route guidance or with route
guidance inactive.
X Press the NAVI button.
The mai nmenu appears.
X Select Settings Settings .
X Select Navigation View Navigation View .
X Select Data Fields
Data Fields.
X Select First
First, Second
Second, Third
ThirdorWithout
Without
Route
Route.
X Select the desired setting.
The Ytick indicate sthe activated function.
Displaying the route progress bar The progress bar shows asimplifiedv iew of the
vehicle's current location on the route. The pro-
gress bar also shows intermediate destinations and traffic messages on the route.
X Press the NAVI button.
The main menu appears.
X Select Settings
Settings.
X Select Navigation View Navigation View.
X Select Route Progress Bar
Route Progress Bar.
The function is activated or deactivated.
Activating or deactivating Motorway
Services
If you are driving on amotorway with this func-
tion activated, you can call up information on
petrol stations or restaurants, for example.
X Press the NAVI button.
The main menu appears.
X Select Settings Settings.
X Select Navigation View
Navigation View.
X Select Offer Motorway Services
Offer Motorway Services.
The function is activated or deactivated. Displaying points of interest (POI) near
motorway exi
ts
You can set whic hPOI categorie snearm otor-
way exit sappear on th emap, e.g. fillin gstations.
X Press th eNAVIbutton.
The main men uappears.
X Select Settings Settings.
X Select Navigatio nView
Navigatio nView.
X Select Services Displayed
Services Displayed .
The currentl yset POI categorie sare dis-
played.
X Selec tthe POI category you wish to change.
The list of POI categorie sappears.
X Selec tthe desire dPOI category.
Am enua ppears.
X Select Select
Select .
The POI category is displayed near motorway
exit sont hemap.
or X Select Select Subcategories
Select Subcategories.
The list of subcategories appears.
X Selec tfurther subcategories as desired.
Activating or deactivating th eautomatic
overview
R During active rout eguidance: when the
vehicl eisapproachin gajunction ,the map
and viewin gangles are enlarged. This way, the
next chang eofdirection is easier to identify. If
th en extjunction is still at som edistance, the
map and viewin gangle are minimised.
R Wit hroute guidance inactive: them ap is
enlarged or minimised dependin gonvehicle
speed.
X Press th eNAVIbutton.
The main men uappears.
X Select Settings
Settings.
X Select Navigatio nView
Navigatio nView.
X Select Automatic Overview
Automatic Overview.
The function is activated or deactivated.
Activating or deactivating th edispla yof
traffic signs
If this function is activated, lan erecommenda-
tion sare displayed usin gtraffic signs .The traffic
signs indicate possibl edestination sand the
number of th eroadt hatleads to th erecom-
mended lane. Navigation
193Multimediasystem Z
Page 213 of 261
The socket is located in the luggage compart-
ment on the left-hand-side when viewed in the
direction of travel, next to the rear door.
X Lift up the cover of the socket. Assembly tool
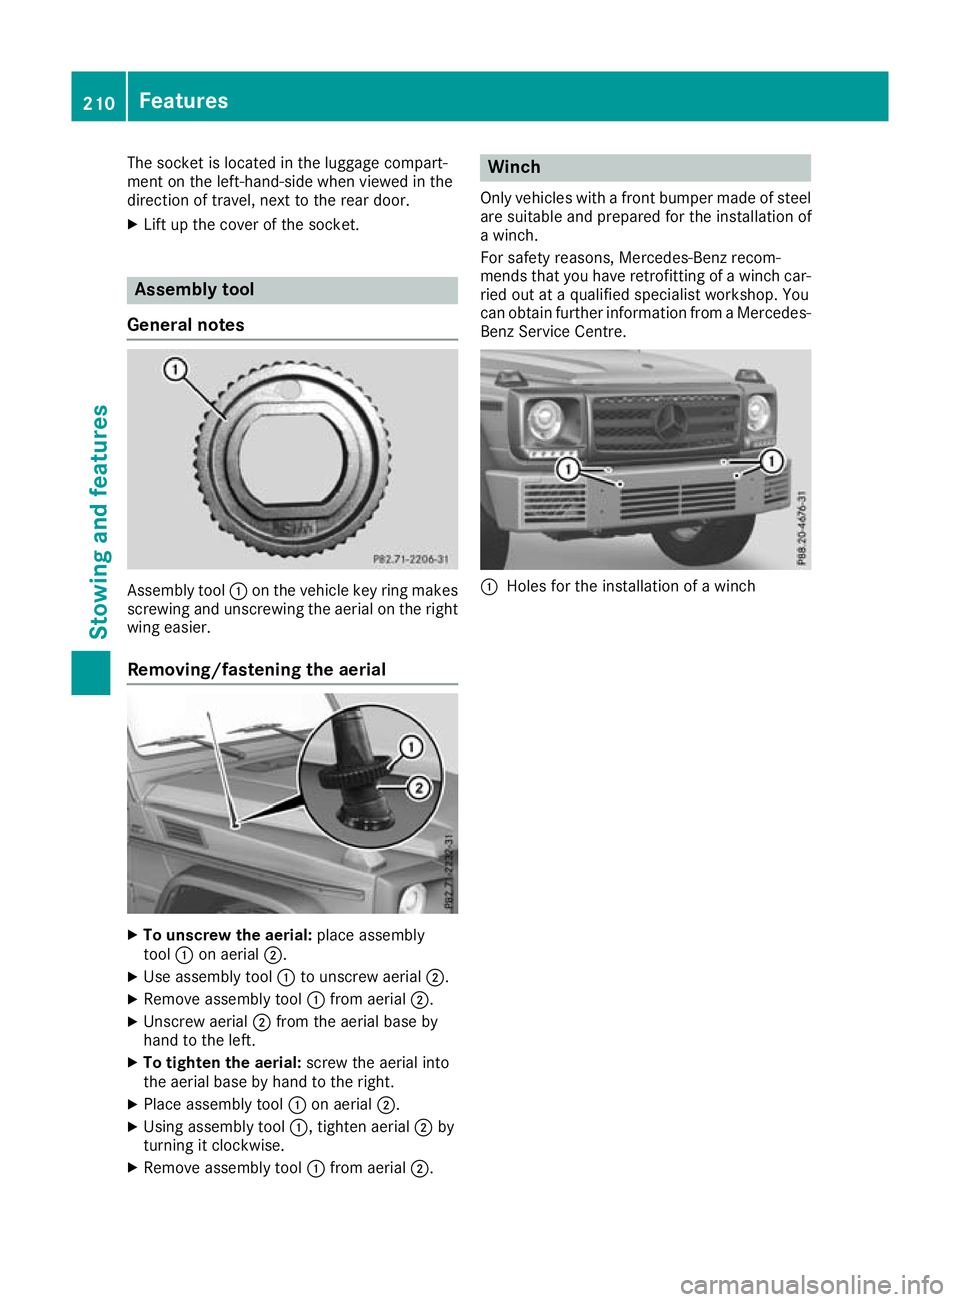
Genera lnotes Assembly tool
:on th evehicl ekey ring makes
screwing and unscrewing the aeria lonthe right
wing easier.
Removing/fastening the aerial X
To unscre wthe aerial: place assembly
tool :on aerial ;.
X Use assembl ytool :to unscrew aerial ;.
X Remove assembl ytool :from aerial ;.
X Unscrew aerial ;from the aeria lbaseby
hand to the left.
X To tighten the aerial: screwthe aeria linto
the aeria lbasebyh andtot he right.
X Place assembl ytool :on aerial ;.
X Using assembl ytool :,t ighten aerial ;by
turning it clockwise.
X Remove assembl ytool :from aerial ;. Winch
Only vehic lesw ithafront bumper made of steel
are suitabl eand prepared for the installation of
aw inch.
For safety reasons, Mercedes-Benz recom-
mends that you have retrofitting of awinch car-
ried out at aqualified specialist workshop. You
can obtai nfurther information from aMercedes-
Benz Service Centre. :
Holes for the installation of awinch 210
FeaturesStowing and features
Page 216 of 261
Note
sono illevel Depending on your drivin
gstyle ,the vehicle
consumes up to 0.8 litres of oi lper 1,000 km.
The oi lconsumption ma ybehighe rtha nt his
when the vehicl eisnew or if yo ufrequentl ydrive
at high engine speeds.
To check the oi llev el:
R park the vehicl eonalevel surface
R the engine shoul dbeswitched off for approx-
imatel yfivem inute sifthe engine is at normal
operating temperature
R if the engine is not at normal operating tem-
perature, e.g .ifthe engine wa sonlys tarted
briefly, wait approximately 30 minute sbefore
carrying out the measurement
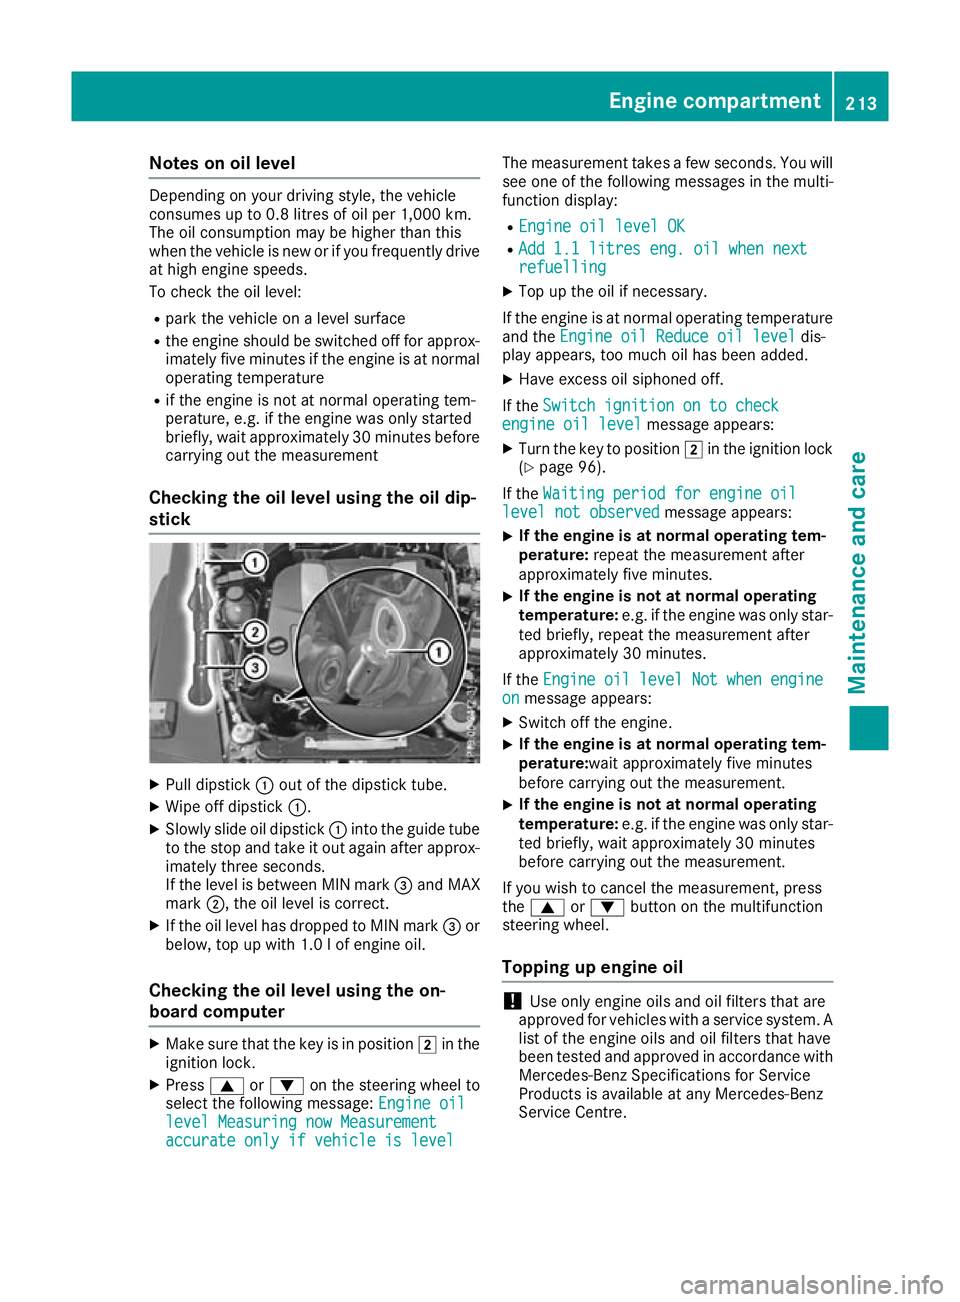
Checking the oil level using the oil dip-
stick X
Pull dipstick :out of the dipstick tube.
X Wipe off dipstick :.
X Slowly slide oil dipstick :into the guide tube
to the stop and take it out again after approx- imately three seconds.
If the level is between MIN mark =and MAX
mark ;,the oil level is correct.
X If the oil level has dropped to MIN mark =or
below, top up with 1.0 lofe ngine oil.
Checking the oil level using the on-
board computer X
Make sure that the key is in position 2in the
ignition lock.
X Press 9or: on the steering wheel to
select the following message: Engine oil Engine oil
level Measuring now Measurement level Measuring now Measurement
accurate only if vehicle is level accurate only if vehicle is level The measurement takes
afew seconds. You will
see one of the following messages in the multi-
function display:
R Engine oil level OK Engine oil level OK
R Add 1.1 litres eng. oil when next
Add 1.1 litres eng. oil when next
refuelling refuelling
X Top up the oil if necessary.
If the engine is at normal operating temperature and the Engine oil Reduce oil level
Engine oil Reduce oil level dis-
play appears, too much oil has been added.
X Have excess oil siphoned off.
If the Switch ignition on to check
Switch ignition on to check
engine oil level
engine oil level message appears:
X Turn the key to position 2in the ignition lock
(Y page 96).
If the Waiting period for engine oil
Waiting period for engine oil
level not observed
level not observed message appears:
X If the engine is at normal operating tem-
perature:
repeat the measurement after
approximately five minutes.
X If the engine is not at normal operating
temperature:
e.g. if the engine was only star-
ted briefly, repeat the measurement after
approximately 30 minutes.
If the Engine oil level Not when engine Engine oil level Not when engine
on
on message appears:
X Switch off the engine.
X If the engine is at normal operating tem-
perature:wait approximately five minutes
before carrying out the measurement.
X If the engine is not at normal operating
temperature:
e.g. if the engine was only star-
ted briefly, wait approximately 30 minutes
before carrying out the measurement.
If you wish to cancel the measurement ,press
the 9 or: button on the multifunction
steering wheel.
Topping up engineo il !
Use only engine oils and oil filters that are
approved for vehicles with aservice system. A
list of the engine oils and oil filters that have
been tested and approved in accordance with
Mercedes-Benz Specifications for Service
Products is available at any Mercedes-Benz
Service Centre. Engine compartment
213Maintenance and care Z
Page 217 of 261
The following cause engine failure or damage
to the exhaust system:
R Use of engine oils and oil filters that have
not been expressly approved for the service
system
R Replacement of engine oil and oil filter after
the replacement interval specified by the
service system has expired
R Use of engine oil additives
! Do not add too much oil. If the oil level is
above the "max" mark on the dipstick ,too
much oil has been added. This can lead to
damage to the engine or the catalytic con-
verter .Have excess oil siphoned off. H
Environmental note
When topping up the oil, take care not to spill
any. If oil enters the soil or waterways, it is
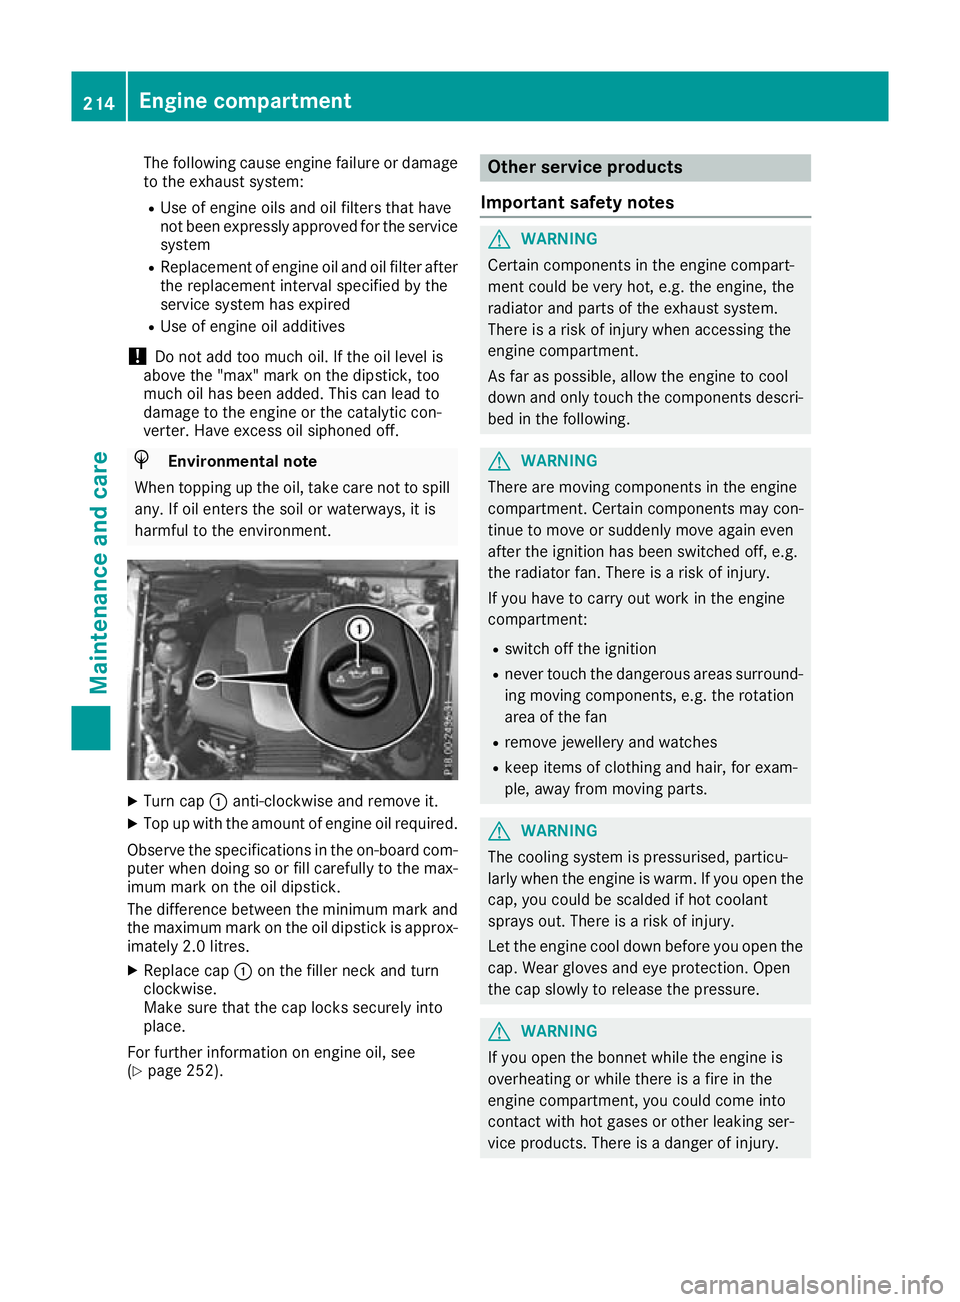
harmful to the environment. X
Turn cap :anti-clockwise and remove it.
X Top up with the amount of engine oil required.
Observe the specification sinthe on-board com-
puter when doing so or fill carefully to the max- imum mark on the oil dipstick.
The differenc ebetween the minimum mark and
the maximum mark on the oil dipstick is approx- imately 2.0 litres.
X Replace cap :on the filler neck and turn
clockwise.
Make sure that the cap locks securely into
place.
For further information on engine oil, see
(Y page 252). Other service products
Important safety notes G
WARNING
Certain components in the engin ecompart-
ment coul dbevery hot, e.g. the engine, the
radiator and parts of the exhaust system.
There is arisk of injury when accessing the
engine compartment.
As far as possible,a llow the engine to cool
downa nd only touch the components descri-
bed in the following. G
WARNING
There are moving components in the engine
compartment. Certain components may con-
tinue to move or suddenly move again even
after the ignitio nhas been switched off, e.g.
the radiator fan. There is arisk of injury.
If you have to carry out work in the engine
compartment:
R switch off the ignition
R never touch the dangerous area ssurround-
ing moving components, e.g. the rotation
area of the fan
R remove jewellery and watches
R keep items of clothing and hair, for exam-
ple,a wayfrom moving parts. G
WARNING
The cooling system is pressurised ,particu-
larl yw hen the engine is warm .Ifyou open the
cap, you coul dbescalded if hot coolant
sprays out. There is arisk of injury.
Let the engine cool downb efore you open the
cap. Wearg lovesand eye protection. Open
the cap slowly to release the pressure. G
WARNING
If you open the bonnet while the engine is
overheating or while there is afire in the
engine compartment, you coul dcome into
contact with hot gase sorother leaking ser-
vice products. There is adange rofinjury. 214
Engine compartmentMaintenanc
eand care
Page 218 of 261
Allow an overheating engine to coo
ldown
before opening the bonnet. If ther eisafirein
the engine compartment, leav ethe bonnet
closed and notify the fir ebrigade.
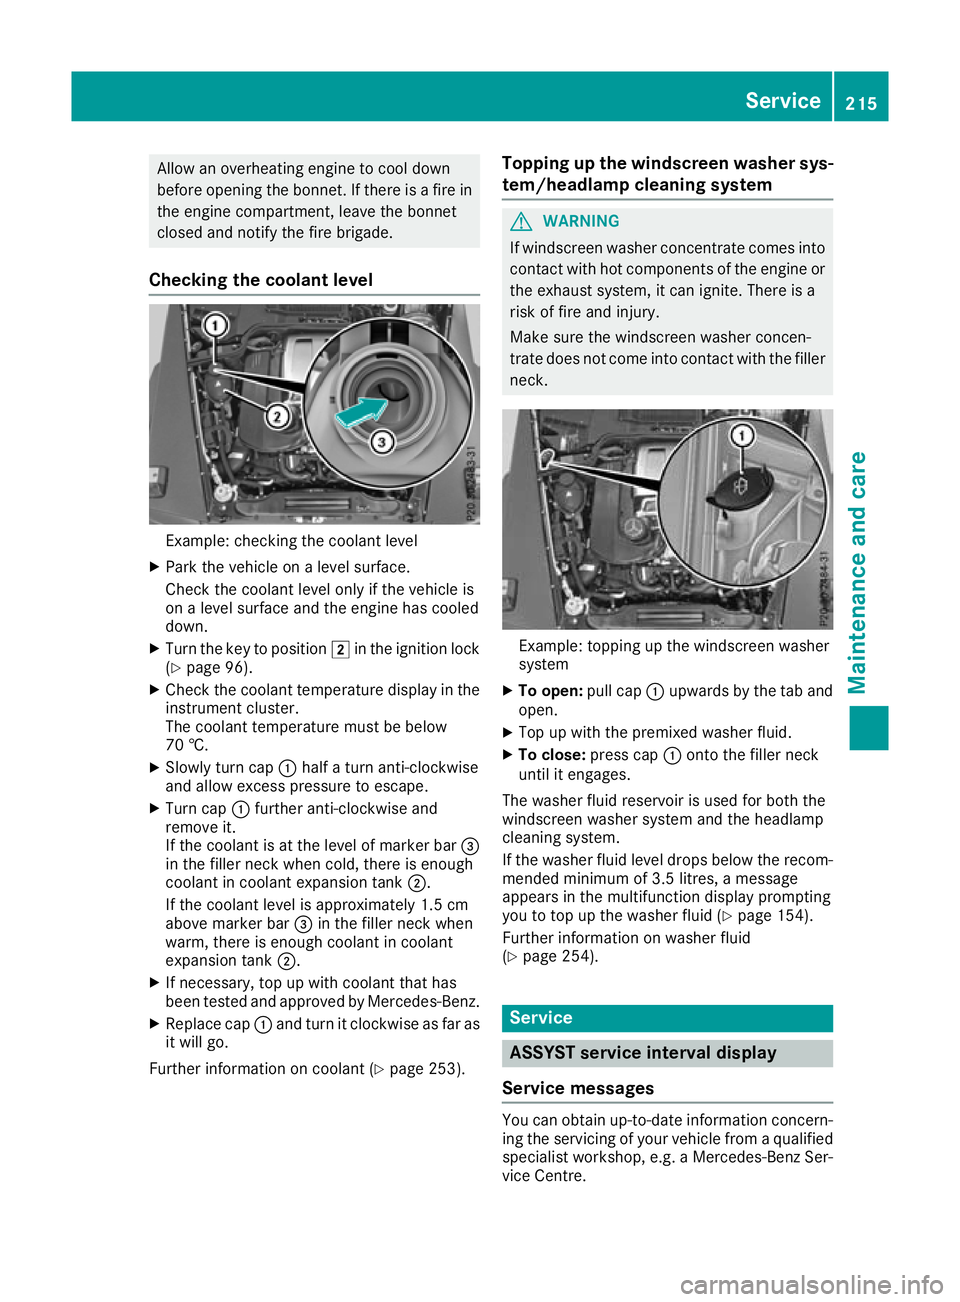
Checkin gthe coolant level Example: checking the coolant level
X Park the vehicl eonalevel surface.
Check the coolant level onl yifthe vehicl eis
on alevel surface and the engine ha scooled
down.
X Turn the key to position 2in the ignition lock
(Y page 96).
X Check the coolant temperatur edisplay in the
instrument cluster.
The coolant temperatur emustbeb elow
70 †.
X Slowl yturnc ap : half aturna nti-clockwise
and allo wexcess pressure to escape.
X Turn cap :furthe ranti-clockwise and
remove it.
If the coolant is at the level of marker bar =
in the fille rneck when cold, there is enough
coolant in coolant expansio ntank ;.
If the coolant level is approximately 1.5 cm
above marker bar =in the fille rneck when
warm, there is enoug hcoolant in coolant
expansio ntank ;.
X If necessary ,top up with coolant tha thas
been teste dand approved by Mercedes-Benz.
X Replace cap :and tur nitclockwise as fa ras
it will go.
Furthe rinformatio noncoolant (Y page 253). Topping up the windscreen washe
rsys-
tem/headlamp cleanin gsystem G
WARNING
If wind screen washer concentrate comes into
contact with hot components of the engine or
the exhaust system, it can ignite. There is a
risk of fire and injury.
Make sure the windscreen washer concen-
trate does not come into contact with the filler neck. Example: topping up the windscreen washer
system
X To open: pull cap:upwards by the tab and
open.
X Top up with the premixed washe rfluid.
X To close: press cap :onto the fille rneck
unti lite ngages.
The washe rfluid reservoi risusedf or both the
windscree nwashe rs ystem and the headlamp
cleaning system.
If the washe rfluid level drops belo wthe recom-
mended minimu mof3.5 litres ,amessage
appear sinthe multifunctio ndisplay prompting
yo utot op up the washe rfluid (Y page 154).
Furthe rinformatio nonwashe rfluid
(Y page 254). Service
ASSYST service interval display
Service messages Yo
uc an obtain up-to-dat einformation concern-
ing the servicin gofyour vehicle from aqualified
specialis tworkshop, e.g. aMercedes-Ben zSer-
vice Centre. Service
215Maintenance and care Z