2016 BMW M4 engine
[x] Cancel search: enginePage 163 of 228

General driving information
Closing the boot lid WARNING
An open boot lid projects beyond the ve‐
hicle, and in the event of an accident, braking
or avoidance manoeuvres, it can endanger ve‐ hicle occupants and other road users, or dam‐
age the vehicle. There is also the danger of ex‐
haust fumes entering the interior of the
vehicle. Danger of injury or damage to prop‐
erty. Do not drive with the boot lid open.◀
If there is no alternative to driving with the tail‐
gate open:▷Close all windows and the Glass Roof.▷Turn up the blower to a high output level.▷Maintain moderate speed.
Hot exhaust system
WARNING
During driving, high temperatures can be
generated under the body, for example be‐
cause of the exhaust system. If flammable ma‐
terials, for example leaves of grass, come into
contact with hot parts of the exhaust system,
these materials can catch fire. Danger of injury
or damage to property.
Never remove the heat shields fitted here, or
apply underseal to them. Make sure that when driving, idling or parking, no flammable materi‐
als can come into contact with hot vehicle
parts. Do not touch the hot exhaust system.◀
Radio signals WARNING
Certain vehicle functions may be affec‐
ted by interference from high-frequency radio
signals. Such signals are output from a series
of transmission systems, for example, from air
traffic beacons or relay stations for mobile tele‐
communications.
We recommend you consult a Service Partner
or a qualified specialist workshop should you
experience any difficulties.◀
Mobile communication equipment WARNING
The vehicle's electronics and mobile
radio devices can interfere. The transmission
operation of mobile radio devices generates
radiation. Danger of injury or damage to prop‐
erty. If possible, only use mobile radio devices,
e.g. mobile telephones, in the interior with di‐
rect connection to an external antenna to ex‐
clude mutual interference and to dissipate the
radiation from the vehicle's interior.◀
Aquaplaning
On wet or slushy roads, a wedge of water can
form between the tyres and the road.
This situation, known as aquaplaning, means
that the tyre can actually lose contact com‐
pletely with the road surface and the vehicle
can neither be steered nor the brakes properly
applied.
Wading ATTENTION
Driving through excessively deep water
too fast can result in water entering the engine
compartment, electrical system or transmis‐
sion. Danger of damage to property. When
driving through water, do not exceed the maxi‐
mum specified water depth and maximum
fording speed.◀
Only if the water is calm and only up to a water
depth of max. 25 cm, approximately 9.8 inches
and at this depth drive no faster than walking
speed up to 5 km/h, approximately 3 mph.
Safe braking Your vehicle is equipped with ABS as standard.Seite 163Driving precautionsDriving hints163
Online Edition for Part no. 01 40 2 964 013 - VI/15
Page 164 of 228
Applying the brakes fully is the most effective
way of braking in situations in which this is
necessary.
The vehicle can be steered. Any obstacles can
be avoided with steering wheel movements
that are as calm as possible.
A pulsing of the brake pedal shows that ABS is
regulating.
In certain braking situations, the perforated
brake disks can cause functional noise. How‐
ever, this has no effect on the efficiency and
operational safety of the brakes.
Objects in the range of movement of
the pedals and in the footwell
WARNING
Objects in the driver's footwell can re‐
strict the pedal travel, or block a pedal that has
been pressed. Danger of accidents. Stow
items in the vehicle so that they are secure and
cannot get into the driver's footwell. Only use
floor mats that have been categorised as ap‐
propriate for the vehicle and that can be fas‐
tened accordingly. Do not use any loose floor
mats, and do not place several floor mats on
top of one another. Make sure that there is suf‐
ficient space for the pedals. Ensure that the
floor mats are securely reattached after having
been removed, for example for cleaning.◀
Wet roads
In damp weather, if road grit has been spread
or there is heavy rain, apply the brakes lightly
every few kilometres/miles.
In doing so, do not obstruct other road users.
The resulting heat dries the brake discs and
pads.
The braking force will be available immediately
if needed.Downhill gradients
WARNING
Even slight, continuous pressure on the
brake pedal can cause overheating, brake pad
wear or even brake system failure. Danger of
accidents. Avoid excessive loads on the
brake.◀
WARNING
When idling or with the engine switched
off, safety-relevant functions are restricted or
no longer available, for example the braking ef‐
fect of the engine or power assistance for the
braking force and steering. Danger of acci‐
dents. Do not drive at idle speed or with the
engine switched off.◀
When driving on long or steep downhill
stretches, use the gear in which the least brak‐
ing is required. Otherwise the brake system
can overheat and braking action is reduced.
Manual gearbox:
The braking effect can be additionally in‐
creased by shifting down, even into first gear, if
applicable.
M double clutch transmission:
The braking action of the engine can be boos‐
ted further by shifting down in sequential
mode, see page 75.
Corrosion of the brake disc Corrosion of the brake discs and contamina‐
tion of the brake pads increase with the
following circumstances:▷Low mileage.▷Extended periods when the vehicle is not
used.▷Infrequent use of the brakes.
Corrosion occurs when the minimum pressure
that must be exerted by the pads during brake
applications to clean the discs is not reached.
Seite 164Driving hintsDriving precautions164
Online Edition for Part no. 01 40 2 964 013 - VI/15
Page 168 of 228

Saving fuelVehicle equipmentThis chapter describes all standard, national
and special equipment provided in the model
series. Equipment not available in the vehicle is
therefore also described, for example the se‐
lected special equipment or national version.
This also applies to safety-relevant functions
and systems. Comply with the relevant na‐
tional regulations when using the correspond‐
ing functions and systems.
General
Your vehicle contains wide-ranging technolo‐
gies for reducing consumption and emission
levels.
Fuel consumption depends on various factors.
A number of measures, such as a moderate
driving style and regular maintenance, can in‐
fluence fuel consumption and reduce burden
on environment.
Removing transported load that is not required
Extra weight increases fuel consumption.
Removing add-on parts after use
Remove auxiliary mirrors, roof racks and rear-
mounted racks after use.
Add-on parts on the vehicle interfere with its
aerodynamic performance and inflate fuel con‐
sumption.Closing windows and the
glass roof
An opened glass roof or opened window in‐
creases the drag coefficient and thus reduces
the range.
Tyres General Tyres can have differing effects on fuel con‐
sumption. For example, fuel consumption can
be affected by tyre size.
Checking tyre pressures regularly Check and, if necessary, correct tyre inflation
pressures at least twice a month and before
setting off on a longer journey.
Insufficient tyre inflation pressure enlarges the
rolling resistance and thus increases fuel con‐
sumption and tyre wear.
Setting off immediately Do not warm up the engine with the vehicle at
a standstill; it is preferable to set off straight
away, driving at moderate engine speeds.
This brings the cold engine to operating tem‐
perature as quickly as possible.
Driving with foresight
Avoid accelerating and braking unnecessarily.
Keep an appropriate distance from the preced‐
ing vehicle.
Anticipating the road situation and adopting a
smooth driving style will reduce fuel consump‐
tion.Seite 168Driving hintsSaving fuel168
Online Edition for Part no. 01 40 2 964 013 - VI/15
Page 169 of 228
Avoid high engine speeds
Basic principle: driving at low engine speeds
reduces fuel consumption and wear.
Use 1st gear to drive off. As from 2nd gear, ac‐
celerate quickly. Avoid high engine speeds and
shift up quickly.
Shift into the highest possible gear when you
have reached the desired speed and drive at a
constant speed with the lowest possible en‐
gine speed.
Pay attention to the shift point indicator in the
vehicle, if fitted, see page 88.
Using overrun mode When approaching a red traffic light, take your
foot off the accelerator and allow the vehicle to
roll.
On downward stretches, take your foot off the
accelerator and allow the vehicle to roll.
The fuel supply is interrupted when coasting.
Switching off engine if
stopping for a relatively long
time
When you stop the vehicle for longer periods,
for example at traffic lights, railway crossings
or in traffic jams, switch off the engine.
Auto Start Stop function
The Auto Start Stop function of your vehicle
shuts off the engine automatically during a
stop.
If the engine is switched off and then started
again, the fuel consumption and emissions are
reduced compared with a permanently running
engine. Savings can be made just by stopping
the engine for a few seconds.
Fuel consumption also depends on other fac‐
tors, such as driving style, road condition,maintenance or environmental factors, for ex‐
ample.
Switching off functions that
are not necessary at the moment
Functions such as seat heating or heated rear
window require a great deal of energy and re‐
duce the range, especially in city traffic and
stop-and-go traffic.
Switch these functions off if they are not re‐
quired.
Having the maintenance
done
Have the vehicle serviced regularly to achieve
optimal economy and lifetime. Have mainte‐
nance carried out by a Service Partner or a
qualified specialist workshop.
Please also see the BMW Maintenance Sys‐
tem, see page 191.Seite 169Saving fuelDriving hints169
Online Edition for Part no. 01 40 2 964 013 - VI/15
Page 172 of 228
RefuellingVehicle equipmentThis chapter describes all standard, national
and special equipment provided in the model
series. Equipment not available in the vehicle is
therefore also described, for example the se‐
lected special equipment or national version.
This also applies to safety-relevant functions
and systems. Comply with the relevant na‐
tional regulations when using the correspond‐
ing functions and systems.
Notes Before refuelling, observe notes on fuel quality,
see page 174.
ATTENTION
If the range drops below 50 km, approx.
30 miles, the engine could not be supplied
anymore with sufficient fuel. Engine functions
are not ensured anymore. Danger of damage
to property. Refuel in good time.◀
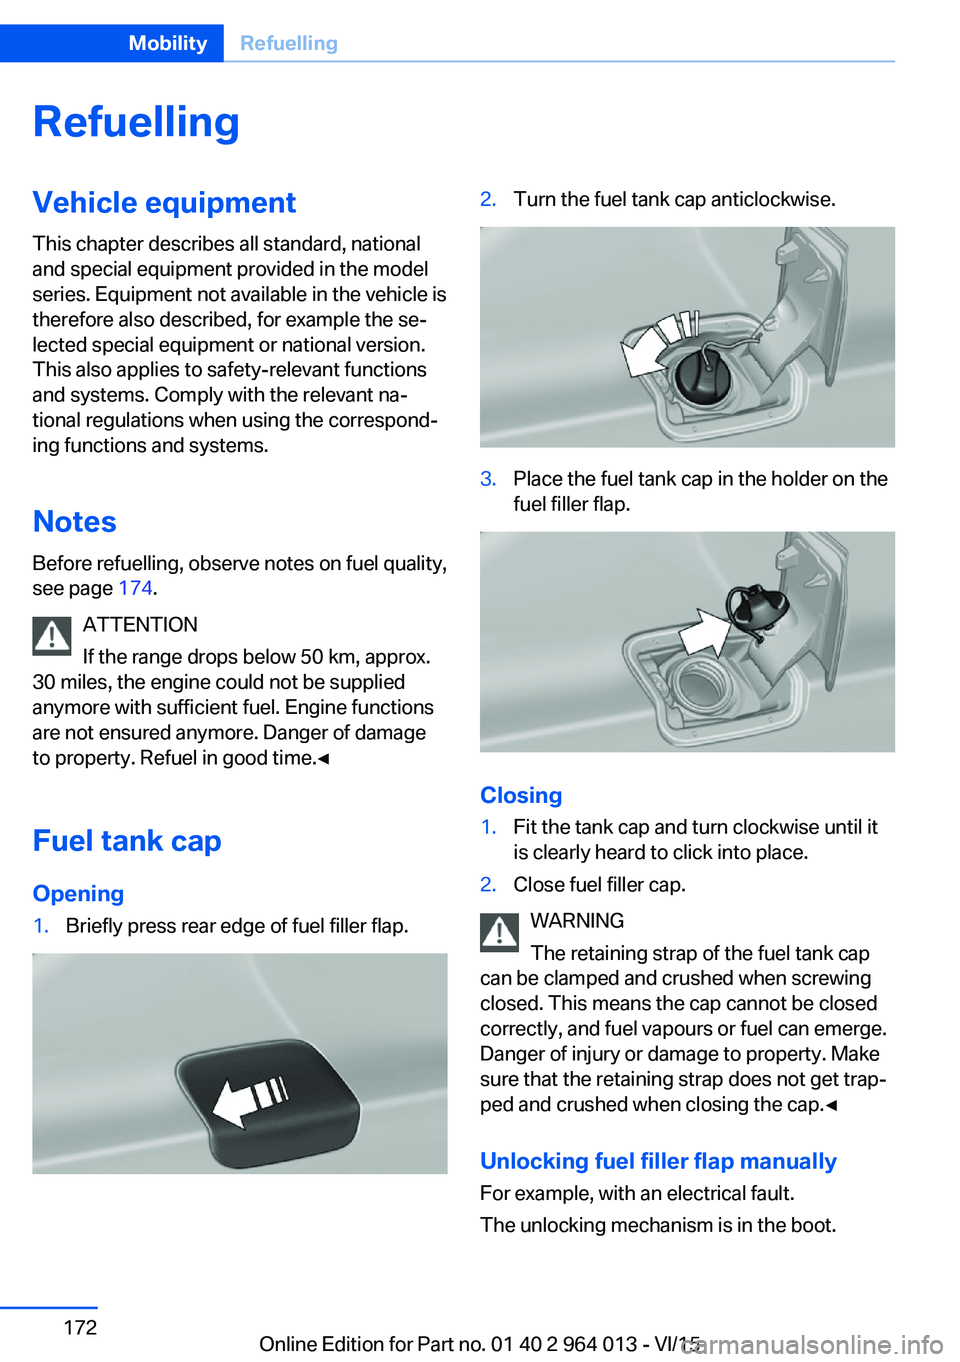
Fuel tank cap Opening1.Briefly press rear edge of fuel filler flap.2.Turn the fuel tank cap anticlockwise.3.Place the fuel tank cap in the holder on the
fuel filler flap.
Closing
1.Fit the tank cap and turn clockwise until it
is clearly heard to click into place.2.Close fuel filler cap.
WARNING
The retaining strap of the fuel tank cap
can be clamped and crushed when screwing
closed. This means the cap cannot be closed
correctly, and fuel vapours or fuel can emerge.
Danger of injury or damage to property. Make
sure that the retaining strap does not get trap‐
ped and crushed when closing the cap.◀
Unlocking fuel filler flap manually
For example, with an electrical fault.
The unlocking mechanism is in the boot.
Seite 172MobilityRefuelling172
Online Edition for Part no. 01 40 2 964 013 - VI/15
Page 174 of 228

FuelVehicle equipmentThis chapter describes all standard, national
and special equipment provided in the model
series. Equipment not available in the vehicle is
therefore also described, for example the se‐
lected special equipment or national version.
This also applies to safety-relevant functions
and systems. Comply with the relevant na‐
tional regulations when using the correspond‐
ing functions and systems.
Fuel quality
General Depending on the region, many filling stations
sell fuel that is adapted to the conditions in
winter or summer. Fuel that is sold in winter fa‐
cilitates cold starting, for example.
Note ATTENTION
Even fuels corresponding to the specifi‐
cations may be of low quality. Engine problems
can arise, for example poor engine starting, im‐
paired driving properties or reduced perform‐
ance. Danger of damage to property. In the
case of engine problems, use a different filling
station or refuel with a higher octane fuel from
a brand maufacturer.◀
Petrol
For optimal fuel consumption, the petrol
should be sulphur-free or as low in sulphur
content as possible.
Fuels labelled on the pump as containing metal
must not be used.ATTENTION
Even small quantities of the wrong fuel or
wrong fuel additives can damage the fuel sys‐
tem and engine. In addition, the catalytic con‐
verter will be permanently damaged. Danger of
damage to property. Do not use the following
fuel or additives with petrol engines:▷Leaded petrol.▷Metallic additives, for example manganese
or iron.
After filling the wrong fuel, do not press the
start/stop button. Contact a Service Partner or
a qualified specialist workshop.◀
You can fill up with fuels with a maximum pro‐
portion of ethanol of 10 %, in other words E10.
ATTENTION
Incorrect fuels can damage the fuel sys‐
tem and engine. Danger of damage to prop‐
erty. Do not fill with any fuels that either have a
higher ethanol content than recommended or
that contain methanol, for example M5 to
M100.◀
The engine has anti-knock control. This means
that different petrol grades can be used.
Petrol grade Super Plus, with RON 98.
Fill up this fuel so that the nominal perform‐
ance data values and consumption is achieved.
Minimum grade Super with RON 95.
ATTENTION
Fuel below the specified minimum qual‐
ity can impact the engine function or lead to
engine damage. Danger of damage to prop‐
erty. Do not refuel petrol below the specified
minimum quality.◀
Seite 174MobilityFuel174
Online Edition for Part no. 01 40 2 964 013 - VI/15
Page 180 of 228
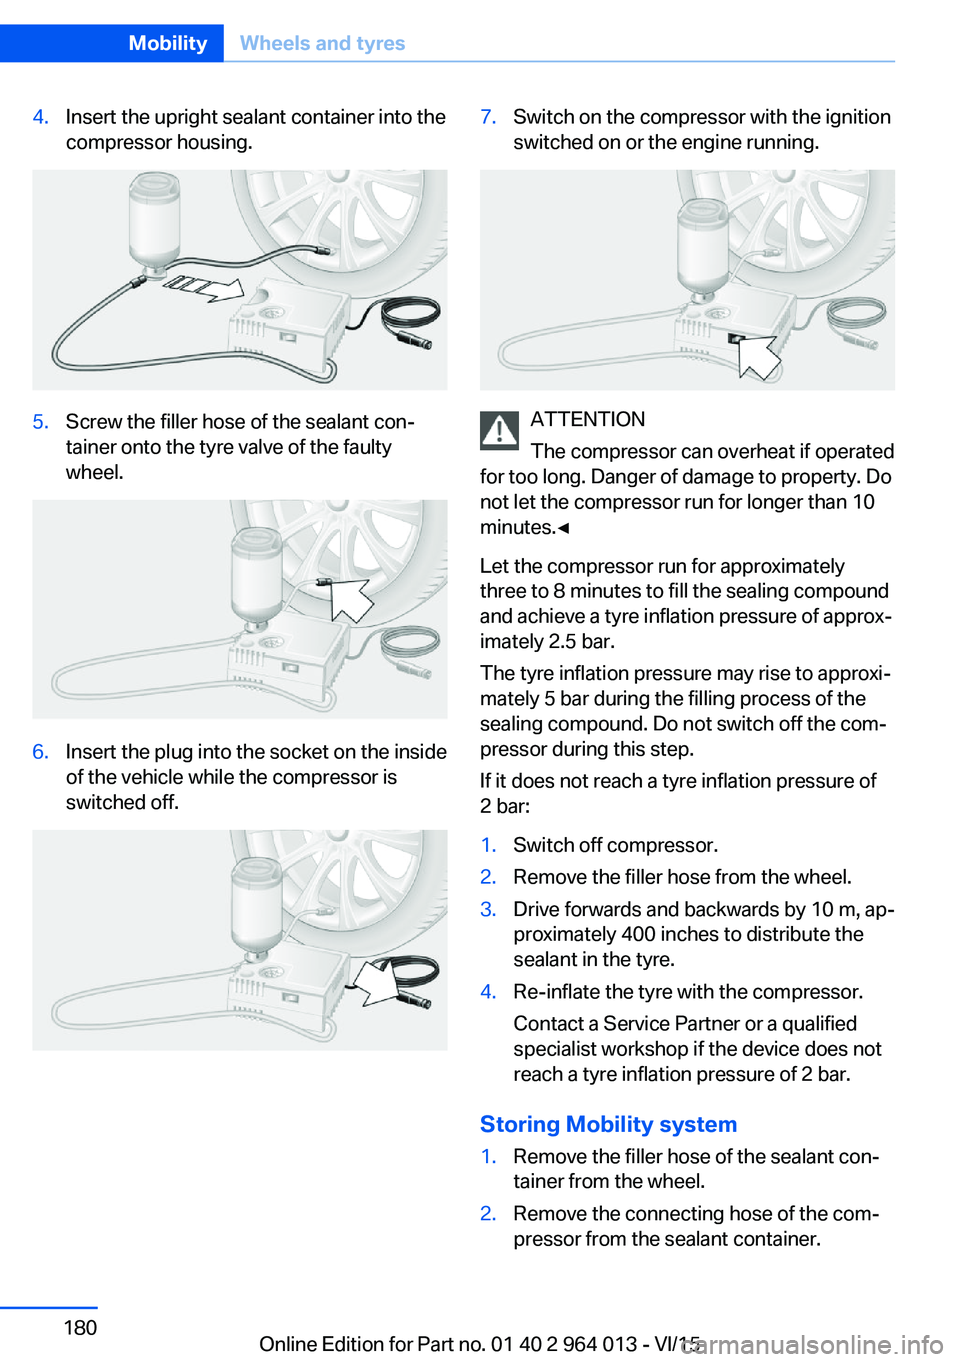
4.Insert the upright sealant container into the
compressor housing.5.Screw the filler hose of the sealant con‐
tainer onto the tyre valve of the faulty
wheel.6.Insert the plug into the socket on the inside
of the vehicle while the compressor is
switched off.7.Switch on the compressor with the ignition
switched on or the engine running.
ATTENTION
The compressor can overheat if operated
for too long. Danger of damage to property. Do
not let the compressor run for longer than 10
minutes.◀
Let the compressor run for approximately
three to 8 minutes to fill the sealing compound
and achieve a tyre inflation pressure of approx‐
imately 2.5 bar.
The tyre inflation pressure may rise to approxi‐
mately 5 bar during the filling process of the
sealing compound. Do not switch off the com‐
pressor during this step.
If it does not reach a tyre inflation pressure of
2 bar:
1.Switch off compressor.2.Remove the filler hose from the wheel.3.Drive forwards and backwards by 10 m, ap‐
proximately 400 inches to distribute the
sealant in the tyre.4.Re-inflate the tyre with the compressor.
Contact a Service Partner or a qualified
specialist workshop if the device does not
reach a tyre inflation pressure of 2 bar.
Storing Mobility system
1.Remove the filler hose of the sealant con‐
tainer from the wheel.2.Remove the connecting hose of the com‐
pressor from the sealant container.Seite 180MobilityWheels and tyres180
Online Edition for Part no. 01 40 2 964 013 - VI/15
Page 181 of 228
3.Take the filler hose of the sealant container
that was previously connected to the tyre
valve and connect it to the free connection
on the sealant container.
This can prevent sealant residues from es‐
caping from the container.4.Pack empty sealant container to avoid soil‐
ing in the boot.5.Store Mobility system in the vehicle again.
Spreading sealant compound
Immediately drive for approximately
10 km/5 mi to evenly distribute the sealing
compound in the tyre.
Do not exceed a speed of 80 km/h/50 mph.
If possible, do not drive slower than
20 km/h/12 mph.
Correcting the tyre inflation pressure
1.Stop in a suitable area.2.Bolt the connecting hose of the compres‐
sor directly onto the tyre valve.3.Insert the plug into the socket on the inside
of the vehicle.4.Correct tyre inflation pressure to 2.5 bar.▷Increase pressure: switch on the com‐
pressor with the engine running or the
ignition switched on.▷Reduce pressure: press the button on
the compressor.
Continuing with journey
Do not exceed maximum permitted speed of
80 km/h, approximately 50 mph.
Reinitialise runflat indicator.
Reinitialise Tyre Pressure Monitor.
Have the punctured tyre and the sealant con‐
tainer of the Mobility system replaced as soon
as possible.
Snow chains
Fine-link snow chains Only certain fine-link snow chains have been
tested, found safe for use in traffic, and cate‐
gorised as suitable by the manufacturer of your
vehicle.
Information regarding suitable snow chains is
available from a Service Partner or a qualified
specialist workshop.
Using Snow chains may only be used in pairs on the
rear wheels with tyres of the following sizes:▷255/40 R 18.▷255/35 R 19.
Observe the snow chain manufacturer's notes.
Ensure that the snow chains are always ade‐
quately taut. Re-tighten them if necessary in
accordance with the chain manufacturer's in‐
structions.
Do not initialise the runflat indicator with snow
chains fitted, as the instrument might other‐
wise issue an incorrect reading.
Do not initialise the Tyre Pressure Monitor with
snow chains fitted, as the instrument might
otherwise issue an incorrect reading.
When driving with snow chains, activate M Dy‐
namic Mode briefly if necessary.
Maximum speed with snow chains
When snow chains are fitted, do not exceed
50 km/h, 30 mph.
Seite 181Wheels and tyresMobility181
Online Edition for Part no. 01 40 2 964 013 - VI/15