Page 65 of 302

-Vehicles with a pass through in the center
console have seating for four. The long cen
ter console between the two rear seats is
not a seating position . Therefore, a safety
belt is not provided .
- Applies to vehicles with reclining rear seat*:
- Do not use the front passenger's seat for
seating when it is in the reclining position.
This increases the risk of serious injury or
death .
- Never adjust the reclining position when
the front passenger 's seat is occupied .
This increases the risk of injury.
- Do not tilt the display if the driver's view
of the right exterior mirror will be ob
structed .
- Make sure the area between the leg sup
port and the front passenger's seat back
rest is clear before folding the leg support in so that you are not pinched.
(D Note
If a child seat is attached to one of the rear
seats, this seat must not be adjusted using
the power controls under any circumstances.
The easy entry function for this seat must also
be deactivated in the MMI
c:> page 64. The
child seat as well as the rear seat can be dam
aged by the adjustment process .
(!) Tips
The massage function switches off automati
cally after approximately
10 minutes .
- If you cannot move the front passenger seat
or the reclining rear seat, it may be because
- the front passenger's seat memory func
tion is switched off¢
page 66 or
- the child safety lock is switched on (the~
button ¢
page 40 or the right T button
c::> page 40 lights up in the driver's door),
or
- the front passenger seat adjustment is
switched off in the MMI
c:> page 64.
Seats and storage
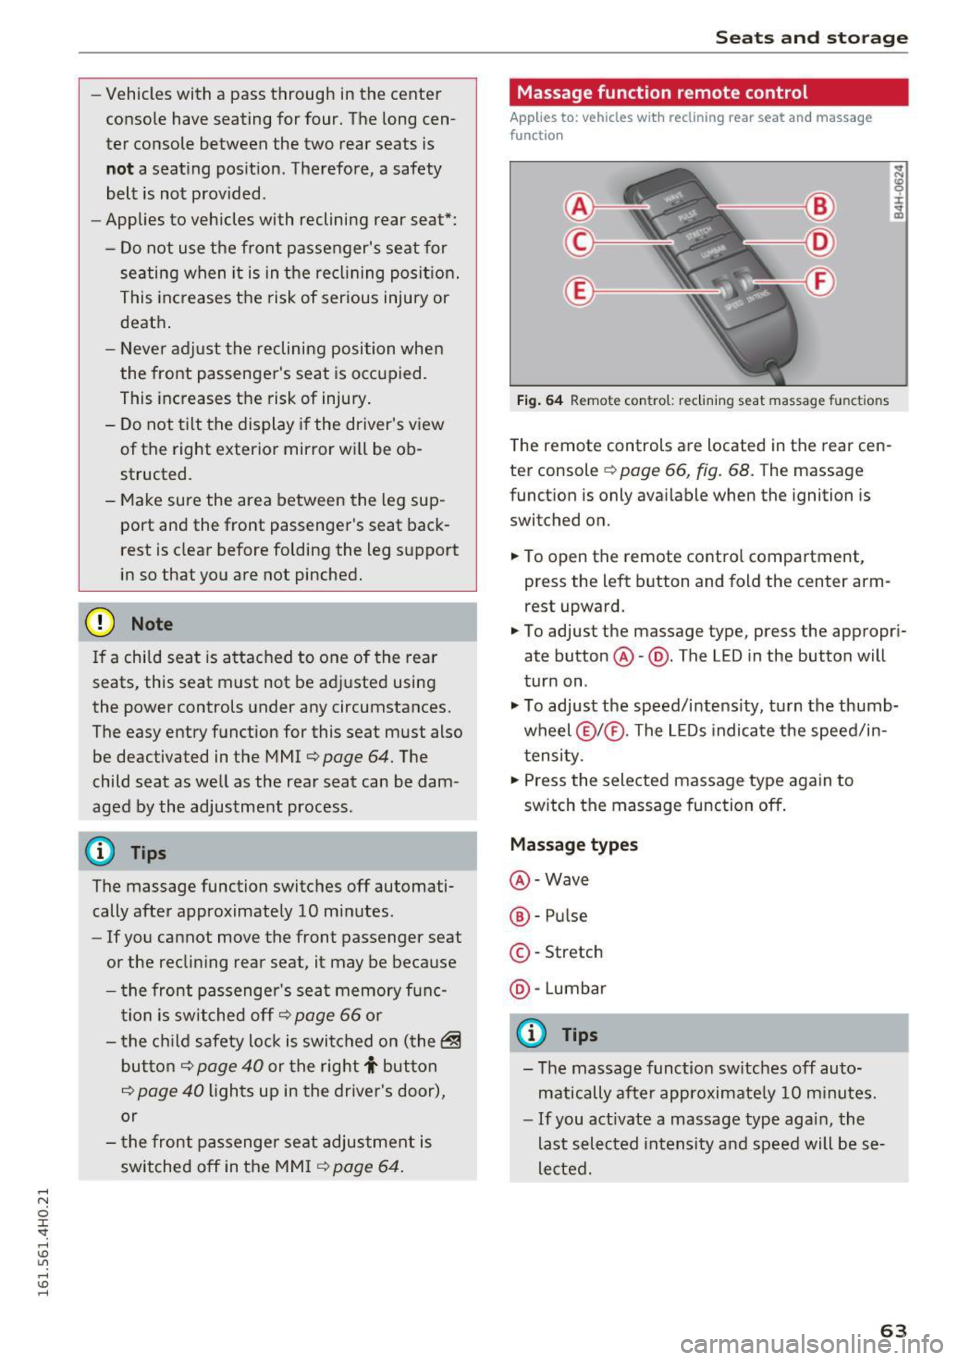
Massage function remote control
Applies to: vehicles with reclining rear seat and massage
functio n
Fig. 64 Remote con trol: re clining seat massag e functions
The remote controls are located in the rear cen
ter console
c::> page 66, fig. 68. T he massage
function is only available when the ignition is
switched on.
.,. To open the remote control compartment,
press the left button and fold the center arm rest upward.
.,. To adjust the massage type, press the appropri
ate button @-@ . The L ED in the button will
turn on .
.,. To adjust the speed/intensity, turn the thumb
wheel @I® . The LEDs indicate the speed/in
tensity.
.,. Press the selected massage type again to
switch the massage function off.
Massage types
@-Wave
®-Pulse
©-Stretch
@ -Lumbar
@ Tips
- The massage function switches off auto
matically after approximate ly
10 minutes.
- If you act ivate a massage type again, the
last selected intensity and speed will be se
lected.
63
Page 66 of 302

Seats and storage
Comfort settings
Applies to: vehicles with comfort seats in the rear
You con adjust settings for the rear seat from
the cockpit using the MMI.
• Se lect I CAR I function button> Car systems con
trol button
> Vehicle settings > Seats > Rear
seats .
Factory settings position -
This function moves
the outer rear seats and the front passenger
seatback into the factory settings posit io n.
Entry assistance -Entry assistance makes it eas
ier to enter and ex it the rear seat more comforta
b ly. When the function is activated, the rear seat
moves all the way back automatically when t he
corresponding door opens.
Front passenger seat adjustment* -If the fu nc
tion is activated in the MMI, the front passenger
seat can be adjusted from the rear seat
c::> page 61, fig. 62.
Head restraints
Adjusting the head restraints
Head restraints that ore adjusted according to
body size, along with the safety belt, offer effec
tive protection .
Fig. 65 Comfo rt hea d rest ra ints: a dju st ing t he s ide bol
sters
64
Fig. 66 Outer rea r seat: adjus ting the head restra in t
Adjust the head restraint so the upper edge is as
even as possible with the top of your head . If tha t
i s not possible, try to adjust the head res traint so
that it is as close to this position as possible
c::> poge 64.
Adjusting front head restraints
• To adjust the height of the front head re
straints, press/push the button©
c::> page 59,
fig. 59 up/down c::> ,&...
• Vehicles with reclining rear seat: Grasp the
sides of the passenger's head restraint with
both hands and slide it upward/downward.
Adjusting rear head restraints (adjustable
head restraints )
The center rear head restraint is not adjustable .
• Grasp the sides of the head restraint wi th both
hands and slide it up ward until you feel it click
into place
c::> ,&...
• To lower the head restraints, press button -
sma ll arrow -
c::> fig. 66 and slide the head re
straint all the way down.
Adjusting the side bolsters*
• To adjust the side bolsters*, press them int o
the desired position
c::> fig. 65.
Refer to
c::> page 132, Proper adjustment of head
restraints
for guidelines on how to adjust the
height of the front head restraints to suit the
oc
cupant's body size.
~ WARNING
-All seats are equ ipped with head restraints.
Driving without head restra ints or with head ..,.
Page 67 of 302

restraints that are not properly adjusted in
creases the risk of ser ious or fatal neck in
jury dramatically.
- Read and heed all WARNINGS
¢page 132,
Proper adjustment of head restraints.
- Vehicles with a pass through in the center
console have seating for four. The long cen
ter console between the two rear seats is
Memory function
Description
Applies to: vehicles with memory function
The memory functio n allows you to quickly and
eas ily store and recall personal seating profi les
for the driver, front passenger and outer rear
seats* . The memory function is operated through
the master key and the memory buttons in the
driver's/front passenger's doors and the rear
doors".
The driver's seating profi le is stored and assigned
to the master key each time the vehicle is locked.
When you open the door, the seating profile is
Remote control
master key
Driver
Seat X
Head restraint X
Steering wheel* X
Safety belt* X
Both exterior rea rview X
mirrors*
Remote control key
Applies to: veh icles with memory function
To assign the driver's seat settings to the remote
control key when locking the vehicle, the function
must be switched on .
~ Select: I CARI function button > Car systems
control button > Vehicle settings > Seats >
Driver seat > Remote control key > On .
Seats and storage
not a seating position. Therefore, a safety
be lt is not provided.
(D Tips
-To prevent the head restraints from running
into the headliner, they retract automatica l
ly when moving the seat forward or upward.
- Correctly adjusted head restraints and safe
ty be lts are an extremely effective combina
tion of safety features.
automat ically recalled. If two people use one ve
hicle, it is recommended that each person always
uses "their own" master key .
T wo seating profiles can be stored in eac h of the
drive r's/front passenger's doors and one seating
profi le in each of the rear doors*. Once stored,
these seating p rofiles can be reca lled at any time.
Th e following sett ings are stored:
Memory button
Driver Front passenger Outer rear seats*
X
X
X
X
X X
X
X
X
@ Tips
If you do not want another driver's settings to
be assigned to the remote control key, switch
off the memory function using the MMI or the
IOFF I button ¢p age 66.
65
Page 68 of 302

Seats and storage
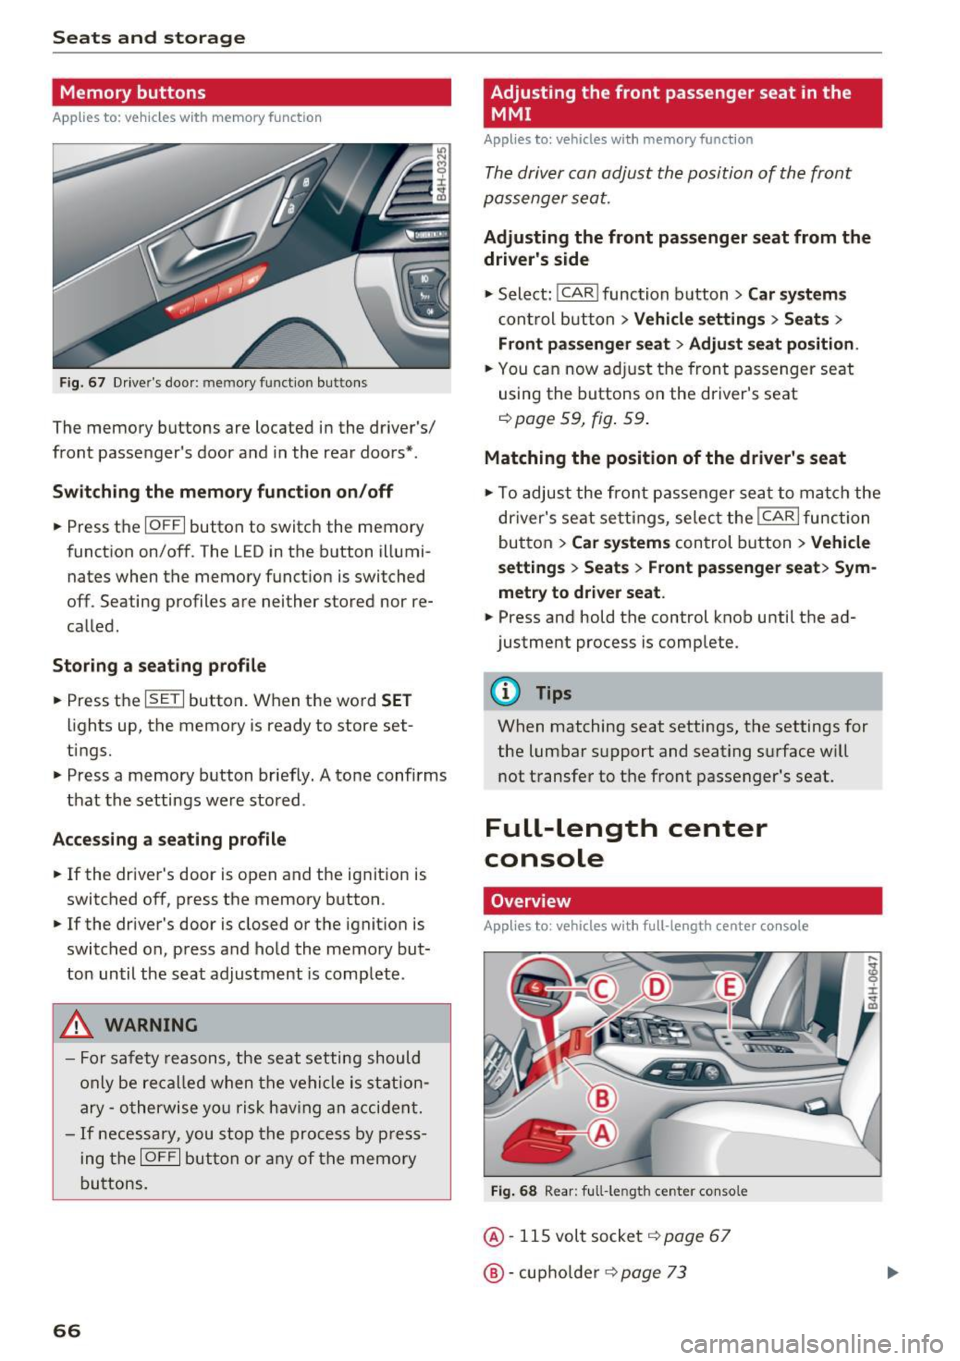
Memory buttons
Applies to: vehicles w ith memory funct ion
F ig. 67 Driver's door: memory function buttons
The memory buttons are located in the driver's/
front passenger's door and in the rear doors*.
Switch ing the memory function on /off
• Press the IOFFI button to switch the memory
function on/off. The LED in the button illumi
nates when the memory funct ion is switched
off. Seating profiles are neither stored nor re
called .
Storing a seating profile
• Press the ISETI button . When the word SET
lights up, the memory is ready to store set
tings.
• Press a memory button briefly. A tone confirms
that the settings were stored .
Accessing a seating profile
• If the driver's door is open and the ignit ion is
switched off, press the memory button .
• If the driver's door is closed or the ignition is
switched on, press and hold the memory but
ton until the seat adjustment is complete.
A WARNING
-For safety reasons, the seat setting should
only be recalled when the vehicle is station
ary -otherwise you r isk having an accident.
- If necessary, you stop the process by press
ing the
IOFF I button or any of the memory
buttons.
66
Adjusting the front passenger seat in the
MMI
Appl ies to : vehicles wi th memo ry funct ion
The driver con adjust the position of the front
passenger seat.
Adjusting the front passenger seat from the
driver's side
• Select: I CAR I function button > Car systems
control button > Vehicle settings > Seats >
Front passenger seat> Adjust seat position .
• You can now adjust the front passenger seat
using the buttons on the driver's seat
¢page 59, fig. 59 .
Matching the position of the driver's seat
• To adjust the front passenger seat to match the
driver's seat settings, select the
I CAR I function
button
> Car systems control button > Vehicle
settings > Seats > Front passenger seat> Sym
metry to driver seat.
• Press and hold the control knob unti l the ad
justment process is complete.
@ Tips
When matching seat settings, the settings for
the lumbar support and seating surface w ill
not transfer to the front passenger's seat.
Full-Length center
console
Overview
Applies to: vehicles wit h ful l- length center co nsole
Fig. 68 Rear: full-le ngth center console
@· 115 volt socket i=> page 67
@·cup holder i=> page 73
Page 69 of 302

© -12 volt socket c:> page 72
@ -Folding table c:> page 68
©-center armrest and storage compartments:
to open the deep compartment, press the rig ht
button and fold the center armrest upward . To
open the compartment fo r the massage funct ion
r emo te contro l*
c:> page 63 and for the tele
phone*, press the left button and fo ld the center
armrest upward .
115-volt socket
Applies to: vehicles with 115-volt socket
The 115-vo lt socket can only be used when the
engine is running
c:> & . When you push the con
nector all the way into the socket, the ch ild safe
ty mechan ism releases and current flows through
the socket .
Equ ipment th at can be conn ect ed
Electrical devices can be connected to the 1 15
volt socket in the vehicle. Power consumption at
the 115-volt socket must not exceed 150 watts
(300 watts peak) . Check the power consumpt ion
of the equipment on the model plate .
LED on the socke t
-The socket is ready for use when the LED is
green.
- If the LED blinks red, there is a malfunction .
The socket will switch off automatically due to overcurrent or overheating. The socket will
switch on again automatically after a cool
down period . Any devices that are connected
and switched on will activate again automati ca lly
c:> ,& .
A WARNING
- T he so ckets and the electrical accesso ries
conne cted to them operate only when the
ignition is switched on . Incorrect usage can
lead to serious injuries or burns. To reduce
the risk of injuries, never leave children un
attended in the vehicle w ith the vehicle key.
- Heavy eq uipment or plugs with integrated
power supply units can damage the socket
and lead to injuries.
-
Seat s and sto rage
-Store all connected equipment securely
while the veh icle is moving so that they can
not be thrown through the vehicle in the
event of a braking maneuver or an accident.
- Never sp ill any liquids on the socket . If any
mo isture gets into the socket, make certain
that all the moisture has dried up before us
ing the socket again .
- Equipment that is connected to the vehicle
socket can heat up more than it does when
connected to the public grid .
- When us ing adapters and extens ion cords,
the child safety for the 115-volt socket is
disabled and the socket is live.
- Never insert anyth ing other than the plug of
an app ropr iate electrical accessory into the
soc ket, especially th ings that conduct ele c
tr icity, e.g. metal pens, knitting need les,
etc. into the contacts of the 115 -vol t sock
et .
- Turn the electrical equ ipment off if the
socket has switched off because of over
heating.
(D Note
- Always follow the manufacture r's i nstruc
tions for a ll electrical accessories yo u wan t
t o use with the e lectr ica l socket!
- Do not connect lamps tha t con tain a neon
t u be. Fo r tech nica l reasons the lamp may be
damaged.
- Do not connect any 230-volt equipment to
t he 115-vo lt socket . The equipment may be
damaged. If necessa ry , check the permiss i
ble vo ltage for the equipment on the mode l
label.
- In the case of some power packs, e.g. for a
laptop computer , the bui lt-in ove rcurrent
shutoff prevents it from being switched on
because of excessive start-up current. In
this case, disconnect the power pack from the consumer and reconnect it after abo ut
1 0 seconds .
(D Tips
-Unshielded equ ipment may cause interfer
ence in the radio and the vehicle electronics .
67
Page 70 of 302

Sea ts and stor age
- Some equ ipment may work properly be
cause of the reduced power (wattage), avail
able from the socket .
Folding table in the center console
App lies to: ve hicles w ith fol ding ta bl e in the ce nter console
The folding table is stored in the front area of
the center console.
F ig . 69 Rear center console: open ing the folding table
Fig . 70 Rear cente r co nsole: folding table inclined pos it ion
Opening
• Pull the hand le @ back c:> fig. 69 . The folding
table extends out partially by itself
c:> _& .
• Pull the folding table up until it locks into p lace
® ·
• Fold the tabletop back and down @ .
Storing
• Release the tabletop @to fold it back .
• You can now move the fo ld ing table vertica lly
back into its orig inal position.
_& WARNING
- Do not open the folding table whi le driving.
Ope ning the folding table wh ile driving in
creases the risk of injury in the event of a
collision or sudden braking.
68
- To reduce the r isk of pinching, open and
close the folding table carefully and in a
controlled manner.
Luggage compartment
Tie -downs and luggage compartment net
The luggage compartment net prevents small
objects from sliding .
Fig . 71 Location of t he fas ten ing eyes in the luggage com
pa rtment
F ig. 72 Luggage compartment net unhooked
• To secure objects w it h the l uggage compart
ment net*, fold the tie-down b racket upward
<=>fig. 71.
• Insert the hooks on the luggage compartment
net* into the tie -downs
c:> fig. 72.
• Read and heed a ll WARNINGS <=> page 135,
Storing cargo correctly .
In a collision, the laws of physics mean that even
smaller items that are loose in the vehicle will
turn into heavy missi les that can cause serious in
j ury . Items in the vehicle pick up k inetic energy
which var ies with the vehicle and the weight of
the item. Veh icle speed is the most s ignificant
fuctor .
~
Page 71 of 302

For example, in a frontal collision at a speed of
30 mph (48 km/h) , the forces acting on a 10-lb
(4.5 kg) object are about
20 times the normal
weight of the item. This means that the weight
of the item would suddenly be the equivalen t of
about 200 lbs (90 kg) . One can easily imagine the
injuries that an item of that weight flying freely
through the passenger compartment can cause
in a collision at a speed considered relatively low.
A WARNING
Weak, damaged or imp roper straps used to
secure items to tie-downs can fail during hard
braking or in a collision and cause serious per
sonal injury.
- Always use suitable retaining straps and properly secure items to the tie-downs in
the luggage compartment to help prevent
items from shifting or flying forward.
- Never attach a child seat tether strap to a
tie-down .
- For strength-related reasons, the mounting
hooks can only be used to secure objects
weighing up to 10 lb. (5 kg). Heavier objects
will not be adequately secured -there is a
risk of injury.
Pass-through with ski
bag
Preparing the pass-through
Applies to: veh icles with pass-th rough a nd ski sack
Long objects such as skis can be transported in
the ski sack.
Fig. 73 Rea r be nch seat: removing th e protect ive cove r
-
Seats and storage
Fig. 74 Rear center armrest: attaching the p rotect ive cover
"' Fold the rear center armrest and the cover lo
cated behind it down.
"' Press the button to remove the protective cover
qfig. 73.
"'To protect the front area of the center armrest
position the cover as illustrated
¢ fig. 7 4 and
press the suction cups down so they adhere .
"' Slide the loaded ski sack* from the luggage
compartment out through the opening. The
zipper must face toward the rear.
"' Secure the ski sack*
q page 69.
Securing the ski sack
Applies to: vehicles with pass-through and ski sack
Fig.
75 Luggage compart men t: securing the ski sac k*
Fig. 76 Rear bench seat: ty ing dow n the ite m
'
69
Page 72 of 302

Seats and storage
There are two straps with hooks @ on the sides
of the ski sack* ¢
fig. 75. There is also a securing
strap ®~
fig. 76 on the sack.
.. To secure the ski sack in the luggage compart
ment, hang the hooks in the rear tie-downs
¢fig. 75.
.. Tighten the strap on the ski sack to prevent the
objects in the sack from sliding ¢
fig. 76.
A WARNING
-The ski sack is intended only for the trans
portation of skis and other light objects . To
reduce the risk of serious personal injury,
never transport heavy or pointed objects in
the ski sack.
- When braking rapidly or during an accident,
the load could be displaced and cause injury
to occupants.
- Sharp edges on the load must be covered
for protection. Always fasten the belt tight
ly around the sack and its contents.
- For safety reasons, do not transport more
than two pairs of skis in the ski sack.
- You must secure the ski sack with the strap
after loading.
- Make sure all objects that you are transport
ing in the pass-through are secured. Other
wise they could slide around during sudden
braking maneuvers and cause injury.
@ Tips
- Never stow the ski sack away when it is still
wet or damp (for example, snow melting
from skis). Allow it to dry completely before stowing it away.
- Position skis in the ski sack with the pointed
ends facing the front and ski poles with the pointed ends facing the rear.
70
-
Roof rack
Description and mounting locations
Additional cargo can be carried with a roof lug
gage rack.
~ M 0
------.::::::,,1
Fig. 77 Roof rack attachment points
.. Always read and follow the instructions provid
ed by the roof rack manufacturer when instal
ling the roof rack system.
If luggage or cargo is to be carried on the roof,
you must observe the following :
- To enhance the vehicle 's streamlined design,
rain gutters have been molded into the roof .
It
is not possible to use normal roof racks. Only
install a roof rack specifically designed for your
model AB. Contact the nearest Audi dealer for
information on approved modular roof racks for
your vehicle .
- Only use roof racks approved for your vehicle .
These approved roof racks are the basis for a
complete roof rack system. Additional attach
ments or carrier systems are needed to trans
port luggage and sports equipment . We recom
mend using roof racks from the Audi original
accessories program.
- When installing the roof rack, make sure it is
only mounted on the designated locations on
the roof ~
fig. 77.
- We rec om mend that you keep the installation
instructions for your roof rack system together
with your Owner's literature in the vehicle.
When should the roof rack be removed?
-Before going through an automatic car wash (it
is best to ask the car wash operator for advice)
1111>