Page 49 of 302

detected by the light sensors. So always
switch on the headlights
io u nder these
weather cond itions and when driving in the
dark.
- Crashes can happen when you cannot see
the road ahead and when you cannot be
seen by other motorists. Always turn on the
headlights so that you can see ahead and so
that others can see your car from the back.
- The rear fog lights should only be turned on in accordance with traffic regulat ion, as the
lights are br ight for following traffic.
- Please obse rve legal regulations when using
the light ing systems described .
@ Tips
-The light sensor* for automatic dynam ic
headlight range control* is located in the
rear view mirror mount . You should there
fo re not app ly any st icke rs to the windshie ld
i n this area in order to prevent malfunctions
or fail ures.
- In the event of a light sensor malfunction,
the driver is not ified in the i nstr ument clus
ter display
~page 22.
-You w ill hear a warning tone if yo u open the
driver door when the exter io r lights are
switched on .
- In coo l o r damp wea ther, the inside of the
headlig hts, turn s ignals and tai l ligh ts can
fog over d ue to the temperature d if f erence
between the inside and outside. They will
clear short ly after switch ing them o n. This
does not affect the serv ice life of the light
i ng .
Lights and V ision
Emergency flasher
The emergency flasher makes other motorists
aware that you or your vehicle ore in on emer
gency situation .
~ ~
~ ·--==-..-,-.,..= ..... ·=- -,
I
Fig . 43 Cen te r console: emergency flas her swi tch
• Press the switch~ ~fig . 43 to turn the eme r-
gency flashers on or off .
When the emergency flasher is on, a ll fo ur turn
signals blin k at the same time. The turn signal in
dicator lights
II B in the instrument cluster, as
well as the light in the emergency flasher switch
~ b link likew ise. The emergency flasher also
works when the ign ition is turned off .
The emergency flashers will turn on automatical ly if you are in an accident where the airbag has
deployed .
(l') Tips
You should turn on the eme rgency flashers
when:
- you a re t he last vehicle standing in a traffic
jam so that any other vehicles coming can see you, or when
- your vehicle has broken down or you are in
an emergency situat ion, or when
- your vehicle is be ing towed by a tow truck or
if you a re towing another vehicle behind
yo u.
Adjusting the exterior lighting
The settings ore adjusted in the MMI.
• Select: I CAR I function button > Car s yste ms
control button > Vehicle settings > Exte rior
lighting .
47
Page 50 of 302

Lights and Vision
Autom atic headli ghts
You can adjust the follow ing settings in the Au
tomatic headlight s
menu:
Headlights activation time -You can adjust if the
headligh ts switch on
Early , M ed . or Late accord
i n g to the sensitivity of the light se nsor.
Audi adaptive light * -You can switch adaptive
light
On and Off .
Autom atic high beams *
You can switch the high beam ass ist on and off .
Daytime running lights
USA models:
You can switch the daytime r unning
lights
on and off .
Canada m odels:
The function ca nnot be tu rned
off.
It is activ ated au tomatically each time the ig
n ition is switched on . This menu item is shown
"greyed out" .
Coming home, Leaving home
The com ing home func tion illum ina tes the area
ou tside the ve hicle when yo u sw itch the igni tion
off and ope n the driver's door . To tu rn the f unc
t ion on, select
Lights when leaving car > On .
The leav ing home function illuminates the area
ou tside the ve hicl e when yo u un lock the vehicle .
T o tur n the function on, select
Lights when un
locking car > On.
The com ing home and le aving home f unctions
only operate w hen it is dark and the lig ht sw itch
is in t he
AUTO position.
48
Turn signal and high beam lever
The lever on the left side of the steering column
is used to operate the turn signals and the high
beam as well as the headlight flasher .
Fig. 44 T urn signa l an d hi gh beam lev er
The turn signa l and hig h beam lever has the fol
l owing functions:
Turn signals¢ Q ©@
N 0
9 :I:
~
.,. Push the leve r up as f ar as it ca n go to t urn on
t he rig ht tu rn signa l or down to tur n on t he left
turn signa l
r:!>fig. 44 .
.,. Move th e lever br ie fly u ntil yo u meet r esistance
and release it to flash three times.
.,. Move the lever (up or down) unt il y ou meet re
sistance and ho ld it there to determine the
flashing time for the turn sig nals .
High beam gD@
.,. Push the lever fo rward to sw itch on the high
beam (vehicles wit h high beam assist*
r:!> page49).
.,. Pull the lever back towards you to switch off
the high beam .
Headlight fla sher gD ©
.,. Pull the lever toward the steering whee l to use
the headlight flasher.
Notes on these features
- The turn signals on ly wor k w it h the ignition
sw itc hed on. The ind icator lights
II or H in
the instrument cluster ¢ page 11 also blink.
- After you h ave t urned a corner, the turn signa l
sw itches o ff automat ica lly.
- Th e
high beam works only when the head ligh ts
are on. The ind icator light
Bl in the instrumen t Iii>
Page 51 of 302

.... N
cluster illuminates when the high beams are
on.
- The
headlight flash er works only as long as you
hold the lever -even if there are no lights
turned on. The indicator light
& in the instru
ment cluster illum inates when you use the
headlight flasher.
A WARNING
Do not use the high beam or headlight flasher
if you know that these could bl ind oncoming
traffic.
High beam assist
App lies to: vehicles with high beam assist
The high beam assist automatically switches the
high beams on or off, depending on the sur
roundings and traffic conditions.
Fig. 45 Turn s ignal and h igh bea m lever : Turning on and
off the high beam assist
Activating high beam assist g
,.._ 0 ± .,. a,
Requirement:
The light switch must be in the AU
TO pos ition, the low beam headlights must be on
and the high beam assist must be switched on in
the Infota inment ~
page 47 .
.. Press the lever forwards (Din order to activate
the high beam assist. The indicator light
II
turns on in the instrument cluster display and
the high beams switch on or off automatically.
T he ind icator light
B turns on if the high
beams were switched on.
Switching the high beams on/off manually
a Requirement: High beam ass ist is activated . J:
'SI: ....
....
Lights and Vision
If the high beams did not switch on/off automat
ica lly when expected, you may instead switch
them on/off manually:
.. To switch the high beams on manually, press
the lever forwards (D. The indicator light
II
turns on.
.. To switch the high beams off manually, pull the
lever backwards @. The high beam assist is de
activated.
Operating the headlight flasher
.. To operate the flashers while the high beam as
sist is active and the high beams are switched
off, pull the lever into position@. The high
beam ass ist will remain active.
Messages in the instrument cluster display
Headlight assist: System fault
Drive to your authorized Audi dealer immediate ly
to have the malfunction corrected. You can still
switch the high beams on or off manually .
Headlight assist: Unavailable . No camera view
The camera view is blocked, for example by a
sticker or debris.
The sensor is located between the interior rear
view m irror and the windshield. Therefore, do not
place any stickers in this area on the windshield .
Service setting
There is a different sensitivity setting for servic
ing. This setting can be activated by pressing and
ho lding the button on the interior rearview mir
ror for more than 18 seconds. The LED next to
the button blinks three times. If you have acci dentally selected th is service function, the origi
nal sens itiv ity will be automat ically restored the
next t ime you sw itch the ignition on.
A WARNING
High beam assist is only intended to assist
the driver. The driver is still responsible for
controlling the headlights and switching the
high beams on and off manua lly depending
on traffic, lighting and visibility conditions.
Fail ure to intervene manually may lead to r isk
Ill>-
49
Page 52 of 302

Lights and Vision
of accident . It may be necessary to operate
the high beams manually in the following sit
uations, e.g.:
- For adverse weather conditions such as fog,
heavy ra in, blow ing snow or spraying water.
- On roads where oncoming traffic may be
partially obscured such as expressways.
- If there are individuals on the road with no
lighting or poor light ing, s uch as cyclists.
- In tight curves and on steep slopes .
- In poorly lit areas .
- Wi th stro ng reflecto rs such as signs.
- If the area of the windsh ield near the sensor
is fogged ove r, dirty, icy or covered with a
s ticker.
(D Tips
- The high beam ass ist is active above a speed
of app rox.
25 mph (40 km/h).
- If after activation, your speed fa lls below
approx.
15 mph (24 km/h), the hig h beams
will automatically be switched off.
Interior lighting
Front and rear interior lighting
Fig. 46 Headliner : Front interior lights
Fig. 47 Rear headli ner: Read ing light
50
Press the appropriate button ~ fig. 46:
§]-Inter io r l ight ing on/off
~ -Door contact switch on/off . The inter io r li ght
i ng is controlled automatically.
~ -Reading lights on/off
~ -Switching the rear readi ng lig hts on/off from
the cockpit .
I REAR MODEi* -Sw itch ing the rear reading lights
on/off from the co ckpit: press the I REAR MODE!
button and then the approp ria te button ~ in the
cockpit.
Ambience lighting
Applies to: vehicles with ambience lighting
You can select a color prof ile and brightness for
the ambience lighting in various areas of the ve
hicle, called zones.
Turning ambience lighting on
.. Select in the MM I: ICAR !fu nction button> Car
sy stems
control button > Vehicle settings > In
terior light ing
> On .
Adjusting /turn ing off the brightness
.. Select in t he M MI: ICAR !f unc tion bu tton > Ca r
sys tems
control button > Vehicle settings > In
terior light ing
> Brightness .
.. Turn the knob to the desired vehicle area and
press the knob. The bar that appears indicates
the selected brightness .
.. To increase or reduce the brightness, turn the
knob and press it .
Selecting a color profile*
.. Select in the MMI: ICAR ! function button > Car
systems
control button > Vehicle settings > In
terior lighting > Color p rofile .
The ambience lighting tu rns o n when the fu nc
tion is activated in the MMI and when you turn
the headlights on while the ignition is switched
on.
Page 53 of 302

Adjusting the brightness
You can adj ust the brigh tness for the four zones
Front top , Front f ootwell , Rea r top and Rear
footwell
or for All area s at the same time.
Selecting a color profile
You can se lect from the Ivory , Polar and Rub y/
Polar
color profi les.
@ Tips
The settings are automatically stored and as
sig ned to the remo te control key that is in
use .
Instrument illumination
You can adjust the brightness of the instrument
and display illumination as well as the Head-up
Display* .
Fig . 4 8 Instr ument ill um ination
.. Press the knob to release it.
.. Turn the knob toward"-" or"+" to reduce or in
crease the brightness .
.. Press the knob aga in to return it to its orig inal
pos itio n.
(D Tips
The instrument ill umination (for dia ls and
needles) lights o n when the igni tion is switch
ed on and t he ve hicle lights are tu rned off. As
t he daylight fade s, the illum ina tion of the di
a ls likewi se dims au tom atic ally a nd w ill go
ou t comp lete ly when the outsi de light is very
low. This feature is meant to rem ind you to
sw itch on the head lights when o utside light
conditions become poor.
Lights and V ision
Vision
Adjusting the exterior mirrors
Fig. 4 9 Driver 's doo r: knob fo r the exte rio r mirr ors
Turn the knob to the des ired position:
Q/P -Adjusting the left/right e xterior mirror.
Move the knob in t he des ired direct ion .
Qill -Hea ting the mir ror glass depend ing o n the
outside tempe rature .
8 -Foldi ng the o utside mir ro rs . In the Infotai n
ment system , you can se le ct if t he m irro rs fo ld in
a utomat ically when you lock the vehi cle
~ page 33.
Front passenger 's exterior mirror tilt
function
T o help you see the curb when backing into a
parking space, the su rface o f the mirro r tilts
s li ght ly . For this to happen, the knob must be in
the position for the front passenger's outside
mirror .
Yo u can adjus t the tilted mir ro r sur face by turn
i ng the knob in the desired d irect ion . When you
move out of reverse and into another gea r, the
new m irror position is stored and assigned to the
key you are using.
T he m irror goes back into its or iginal pos ition
once you drive forward faster t han 9 mph (15
km/h) or sw itch the ignition off.
A WARNING
-Cu rved m irror surfaces (aspher ic or convex *)
enlarge the field of v is ion . However, they
make objects in the mirro r appea r small er
51
Page 54 of 302

Lights and Vision
and farther away. Your may estimate incor
rectly when you use these mirrors to gauge
your distance from the vehicles behind you
when changing lanes, which increases the risk of an accident .
CD Note
-If the mirror housing was moved by outside
forces (such as an impact when maneuver
ing), you must use the power folding func
tion to fold the mirror all the way out. The
mirror housing must not be moved back in
to place by hand because this would impair
the function of the mirror mechanism.
- If you wash the vehicle in an automatic car
wash, you must fold the exterior mirrors in
to reduce the risk of damage to the mirrors.
Never fold power folding exterior mirrors by
hand. Only fold them in and out using the
power controls.
@ Tips
- If the power adjusting function malfunc
tions, the glass in both mirrors can be ad
justed by pressing on the edge of it by hand.
- The exterior mirror settings are stored with
the memory function"~
page 65.
Dimming the mirrors
Fig. SO Automa tic dimming rearview mirror
0 ... M 9 :x:
~
~ To dim the rearview mirror and both exterior
m irrors, press th e@ button. The diode ®
turns on. The rearview and exterior mirrors dim
automatically when light shines on them, for
example from headlights on a vehicle to the rear .
52
A WARNING
Electrolyte fluid can leak from automatic dim
ming mirrors if the glass is broken. Electro
lyte fluid can irritate skin, eyes and respirato
ry system .
- Repeated or prolonged exposure to electro
lyte can cause irritation to the respiratory
system, especially among people with asth
ma or other respiratory conditions. Get
fresh air immediately by leaving the vehicle
or, if that is not possible, open windows and
doors all the way.
- If electrolyte gets into the eyes, flush them
thoroughly with large amounts of clean wa
ter for at least 15 minutes; medical atten
tion is recommended .
- If electrolyte contacts skin, flush affected
area with clean water for at least 15 mi
nutes and then wash affected area with
soap and water; medical attention is recom
mended. Thoroughly wash affected clothing
and shoes before reuse .
- If swallowed and person is conscious, rinse
mouth with water for at least 15 minutes .
Do not induce vomiting unless instructed to
do so by medical professional. Get medical
attention immediately.
CD Note
Liquid electrolyte leaking from broken mirror
glass will damage any plastic surfaces it
comes in contact with . Clean up spilled elec
trolyte immediately with clean water and a
sponge.
(0 Tips
- Switching off the dimming function of the
inside rear view mirror also deactivates the
automatic dimming function of the exterior
mirrors.
- Automatic dimming for the mirror only op
erates properly if the sun shade* for the
rear window is not in use or the light strik
ing the inside mirror is not hindered by oth-
er objects.
II>
Page 55 of 302
![AUDI S8 2016 Owners Manual -The automati c dimm ing mir rors do not dim
when the interior lig hting is turned on or
the reverse gea r is selected.
Sun visors
E ]
®
~ ~--· . _. ,
Fig. 5 1 Su n visor
The s](/manual-img/6/57611/w960_57611-54.png "AUDI S8 2016 Owners Manual -The automati c dimm ing mir rors do not dim
when the interior lig hting is turned on or
the reverse gea r is selected.
Sun visors
E ]
®
~ ~--· . _. ,
Fig. 5 1 Su n visor
The s")
-The automati c dimm ing mir rors do not dim
when the interior lig hting is turned on or
the reverse gea r is selected.
Sun visors
E ]
®
~ ~--· . _. ,
Fig. 5 1 Su n visor
The s un visors for the dr iver and passenge r can
be released from their b rackets an d turned to
ward the doors ¢
fig. 51 @. They can also be
moved back and forth lengthwise in this posit ion .
The mir ror light swi tches on when the cover over
the vanity mirror @opens .
There i s a s hade be twee n the dr iver's an d pas
se nger's sun visors that c an be used to cove r th e
ga p above the rea rview mir ror.
Sun shade
F ig. 52 Cockpit: Sun s hade switch
Lights and V ision
Fi g. 53 Rea r doo r: Sun s hade b utto n
Extending /retracting the rear window
shade*
.,. To exte nd or ret ract t he s un s hade from the
c ockpit ,
press t he l~•~ I b utt on in the ce nte r con
sole
¢ fig . 52 .
.,. To extend or retract the s un s hade from the
rear of the vehicle ,
press the GM button in the
door ¢
fig. 53.
Extending the rear door sun shades*
.,. Close the w ind ow in the re a r door.
.,. To exte nd the sun shade
from the driver's seat ,
pull the left/ right rea r power window switch ~
in the drive r's door.
.,. To extend the sun shade from the
rear of the
vehicle ,
pull the power window sw itch lilii) in the
left/ right rear door .
Retracting the rear door sun shades*
.,. To retract the s un sha de from the driver's seat ,
press the left/right rear power w indow switch
~ in the d river's doo r .
.,. To retract the sun shade from the
rear of the
vehicle ,
press the power w indow switch lia) in
t h e lef t/r ight rear door .
Yo u can adjust the sett ings fo r the rear sun shade
so the shade retracts a utomat ica lly when you se
l ect t he reverse gear . Se lect :
I CARI f u nct ion but
ton
> Car systems con trol but ton > Vehicle set
tings > Automatic rear blind > On .
The se tt ings
are au tom atically stored and assig ned to the re
mo te con trol key . T he sun sh ade e xten ds again as
soon as t he veh icle be gins traveling forward at a
s p eed greate r than 9 mph (1 5 km/h), as long as
t h e ignitio n has not been switc hed off in the
mea ntime .
53
Page 56 of 302

Lights and Vision
_&. WARNING
When lowering or raising the sunshade, make
sure there is nothing in its way and that it has
a free path to travel. This could cause person
al injury .
{!) Tips
-Pressing the button Ii.!.) several times con
secutively can trigger the overload protec
tion . The sun shade can only be extended/
retracted again after a brief wa iting period .
- The rear window sun shade only functions
when the vehicle interior is warmer than
14°F (-10°C).
Vanity mirror in the rear
Applies to: vehicles with vanity mirrors in the rear
Fig. 54 Rear he ad lin er : vanity mirro r
• Press the button to fold the m irror open. The
mirror lighting turns on automat ically .
a, N
i
• To change the mirror's ang le, move it forward/
bac k with your hand .
Windshield wipers
Switching the windshield wipers on
Fig. 55 Windshield wip er le v er
54
Move the windshield wiper lever to the corre
sponding position:
@ -Windshield wipers off
(D -Rain sensor mode . The windshield w ipers
switch on once the vehicle speed exceeds approx
i mately 2 mph (4 km/h) and it is raining. The
higher the rain sensor sensit iv ity is set (switch @
to the right) , the earlier the windshield wipers re
act to moisture on the windshield . You can deac
t ivate rain sensor mode in the MMI, which will
then activate intermittent mode . Select:
!CAR I
function button > Car systems control button >
Driver assist> Rain sensor> Off. In intermitten t
mode, you can adjust the interval time using the
switch @.
@ -Slow wiping
@-Fast wiping
@-Single wipe. If you hold the lever in this posi
tion longer, the wipers switch from slow wiping
to fast wiping.
® -C lean the windshield . The wipers wipe one
time after several seconds of driving to remove
water droplets . Yo u can sw itch this function off
by moving the lever to position ® within 10 sec
onds after the afterwipe . The afterwipe function
is r eactivated the next time you switch the igni
tion on .
Cleaning the headlights. The headlight washer
system* only functions when the headlights are
on . If you move the lev er to position ®, the
headlights and the night v ision system camera*
are washed in intervals.
_&. WARNING
-The rain sensor is on ly designed to assist
and support the dr iver . It remains entirely
the driver's responsibility to monitor out
side weather conditions and to manually ac
tivate the wipers as soon as rain or drizzle
reduces vis ibility through the windshield.
- The windsh ield must not be treated with
water-repellent materials. They can increase
glare under poor visibility cond itions such as
wetness, darkness, or when the sun is low
 1
1 2
2 3
3 4
4 5
5 6
6 7
7 8
8 9
9 10
10 11
11 12
12 13
13 14
14 15
15 16
16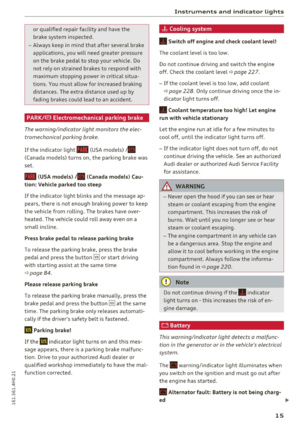 17
17 18
18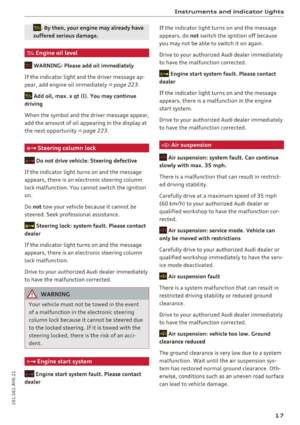 19
19 20
20 21
21 22
22 23
23 24
24 25
25 26
26 27
27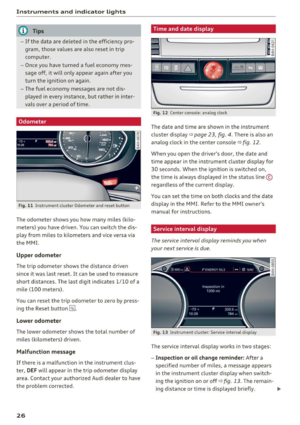 28
28 29
29 30
30 31
31 32
32 33
33 34
34 35
35 36
36 37
37 38
38 39
39 40
40 41
41 42
42 43
43 44
44 45
45 46
46 47
47 48
48 49
49 50
50 51
51 52
52 53
53 54
54 55
55 56
56 57
57 58
58 59
59 60
60 61
61 62
62 63
63 64
64 65
65 66
66 67
67 68
68 69
69 70
70 71
71 72
72 73
73 74
74 75
75 76
76 77
77 78
78 79
79 80
80 81
81 82
82 83
83 84
84 85
85 86
86 87
87 88
88 89
89 90
90 91
91 92
92 93
93 94
94 95
95 96
96 97
97 98
98 99
99 100
100 101
101 102
102 103
103 104
104 105
105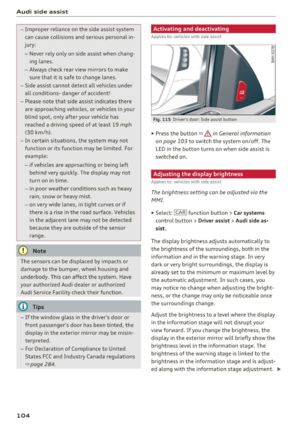 106
106 107
107 108
108 109
109 110
110 111
111 112
112 113
113 114
114 115
115 116
116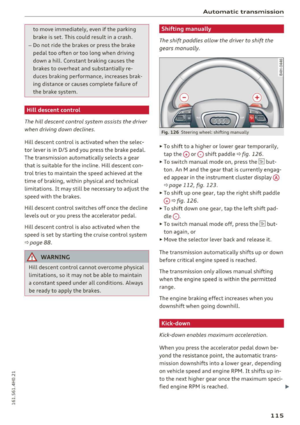 117
117 118
118 119
119 120
120 121
121 122
122 123
123 124
124 125
125 126
126 127
127 128
128 129
129 130
130 131
131 132
132 133
133 134
134 135
135 136
136 137
137 138
138 139
139 140
140 141
141 142
142 143
143 144
144 145
145 146
146 147
147 148
148 149
149 150
150 151
151 152
152 153
153 154
154 155
155 156
156 157
157 158
158 159
159 160
160 161
161 162
162 163
163 164
164 165
165 166
166 167
167 168
168 169
169 170
170 171
171 172
172 173
173 174
174 175
175 176
176 177
177 178
178 179
179 180
180 181
181 182
182 183
183 184
184 185
185 186
186 187
187 188
188 189
189 190
190 191
191 192
192 193
193 194
194 195
195 196
196 197
197 198
198 199
199 200
200 201
201 202
202 203
203 204
204 205
205 206
206 207
207 208
208 209
209 210
210 211
211 212
212 213
213 214
214 215
215 216
216 217
217 218
218 219
219 220
220 221
221 222
222 223
223 224
224 225
225 226
226 227
227 228
228 229
229 230
230 231
231 232
232 233
233 234
234 235
235 236
236 237
237 238
238 239
239 240
240 241
241 242
242 243
243 244
244 245
245 246
246 247
247 248
248 249
249 250
250 251
251 252
252 253
253 254
254 255
255 256
256 257
257 258
258 259
259 260
260 261
261 262
262 263
263 264
264 265
265 266
266 267
267 268
268 269
269 270
270 271
271 272
272 273
273 274
274 275
275 276
276 277
277 278
278 279
279 280
280 281
281 282
282 283
283 284
284 285
285 286
286 287
287 288
288 289
289 290
290 291
291 292
292 293
293 294
294 295
295 296
296 297
297 298
298 299
299 300
300 301
301