Page 57 of 302
 Lil
..... <J:) .....
on the horizon. In addition, they can cause
the windshield wipers to chatter.
- Properly functioning windshield wiper
blades are")
..... N
0 J:
'SI: .....
.....
on the horizon. In addition, they can cause
the windshield wipers to chatter.
- Properly functioning windshield wiper
blades are required for a clear view and safe
driving
c=> page 55, Replacing windshield
wiper blades.
- In the case of frost, check whether the
windshield wiper blades are frozen to the
windshield. Switching on the windshield
wipers can damage the wiper blades!
- Prior to using a car wash, the windshield wiper system must be switched off (lever in
position @). This helps to prevent uninten
tional switching on and damage to the
windsh ield wiper system.
- Do not use the wipers to clear a frosted win dow . Using the wipers as a convenient ice
scraper will destroy the wiper blades.
@ Tips
- The windshield wipers are switched off
when the ignition is off. Activate the w ind
sh ield wipers afte r the ignit ion is switched
back on by moving the windshield wiper lev
er to any position.
- Worn or dirty windshield wipe r blades result
in streaking . This can affect the rain sensor
function. Check your windshield wipe r
blades regu larly .
- The washer fluid nozzles of the windshield
washer system are heated at low tempera
tures when the ignition is on.
- When stopping temporarily, e.g. at a traffic
light, the set speed of the windshield wipers
is automatically reduced by one speed.
Cleaning windshield wiper blades
Clean the windshield wiper blades when they be
gin to leave streaks. Use a soft cloth and glass
cleaner to clean the windshield wiper blades.
.,. Place the windshield wiper arms in the service
position. Refer to
c=> page 55.
.,. lift the wiper arm away from the front window .
Lights and Vision
A WARNING
Dirty windshield wiper blades can impair your
view. This can lead to accidents .
Replacing windshield wiper blades
Fig. 56 Remov ing w indsh ield wiper blades
Wiper service position/ Blade replacement
position
.,. Switch the ignition off and move the windshield
wiper lever to position@¢
page 54, fig. 55.
The windsh ield wipers move into the service po
sition .
.,. To bring the wipers back into the original posi
tion, switch the ignition on and press the wind
shie ld wiper lever.
You can also turn the service posit ion on or off in
the MMI:
.,. Switch the windshie ld wipers off (posit io n @
c=> page 54, fig. 55).
.,. Select: !CAR ! function button > Car systems
control button > Servicing & checks > Wiper
service position > On.
Removing the wiper blade
.,. Lift the windshie ld wiper arm up from the
w indshie ld .
.,. Press the locking knob
(D c=> fig. 56 on the wiper
b lade . Hold the wiper blade firmly .
.,. Remove the w iper blade in the direction of the
arrow.
Attaching the wiper blade
.,. Install the new wiper blade in the re tainer on
the wiper arm @until you hear it click into
p lace on the wiper arm .
.,. Place the wiper arm back on the windshield. ..,.
55
Page 58 of 302

Lights and Vision
.. Turn the service position off.
_& WARNING
For your safety, you should replace the wiper
blades once or twice a year. See your author
ized Audi dealer for replacement blades.
- The windshield wiper blades must only be
folded away when in the serv ice position!
Otherwise, you risk damaging the paint on
the hood or the windshield wiper motor.
- You should not move your vehicle or press
the windshield wiper lever when the wiper
arms are folded away from the windshield.
The windshield wipers would move back in
to their original position and could damage
the hood and windshield.
- To help prevent damage to the wiper sys
tem, a lways loosen blades which are frozen
to the windshield before operating wipers.
- To help prevent damage to wiper blades, do
not use gasoline, kerosene, paint thinner, or
other solvents on or near the w iper blades.
- To help prevent damage to the wiper arms
or other components, do not attempt to move the wipers by hand.
(D Tips
- Commercial hot waxes applied by automat ic
car washes affect the cleanability of the
windsh ield.
- You can also use the serv ice position, for ex
ample, if you want to protect the windsh ield
from icing by us ing a cover.
- You cannot activate the service position
when the hood is open.
56
Digital compass
Switching the compass on and off
Applies to: vehicles with digital compass
The compass direction is shown in the rearview
mirror.
[ j
Fig . 57 Rearv iew m irror: Digital compass activated
.. To switch the compass on or off, press and hold
the button @until the compass display in the
mirror
c:!:> fig. 57 appears or disappears.
The dig ital compass only works when the ignit ion
is on. The directions are indicated with abbrevia
tions:
N (north), NE (northeast), E (east), SE
(southeast), S (south), SW (southwest), W
(west), NW (northwest).
_& WARNING
The digital compass is to be used as a direc
tional aid only. Even though you may want to
look at it while you are driving, you must still
pay attention to traff ic, road and weather
conditions as well as other possible hazards.
(0 Tips
To prevent inaccurate compass readings, do
not bring any remote controls, electrical devi
ces or metallic objects near the mirror.
-
Page 59 of 302
Adjusting the magnetic zone
Applies to: vehicles with digital compass
The magnetic zone must be adjusted correctly
for the compass to read accurately .
®
Fig. 58 Magnetic zone map
• Press and hold the button @i=> page 56, fig. 57
until the number of the magnetic zone appears
in the rearv iew mirror.
• Press the button @repeatedly to select the
correct magnetic zone. The select ion mode
tu rns off after a few seconds.
Calibrating the compass
Applies to: vehicles with digital compass
You must recalibrate the compass if it does not
display the correct direction .
• Press and hold the button @until a C appears
in the rearv iew mirror.
• Drive in a c ircle at about 6 mph ( 10 km/h) until
a direction is disp layed in the rearview mirror.
_& WARNING ,___
To avoid endangering yourself and other driv
ers, calibrate the compass in an area where
there is no traffic.
Lights and V ision
57
Page 60 of 302

Seat s and sto rage
Seats and storage
General information
Why is your seat adjustment so important?
The safety belts and the airbag system can only
provide maximum protection if the front seats are correctly adjusted .
There are various ways of adjusting the front
seats to provide safe and comfortable support
for the dr iver and the front passenger . Adjust
your seat properly so that:
- you can easily and quickly reach all the switches
and controls in the instrument panel
- your body is properly supported thus reducing
physical stress and fatigue
- the safety belts and a irbag system can offer
maximum protection ¢
page 146.
In the following sections, you will see exact ly
how you can best adjust your seats.
There are spec ial regulat ions and instr uctions for
installing a c hild seat on the front passenger's
seat. Always follow the information regarding
child safety provided in
¢ page 168, Child safe
ty .
A WARNING
Incorrect seating position of the driver and all
other passengers can result in serious person
al injury.
- Always keep your feet on the floor when the
vehicle is in motion - never put your feet on
top o f the instr ument pane l, o ut of the win
dow o r on top of the sea t cushion. This ap
plies espe cially to the passenge rs.
If your
seat ing pos ition is inco rre ct, you increase
the risk of injury in the case of sudden brak
ing or an accident . If the airbag inf lates and
the seating position is incor rect, this could
result in personal injury or even death.
- It is important for both the driver and front
passenge r to keep a d istance o f at least
10 inches (25 cm) between themselves and
the steering wheel and/or instrument pan el. If you're s itting any closer than this, the
airbag system cannot pro tect you properly.
58
In addition, the front seats and head re
straints must be adjusted to your body
he ight so that they can give you maximum
protection .
- Always try to keep as much distance as pos
sible between yourself and the steer ing
wheel or instrument panel.
- Do not adjust the driver's or front passeng
er's seat while the veh icle is moving. Yo ur
seat may move unexpectedly, causing sud
den loss of vehicle contro l and personal in
jury. If you ad just yo ur seat while the veh icle
is moving, you a re o ut of po sition.
, Driver's seat
The correct seat position is important for safe
and relaxed driving .
We recommend that you adjust the dr iver's seat
i n the following manner:
.. Adjust the seat in fore and aft direction so that
you can easi ly push the pedals to the floor
while keep ing your knees slightly bent¢
A. in
Why is your seat adjustment so important? on
page 58 .
.. Adjust the bac krest so that whe n you s it w it h
your back agains t the backrest, yo u can s till
gras p the top of the steering wheel.
.. Adjust the head res traint so the uppe r edge is
as even as possib le w ith the top of you r head. If
that is not possible, try to adjust the head re
straint so that it is as close to this pos it ion as
possible ¢
page 64.
A WARNING
Neve r place any objects in the dr iver's foo t
well. An object could get into the pedal area and inte rfere with pedal function. In case of
sud den bra king or an ac cident, you w ould no t
be ab le to b rake o r accelerate.
-
Page 61 of 302

Front passenger's seat
Always move the front pas senger seat into the
rearmost position .
To avoid contact with the airbag while it is de
ploying, do not sit any closer to the instrument
panel than necessary and always wear the three
point safety belt provided adjusted correctly . We
recommend that you adjust the passenger's seat
in the following manner:
.. Bring the backrest up to an (almost) upright
posit ion .
Do not ride with the seat reclined .
.. Adjust the head restraint so the upper edge is
as even as possible with the top of your head.
If
that is not possible, try to adjust the head re
straint so that it is as close to this position as
possible
c::> page 64.
.. Place your feet on the floor in front of the pas
senger's seat .
Front seats
Controls
Moving the seat forward or back and adjusting
the height , backrest angle and seat angle.
Fig. 59 Front s eat : adjus ting the sea t
®-Moving the seat forward/back: press the but
ton forward/back
c::> & .
@ -Moving the seat up/down: press the button
up/down
c::> & . To adjust the front section of the
seat, press the front button up/down
c::> & . To
adjust th e rear section of the seat, press the rear
button up/down
c:> &.
@ -
Turn the massage function on/off. You can
select the type of massage using the multifunc
tion button
¢ page 60.
Seats and storage
© -Backrest forward/back : press the button for
ward/back
c::> .&. .
©-Comfort head restraints¢ page 64, c::> ,&.
(D -Multifunction button c:;, .&., c::> page 60 .
A WARNING
--Never adjust the driver's or front passeng
er's seat while the vehicle is moving. If you
do this while the veh icle is moving, you will
be out of position. Always adjust the driver's
or front passenger 's seat when the vehicle is
not moving .
- Be careful when adjusting the seat height .
Check to see that no one is in the way, or se
rious injury could result!
- Because the seats can be electrically adjust
ed with the ignition off, never leave children
unattended in the vehicle. Unsupervised use
of the electric seat adjustments may cause
serious injury .
- To reduce the risk of injury in the case of sudden braking or accident, front passen
gers must never ride in a moving vehicle
with the backrest reclined. Safety belts and
the airbag system only offer maximum pro
tection when the backrest is upright and the
safety belts are properly positioned on the
body. The more the backrest is reclined, the
greater the risk of personal injury from an
incorrect seating position and improperly positioned safety belts.
59
Page 62 of 302

Sea ts and stor age
Multifunction button
Applies to: ve hicles w ith memory funct ion
You con adjust the massage function, upper sec
tion of the backrest, lumbar support, side bol
sters, seating surface and safety belt height us
ing the multifunction button.
F ig . 60 MMI display: seat settings
Operat ing
,.. The M MI displays the possible sea t set tings @
when you tu rn the multifunct ion button @
c::> page 59, fig . 59 to the left or right c::> fig. 60,
c::> _&. .
,.. To select a seat setting, turn the multifunction
button
(I) until the desired seat setting is high
lighted with a red border .
• The arrows ® indicate the possible adjust
ments . Fo r example, to move the lumbar sup
po rt down, press the mult ifunct ion button @
down. The corresponding arrow © ligh ts up.
The follow ing seat sett ings @are possible:
Massage func tion * -Massage type Wave, Kno ck
ing , Stre tch, Lumbar , S houlder or Off .
You can
set the massage strength level from 1 to 5. You
can turn the selected massage on/off us ing the
button @
c::> page 59, fig . 59.
Safe ty belt height adju stm ent * -Moving the
safety belt up/down
c::> page 143, c::> &.
Uppe r back rest -Moving the angle of the upper
section of the backrest forward/back
c::> &.
Lumb ar support -Moving the l umbar support
up/down and making it firmer/softer
c::> & .
Side bolst ers* -Increas ing/red ucing the side
support in the seat using the s ide bo lsters on the
seating surface and backrest
c::> .&. .
60
Seating surface -Making the seating surface lon
ger/shorter
c::> & .
A WARNING
-Never ad just the driver's or front passeng
er 's seat while the vehicle is moving. If you
do this while the vehicle is moving, you will
be out of posit io n. Always adjust the driver's
or front passenger's seat when the vehicle is
not moving .
- Be careful when adjust ing the seat height .
Check to see that no o ne is in the way, or se
rious inju ry could result!
- Because the seats can be electr ically adjust
ed w ith the ignition off, never leave children
unattended i n the vehicle. Uns upervised use
of the e lectr ic sea t adjustments may ca use
serious in ju ry.
- To reduce the r is k of injury in the case of
sudden b raking or accident, front pa ssen
gers must never ride in a moving vehicle
w ith the backrest reclined . Safety belts and
the airbag system on ly offer maximum pro
tection when the backrest is upright and the
safety belts are properly positioned on the
body. The more the backrest is reclined, the
greater the risk of pe rsonal injury from an
incorrect seating position and improperly
positioned safety belts.
@ Tips
- The massage funct ion sw itches off auto
matically after approximately 10 m inutes.
- In vehicles w ith the reclining rear seat, on ly
the safety be lt height and the seat ing sur
face can be adjusted on the front passenger
seat using the mu ltifunction bu tton.
- The side bolsters* deflate when the driver's
door is ope ned . This allows you to enter and
ex it comfortab ly. The side bolste rs infla te
again once yo u begin driving.
-
Page 63 of 302

Armrest
There is a storage compartment under the arm
rest.
Fi g. 6 1 Cockpit: center armrest
Opening th e stor age compartment
... Press the b utton -arrow -and move the armrest
up
¢fig. 61.
Adjusting the armrest
... To move the armrest forward and up, press the
button -arrow- while pull ing the a rmrest into
the des ired position .
.,. To bri ng the armrest back into its orig inal posi
tio n, press the button -ar row -while press ing
the arm rest down.
Pl ease note that the driver 's arm movements
may be restric ted with the arm rest folded down.
F or this reason, the armrest shou ld not be folded
down when driving in city traffic .
Rear seats
General information
Safe transportation of passengers on the rear
seats requires proper safety precautions.
All passengers on the rear seats must be seated
in compliance w ith the safety guidelines ex
p la ined in ¢
page 138 and¢ page 146 . The cor
rect seating posit ion is critical for the safety of
front
and rear seat passenge rs a like¢ page 132 .
A WARNING
-Occ upan ts in the fro nt and rear seats m ust
always be prope rly res trai ned.
Seats and storag e
-Do not let anyone ride in the ve hicle w ithout
the head restraints provided. Head re
straints help to reduce injuries.
- Loose items inside the passenger compart
ment can fly forward in a c rash or sudden
maneuver and injure occupants. Always
store articles in the luggage compa rtment
and use the tie-down eyelets.
- Read and heed all WARNINGS
<=> page 132,
Proper seating positions for passengers in
rear seats .
Adjusting the rear seats
Applies to: vehicles with power adjustable rear seats
Fig. 6 2 Passenger side rear seat: seat ad justment buttons
F ig. 63 Rear door: memo ry function buttons
Adjusting lumbar support
... To adjust the curvature of the lumbar support,
press the button @ to the left/right.
.,. To adjust the height of the lumbar support,
press the button @ upward/downward.
Adjusting the head re straint angle
... To adjust the head restraint so that it is more
vertical/more angled, press the button @ for-
ward/back. ..,.
61
Page 64 of 302

Seat s and sto rage
Adju st ing th e seat po sition
.,. To adjust the seat forwa rd/bac k, press the but
ton © forward/back .
.,. To move the seat up/down, press the button ©
upward/downward .
Adjusting th e massage function*
.,. To adjust the "p ulsating"/"wave" massage
funct ion, press the butto n© to the left/r ight.
The massage f unction is at its strongest level
when three LEDs in the button turn on .
.,. To reduce the massage level, press the © but
ton again .
.,. To switch the massage function off, press the
button repeatedly until the LED turns off.
Adju st ing th e re clining p osition
.,. To adjust the reclining position, press and hold
the button ® until the seat reaches its end po
s ition .
.,. Applies to vehicles with reclining seat*: If you
select the reclining position, the front passeng
er's seat moves forward and the backrest re
cl ines. Depending on the last setting, the leg
support may fold out at the same t ime. The
front passenger 's seat can no longer be used in
the recl ining position¢ _&.. You can adjust the
l eg support or fold the display fo rward in the
reclining position.
Selecting the standard seat position
.,. To adjust the standard seat pos ition, press and
hold the bu tton (D unt il the seat reaches its
end position .
.,. Applies to vehicles with reclining seat*: If you
select the standard seat position, the front pas
senger's seat is moved back into the starting
pos ition, the head restra int is moved to the up
rig ht posit ion a nd the leg support is folded in
ward ¢_& .
Adju st ing th e di splay*
.,. To tilt the disp lay forward/back, press and hold
the left/right button @ unt il the display reach
es the desired pos ition.
.,. Applies to vehicles with reclining seat*: To
maintain a clear view of the road when the seat
is in the reclining position, press and hold the
62
right button @ until the disp lay has folded for
ward. Make sure the driver has a clear view of the exter ior mirrors. If so, confirm the quest ion
in the Infotainment system with
Yes . If you an
swer
No or do not respond to the quest ion, the
disp lay w ill return to the upright pos ition.
Adju sting the leg support (vehicles with
reclining seat*)
Requirement: The reclining pos it ion must be se
lected ¢
page 62.
.,. To fold the leg support o ut/in, press and hold
the left/r ight button @ until the leg support
reaches the desired pos it ion.
.,. To angle the leg support so that it is more up
r ight/more reclined or to move it forward/back,
adjusting the front passenger's seat accord ing
ly.
Adjusting the front pa ssenger 's seat
.,. Make sure that the front passenger's seat ad
justment is switched on in the Infotainment
system
¢ page 64 .
.,. To act ivate the front passenger's seat adjust
ment, press the button ®·
.,. To adjust the front p assenger's se at forward/
back, press the button © forward/back .
.,. To move the front passenger's seat up/down,
press the button © upward/downward .
.,. To adjust the front passenger's seat backrest so
that is more upright/more recl ined, press the
button @ forward/back .
.,. Applies to veh icles with reclin ing seat*: To ad
just the reclin ing/standa rd seat position, press
and hold the button@/(D unt il the seat reach
es its end position.
~ WARNING
-
- The power ad justment for the ind iv idual
seats a lso works with the ignition. For this
reason, children sho uld never be left unat
tended in the vehicle -they could be injured!
- Exercise caution when adjust ing the seats.
Unsupervised or careless seat adjustment
can pinch fingers or hands ca us ing injur ies .
 1
1 2
2 3
3 4
4 5
5 6
6 7
7 8
8 9
9 10
10 11
11 12
12 13
13 14
14 15
15 16
16 17
17 18
18 19
19 20
20 21
21 22
22 23
23 24
24 25
25 26
26 27
27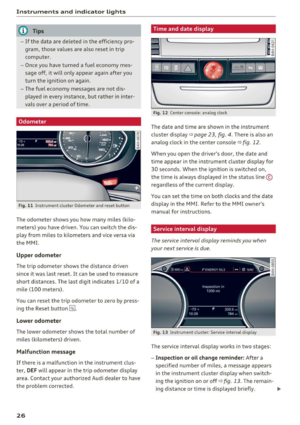 28
28 29
29 30
30 31
31 32
32 33
33 34
34 35
35 36
36 37
37 38
38 39
39 40
40 41
41 42
42 43
43 44
44 45
45 46
46 47
47 48
48 49
49 50
50 51
51 52
52 53
53 54
54 55
55 56
56 57
57 58
58 59
59 60
60 61
61 62
62 63
63 64
64 65
65 66
66 67
67 68
68 69
69 70
70 71
71 72
72 73
73 74
74 75
75 76
76 77
77 78
78 79
79 80
80 81
81 82
82 83
83 84
84 85
85 86
86 87
87 88
88 89
89 90
90 91
91 92
92 93
93 94
94 95
95 96
96 97
97 98
98 99
99 100
100 101
101 102
102 103
103 104
104 105
105 106
106 107
107 108
108 109
109 110
110 111
111 112
112 113
113 114
114 115
115 116
116 117
117 118
118 119
119 120
120 121
121 122
122 123
123 124
124 125
125 126
126 127
127 128
128 129
129 130
130 131
131 132
132 133
133 134
134 135
135 136
136 137
137 138
138 139
139 140
140 141
141 142
142 143
143 144
144 145
145 146
146 147
147 148
148 149
149 150
150 151
151 152
152 153
153 154
154 155
155 156
156 157
157 158
158 159
159 160
160 161
161 162
162 163
163 164
164 165
165 166
166 167
167 168
168 169
169 170
170 171
171 172
172 173
173 174
174 175
175 176
176 177
177 178
178 179
179 180
180 181
181 182
182 183
183 184
184 185
185 186
186 187
187 188
188 189
189 190
190 191
191 192
192 193
193 194
194 195
195 196
196 197
197 198
198 199
199 200
200 201
201 202
202 203
203 204
204 205
205 206
206 207
207 208
208 209
209 210
210 211
211 212
212 213
213 214
214 215
215 216
216 217
217 218
218 219
219 220
220 221
221 222
222 223
223 224
224 225
225 226
226 227
227 228
228 229
229 230
230 231
231 232
232 233
233 234
234 235
235 236
236 237
237 238
238 239
239 240
240 241
241 242
242 243
243 244
244 245
245 246
246 247
247 248
248 249
249 250
250 251
251 252
252 253
253 254
254 255
255 256
256 257
257 258
258 259
259 260
260 261
261 262
262 263
263 264
264 265
265 266
266 267
267 268
268 269
269 270
270 271
271 272
272 273
273 274
274 275
275 276
276 277
277 278
278 279
279 280
280 281
281 282
282 283
283 284
284 285
285 286
286 287
287 288
288 289
289 290
290 291
291 292
292 293
293 294
294 295
295 296
296 297
297 298
298 299
299 300
300 301
301