Page 209 of 248

Checking and refilling levels
performed by a technical service or special-
i sed w
ork
shop.
The correct oil specifications for your engine
are listed in the ›››
page 40.
Service intervals
Service intervals can be flexible (LongLife
service) or fixed (dependent on time/dis-
tance travelled).
If the PR code that appears on the back of the
Maintenance Programme booklet is PR QI6,
this means that your vehicle has the LongLife
service programmed. If it lists the codes QI1,
QI2, QI3, QI4 or QI7, the interval service is
dependent on time/distance travelled.
Flexible service intervals (LongLife service
intervals*)
Special oils and processes have been devel-
oped which, depending on the characteris-
tics and individual driving profiles, enable
the extension of the oil change service (Long-
Life service intervals).
Because this oil is essential for extending the
service intervals, it must only be used ob-
serving the following indications:
● Avoid mixing it with oil for fixed service in-
terv
als.
● Only in exceptional circumstances, if the
engine oi l
level is too low ››› page 207 and
LongLife oil is not available, it is permitted to top up (once) with oil for
fixed ser
vice inter-
vals ›››
page 40 (up to a maximum of 0.5
litres).
Fixed service intervals*
If your vehicle does not have the “LongLife
service interval” or it has been disabled (by
request), you may use oils for fixed service
intervals, which also appear in
››› page 40. In this case, your vehicle
must be serviced after a fixed interval of 1
year/15,000 km (10,000 miles)(whatever
comes first) ››› Booklet Maintenance Pro-
gramme.
● In exceptional circumstances, if the engine
oil l
evel is too low ››› page 207 and you can-
not obtain the oil specified for your vehicle,
you can add a small quantity of oil conform-
ing to the specification ACEA A2 or ACEA A3
(petrol engines) or ACEA B3 or ACEA B4 (die-
sel engines) (up to 0.5 l).
Vehicles with diesel particulate filter*
The Maintenance Programme states whether
your vehicle is fitted with a diesel particulate
filter.
Only VW 507 00 engine oil, with reduced ash
formation, may be used in diesel engines
equipped with particulate filter. Using other
types of oil will cause a higher soot concen-
tration and reduce the life of the DPF. There-
fore: ●
Avoid mi
xing this oil with other engine oils.
● Only in exceptional circumstances, if the
engine oil
level is too low ››› page 207 and
you cannot obtain the oil specified for your
vehicle, you can use a small quantity of oil
(once) conforming to the VW 506 00,
VW 506 01, VW 505 00, VW 505 01 or
ACEA B3/ACEA B4 specification. (up to 0.5 l). Note
Before a long trip, we recommend finding an
engine oi l
that conforms to the correspond-
ing VW specifications and recommend keep-
ing it in the vehicle. This way, the correct en-
gine oil will always be available for a top-up if
needed. Checking engine oil level
Fig. 207
Engine oil dipsticks. » 207
Technical data
Advice
Operation
Emergencies
Safety
Page 210 of 248

Advice
Read the additional information carefully
› ›
›
page 40
The dipstick shows the engine oil level.
››› Fig. 207.
Checking oil level
– Park the vehicle on a level surface and en-
sure the en
gine is at operating tempera-
ture.
– Switch the ignition off.
– Open the bonnet.
– Wait a few minutes for the engine oil to
flow bac
k to the sump and remove the dip-
stick.
– Wipe the dipstick with a clean cloth and in-
sert it
again as far as it will go.
– Then pull the dipstick out again and check
the oil l
evel.
It is normal for the engine to consume a cer-
tain amount of oil. Depending on how you
drive and the conditions in which the vehicle
is used, oil consumption can be up to 0.5 li-
tres per 1,000 km. Oil consumption can also
be higher for the first 5,000 km (3000 miles).
You should therefore check the oil level at
regular intervals, ideally every time you fill
the tank or before setting off on a long trip. CAUTION
● The oil l
evel must never exceed area A ›››
Fig. 207. Risk of damage to the exhaust
system!
● If the engine oil cannot be topped up under
the given condition
s, do not drive on! Stop
the engine and seek the professional assis-
tance of an Official Service, as this could
cause serious damage to the engine. Topping up engine oil
–
Check the engine oil level ››
›
page 207,
Checking engine oil level .
– Unscrew the cap from the filler opening.
– Put in the specified grade of oil 0.5 litres at
a time ›››
page 206.
– Check the oil level ›››
page 207.
– Replace the oil filler cap carefully and push
the dipstic
k all the way in.
Changing engine oil Engine oil must be changed with the frequen-
cy
indic
at
ed in the Maintenance Programme
or according to the service interval indicator
››› page 30. CAUTION
Do not mix engine oil with additives. Risk of
dam ag
e to the engine! Damage caused by
these products is not covered by the warran-
ty. Note
Wash your skin thoroughly if it comes into
cont act
with engine oil. Coolant
Chec k
in
g coolant level Fig. 208
Engine compartment: coolant fluid
t ank. Read the additional information carefully
› ›
›
page 40
The coolant expansion tank is located in the
engine compartment of the vehicle.
208
Page 211 of 248

Checking and refilling levels
– Sw it
c
h the ignition off.
– Open the bonnet ›››
page 203.
– Read off the coolant level on coolant ex-
pans
ion tank ››› Fig. 208. When the engine
is cold, the coolant should be between
marks B (min.) and
A (max.). When the
en gine i
s
hot, it may be slightly above mark
A (max.).
If the c
oo
lant fluid level in the reservoir is too
low, this will be indicated by the red warn-
ing lamp illuminating on the general dash
panel ››› page 100, Coolant level and temper-
ature . However, we recommend checking
the coolant level directly in the tank.
Coolant fluid loss
Any loss of coolant normally indicates a leak.
It is not sufficient merely to top up the cool-
ant. The cooling system should be inspected
by an Official Service without delay. CAUTION
● In the event of
a fault that causes the en-
gine to overheat, contact an authorised SEAT
dealer immediately, as this could damage the
engine.
● Anti-freeze that does not correspond to the
correct
specification may particularly affect
corrosion protection considerably.
● Faults caused by corrosion may lead to
cool
ant leaks. Risk of serious engine faults! Topping up the coolant level
–
Switch the ignition off.
– Wait for the engine to cool down.
– Cover the cap on the coolant expansion
tank ›
›› Fig. 208 with a cloth and carefully
unscrew the cap.
– Refill the level of coolant.
– Screw the cap on again until it clicks into
plac
e.
Do not use a different type of additive if the
prescribed anti-freeze additive is not availa-
ble, in the event of an emergency. In this
case, use only water and bring the coolant
concentration back up to the correct level as
soon as possible at an Official Service.
Always top up with unused coolant.
Never fill the coolant tank above mark A (max.)
››
›
Fig. 208 Excess coolant is forced
out of the cooling system through the over-
pressure valve in the filler cap of the expan-
sion tank when the engine heats up. WARNING
● The anti-freez e a
dditive and, therefore, the
entire coolant, are a health hazard. Avoid
touching the coolant. Coolant fumes are also
a health hazard. For this reason, always store
the coolant additive in a safe place out of the
reach of children. Risk of poisoning! ●
If s p
lashed into eyes, rinse immediately
with clean water and seek immediate medical
attention.
● Seek immediate medical attention if the
cool
ant is accidentally ingested. CAUTION
If the coolant cannot be topped up under the
giv en c ondition
s, do not drive on. We rec-
ommend contacting an authorised SEAT deal-
er, as this can damage the engine. Brake fluid
Chec kin
g brake fluid level Fig. 209
Engine compartment: brake fluid
r e
ser
voir. Read the additional information carefully
› ›
›
page 41 »
209
Technical data
Advice
Operation
Emergencies
Safety
Page 212 of 248

Advice
The brake fluid reservoir is located in the en-
gine c omp
ar
tment of the vehicle.
– Switch the ignition off.
– Open the bonnet ›››
page 203.
– Check the brake fluid level in the reservoir
›››
Fig. 209. It should be between the “MIN”
and “MAX” marks.
The fluid level drops slightly after a period of
time due to automatic compensation for
brake pad wear. This is quite normal.
However, if the level goes down noticeably in
a short time, or drops below the “MIN” mark,
there may be a leak in the brake system. If
the brake fluid level in the reservoir is too
low, this will be indicated by the warning
lamp illuminating on the instrument panel
››› page 99, Brake system . WARNING
● If the fluid l ev
el has dropped below the MIN
mark, do not continue driving. Risk of acci-
dent! Go to a technical service.
● Heavy use of the brakes may cause a va-
pour lock if
the brake fluid is left in the brake
system for too long. This would seriously af-
fect the efficiency of the brakes and the safe-
ty of the vehicle. Changing the brake fluid
Brake fluid absorbs moisture. Therefore, it
gra
dual
ly absorbs moisture from the atmos-
phere. If the water content in the brake fluid
is too high, the brake system could corrode.
The water content also reduces the boiling
point of the brake fluid.
The brake fluid must comply with one of the
following standards or specifications:
● VW 50114
● FMVSS 116 DOT4 CAUTION
Brake fluid damages the vehicle paintwork. Windscreen washer
top
pin
g up windscreen washer fluid Fig. 210
Engine compartment: windscreen
w a
sher r
eservoir. Read the additional information carefully
› ›
›
page 41
The container for the windscreen washer con-
tains the cleaning fluid for the windscreen or
rear window and the headlight washer sys-
tem. The container is located in the engine
compartment.
The capacity of the reservoir is approximately
3.5 litres; in vehicles with a headlight washer
system, it is approximately 5.4 litres 1)
.
Plain water on its own is not enough to clean
the glass and the headlights properly. We 1)
Valid only for certain countries. 5.4 litres for both
ver s
ions.
210
Page 213 of 248
.
Although your vehicle has")
Checking and refilling levels
therefore recommend using clean water with
a gl a
s
s cleaning product to eliminate any
stubborn dirt (with an anti-freeze additive in
winter).
Although your vehicle has heated windscreen
washer jets, anti-freeze should always be
added to the water in winter.
Ethanol can be used where glass cleaner with
anti-freeze is unavailable. The concentration
of ethanol must be no greater than 15 %.
However, remember that anti-freeze in this
proportion only protects down to -5°C
(+23°F). CAUTION
● Never mi x
the windscreen washing water
with anti-freeze used for the cooling system
or other additives.
● If the vehicle is equipped with a headlight
washer sy
stem, only mix in with the water a
detergent that does not damage polycarbon-
ates. Note
When topping up the fluid, do not move the
filt er fr
om the container opening, as this
could contaminate the fluid hoses and lead to
a windscreen washer malfunction. Battery
Intr oduction Read the additional information carefully
›› ›
page 41.
Warning symbols on the battery
Sym bolMeaning
Always wear safety glasses!
Battery acid is extremely corrosive. Always wear
gloves and hearing protection!
Keep open flames, sparks, uncovered lights
and lit cigarettes away when working on the
battery!
A highly explosive mixture of gases is released
when the battery is under charge!
Keep children away from the battery!
Incorrect handling of the vehicle battery
c
ou
l
d lead to damage. We therefore recom-
mend all work on the vehicle battery be per-
formed by an authorised SEAT dealer.
Always be aware of the danger of injury and
scalding as well as the risk of accident or fire
when working on the battery and the electri-
cal system. Therefore, always observe the
warnings and follow all general safety pre-
cautions. WARNING
● Batt er
y acid is very corrosive, therefore, the
battery must be handled with the utmost
care. Wear protective gloves and protect your
eyes and skin when handling batteries. The
corrosive fumes in the air irritate and inflame
the respiratory tract and cause conjunctivitis.
It corrodes tooth enamel. Causes deep and
difficult-to-heal wounds when it comes in
contact with the skin. Repeated contact with
diluted acids causes skin disease (inflamma-
tion, ulcers and fissures). When in contact
with water, acids dilute and develop a great
deal of heat.
● Do not tilt the battery, as acid could leak
out of the
vapour vents. Protect your eyes
with glasses or a protective helmet! Risk of
blindness! If acid should splash into the
eyes, rinse the affected eye immediately for
several minutes using clean water. Then seek
medical care immediately.
● Neutralize any acid splashes on the skin or
clothing w
ith soap solution as quickly as pos-
sible and rinse off with plenty of water. If acid
is swallowed by mistake, consult a doctor im-
mediately.
● Keep children away from the battery.
● Hydrogen is released and a highly explo-
sive mi
xture of gases is generated when the
battery is under charge. Sparks when discon-
necting or releasing cable terminals with the
ignition switched on could also cause an ex-
plosion. » 211
Technical data
Advice
Operation
Emergencies
Safety
Page 214 of 248

Advice
●
A short c
ircuit is produced if the battery ter-
minals are bridged, e.g. using metal objects,
cables, etc. Possible consequences of a short
circuit: melting of lead plates, battery explo-
sion and fire, splashing acid.
● The following is forbidden while working on
the batter
y: fire and open flames, smoking
and activities that could produce sparks.
Avoid causing sparks when handling cables
or electrical apparatus. Risk of injury in the
event of large sparks.
● Before working on the electrical system,
you mus
t switch off the engine, the ignition
and all electrical components and disconnect
the cable from the negative terminal (-) of the
battery. To change a bulb, simply switch off
the corresponding light.
● Never charge a frozen or thawed out bat-
tery
. Risk of explosion and acid burns! Re-
place a frozen battery.
● Never use the jump leads on batteries in
which the electr
olyte level is too low. Risk of
explosion and acid burns!
● Never use a damaged battery. Risk of ex-
plos
ion! Replace a damaged battery immedi-
ately. CAUTION
● Never di s
connect the battery when the igni-
tion is switched on, as the electrical system
(electronic components) of the vehicle could
be damaged. When disconnecting the battery
from the vehicle electrical system, disconnect its negative terminal (-) first. Only then may
the pos
itiv
e terminal (+) be disconnected.
● When connecting the battery, first connect
the positiv
e terminal (+) and then the nega-
tive terminal (-). The battery cables must nev-
er be connected to the wrong battery termi-
nals. Risk of burning the electrical installa-
tion!
● Make sure the battery acid does not come
into cont
act with the bodywork. Risk of paint-
work damage.
● Do not expose the battery to direct sunlight
to prot
ect it from ultraviolet radiation.
● If the vehicle is not used for 3 or 4 weeks,
the batter
y could run flat. This is because
some components use electricity even in
standby mode (e.g. control units). Prevent the
battery from running flat by disconnecting its
negative terminal or leave it charging at a low
current.
● If you frequently use the vehicle for short
trips, the batt
ery may not fully charge and
could run flat. For the sake of the environment
A flat battery is particularly harmful waste for
the env ir
onment. It must therefore be dis-
posed of according to current local law. Note
Replace a battery once it is older than 5
ye ar
s. Lifting the battery cover
Fig. 211
Battery: Opening the cover. The battery is located beneath a plastic cover
in the en
gine c
omp
artment.
– Open the battery cover in the direction indi-
cated b
y the arrow ››› Fig. 211.
– The positive terminal (+) of the battery is
connected in r
everse order.
212
Page 215 of 248

Checking and refilling levels
Checking the battery electrolyte level Fig. 212
Battery: Electrolyte level indicator. We recommend you have the acid level regu-
l
arly
c
hecked at an official technical service,
particularly in the following cases.
● At high outside temperatures.
● On long daily trips.
● Whenever the vehicle is loaded
›››
page 213, Charging the battery.
In vehicles equipped with a battery with col-
our indicator, the so-called magic eye
››› Fig. 212 changes colour to indicate the
acid level.
Air bubbles can influence the colour of the in-
dicator. Therefore, carefully knock the indica-
tor before checking the acid level.
● Black – the acid level is correct.
● Colourless or light yellow – acid level too
low , b
attery must be changed. Note
● The batt er
y acid level is also regularly
checked during servicing at authorised SEAT
dealers.
● The electrolyte level on “AGM” batteries
cannot be c
hecked for technical reasons.
● Vehicles equipped with the “Start-Stop”
syst
em include a battery control unit to con-
trol the battery level for repeated engine
starting. Winter service
At low temperatures the battery provides only
a fr
action of
the s
tarting power it has at nor-
mal temperatures.
A flat battery can also freeze at temperatures
slightly below to 0°C (32°F).
We therefore recommend you have the bat-
tery checked and, if necessary, charged at an
official SEAT technical service before the start
of winter.
Charging the battery A fully-charged battery is essential for relia-
b
l
e s
tarting.
– Switch off the ignition and all electrical
equipment. –
For “fa
st-charging” only: disconnect both
battery connection cables (first the “nega-
tive” terminal and then the “positive”).
– Connect the charger cables to the battery
terminal
s (red = “positive”, black = “nega-
tive”).
– Plug in the battery charger and switch on.
– After charging the battery: Switch off the
batter
y charger and disconnect the cable.
– Remove the charger cables.
– If necessary, reconnect both battery cables
to the batt
ery (first the “positive” cable,
then the “negative” cable).
When charging with a low current (e.g. with a
small battery charger ), the battery does not
normally have to be disconnected. The in-
structions of the battery charger manufactur-
er must be followed.
Use a current equivalent to or lower than
10% of the battery capacity to fully charge
the battery.
Before “fast-charging” the battery however,
both battery cables must be disconnected.
“Fast-charging” a battery is dangerous and
requires a battery charger and special knowl-
edge. Fast charges should be performed by
an official technical service.
The battery caps should not be opened while
the battery is being charged. »
213
Technical data
Advice
Operation
Emergencies
Safety
Page 216 of 248

Advice
CAUTION
In vehicles fitted with the “Start-Stop” sys-
tem, the c h
arger cable cannot be directly con-
nected to the negative terminal of the vehicle
battery but must be attached to the engine
ground point ›››
page 52. Disconnecting and connecting the
batt
er
y The following functions will either be inoper-
ative or w
i
ll not work properly after discon-
necting and reconnecting the battery:
FunctionInstallation
Setting the clock››› page 95
The multifunction display data
is deleted››› page 97 Note
We recommend having the vehicle checked by
an authorised S EA
T dealer to guarantee the
correct working order of all electrical sys-
tems. Replacing the battery
A replacement battery must have the same
c
ap
ac
ity, voltage, current rating and size as
the original. The appropriate types of battery can be acquired from authorised SEAT deal-
ers.
We r
ecommend having the battery changed
by an authorised SEAT dealer, where the new
battery will be correctly installed and the
original disposed of in line with regulations.
Automatic disconnection of electrical
equipment When heavily-charging a battery, the pro-
gr
amme sel
ect
ed by the electrical system
control unit prevents the battery from auto-
matically discharging. This may result in the
following:
● Increase in idling speed so that the alterna-
tor can s
upply more current to the electrical
system.
● The performance of certain electrical com-
ponents cou
ld be limited or some may switch
off temporarily, e.g. the heated seats, the
heated rear window, the 12 V power socket. Note
Despite any measures taken by the control
unit, the b att
ery could drain. e.g. with the en-
gine is switched off, the key is turned in the
ignition for a long period or the side lights or
parking lights are switched on. The switching
off of certain electrical components does not impair driving comfort and often the driver
wi
l
l not even notice.214
 1
1 2
2 3
3 4
4 5
5 6
6 7
7 8
8 9
9 10
10 11
11 12
12 13
13 14
14 15
15 16
16 17
17 18
18 19
19 20
20 21
21 22
22 23
23 24
24 25
25 26
26 27
27 28
28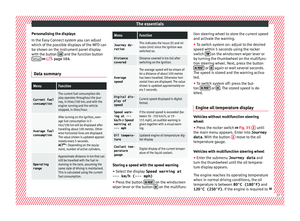 29
29 30
30 31
31 32
32 33
33 34
34 35
35 36
36 37
37 38
38 39
39 40
40 41
41 42
42 43
43 44
44 45
45 46
46 47
47 48
48 49
49 50
50 51
51 52
52 53
53 54
54 55
55 56
56 57
57 58
58 59
59 60
60 61
61 62
62 63
63 64
64 65
65 66
66 67
67 68
68 69
69 70
70 71
71 72
72 73
73 74
74 75
75 76
76 77
77 78
78 79
79 80
80 81
81 82
82 83
83 84
84 85
85 86
86 87
87 88
88 89
89 90
90 91
91 92
92 93
93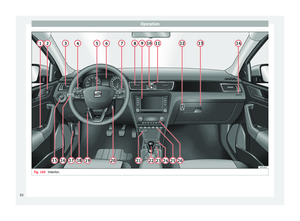 94
94 95
95 96
96 97
97 98
98 99
99 100
100 101
101 102
102 103
103 104
104 105
105 106
106 107
107 108
108 109
109 110
110 111
111 112
112 113
113 114
114 115
115 116
116 117
117 118
118 119
119 120
120 121
121 122
122 123
123 124
124 125
125 126
126 127
127 128
128 129
129 130
130 131
131 132
132 133
133 134
134 135
135 136
136 137
137 138
138 139
139 140
140 141
141 142
142 143
143 144
144 145
145 146
146 147
147 148
148 149
149 150
150 151
151 152
152 153
153 154
154 155
155 156
156 157
157 158
158 159
159 160
160 161
161 162
162 163
163 164
164 165
165 166
166 167
167 168
168 169
169 170
170 171
171 172
172 173
173 174
174 175
175 176
176 177
177 178
178 179
179 180
180 181
181 182
182 183
183 184
184 185
185 186
186 187
187 188
188 189
189 190
190 191
191 192
192 193
193 194
194 195
195 196
196 197
197 198
198 199
199 200
200 201
201 202
202 203
203 204
204 205
205 206
206 207
207 208
208 209
209 210
210 211
211 212
212 213
213 214
214 215
215 216
216 217
217 218
218 219
219 220
220 221
221 222
222 223
223 224
224 225
225 226
226 227
227 228
228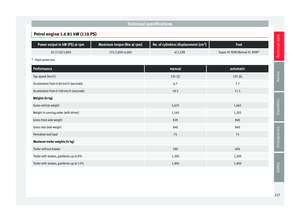 229
229 230
230 231
231 232
232 233
233 234
234 235
235 236
236 237
237 238
238 239
239 240
240 241
241 242
242 243
243 244
244 245
245 246
246 247
247