Page 177 of 248

Driver assistance systems
too much traffic or in a car park when there
ar e g
ood w
eather and visibility conditions.
Cleaning the camera lens
Keep the camera lens clean and clear of snow
and ice:
● Moisten the lens using a normal alcohol-
based gl
ass cleaning product and clean the
lens with a dry cloth.
● Remove snow using a small brush.
● Use de-icing spray to remove any ice. CAUTION
● Never u se abr
asive cleaning products to
clean the camera lens.
● Do not use hot or warm water to remove ice
or snow fr
om the camera lens. Doing so could
damage the camera. Parking and manoeuvring with the
r
e
ar a
ssist Fig. 186
Display on the Infotainment system
s c
r
een: orientation lines. Switching the system on and off
●
The rear assist will switch on when the igni-
tion i s
on or the en
gine running, on engaging
reverse gear (manual gearbox) or on chang-
ing the selector lever to the R position (auto-
matic gearbox).
● The system switches off 8 seconds after
diseng
aging reverse gear (manual gearbox)
or removing the selector lever from the R po-
sition (automatic gearbox). The system will
also disconnect immediately after the igni-
tion is switched off. In combination with the Parking System Plus
›››
page 168, the camera image will cease to
be transmitted immediately when reverse
gear is engaged or when the selector lever is
moved from the R position, and the optical
information provided by the Parking Aid sys-
tem will be displayed.
Also in combination with the system, the rear
assist image can also be concealed:
● By pressing one of the Infotainment system
button
s on the display.
● OR: By pressing the miniature vehicle that
appear
s on the left of the screen (which
switches to the full-screen mode of the Park-
ing System Plus's optical system).
If you wish to display the rear assist image
again:
● Disengage reverse, or change the selector
lever's
position, engage reverse again or
move the selector lever to position R.
● OR: Press the RVC function b
utton1)
Meaning of the orientation lines
››› Fig. 186 »1)
WARNING: the RVC function b
utton will only be ac-
tivated and available when the reverse gear is en-
gaged or the selector lever is set to position R.
175
Technical data
Advice
Operation
Emergencies
Safety
Page 178 of 248
 on the road surface.
End of the side lines: the area marked in
green ends approxima")
Operation
Side lines: e xt
en sion of the vehicle (the
approximate width of the vehicle plus the
rear view mirrors) on the road surface.
End of the side lines: the area marked in
green ends approximately 2 m behind
the vehicle on the road surface.
Intermediate line: indicates a distance of
approximately 1 m behind the vehicle on
the road surface.
Red horizontal line: indicates a safe dis-
tance of approximately 40 cm at the rear
of the vehicle on the road surface.
Parking manoeuvre
● Place the vehicle in front of the parking
spac
e and engage reverse gear (manual
gearbox) or move the selector to the R posi-
tion (automatic gearbox).
● Reverse slowly, and turn the steering wheel
so that the s
ide orientation lines lead to-
wards the parking space.
● Guide the vehicle into the parking space so
that the s
ide orientation lines run parallel to
it.
cruise speed (Cruise control)*
Introduction Read the additional information carefully
› ››
page 31
1
2
3
4 The cruise control system allows you to drive
at
a c
on
stant speed of 30 km/h (19 mph) or
higher without having to press the accelera-
tor. However, the speed is only maintained
within the margin permitted by the engine
power and the braking effect of the engine.
The warning lamp lights up on the general
instrument panel if cruise control is switched
on. WARNING
● For s af
ety reasons the cruise control sys-
tem must not be used in dense traffic or
where roads conditions are poor (e.g. due to
ice, aquaplaning, loose grit, snow). – Risk of
accident!
● The programmed speed can only be re-es-
tabli
shed if it is not too high for current traf-
fic conditions.
● Always switch the cruise control system off
after u
sing it in order to avoid involuntary
use. CAUTION
● The crui se c
ontrol cannot maintain a con-
stant speed when the vehicle is moving
downhill. The vehicle tends to accelerate un-
der its own weight. Therefore, shift down or
use the brake pedal in good time to slow the
vehicle. Note
● In v ehic
les with an automatic gearbox, the
cruise control system cannot be switched on
if the selector lever is in position P, N or R.
● In vehicles with a manual gearbox, the
cruise c
ontrol cannot be switched on if first
gear or reverse gear is engaged. Setting the speed
Fig. 187
Turn signal and main beam head-
light l
ev
er: cruise control buttons. Setting speed
– Move knob 1
› ›
› Fig. 187
to the ON posi-
tion.
– Briefly press rocker switch 2 in S
ET posi-
tion when y
ou have reached the speed you
wish to set.
176
Page 179 of 248

Driver assistance systems
On releasing rocker switch 2 from S
ET, the
c urr
ent speed is stored and will remain con-
stant without having to press the accelerator
pedal.
Adjusting the programmed speed Increasing speed by pressing the accelerator
peda
l
– Pr
ess the accelerator to increase the speed
of the v
ehicle.
– Release the accelerator and the previously
progr ammed s
peed will be resumed.
If, when pressing the accelerator, the vehicle
exceeds the programmed speed by more
than 10 km/h (6 mph) for more than 3 mi-
nutes, the set speed will be deleted. The
speed will have to be stored again.
Increasing speed by pressing switch 2–
Press rocker switch 2
› ›
›
Fig. 187
››› page 176 in RES.
– If the button is held down in the RES po
si-
tion, the speed increases continuously. Re-
lease the switch when the required speed
is reached. The speed is stored.
Setting a lower speed – The set speed can be reduced
by pressing
switch 2
› ›
›
Fig. 187 ›››
page 176 in SET. –
If the butt
on is held down in the SET posi-
tion, the speed decreases continuously. Re-
lease the switch when the required speed
is reached. The speed is stored.
– On releasing the switch at speeds of less
than 30 km/h (19 mph), no speed w
ill be
set and the memory will be deleted. The ve-
hicle must be moving at a speed of over
30 km/h (19 mph) and switch 2 pressed
ag ain t
o
SET for it to be set.
The speed can be reduced by pressing the
brake pedal, which temporarily switches off
the cruise control.
Temporary deactivation of cruise con-
trol Cruise control
is
sw
itched off temporarily by
pressing switch 1
› ›
› Fig. 187 ››› page 176 in
CANCEL or by pressing the brake or clutch
pedal.
The set speed is stored.
To recover the set speed, briefly press switch 2 in RE
S once you have released the brake
or c lut
ch pedal.
Turning off the cruise control system –
Move knob 1
› ›
›
Fig. 187 ›››
page 176 to
OFF. Monitoring system Front As-
sis
t*
Introduction The Front Assist Monitoring system helps to
prev
ent
rear collisions.
The Front Assist can warn the driver of colli-
sion hazards, prepare the vehicle for emer-
gency braking in case of danger, assist the
driver on braking and cause automatic brak-
ing.
The Front Assist is not a replacement for
driver awareness.
Distance warning
If the system detects that safety is endan-
gered by the proximity of the vehicle in front,
it may warn the driver by means of a message
on the instrument panel when driving at a
speed of between approximately 60 km/h
(37 mph) and 210 km/h (130 mph)
››› Fig. 188.
The warning moment varies depending on
the traffic situation and driver behaviour.
Pre-warning
If the system detects a possible collision with
the vehicle in front, it may warn the driver by
means of an audible warning and an indica-
tion on the instrument panel when driving at »
177Technical data
Advice
Operation
Emergencies
Safety
Page 180 of 248
 and 210 km/h (130 mph)
› ›
›
Fig. 188.
The warning moment varies depending on
the traffic situation and driver behaviour. At
the same")
Operation
a speed of between approximately 30 km/h
(18 mph) and 210 km/h (130 mph)
› ›
›
Fig. 188.
The warning moment varies depending on
the traffic situation and driver behaviour. At
the same time, the vehicle will prepare for a
possible emergency braking ››› .
C ritic
a
l warning
If the driver fails to react to the pre-warning,
the system may actively intervene in the
brakes when driving at a speed of between
approximately 30 km/h (18 mph) and
210 km/h (130 mph), generating a brief jolt
to warn of the imminent collision.
Automatic braking
If the driver also fails to react to the pre-warn-
ing, the system may brake the vehicle auto-
matically, by progressively increasing braking
effect driving at a speed of between approxi-
mately 5 km/h (3 mph) and 210 km/h
(130 mph). By reducing speed in case of a
possible collision, the system may contribute
to reducing the consequences of an accident.
Front assist
If the Front Assist notices that the driver is
not braking sufficiently in case of a collision
hazard, the system can increase braking ef-
fect and thus avert the collision when driving
at a speed of between approximately 5 km/h (3 mph) and 210 km/h (130 mph). Front as-
sis
t only acts while the brake pedal is press-
ed down hard. WARNING
The intelligent technology in the Front Assist
cannot c
hange the laws of physics. The driver
is always responsible for braking in time. If
the Front Assist issues a warning, then, de-
pending on the traffic circumstances, you
must brake immediately or dodge the obsta-
cle.
● Adapt your speed and safe distance to the
vehicl
e in front of you at all times to suit visi-
bility, weather, road and traffic conditions.
● The Front Assist alone cannot avoid acci-
dents and seriou
s injuries.
● In complex driving situations, the Front As-
sis
t may issue unnecessary warnings and in-
tervene unnecessarily in braking, such as in
traffic islands.
● If the operation of the Front Assist is im-
paired, f
or example, by dirt or because the ra-
dar sensor has lost its settings, the system
may issue unnecessary warnings and inter-
vene inopportunely in the braking.
● During driving, the Front Assist does not re-
act to peop
le or animals or vehicles crossing
your path or which approach you head-on in
the same lane.
● The driver must always be ready to take
over the c
ontrol of the vehicle. Note
● When the Front As
sist causes a braking,
the brake pedal is “harder”.
● Automatic interventions by the Front Assist
on the brake
s may be interrupted by pressing
the clutch, accelerator or moving the wheel.
● If the Front Assist does not work as descri-
bed in this c
hapter (e.g. in intervenes several
times unnecessarily), switch it off. Have the
system checked by a specialised workshop.
SEAT recommends visiting a SEAT dealership. On-screen warning lamps and mes-
s
ag
e
s Fig. 188
On the instrument panel display:
W arnin
g indic
ations. Distance warning
If
the s
af
e distance with regard to the vehicle
in front is exceeded, the relevant warning will
178
Page 181 of 248

Driver assistance systems
appear on the instrument panel display
. WARNING
Observe the safety warnings ››› in Warning
and indication l amp
s on page 98. Note
When the Front Assist is connected, the indi-
cation s
on the instrument panel screen may
be concealed by warnings from other func-
tions, such as an incoming call. Radar sensor
Fig. 189
On the front bumper: radar sensor. A radar sensor is installed on the front bump-
er t
o det
ermine the tr
affic situation
››› Fig. 189 1 . This sensor can detect vehi-
c l
e
s in front up to a distance of approximately
120 m. The radar sensor's visibility may be impaired
by dir
t, mud or snow, or by environmental in-
fluences such as rain or mist. In this case the
Front Assist monitoring system does not
work. The instrument panel displays the fol-
lowing message: Front Assist: No sensor vision! If necessary clean the ra-
dar sensor ››› .
When the r a
d
ar sensor begins to operate
properly again, the Front Assist will automati-
cally be available again. The message will
disappear from the instrument panel display.
Front Assist operation may be affected by a
strong radar reverse reflection. This may oc-
cur, for example, in a closed car park or due
to the presence of metallic objects (e.g. rails
on the road or sheets used in road works).
The area in front of and around the radar sen-
sor should not be covered with adhesives,
additional or similar headlights, as this may
negatively affect Front Assist operation.
If structural modifications are made to the ve-
hicle, for example, if the suspension is low-
ered or the front spoiler is modified, Front As-
sist operation may be affected. So structural
modifications should only be made by speci-
alised workshops. SEAT recommends visiting
a SEAT dealership for this purpose.
If work is done incorrectly on the front of the
vehicle, the radar sensor could be damaged
or lose its settings, and Front Assist opera-
tion may be affected. So repair work should only be made by specialised workshops.
SEAT r
ecommends visiting a SEAT dealership
for this purpose. CAUTION
If you have the sensation that the radar sen-
sor is d
amaged or has lost its settings, dis-
connect the Front Assist. This will avoid pos-
sible damage. If this occurs have it adjusted.
● The sensor may become damaged or lose
its settin
gs when knocked, for example, dur-
ing a parking manoeuvre. This may compro-
mise the system's efficacy or disconnect it.
● Repairs to the radar sensor require special-
ist
knowledge and special tools. SEAT recom-
mends visiting a SEAT dealership for this pur-
pose.
● Clean away the snow with a brush and the
ice pref
erably with a solvent-free de-icer
spray. 179
Technical data
Advice
Operation
Emergencies
Safety
Page 182 of 248

Operation
Operating the Front Assist monitoring
sy s
t
em Fig. 190
On the instrument panel display:
Fr ont
As
sist switched off message. Fig. 191
On the turn signal and main beam
he a
dlight
lever: button for the driving assis-
tance systems The Front Assist monitoring system is active
whenev
er the ignition i
s
switched on. When the Front Assist is switched off, so too
are the pre-w
arning function (pre warning)
and the distance warning.
SEAT recommends leaving the Front Assist al-
ways switched on. Exceptions ››› page 180,
Switching the Front Assist Monitoring Sys-
tem off in the following situations .
Switching the Front Assist monitoring sys-
tem on and off
With the ignition switched on, the Front As-
sist can be switched on and off as follows:
● Select the corresponding menu option us-
ing the butt
on for the driver assist systems
››› Fig. 191.
● OR: switch the system on or off in the Easy
Connect
system with the button and the
f u
nction b
uttons and
Driv
er As
s ist ›››
pag
e 20.
When the Fr ont Assist monitoring system is
switched off, the instrument panel will inform
that it has been switched off with the follow-
ing indicator ››› Fig. 190.
Switching the pre-warning function on or off
The pre-warning function can be switched on
or off in the Easy Connect system with the
button and the function buttons
and
Driv er As
s
ist
› ›
›
page 20.
The system will store the setting for the next
time the ignition is switched on. SEAT recommends keeping the pre-warning
function sw
itched on at all times.
Switching distance warning on and off
If the safe distance with regard to the vehicle
in front is exceeded, the relevant warning will
appear on the instrument panel display
. In this case, increase the safe dis-
tance.
The distance warning function can be activa-
ted or deactivated in the Easy Connect sys-
tem with the button and the function but-
t on
s
and
Driv
er As
s ist
› ›
›
page 20.
The system will store the setting for the next
time the ignition is switched on.
SEAT recommends keeping the distance
warning switched on at all times.
Switching the Front Assist Monitoring
Sys
tem off in the following situations In the following situations the Front Assist
Monit
orin
g
System should be deactivated
due to the system's limitations ››› :
● When the vehicle is to be towed.
● If the vehicle is on a test bed.
● When the radar sensor is damaged.
● If the radar sensor takes a heavy knock, for
e x
amp
le in a rear collision.
180
Page 183 of 248

Driver assistance systems
● If it
int
ervenes several times unnecessarily.
● If the radar sensor is covered temporarily
with some kind of
accessory, such as an ad-
ditional headlight or the like.
● When the vehicle is to be loaded on a lorry,
ferry
or train. WARNING
If the Front Assist is not switched off in the
sit uation
s described, serious accidents and
injuries may occur.
● Switch off the Front Assist in critical situa-
tions. System limitations
The Front Assist Monitoring System has cer-
t
ain ph
y
sical limitations inherent in the sys-
tem. Thus, in certain circumstances some of
the system's reactions may be inopportune
or be delayed from the driver's standpoint.
So pay attention in order to intervene if nec-
essary.
The following conditions may cause the Front
Assist Monitoring System not to react or do
so too late:
● On taking tight bends.
● Pressing the accelerator all the way down.
● If the Front Assist is switched off or dam-
aged. ●
If the ASR ha
s been manually disconnec-
ted.
● If the ESC is controlling.
● If several brake lights of the vehicle or elec-
trically
connected trailer are damaged.
● If the radar sensor is dirty or covered.
● If there are metal objects, e.g. rails on the
roa
d or sheets used in road works.
● If the vehicle is reversing.
● If the vehicle over-accelerates.
● In case of snow or heavy rain.
● In case of narrow vehicles, such as motor-
bike
s.
● Misaligned vehicles.
● Vehicles crossing the other's path.
● Vehicles approaching in the opposite direc-
tion.
● Special loads and accessories of other ve-
hicle
s that jut out over the sides, backwards
or over the top. City Emergency braking function Fig. 192
On the instrument panel display:
pr e-w
arnin
g message The City Emergency braking function is part
of
the Fr
ont
Assist monitoring and is active
whenever the system is switched on.
Depending on the equipment, the pre-warn-
ing function can be switched on or off in the
Easy Connect system with the button and
the f u
nction b
uttons and
Driv
er As
s ist ›››
pag
e 20.
The C ity Emergency braking function picks
up, at speeds between 5 km/h (3 mph) and
30 km/h (19 mph) approximately, the traffic
situation in front of the vehicle up to a dis-
tance of about 10 m.
If the system detects a possible collision with
a vehicle in front of it, the vehicle prepares
for a possible emergency braking ››› .
»
181
Technical data
Advice
Operation
Emergencies
Safety
Page 184 of 248

Operation
If the driver fails to react to a possible colli-
s ion, the sy
s
tem may brake the vehicle auto-
matically, by progressively increasing braking
effect driving to reduce speed in the event of
a collision. The system can thus help to re-
duce the consequences of an accident.
Status display
Automatic deceleration by means of the City
Emergency braking function is displayed on
the instrument panel by means of the pre-
warning ››› Fig. 192 1)
. WARNING
The smart technology included in the City
Emerg ency
braking function cannot defy the
laws of physics. The driver is always respon-
sible for braking in time.
● Adapt your speed and safe distance to the
vehicl
e in front of you at all times to suit visi-
bility, weather, road and traffic conditions.
● The City Emergency braking function alone
cannot pr
event accidents or serious injury.
● In complex driving situations, the City
Emergency
braking function may issue unnec-
essary warnings and intervene inopportunely
in braking, such as in work areas or if there
are metal rails. ●
If the oper ation of
the City Emergency brak-
ing function is impaired, for example, by dirt
or because the radar sensor has lost its set-
tings, the system may issue unnecessary
warnings and intervene inopportunely in the
braking.
● During driving, the City Emergency braking
function doe
s not react to people or animals
or vehicles crossing your path or which ap-
proach you head-on in the same lane. Note
● When the C ity Emer
gency braking function
causes a braking, the brake pedal is “hard-
er”.
● Automatic interventions on the brakes by
the City Emer
gency braking function may be
interrupted by pressing the clutch, accelera-
tor or moving the wheel.
● The City Emergency braking function can
brake the
vehicle until it stops completely.
However, the brake system does not halt the
vehicle permanently. Use the foot brake!
● If several inopportune intervenes occur,
switc
h off the Front Assist and with it the City
Emergency braking function. Take it to a spe-
cialised workshop, SEAT recommends visiting
a SEAT dealership. ●
If numer ou
s unnecessary interventions oc-
cur, the City Emergency braking function may
switch off automatically. Start-Stop System*
Operatin g Fig. 193
Instrument panel: Start-Stop system
b utt
on The Start-Stop system helps save fuel and re-
duc
e h
armf
ul and CO2 emissions.
The system is automatically switched on ev-
ery time the ignition is switched on.
The system automatically switches off the en-
gine when the vehicle is stationary, e.g. wait-
ing at traffic lights. 1)
The symbol on the instrument panels with colour
dis p
lay is in colour.
182
 1
1 2
2 3
3 4
4 5
5 6
6 7
7 8
8 9
9 10
10 11
11 12
12 13
13 14
14 15
15 16
16 17
17 18
18 19
19 20
20 21
21 22
22 23
23 24
24 25
25 26
26 27
27 28
28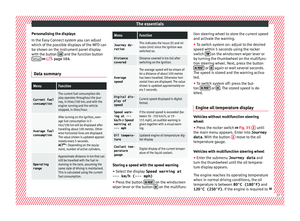 29
29 30
30 31
31 32
32 33
33 34
34 35
35 36
36 37
37 38
38 39
39 40
40 41
41 42
42 43
43 44
44 45
45 46
46 47
47 48
48 49
49 50
50 51
51 52
52 53
53 54
54 55
55 56
56 57
57 58
58 59
59 60
60 61
61 62
62 63
63 64
64 65
65 66
66 67
67 68
68 69
69 70
70 71
71 72
72 73
73 74
74 75
75 76
76 77
77 78
78 79
79 80
80 81
81 82
82 83
83 84
84 85
85 86
86 87
87 88
88 89
89 90
90 91
91 92
92 93
93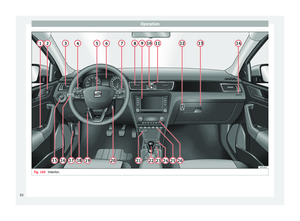 94
94 95
95 96
96 97
97 98
98 99
99 100
100 101
101 102
102 103
103 104
104 105
105 106
106 107
107 108
108 109
109 110
110 111
111 112
112 113
113 114
114 115
115 116
116 117
117 118
118 119
119 120
120 121
121 122
122 123
123 124
124 125
125 126
126 127
127 128
128 129
129 130
130 131
131 132
132 133
133 134
134 135
135 136
136 137
137 138
138 139
139 140
140 141
141 142
142 143
143 144
144 145
145 146
146 147
147 148
148 149
149 150
150 151
151 152
152 153
153 154
154 155
155 156
156 157
157 158
158 159
159 160
160 161
161 162
162 163
163 164
164 165
165 166
166 167
167 168
168 169
169 170
170 171
171 172
172 173
173 174
174 175
175 176
176 177
177 178
178 179
179 180
180 181
181 182
182 183
183 184
184 185
185 186
186 187
187 188
188 189
189 190
190 191
191 192
192 193
193 194
194 195
195 196
196 197
197 198
198 199
199 200
200 201
201 202
202 203
203 204
204 205
205 206
206 207
207 208
208 209
209 210
210 211
211 212
212 213
213 214
214 215
215 216
216 217
217 218
218 219
219 220
220 221
221 222
222 223
223 224
224 225
225 226
226 227
227 228
228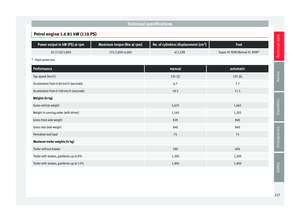 229
229 230
230 231
231 232
232 233
233 234
234 235
235 236
236 237
237 238
238 239
239 240
240 241
241 242
242 243
243 244
244 245
245 246
246 247
247