Page 153 of 248
 Gener a
l
notes Fig. 171
Climatronic: controls. Read the additional information carefully
› ›
›
page 36
Climatronic automatical")
Air conditioning
Climatronic* (automatic air conditioning) Gener a
l
notes Fig. 171
Climatronic: controls. Read the additional information carefully
› ›
›
page 36
Climatronic automatically maintains a com-
fortable temperature. To do so, it automati-
cally regulates the supplied air temperature
and the blower and air distribution levels.
The system also allows for the effect of sun-
light, so there is no need for manual adjust-
ment. It also has a humidity sensor that
helps to automatically demist the wind-
screen.
Automatic operations ››› page 152 guaran-
tee maximum comfort any time of year. Climatronic description
Coolin
g only works if the following conditions
are met:
● The engine is running
● the outside temperature is above +2°C
(+36°F);
● A/C
18
› ››
Fig. 171
sw
itched on.
Starting the Climatronic
The corresponding function will be switched
on when a button is pressed, turning on the
air conditioning if it was switched off, with
the exception of button 17
›
› ›
Fig. 171
(recir-
culation). Switching off the Climatronic
●
Turn control 10 to the left until the seg-
ments of
c
olumn 9
› ››
Fig. 171
sw itch off.
● After 1 second has elapsed, turn the control
again t
o switch off the display.
In order to ensure engines subject to heavy
loads are cooled, the air conditioning com-
pressor is switched off in the event of high
coolant temperatures.
Recommended setting for all seasons of the
year
● Set the required temperature. We recom-
mend +22°C (72°F). »
151
Technical data
Advice
Operation
Emergencies
Safety
Page 154 of 248

Operation
● Pr e
s
s the AUTO button
13
› ››
Fig. 171
.
● Adju
st vents 3 and 4 ›››
page 147 so that
the air flow is directed slightly upwards.
Change between degrees Centigrade and de-
grees Fahrenheit
Keep the AUTO and
A/C
› ››
Fig. 171
b
uttons
held down for 2 seconds at the same time.
The data is displayed on the screen in the
units required. Note
● A v i
sit to the specialised service once a
year is recommended to clean the Climatronic
system.
● The interior temperature sensor 11›››
Fig. 171 is at
the bottom. Do not cover it
with stickers or the like, as this could have a
negative effect on Climatronic operations. Automatic mode
Automatic mode is used to maintain a con-
s
t
ant
temperature and demist the windows
inside the vehicle.
Switching on automatic mode
● Set the interior temperature between +16°C
(+64°F) and +29°C (+84°F).
● Adjus
t vents 3 ›››
page 147 and 4 so that
the air flow is directed slightly upwards. ●
Pres
s the AUTO button
13
› ››
Fig. 171
and
AUTO di
splayed on the screen.
Automatic mode is switched off by pressing
the air distribution buttons or increasing or
decreasing the blower speed. However, the
temperature remains regulated.
Adjusting the temperature ●
When you switch on the ignition, control 1 ›››
Fig. 171 can be u sed t
o set the required in-
terior temperature.
It is possible to select interior temperatures
from +16°C (+64°F) to +29°C (+84°F). In this
range the temperature is regulated automati-
cally. If a temperature below +16°C (+64°F) is
selected, “LO” is displayed on the screen. If a
temperature above +29°C (+84°F) is selected,
“HI” is displayed on the screen. At both ex-
tremes, Climatronic works at maximum cool-
ing or heating power, respectively. The tem-
perature is not regulated.
In the event of prolonged, irregular distribu-
tion of the air flow from the outlets (particu-
larly the footwells) and significant differen-
ces in temperature, e.g. on leaving the vehi-
cle, sensitive people may catch cold. Air recirculation Air recirculation prevents unpleasant smells,
e.g. when p
a
ssing through a tunnel or in
queuing traffic, from entering the interior.
Switching on air recirculation mode
● Press button
17
››› Fig. 171 and the
symbol is displayed on the screen.
Switching off air recirculation mode
● Press button
17
› ›
› Fig. 171
and the
symbol disappears from the screen. WARNING
Read and observe the safety warnings ›››
in
Genera l
notes on page 146. Note
If air recirculation mode remains on for 15 mi-
nute s, the
symbol will start to flash on
the screen to indicate prolonged air recircula-
tion. If air recirculation is not switched off,
the symbol will continue to flash for about 5
minutes. Blower selection
Climatronic automatically regulates blower
s
peed ac
c
ording to the interior temperature.
152
Page 155 of 248
 or clockwise (to in-
crease th")
Driving
It is possible, however, to set the blower
s peed t
o s
uit requirements.
● Turn control 10
› ››
Fig. 171
c
ounter-clock-
wise (to lower the speed) or clockwise (to in-
crease the speed).
Climatronic will switch off when the blower
switches off. WARNING
Read and observe the safety warnings ›››
in
Genera l
notes on page 146. Windscreen defrost
Switching on windscreen defrosting
●
Press the button
12
› ›
›
Fig. 171.
Switching off windscreen defrosting
● Press button
12
› ›
›
Fig. 171 several
times or press the AUTO button.
The t emper
at
ure is regulated automatically.
The air output is increased from vents 1
››› page 147 and 2. Driving
St ar
tin
g and stopping the en-
gine
Introduction Read the additional information carefully
›› ›
page 17 WARNING
● When mov in
g with the engine switched off,
the ignition key must always remain in posi-
tion 2
››› Fig. 172 ›
›› page 154 (ignition on).
The control lamps will light up in this posi-
tion. Otherwise, the steering lock could en-
gage suddenly. Risk of accident!
● Do not remove the key from the ignition un-
til the
vehicle has come to a standstill and is
secure (e.g. the handbrake is engaged). Oth-
erwise, the steering lock could suddenly en-
gage. Risk of accident!
● Always take the ignition key with you when
you le
ave the vehicle. This is particularly im-
portant if you leave children in the vehicle.
Children could, for example, start the engine
with the subsequent risk of accident.
● Never leave the engine running in unventi-
lated or c
losed rooms. The exhaust gases
contain carbon monoxide, an odourless and
colourless poisonous gas. Risk of fatal acci-
dents! Carbon monoxide can cause people to
lose consciousness and can cause death. ●
Never l e
ave the vehicle unattended if the
engine is running.
● Never switch the engine off until the vehi-
cle h
as come to a complete stop. Risk of acci-
dent! CAUTION
● Turnin g the s
teering wheel fully in either
direction when the vehicle is stationary and
the engine is in gear puts the power steering
under great stress. This could lead to noise.
Never leave the steering wheel turned fully in
either direction for more than 15 seconds.
Risk of damage to the power steering system!
● The starter motor may only be used (key
position 3
››› Fig. 172 ›
›› page 154 in the ig-
nition) if the engine is off. Using the starter
motor when the engine is running could dam-
age it.
● Immediately release the ignition key when
the engine st
arts, otherwise damage could be
caused to the starter motor.
● When the engine is cold, you should avoid
high engine speed
s, driving at full throttle
and over-loading the engine before it reaches
operating temperature. Risk of engine dam-
age!
● Do not tow-start the engine. Risk of engine
damag
e! In vehicles with a catalytic convert-
er, fuel that has not been burned could reach
the catalytic converter and catch fire in it.
This would lead to a fault in the catalytic con-
verter. You may use the battery from another » 153
Technical data
Advice
Operation
Emergencies
Safety
Page 156 of 248

Operation
vehicle to help you start your engine
›› ›
page 51.
● After prolonged and demanding operation
of the engine, when the j
ourney has ended,
do not stop the engine immediately. Let the
engine run at idle for about one more minute.
This will stop the engine from overheating. For the sake of the environment
Do not warm up the engine when the vehicle
i s s
tationary. If possible, move off immediate-
ly after starting the engine. This will help the
engine reach operating temperature more
quickly, reducing the quantity of emissions. Note
● The engine c an on
ly be started with the
original SEAT key.
● Loud running noises may be heard briefly
after c
old-starting the engine. This is normal
and is no cause for concern.
● After the engine has been stopped and the
ignition switc
hed off, the radiator fan may
continue running for around 10 minutes.
● If the engine still does not start after a sec-
ond attempt, the fuel
pump fuse might have
blown. Check it and replace if necessary
››› page 80 or contact your Specialised Serv-
ice.
● You should always engage the steering lock
when you e
xit the vehicle. This will hinder
any attempts at theft. Power steering
The power steering allows you to turn the
st
eerin
g wheel more easily.
If the power steering fails or the engine is off
(towing), it is still possible to turn the vehi-
cle's steering wheel fully. However, you need
more strength to steer the vehicle.
Start-up lock security system (immo-
bili
ser) There is an electronic chip in the key. The
el
ectr
onic
immobiliser is deactivated when
the key is inserted into the ignition. The elec-
tronic immobiliser is automatically activated
when the key is removed from the ignition.
The engine will not start if an unauthorised
key is used.
The informative display indicates:
Immobiliser active! Ignition lock Fig. 172
Ignition key positions. Petrol engines
1 – Ignition switched off, engine stopped,
s t
eerin
g can be locked
2 – Ignition switched on
3 – Starting
Die sel
en
gines
1 – Fuel supply stopped, ignition switched
off , en
gine s
topped, steering can be locked
2 – Engine pre-heating, ignition switched
on
3 – Starting
T o en
g
age the Steering lock without the key
in the ignition, turn the steering wheel slight-
ly until you hear it engage.
154
Page 157 of 248

Driving
If the steering lock is engaged
and it
i s diffi-
cult or impossible to turn the key to position 2 , release the lock by turning the steering
wheel s
lightly
in both directions.
Starter button Fig. 173
In the steering column: start-up
p u
sh b
utton for the Keyless Access lock and
start-up system. The layout in right-hand
drive vehicles is symmetrical. Fig. 174
Emergency ignition in vehicles with
Keyl e
ss Access. The start-up button may only be used if there
i
s
a
valid key in the vehicle.
Opening the driver's door when exiting the
vehicle activates the electronic lock on the
steering column if the ignition is disabled.
Switching the ignition on/off
● Briefly push the start-up button ›››
Fig. 173
without touching the brake or clutch ped-
al ››› .
Emer g
ency
starting function
If no valid key is detected inside the vehicle,
an emergency start-up will be required. The
relevant message will appear in the dash
panel display. This may happen when, for ex-
ample, the vehicle key battery is very low or
flat: ●
Immediately
after pushing the start-up but-
ton, keep the vehicle key next to the steering
column ››› Fig. 174.
● The ignition connects and the engine starts
automatic
ally.
Emergency disconnection
If the engine does not stop after briefly press-
ing the start-up button, an emergency dis-
connect will be required:
● Press the starter button twice within 1 sec-
ond or pres
s it once for more than 2 seconds
››› .
● The engine turns off automatically.
En gine r
e
start feature
If no valid key is detected inside the vehicle
after the engine stops, you will only have 5
seconds to restart it. A warning will display
on the dash panel screen.
After this interval, it will not be possible to
start the engine without a valid key inside
the vehicle. WARNING
Any accidental movement of the vehicle could
re s
ult in serious injury.
● When pressing the start-up button, do not
pre
ss the brake or clutch pedal, this way the
engine will start immediately. » 155
Technical data
Advice
Operation
Emergencies
Safety
Page 158 of 248

Operation
WARNING
If vehicle keys are used negligently or with-
out due c ar
e, this may cause accidents and
serious injury.
● Never leave any key inside the vehicle
when exitin
g. Otherwise, a child or unauthor-
ised person could lock the vehicle, start the
engine or connect the ignition and, in this
way, operate electronic equipment (e.g. the
windows). Note
In diesel vehicles with the Keyless Access
sys t
em, there may be a delay in the engine
starting if it requires preheating. Starting the engine
Vehicles with a
diesel
en
gine are equipped
with a glow plug system. When you switch on
the ignition, the glow plug warning lamp
will light up. The engine can be started
straight away when the lamp switches off.
Do not connect electrical appliances during
preheating so as not the drain the vehicle
battery unnecessarily.
Starting the engine
● Move the gearbox lever into neutral or
move the sel
ector lever to position P or N and
pull firmly on the handbrake. ●
Pres
s the clutch pedal all the way down
and start the engine 3
› ››
Fig. 172
› ›
› page 154, without pressing the accelera-
tor. Keep the clutch pedal pressed down until
the engine starts.
● Release the ignition key as soon as the en-
gine star
ts. The key returns to position 2 .
● If the engine does not start after 10 sec-
ond s, t
urn the k
ey back to position 1 . Re-
pe at
the action af
ter 30 seconds.
● Release the handbrake before moving off.
Switching off the engine with the key Stop the engine by turning the ignition key to
po
s
ition 1
› ›
› Fig. 172
››› page 154.
Brakes and brake servo sys-
tems Introduction WARNING
● The brak e ser
vo only works when the en-
gine is running. Braking when the engine is
switched off requires applying more strength
to the brake pedal. Risk of accident!
● Press down on the clutch pedal when stop-
ping and brak
ing with a manual gearbox, pet- rol engine vehicle at low speed. Otherwise,
the brak
e ser
vo might not work properly. Risk
of accident!
● In the event of damage to the standard
front s
poiler or where a different front spoil-
er, wheel trims, etc. are subsequently fitted,
make sure the air vent to the brakes on the
front wheels is not blocked. Otherwise, brak-
ing operations may be impaired. Risk of acci-
dent!
● Always fully release the handbrake. If it is
only p
artially released, this will cause over-
heating of the rear brakes, which can impair
the function of the brake system. Risk of acci-
dent!
● Never leave children unsupervised in the
vehicl
e. They could release the handbrake or
move the gear lever. The vehicle could start
moving. Risk of accident!
● Insufficient fuel can cause the engine to run
irregu
larly or to switch off. Brake assist sys-
tems could be impaired. Risk of accident!
● Always adjust your driving style to suit visi-
bility
, the weather and road and traffic condi-
tions. The best vehicle safety offered by
brake assist systems must never encourage
you to run greater risks. Risk of accident! CAUTION
● Ob ser
ve the information concerning new
brake pads ››› page 163.156
Page 159 of 248

Driving
●
Where br ak
ing is not necessary, do not
wear down the brake pads by pressing down
gently on the brake pedal. This causes the
brakes to overheat, increasing their wear and
increasing braking distances.
● To ensure the brake assist systems work
properly, a
ll wheels must be fitted with tyres
approved by the manufacturer. Note
● If y
ou brake suddenly and the brake system
control unit regards the situation as hazard-
ous for the drivers behind you, the brake
lights will begin to flash automatically. After
reducing speed to approximately 10 km/h (6
mph) or stopping the vehicle, the brake lights
will stop flashing and the hazard warning
lights will switch on. The hazard warning
lights are automatically switched off when
you accelerate or restart the vehicle.
● On long, steep gradients, reduce your
speed and ch
ange to a lower gear (manual
gearbox) or move the selector lever to a lower
gear position (automatic gearbox). This uses
the force of the engine and the brakes do not
suffer as much. If you still have to brake, do
so intermittently, pressing down repeatedly
on the brake pedal.
● Vehicle modifications (e.g. to the engine,
brake
s, frame or a combination of wheels and
tyres) could impair the brake assist systems
››› page 193, Accessories and modifications
to the vehicle . ●
In the event of
a fault in the ABS system,
the ESC, TCS and EDL are switched off auto-
matically. A fault in the ABS is indicated by
the ››› page 101 warning lamp. Brakes
Wear
The rat
e of
wear of the brake pads depends
on the driving style and on the way in which
the vehicle is used. The brake pads will wear
more quickly if you use your vehicle frequent-
ly in urban traffic and short trips or drive in a
sporty style. Under these demanding condi-
tions, visit your specialised service, even be-
fore the scheduled service date, so that the
thickness of the brake pads can be meas-
ured.
Wet roads or road salt
If brakes are wet or frozen, or if you are driv-
ing on roads which have been gritted with
salt, braking power may set in later than nor-
mal. Dry the brakes as soon as possible by
braking repeatedly.
Corrosion
Long periods of inactivity and little use can
lead to rust on the brake discs and dirt on the
brake pads. Where the brake system is sub-
jected to light stress or in the case of corro- sion, clean the brake discs by braking fully
sever
al
times at a high speed.
Brake system fault
If you notice that the braking distance sud-
denly increases and the brake pedal can be
pressed down more fully, there may be a fault
in the brake system. Visit a specialised serv-
ice immediately and adjust your driving style
to the extent of the damage and to limit the
effect of the brakes.
Low brake fluid level
Insufficient brake fluid could cause faults in
the brake system. The brake fluid level is con-
trolled electronically ››› page 99, Brake sys-
tem .
Brake servo
The brake servo supplements the pressure
you exert on the brake pedal. The brake servo
only works when the engine is running.
157
Technical data
Advice
Operation
Emergencies
Safety
Page 160 of 248

Operation
Handbrake Fig. 175
Centre console: handbrake. Applying the handbrake
– Pull the handbrake lever up all the way.
R el
e
asing the handbrake
– Pull the handbrake lever up slightly and
pres
s the unlock button at the same time
››› Fig. 175.
– Keep the button pressed down and push
the lever al
l the way down.
The handbrake warning lamp lights up when
the handbrake is applied and the ignition
switched on . Manual gearbox
Changin
g gears Fig. 176
Gear shift diagram of a 5- or 6-speed
m anual
g
earbox Read the additional information carefully
› ›
›
page 34
When changing gear, always depress the
clutch pedal fully and keep it pressed down
to avoid excessive clutch wear.
In order to drive at an optimum RPM, follow
the gear change indications ›››
page 24.
Engage reverse gear only when the vehicle is
stopped. On engaging reverse gear while the
engine is running, first wait a moment with
the clutch pedal pressed down fully to limit
gear shift noise.
The reverse lights switch on when the reverse
gear is selected and the ignition is on. WARNING
Never engage reverse gear when moving for-
war d. Ri
sk of accident! Note
Do not rest your hand on the gear lever while
drivin g.
The pressure of your hand could lead
to premature wear of the gear system. Automatic gearbox
Ba s
ic information The gearbox changes up and down automati-
c
al
ly
. The gearbox can be set to Tiptronic
mode. The gears can be changed manually in
this mode ›››
page 161.
The engine can only be started in positions P
or N. If, on engaging the steering lock,
switching the ignition on/off or starting the
engine, the selector lever is not in these posi-
tions, the informative display will show Move
the selector lever to position
P/N! , or
P/N is shown on the general
dash panel display.
At temperatures below -10°C (14°F), the en-
gine can only be started in position P.
Move the selector lever to position P when
parking the vehicle on a flat surface. On a
158
 1
1 2
2 3
3 4
4 5
5 6
6 7
7 8
8 9
9 10
10 11
11 12
12 13
13 14
14 15
15 16
16 17
17 18
18 19
19 20
20 21
21 22
22 23
23 24
24 25
25 26
26 27
27 28
28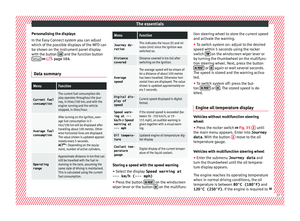 29
29 30
30 31
31 32
32 33
33 34
34 35
35 36
36 37
37 38
38 39
39 40
40 41
41 42
42 43
43 44
44 45
45 46
46 47
47 48
48 49
49 50
50 51
51 52
52 53
53 54
54 55
55 56
56 57
57 58
58 59
59 60
60 61
61 62
62 63
63 64
64 65
65 66
66 67
67 68
68 69
69 70
70 71
71 72
72 73
73 74
74 75
75 76
76 77
77 78
78 79
79 80
80 81
81 82
82 83
83 84
84 85
85 86
86 87
87 88
88 89
89 90
90 91
91 92
92 93
93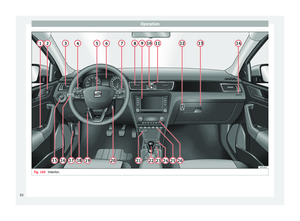 94
94 95
95 96
96 97
97 98
98 99
99 100
100 101
101 102
102 103
103 104
104 105
105 106
106 107
107 108
108 109
109 110
110 111
111 112
112 113
113 114
114 115
115 116
116 117
117 118
118 119
119 120
120 121
121 122
122 123
123 124
124 125
125 126
126 127
127 128
128 129
129 130
130 131
131 132
132 133
133 134
134 135
135 136
136 137
137 138
138 139
139 140
140 141
141 142
142 143
143 144
144 145
145 146
146 147
147 148
148 149
149 150
150 151
151 152
152 153
153 154
154 155
155 156
156 157
157 158
158 159
159 160
160 161
161 162
162 163
163 164
164 165
165 166
166 167
167 168
168 169
169 170
170 171
171 172
172 173
173 174
174 175
175 176
176 177
177 178
178 179
179 180
180 181
181 182
182 183
183 184
184 185
185 186
186 187
187 188
188 189
189 190
190 191
191 192
192 193
193 194
194 195
195 196
196 197
197 198
198 199
199 200
200 201
201 202
202 203
203 204
204 205
205 206
206 207
207 208
208 209
209 210
210 211
211 212
212 213
213 214
214 215
215 216
216 217
217 218
218 219
219 220
220 221
221 222
222 223
223 224
224 225
225 226
226 227
227 228
228 229
229 230
230 231
231 232
232 233
233 234
234 235
235 236
236 237
237 238
238 239
239 240
240 241
241 242
242 243
243 244
244 245
245 246
246 247
247