Page 169 of 248

Driver assistance systems
Note
After driving through water we recommend
that
you contact a specialised service for an
inspection. Preventing damage to the vehicle
In order to prevent damage to the vehicle,
tak
e s
pecial care:
● on roads that are in poor condition,
● when mounting kerbs,
● when approaching very steep ramps, etc.,
● with the parts of the vehicle situated on the
low er p
art of the vehicle, i.e. the spoiler, the
exhaust pipe.
This applies especially to vehicles with a very
low suspension (sport) and when the vehicle
is fully loaded. Driver assistance systems
Br ak
in
g and stability systems
Electronic stability control (ESC) The ESC system increases control of the vehi-
cl
e in emer
gency situations, e.g. during a
sudden change in direction. Depending on
the driving conditions, it reduces the risk of
skidding and increases driving stability.
The system uses the steering wheel angle
and road speed to calculate the changes of
direction desired by the driver, and constant-
ly compares them with the actual behaviour
of the vehicle. When irregularities occur, for
example, if the vehicle begins to skid, the
ESC brakes the appropriate wheel automati-
cally.
The warning lamp on the general instru-
ment panel starts flashing when the system
is working.
The stability (ESC) system includes the fol-
lowing systems:
● Anti-lock brake system (ABS),
● Traction control system (TCS),
● Electronic differential lock (EDL),
● Hydraulic brake assist system (HBA),
● Hill hold control (HHC). The ASR should be switched on at all times.
Only
u
nder certain circumstances should the
system be switched off, e.g.
● driving with chains,
● driving in deep snow or on very soft surfa-
ces,
● D
uring the “swinging movement” required
to remo
ve a stuck vehicle
Switch the ASR back on as soon as possible.
Brake assist system (HBA)*
The HBA system is activated when you press
down on the brake pedal suddenly. It increa-
ses braking power, helping to reduce braking
distances. To reduce braking distance as
much as possible, keep the brake pedal
pressed down firmly until the vehicle comes
to a standstill.
With the help of this system, the ABS is acti-
vated more quickly and more efficiently.
The brake assist function is deactivated auto-
matically when the brake pedal is released.
Hill hold control (HHC)*
The HHC system makes it easier to start the
vehicle on hills. The system maintains the
brake pressure created by pressing down on
the brake pedal for 2 seconds after it has
been released. Your foot can be removed
from the brake pedal and you can use the ac-
celerator pedal and move away on a hill »
167
Technical data
Advice
Operation
Emergencies
Safety
Page 170 of 248

Operation
without having to use the handbrake. The
br ak
e pr
essure drops as the accelerator ped-
al is pressed. If the vehicle cannot be started,
it will start to move backwards after 2 sec-
onds.
The HHC is activated on gradients of over
5%, if the driver door is closed. It only works
for starting on hills, moving both forward and
in reverse. It is not activated during start-up
down hill.
Anti-lock system (ABS) The ABS system prevents the wheels locking
durin
g br
ak
ing. This helps the driver keep
control of the vehicle.
The driver is made aware of ABS assistance
by the pulsating of the brake pedal and a
characteristic noise.
Keep the brake pedal pressed down while the
ABS is working. The ABS will switch off when
the brake pedal is released. Never brake in-
termittently while the ABS is working!
Traction control system (ASR) If the wheels start to slip, the TCS adapts the
en
gine s
peed t
o the driving conditions. Par-
ticularly in unfavourable conditions, the TCS
helps starting, accelerating and hill starts. The TCS
warning l
amp on the general dash
panel flashes when the system is working.
Electronic differential lock If one of the wheels starts to skid, the EDL
brak
e
s that wheel, transmitting the driving
force to the other wheels. This increases ve-
hicle stability and improves driving stability.
To prevent the disc brake of the braking
wheel from overheating, the EDL cuts out au-
tomatically if subjected to excessive loads.
The vehicle will continue to function normally
without EDL. The EDL will switch on again au-
tomatically when the brake has cooled down.
Parking aid Genera l
information Various systems are available to help you
when p
ark
in
g or manoeuvring in tight
spaces, depending on the equipment fitted
on your vehicle.
The rear parking aid is an audible assistant
that warns about obstacles located behind
the vehicle ›››
page 169.
During parking, Parking System Plus assists
the driver by visually and audibly warning them about obstacles detected
in front
and
behind the vehicle ››› page 170. WARNING
● Alw a
ys pay attention, also when looking
straight ahead, to traffic and the vehicle sur-
roundings. The assistance systems are not a
replacement for driver awareness. When in-
serting or removing the vehicle from a park-
ing space, or when performing similar ma-
noeuvres the driver always assumes the re-
sponsibility.
● Adapt your speed and driving style at all
times t
o suit visibility, weather, road and traf-
fic conditions.
● The ultrasound sensors have blind spots in
which ob
stacles and people are not regis-
tered. Pay special attention to children and
animals.
● Always keep visual control of the vehicle
surrou
ndings: use the rear vision mirrors for
additional help. CAUTION
Parking Aid functions may be negatively af-
fect ed b
y different factors that may lead to
damage to the vehicle or its immediate sur-
rounds:
● Under certain circumstances, the system
does not
detect or display certain objects:
– Objects such as chains, trailer draw bars,
fences, posts and thin trees. 168
Page 171 of 248

Driver assistance systems
–
Ob j
ects that are located above the sen-
sors, such as protrusions in a wall.
– Objects with certain surfaces or struc-
tures, such as wire mesh fences or pow-
der snow.
● Certain surfaces of objects and garments
do not refl
ect the ultrasound sensors' sig-
nals. The system cannot detect, at least cor-
rectly, these objects or people wearing such
clothes.
● Ultrasound sensor signals may be affected
by e
xternal sound sources. In certain circum-
stances this may prevent them from detect-
ing people or objects.
● Please note that low obstacles detected by
the syst
em may no longer be registered by
the sensors as the car moves closer, so the
system will not give any further warning. In
certain circumstances, objects such as high
kerbs that could damage the bottom of the
vehicle are not detected either.
● If the first warning from the Parking Aid is
ignored, the v
ehicle could suffer considerable
damage.
● The knocks or damage on the radiator
grill
e, bumper, wheel arch and vehicle under-
body can adjust the orientation of the sen-
sors. This can affect the parking aid function.
Have the function checked by a specialised
workshop. Note
● In cer t
ain situations, the system can give a
warning even though there is no obstacle in
the detected area, e.g:
–with rough or cobbled floors or ground
with long grass;
– with external ultrasound sources, such as
cleaning vehicles or other vehicles;
– In downpours, intense snow or dense ex-
haust gases;
– if the registration plate (front or rear) is
not properly affixed to the bumper sur-
face;
– or in locations such as the brow of a hill.
● In order to guarantee good system opera-
tion, keep the ultr
asound sensors clean, free
of snow or ice, and do not cover them with
adhesives or other objects.
● If you use high-pressure or vapour equip-
ment to c
lean the ultrasound sensors, apply
it directly only very briefly and always from a
distance of more than 10 cm.
● Retrofitting of accessories to the vehicle,
such a
s a bicycle carrier, may interfere with
the operation of the Parking Aid.
● In order to familiarise yourself with the sys-
tem, it i
s advised that you practice parking in
an area or car park that is free from traffic.
There must be good weather and light condi-
tions. ●
The v o
lume and tone of the warnings can
be modified, in addition to the indications
››› page 172.
● In vehicles without a driv
er information
system, these parameters can be modified in
a SEAT Official Service or in a specialised
workshop.
● Please observe information on towing a
trail
er ››› page 173.
● The display on the Easy Connect screen
shows
a slight time delay. Rear parking aid*
The rear Parking Aid assists the driver in
p
ark
in
g by means of audible warning
sounds.
Description
There are sensors integrated in the rear
bumper. When the sensors detect an obsta-
cle, you are alerted by audible warnings.
Make particularly sure that the sensors are
not covered by adhesives, residues and the
like, as this could affect the system's opera-
tion. Cleaning instructions ››› page 196.
The approximate measurement range of the
rear sensors is:
side area0,90 m» 169
Technical data
Advice
Operation
Emergencies
Safety
Page 172 of 248

Operationcentral area1.60 m
As you approach the obstacle, the time inter-
val
betw
een the audible warnings will be re-
duced. When you reach around 0.30 m the
warning will be constant: Do not continue to
move forward (or backward) ››› in General
inform ation on p
age 168, ››› in General in-
form ation on p
age 168 !
If you maintain separation from the obstacle,
the volume of the warning begins to reduce
after four seconds (does not affect the tone
of the constant warning).
Activating/Deactivating
When engaging reverse gear, the parking aid
is automatically switched on. This is con-
firmed with a short warning.
On disengaging reverse gear, the Parking Aid
system is disconnected immediately. Parking system plus* Fig. 181
Represented area. Parking system plus assists you audibly and
v
i
s
ually when parking.
There are sensors integrated in the front and
rear bumpers. When they detect an obstacle,
you are alerted by audible warnings and visu-
ally on the Easy Connect system.
In the event of danger of a frontal collision,
the audible warnings come from the front of
the vehicle, and in the event of the danger of
a rear-end collision they come from the rear.
Make particularly sure that the sensors are
not covered by adhesives, residues and the
like, as this could affect the system's opera-
tion. Cleaning instructions ››› page 196.
The approximate measurement range of the
sensors is:
1.20 m
A 0,90 m
1.60 m
0,90 m
As
y
ou approach the obstacle, the time inter-
val between the audible warnings will be re-
duced. When you reach around 0.30 m the
warning will be constant: do not continue to
move forward (or backward)!
If you maintain separation from the obstacle,
the volume of the warning begins to reduce
after four seconds (does not affect the tone
of the constant warning).
Parking Aid Operation Fig. 182
Centre console: parking aid button. Manual connection of Parking Aid
● Press the butt
on
once.
B C
D
170
Page 173 of 248

● Press a button on th")
Driver assistance systems
Manual disconnection of Parking Aid
● Press the butt
on again.
Manual disconnection of Parking Aid display
(the audible sounds remain active)
● Press a button on the main menu of the fac-
tory
-assembled infotainment system.
● OR: press the BACK fu
nction button.
Automatic connection of Parking Aid ● Engage reverse gear or turn the selector
lever t
o position R.
● OR: If the vehicle approaches an obstacle
that
is in its forwards path at a speed below
10 km/h (6 mph) ››› page 171, Automatic ac-
tivation. The obstacle is detected as of a dis-
tance of approx. 95 cm if the automatic con-
nection is activated in the infotainment sys-
tem. A reduced display is shown.
Automatic disconnection of Parking Aid
● Move the selector lever to position P.
● OR: accelerate to more than approx.
10 km/h (6 mph) for
ward.
Temporary suppression of sound in Parking
Aid
● Press the function b
utton. Change from reduced view to full view
●
Engage reverse gear or turn the selector
lever t
o position R.
● OR: press the car icon in reduced view.
If nec
essary, switch to the rear-assist image
(Rear View Camera “RVC”)
● Engage reverse gear or turn the selector
lever t
o position R.
● OR: Press the RVC fu
nction button.
A short confirmation signal will be heard and
the button symbol will light up yellow when
the system is switched on.
Automatic activation Fig. 183
Miniature indication of automatic ac-
tiv ation When the Parking System Plus is switched on
aut
om
atic
ally, a miniature of the vehicle will be displayed and the segments will be
shown on the lef
t side of the screen
››› Fig. 183.
Automatic activation occurs when slowly ap-
proaching an obstacle located in front of the
vehicle. It only operates every time the speed
is reduced below approximately 10 km/h (6
mph) for the first time.
If the parking aid is switched off using the
button, the following actions must be carried
out in order for it to automatically switch on:
● Switch off the ignition and switch it on
again.
● OR: ac
celerate above 10 km/h (6 mph) be-
for
e reducing speed below this number
again.
● OR: place the selector lever in position P
and then mov
e it from this position.
● OR: switch on and off the automatic activa-
tion in the Ea
sy Connect system menu.
The automatic activation with parking aid
miniature indication can be switched on and
off from the Easy Connect system menu
››› page 20:
● Switch the ignition on.
● Select: CAR button > Settings
> Parking
and manoeuvring .
● Select the Automatic activation op-
tion. When the f
u
nction button check box is
activated , the function is on. »
171
Technical data
Advice
Operation
Emergencies
Safety
Page 174 of 248

Operation
If the system has been activated automatical-
ly , an audib
l
e sound warning will only be giv-
en when obstacles in front are at a distance
of less than 50 cm. CAUTION
The automatic connection of the Parking Aid
only w
orks when you are driving slowly. If
driving style is not adapted to the circum-
stances, an accident and serious injury or
damage may be caused. Segments of the visual indication
Fig. 184
Parking Aid display on the Easy Con-
nect sy
s
tem screen. The distance of separation from the obstacle
c
an be e
s
timated using the segments around
the vehicle.
The optical indication of the segments works
as follows: a white segment is dis-
pla
yed when the obstacle is not within
the vehicle's trajectory or the direction
of travel is in the opposite direction to
its location.
obstacles located in the
vehicle's trajectory and which are more
than 30 cm away from the vehicle are
displayed in yellow.
obstacles that are less than
30 cm away from the vehicle are dis-
played in red.
Moreover, with the SEAT Media System
Plus/Navi System radios, a yellow trail indi-
cates the vehicle's expected journey based
on the steering wheel angle.
Whenever the obstacle is located in the vehi-
cle’s direction of travel, the corresponding
audible warning will sound.
As the vehicle approaches an obstacle, the
segments are displayed closer to the vehicle.
When the penultimate segment is displayed,
this means that the vehicle has reached the
collision zone. In the collision zone, the ob-
stacles are represented in red, including
those out of the path. Do not continue to
move forward (or backward) ››› in General
inf orm
ation on p
age 168, ››› in General in-
f orm
ation on p
age 168 !
White segments:
Yellow segments:
Red segments:
Adjusting the display and audible
warning
s The settings for the display and audible
warnin
g
s are controlled via the Easy Con-
nect*.
Automatic activation
on – activates the Automatic activa-
tion option ››› page 171.
off – deactivates the Automatic ac-
tivation option ››› page 171.
Front volume*
Volume in the front and rear area.
Front sound settings/sharpness*
Frequency (tone) of the sound in the front
area.
Rear volume*
Volume in the rear area.
Rear sound settings/sharpness*
Frequency (tone) of the sound in the rear
area.
Adjust volume
With the parking aid switched on, the active
audio/video source volume will be reduced
to the intensity of the selected setting.
172
Page 175 of 248

Driver assistance systems
Error messages When the Parking Aid is activated or when it
is
sw
itched on, if a continuous warning can
be heard for several seconds (additionally, in
the case of Parking system Plus, the LED of
the button flashes), there is a fault in the
system.
Parking System Plus*
If there is a fault in a sensor, the symbol is
displayed on the Easy Connect display in
front of/behind the vehicle. If a rear sensor is
faulty, only the obstacles in the areas A and
B are displayed
››
›
Fig. 181. If a front sensor
is faulty, only the obstacles in the areas Cand
D are displayed.
Hav e the f
au
lt corrected by a specialised
workshop without delay.
Towing bracket In vehicles equipped with a towing bracket
dev
ic
e fr
om the factory, when the trailer is
connected electrically, the Parking Aid rear
sensors will not be activated when reverse
gear is engaged, when the selector lever is
turned to position R or when the button is
pressed. Parking System Plus
The dist
ance to possible obstacles at the rear
of the vehicle will not be displayed on the
screen and nor will it be indicated by means
of audible sound signals.
The Easy Connect system screen will only dis-
play objects detected at the front, and the ve-
hicle's trajectory will be hidden.
Rear Assist “Rear View Cam-
era”*
Operatin
g and safety warnings WARNING
● The Re ar As
sist does not make it possible
to precisely calculate the distance from ob-
stacles (people, vehicles, etc.) and nor can it
overcome the system's own limits, hence us-
ing it may cause serious accidents and inju-
ries if used negligently or without due care.
The driver should be aware of his/her sur-
roundings at all times to ensure safe driving.
● The camera lens expands and distorts the
field of
vision and displays the objects on the
screen in a different, vague manner. The per-
ception of distances is also distorted by this
effect.
● Some objects may, due to the resolution of
the disp
lay screen - not be displayed in a sat-
isfactory manner or may not be displayed at all. Take special care with thin posts, fences,
rai
lin
gs or trees that might not be displayed
on screen and could damage the vehicle.
● The rear assist has blind spots where it is
not pos
sible to represent people or objects
(small children, animals and certain objects
cannot be detected in its field of vision). Mon-
itor the vehicle's surrounding area at all
times.
● Keep the camera lens clean, free of ice and
snow
, and do not cover it.
● The system is not a replacement for driver
awar
eness. Supervise the parking operation
at all times, as well as the vehicle's surround-
ing area. Adapt your speed and driving style
at all times to suit visibility, weather, road
and traffic conditions.
● Do not be distracted from the traffic by
looking at
the screen.
● The images on the rear assist screen are
only tw
o-dimensional. Due to a lack of spatial
depth, protruding parts or holes in the road,
for example, are more difficult to detect or
may not be seen at all.
● Vehicle load modifies the representation of
the orientation lines
displayed. The width
represented by the lines diminishes with ve-
hicle load. Pay special attention to the vehi-
cle's surroundings when the inside of the ve-
hicle of the luggage compartment is carrying
a heavy load.
● In the following situations, the objects or
other vehic
les shown in the navigation sys-
tem display appear to be further away or » 173
Technical data
Advice
Operation
Emergencies
Safety
Page 176 of 248

Operation
closer than they really are: Pay special atten-
tion:
– On mov in
g from a horizontal plane to a
slope.
– On moving from a slope to a horizontal
plane.
– If the vehicle is heavily loaded at the
rear.
– When the vehicle approaches objects
that are not on the ground surface or are
jutting out from it. These objects may al-
so be outside the camera's angle of vi-
sion when reversing. Note
● It i s
important to take great care and pay
special attention if you are not yet familiar
with the system.
● Rear assist will not be available if the vehi-
cle's
rear lid is open. Instructions for use
Fig. 185
On the rear bumper: location of the
r e
ar a
ssist camera A camera on the rear bumper aids the driver
durin
g r
ev
erse parking or manoeuvring
››› Fig. 185. The camera image is viewed to-
gether with orientation lines projected by the
system on the Infotainment system screen.
The bottom of the screen displays part of the
bumper corresponding to the registration
plate area that will be used as reference by
the driver.
Rear assist settings:
Rear assist offers the user the possibility to
change the image's brightness, contrast and
colour settings.
To change these settings:
● Park the vehicle in a safe place.
● Apply the parking brake. ●
Switc
h the ignition on.
● If necessary, switch on the Infotainment
syst
em.
● Engage reverse gear or turn the selector
lever t
o position R.
● Press the --- function button displayed on
the right of the im
age.
● Make the desired adjustments on the menu
by pr
essing the –/+ function buttons or by
moving the corresponding scroll button.
Necessary conditions for parking and ma-
noeuvring with the
The system should not be used in the follow-
ing cases:
● If the image displayed is not very reliable or
is di
storted, for example low visibility or dirty
lens.
● If the area behind the vehicle is not dis-
pla
yed very clearly or is incomplete.
● If the vehicle is heavily loaded at the rear.
● If the position and installation angle of the
camera h
ave been changed, e.g. after a rear-
end collision. Have the system checked by a
specialised workshop.
Familiarising yourself with the system
To familiarise yourself with the system, the
orientation lines and their function, SEAT rec-
ommends practising parking and manoeu-
vring with the rear assist in a place without
174
 1
1 2
2 3
3 4
4 5
5 6
6 7
7 8
8 9
9 10
10 11
11 12
12 13
13 14
14 15
15 16
16 17
17 18
18 19
19 20
20 21
21 22
22 23
23 24
24 25
25 26
26 27
27 28
28 29
29 30
30 31
31 32
32 33
33 34
34 35
35 36
36 37
37 38
38 39
39 40
40 41
41 42
42 43
43 44
44 45
45 46
46 47
47 48
48 49
49 50
50 51
51 52
52 53
53 54
54 55
55 56
56 57
57 58
58 59
59 60
60 61
61 62
62 63
63 64
64 65
65 66
66 67
67 68
68 69
69 70
70 71
71 72
72 73
73 74
74 75
75 76
76 77
77 78
78 79
79 80
80 81
81 82
82 83
83 84
84 85
85 86
86 87
87 88
88 89
89 90
90 91
91 92
92 93
93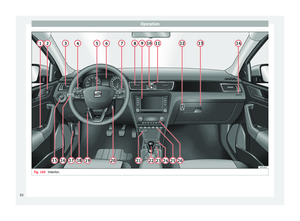 94
94 95
95 96
96 97
97 98
98 99
99 100
100 101
101 102
102 103
103 104
104 105
105 106
106 107
107 108
108 109
109 110
110 111
111 112
112 113
113 114
114 115
115 116
116 117
117 118
118 119
119 120
120 121
121 122
122 123
123 124
124 125
125 126
126 127
127 128
128 129
129 130
130 131
131 132
132 133
133 134
134 135
135 136
136 137
137 138
138 139
139 140
140 141
141 142
142 143
143 144
144 145
145 146
146 147
147 148
148 149
149 150
150 151
151 152
152 153
153 154
154 155
155 156
156 157
157 158
158 159
159 160
160 161
161 162
162 163
163 164
164 165
165 166
166 167
167 168
168 169
169 170
170 171
171 172
172 173
173 174
174 175
175 176
176 177
177 178
178 179
179 180
180 181
181 182
182 183
183 184
184 185
185 186
186 187
187 188
188 189
189 190
190 191
191 192
192 193
193 194
194 195
195 196
196 197
197 198
198 199
199 200
200 201
201 202
202 203
203 204
204 205
205 206
206 207
207 208
208 209
209 210
210 211
211 212
212 213
213 214
214 215
215 216
216 217
217 218
218 219
219 220
220 221
221 222
222 223
223 224
224 225
225 226
226 227
227 228
228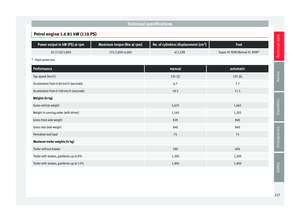 229
229 230
230 231
231 232
232 233
233 234
234 235
235 236
236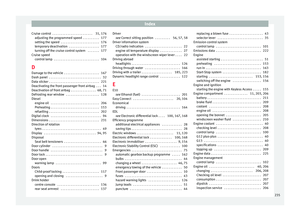 237
237 238
238 239
239 240
240 241
241 242
242 243
243 244
244 245
245 246
246 247
247