2015 MERCEDES-BENZ GLE SUV light
[x] Cancel search: lightPage 215 of 453
Deactivating DISTRONIC PLUS
There are several ways to deactivate
DISTRONIC PLUS:
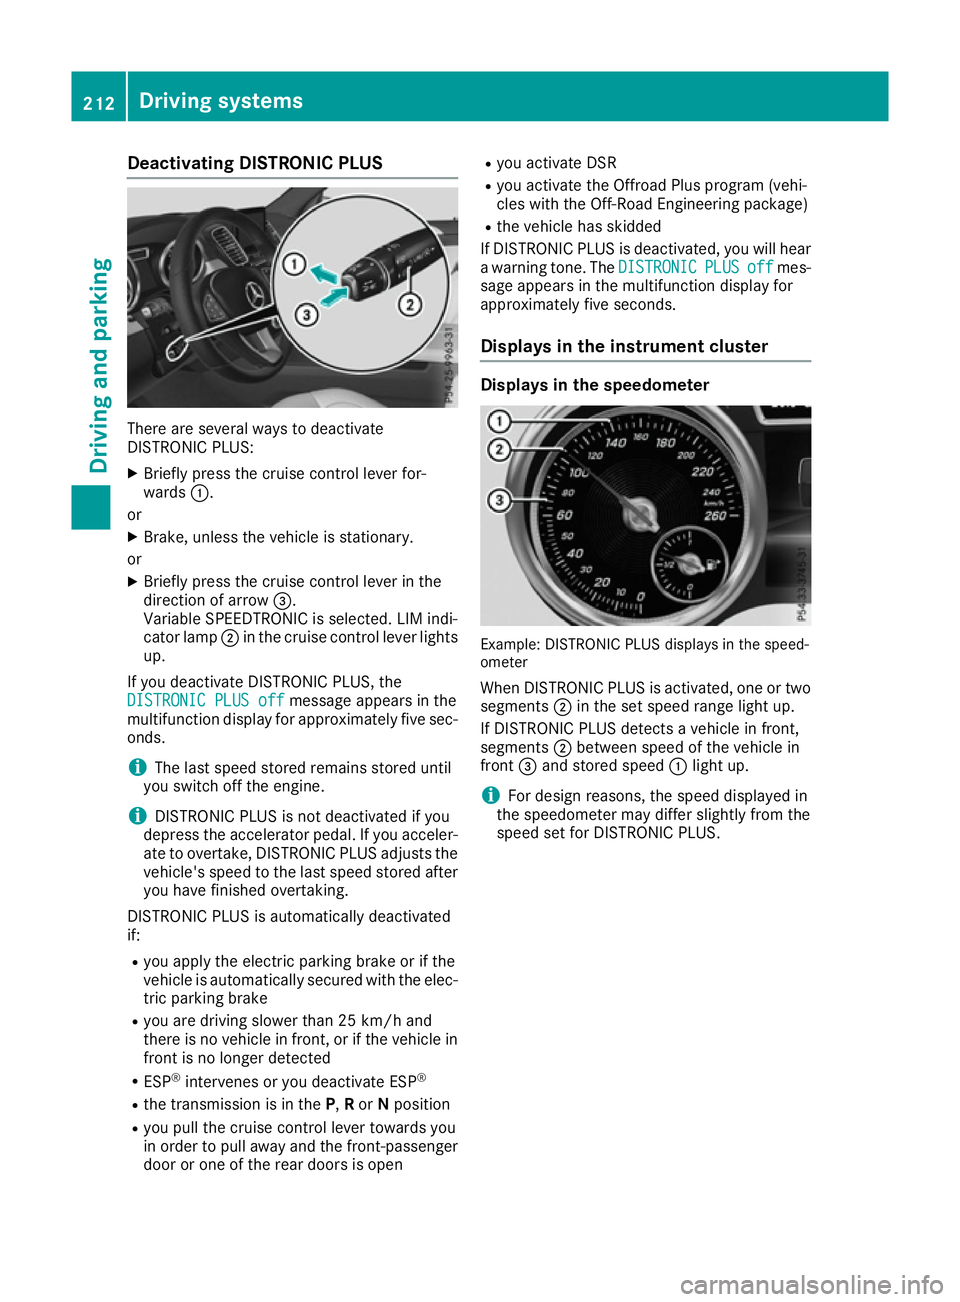
X Briefly press the cruise control lever for-
wards :.
or X Brake, unless the vehicle is stationary.
or X Briefly press the cruise control lever in the
direction of arrow =.
Variable SPEEDTRONIC is selected. LIM indi-
cator lamp ;in the cruise control lever lights
up.
If you deactivate DISTRONIC PLUS, the DISTRONIC PLUS off
DISTRONIC PLUS off message appears in the
multifunction display for approximately five sec-
onds.
i The last speed stored remains stored until
you switch off the engine.
i DISTRONIC PLUS is not deactivated if you
depress the accelerator pedal. If you acceler- ate to overtake, DISTRONIC PLUS adjusts the
vehicle's speed to the last speed stored after
you have finished overtaking.
DISTRONIC PLUS is automatically deactivated
if: R you apply the electric parking brake or if the
vehicle is automatically secured with the elec-
tric parking brake
R you are driving slower than 25 km/h and
there is no vehicle in front, or if the vehicle in
front is no longer detected
R ESP ®
intervenes or you deactivate ESP ®
R the transmission is in the P,Ror Nposition
R you pull the cruise control lever towards you
in order to pull away and the front-passenger door or one of the rear doors is open R
you activate DSR
R you activate the Offroad Plus program (vehi-
cles with the Off-Road Engineering package)
R the vehicle has skidded
If DISTRONIC PLUS is deactivated, you will hear a warning tone. The DISTRONIC
DISTRONIC PLUS PLUSoff
offmes-
sage appears in the multifunction display for
approximately five seconds.
Displays in the instrument cluster Displays in the speedometer
Example: DISTRONIC PLUS displays in the speed-
ometer
When DISTRONIC PLUS is activated, one or two segments ;in the set speed range light up.
If DISTRONIC PLUS detects a vehicle in front,
segments ;between speed of the vehicle in
front =and stored speed :light up.
i For design reasons, the speed displayed in
the speedometer may differ slightly from the
speed set for DISTRONIC PLUS. 212
Driving syste
msDriving and parking
Page 217 of 453
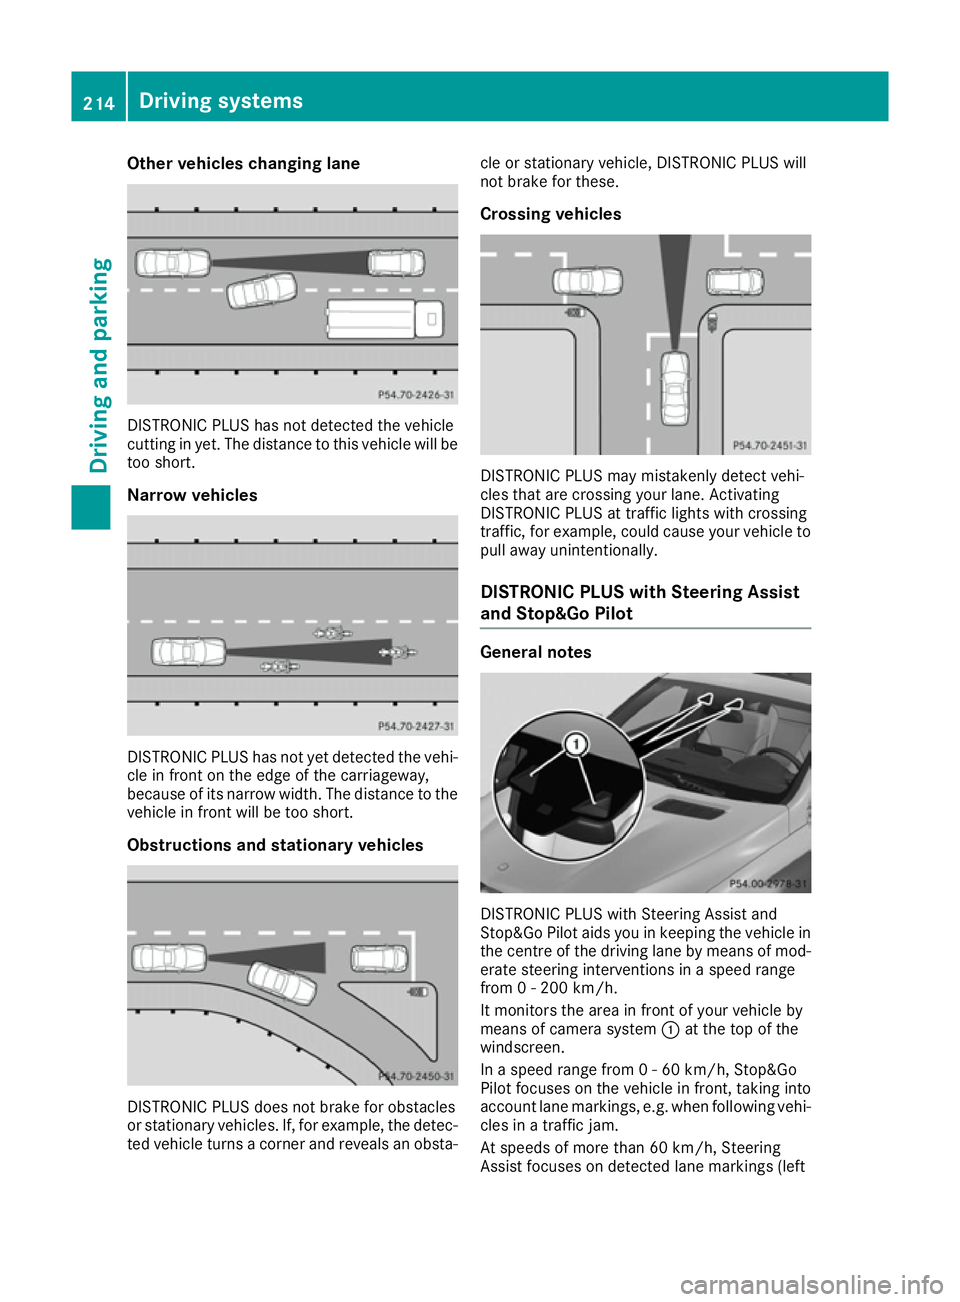
Other vehicles changing lane
DISTRONIC PLUS has not detected the vehicle
cutting in yet. The distance to this vehicle will be too short.
Narrow vehicles DISTRONIC PLUS has not yet detected the vehi-
cle in front on the edge of the carriageway,
because of its narrow width. The distance to thevehicle in front will be too short.
Obstructions and stationary vehicles DISTRONIC PLUS does not brake for obstacles
or stationary vehicles. If, for example, the detec-
ted vehicle turns a corner and reveals an obsta- cle or stationary vehicle, DISTRONIC PLUS will
not brake for these.
Crossing vehicles DISTRONIC PLUS may mistakenly detect vehi-
cles that are crossing your lane. Activating
DISTRONIC PLUS at traffic lights with crossing
traffic, for example, could cause your vehicle to pull away unintentionally.
DISTRONIC PLUS with Steering Assist
and Stop&Go Pilot General notes
DISTRONIC PLUS with Steering Assist and
Stop&Go Pilot aids you in keeping the vehicle in
the centre of the driving lane by means of mod-
erate steering interventions in a speed range
from 0 - 200 km/h.
It monitors the area in front of your vehicle by
means of camera system :at the top of the
windscreen.
In a speed range from 0 - 60 km/h, Stop&Go
Pilot focuses on the vehicle in front, taking into
account lane markings, e.g. when following vehi- cles in a traffic jam.
At speeds of more than 60 km/h, Steering
Assist focuses on detected lane markings (left 214
Driving systemsDriving and parking
Page 218 of 453
and right), only focusing on the vehicle in front if
detected lane markings are not present.
If these conditions are not present, Steering
Assist and Stop&Go Pilot cannot provide assis-
tance.
DISTRONIC PLUS must be active in order for the
function to be available.
Important safety notes If you fail to adapt your driving style, DISTRONIC PLUS with Steering Assist and Stop&Go Pilot
can neither reduce the risk of an accident nor
override the laws of physics. It cannot take into
account road, weather or traffic conditions.
DISTRONIC PLUS with Steering Assist and
Stop&Go Pilot is only an aid. You are responsible
for the distance to the vehicle in front, for vehi- cle speed, for braking in good time and for stay-
ing in lane.
DISTRONIC PLUS with Steering Assist and
Stop&Go Pilot does not detect road and traffic
conditions and does not detect all road users. If you are following a vehicle which is driving
towards the edge of the carriageway, your vehi-cle could come into contact with the kerb or
other road boundaries. Be particularly aware of
other road users, e.g. cyclists, that are directly
next to your vehicle.
Obstacles such as traffic pylons on the lane or
projecting out into the lane are not detected.
An inappropriate steering intervention, e.g. after
intentionally driving over a lane marking, can be
corrected at any time if you steer slightly in the opposite direction.
DISTRONIC PLUS with Steering Assist and
Stop&Go Pilot cannot continuously keep your
vehicle in lane. In some cases, the steering
intervention is not sufficient to bring the vehicle back to the lane. In such cases, you must steer
the vehicle yourself to ensure that it does not
leave the lane.
The support offered by the system may be
impaired if:
R there is poor visibility, e.g. due to insufficient
illumination of the road, or due to snow, rain,fog or spray
R there is glare, e.g. from oncoming traffic, the
sun or reflection from other vehicles (e.g. if
the road surface is wet)
R the windscreen is dirty, misted up, damaged
or covered, for instance by a sticker, in the
vicinity of the camera R
no or several, unclear lane markings are pres-
ent for one lane, e.g. in a construction area
R the lane markings are worn away, dark or cov-
ered up, e.g. by dirt or snow
R the distance to the vehicle in front is too small
and the lane markings thus cannot be detec-
ted
R the lane markings change quickly, e.g. lanes
branch off, cross one another or merge
R the road is narrow and winding
R there are highly variable shade conditions on
the road
The system is switched to passive and no longer assists you by performing steering interventions
if:
R you actively change lane
R you switch on the turn signal
R you take your hands off the steering wheel or
do not steer for a prolonged period of time
i After you have finished changing lanes,
Steering Assist and Stop&Go Pilot are auto-
matically active again.
Steering Assist and Stop&Go Pilot cannot pro-
vide assistance:
R on very sharp corners
R when towing a trailer
R a loss of tyre pressure or a defective tyre has
been detected and displayed
Pay attention also to the important safety notes
for DISTRONIC PLUS (Y page 207).
The steering interventions are carried out with a limited steering moment. The system requires
the driver to keep his hands on the steering
wheel and to steer himself.
If you do not steer yourself or if you take your
hands off the steering wheel for a prolonged
period of time, the system will first alert you with
a visual warning. A steering wheel symbol
appears in the multifunction display. If you have
still not started to steer and have not taken hold of the steering wheel after five seconds at the
latest, a warning tone also sounds to remind you
to take control of the vehicle. Steering Assist
and Stop&Go Pilot switch to passive mode.
DISTRONIC PLUS remains active. Driving systems
215Driving and parking Z
Page 221 of 453
Normal level
Setting the vehicle to normal level
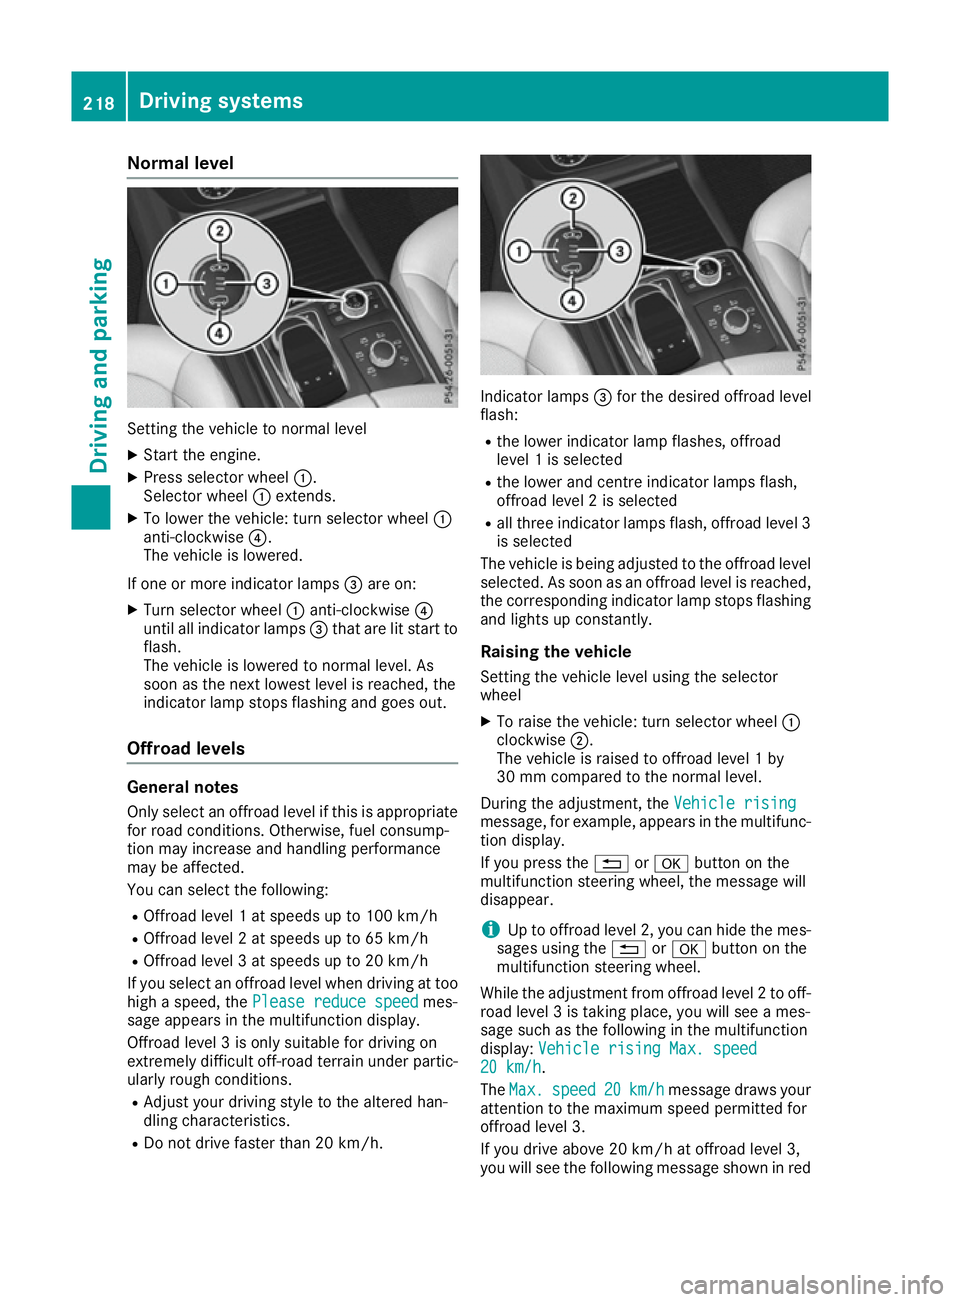
X Start the engine.
X Press selector wheel :.
Selector wheel :extends.
X To lower the vehicle: turn selector wheel :
anti-clockwise ?.
The vehicle is lowered.
If one or more indicator lamps =are on:
X Turn selector wheel :anti-clockwise ?
until all indicator lamps =that are lit start to
flash.
The vehicle is lowered to normal level. As
soon as the next lowest level is reached, the
indicator lamp stops flashing and goes out.
Offroad levels General notes
Only select an offroad level if this is appropriate for road conditions. Otherwise, fuel consump-
tion may increase and handling performance
may be affected.
You can select the following:
R Offroad level 1 at speeds up to 100 km/h
R Offroad level 2 at speeds up to 65 km/h
R Offroad level 3 at speeds up to 20 km/h
If you select an offroad level when driving at too
high a speed, the Please reduce speed
Please reduce speed mes-
sage appears in the multifunction display.
Offroad level 3 is only suitable for driving on
extremely difficult off-road terrain under partic- ularly rough conditions.
R Adjust your driving style to the altered han-
dling characteristics.
R Do not drive faster than 20 km/h. Indicator lamps
=for the desired offroad level
flash:
R the lower indicator lamp flashes, offroad
level 1 is selected
R the lower and centre indicator lamps flash,
offroad level 2 is selected
R all three indicator lamps flash, offroad level 3
is selected
The vehicle is being adjusted to the offroad level
selected. As soon as an offroad level is reached,
the corresponding indicator lamp stops flashing and lights up constantly.
Raising the vehicle
Setting the vehicle level using the selector
wheel
X To raise the vehicle: turn selector wheel :
clockwise ;.
The vehicle is raised to offroad level 1 by
30 mm compared to the normal level.
During the adjustment, the Vehicle rising Vehicle rising
message, for example, appears in the multifunc-
tion display.
If you press the %ora button on the
multifunction steering wheel, the message will
disappear.
i Up to offroad level 2, you can hide the mes-
sages using the %ora button on the
multifunction steering wheel.
While the adjustment from offroad level 2 to off-
road level 3 is taking place, you will see a mes-
sage such as the following in the multifunction
display: Vehicle rising Max. speed
Vehicle rising Max. speed
20 km/h 20 km/h.
The Max. Max. speed
speed 20
20km/h
km/h message draws your
attention to the maximum speed permitted for
offroad level 3.
If you drive above 20 km/h at offroad level 3,
you will see the following message shown in red 218
Driving systemsDriving an
d parking
Page 226 of 453
If this vehicle is not driven in a safe manner, it
can lead to an accident, to the vehicle over-
turning as well as serious or even fatal inju-
ries.
R In the event of an accident with the vehicle
overturning, passengers who are not wearing
their seat belt are considerably more likely to die than passengers wearing their seat belt.
You and all vehicle occupants should always
wear your seat belts.
General notes
Only select raised level if this is appropriate for
the road conditions. Otherwise, fuel consump-
tion may increase and handling may be affected.
Make changes to the vehicle level while the
vehicle is in motion. This enables the vehicle to
adjust to the new level as quickly as possible.
The vehicle level may change visibly if you park
the vehicle and the outside temperature
changes. If the temperature drops, the vehicle
level lowers; with an increase in temperature,
the vehicle level rises.
If you unlock the vehicle or open a door, the
vehicle begins to compensate for load discrep-
ancies while still parked. However, for signifi-
cant level changes, e.g. after the vehicle has
been stationary for a long period, the engine
must be running. For safety reasons, the vehicle is only lowered when the doors are closed. Low-
ering is interrupted if a door is opened; it con-
tinues once the door has been closed.
Vehicles without a trailer coupled: below a
speed of 65 km/h, you can select between the
normal and raised vehicle level. Select the nor-
mal vehicle level for normal road conditions and
the raised vehicle level when using snow chains or if the road conditions are very poor. Your
selection remains stored even if you remove the
key from the ignition lock. If you try to select
raised level at a speed above 65 km/h, the
Please
Please reduce reducespeed
speedmessage appears in the
multifunction display.
Vehicles with a trailer coupled: below a speed
of 30 km/h, you can select between the normal
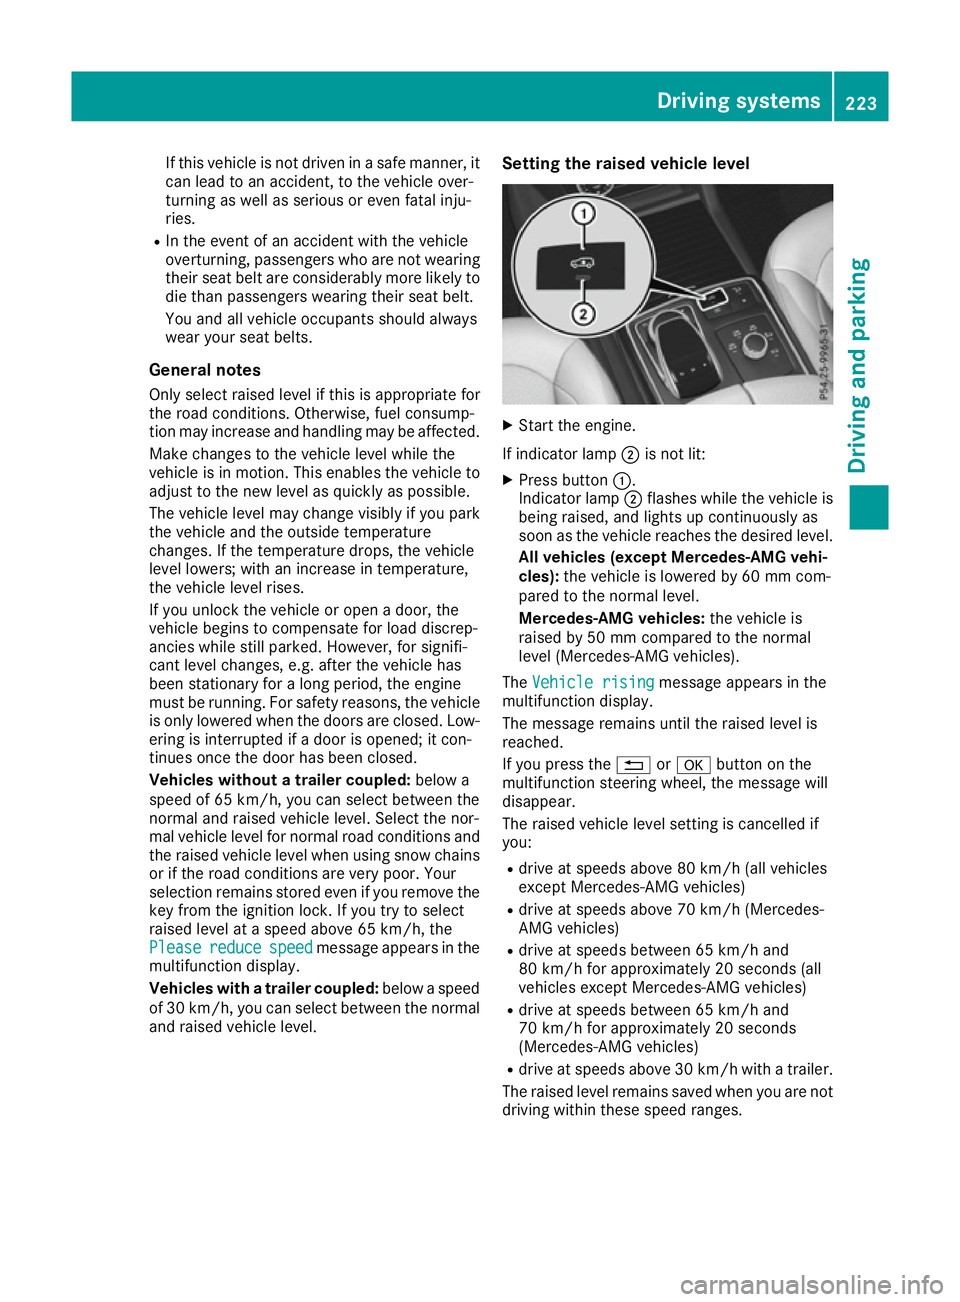
and raised vehicle level. Setting the raised vehicle level X
Start the engine.
If indicator lamp ;is not lit:
X Press button :.
Indicator lamp ;flashes while the vehicle is
being raised, and lights up continuously as
soon as the vehicle reaches the desired level.
All vehicles (except Mercedes-AMG vehi-
cles): the vehicle is lowered by 60 mm com-
pared to the normal level.
Mercedes-AMG vehicles: the vehicle is
raised by 50 mm compared to the normal
level (Mercedes-AMG vehicles).
The Vehicle rising Vehicle rising message appears in the
multifunction display.
The message remains until the raised level is
reached.
If you press the %ora button on the
multifunction steering wheel, the message will
disappear.
The raised vehicle level setting is cancelled if
you:
R drive at speeds above 80 km/h (all vehicles
except Mercedes-AMG vehicles)
R drive at speeds above 70 km/h (Mercedes-
AMG vehicles)
R drive at speeds between 65 km/h and
80 km/h for approximately 20 seconds (all
vehicles except Mercedes-AMG vehicles)
R drive at speeds between 65 km/h and
70 km/h for approximately 20 seconds
(Mercedes-AMG vehicles)
R drive at speeds above 30 km/h with a trailer.
The raised level remains saved when you are not driving within these speed ranges. Driving systems
223Driving and parking Z
Page 227 of 453
Setting the normal vehicle level
! Make sure there is enough ground clear-
ance when the vehicle is being lowered. It
could otherwise hit the ground, damaging the
underbody. X
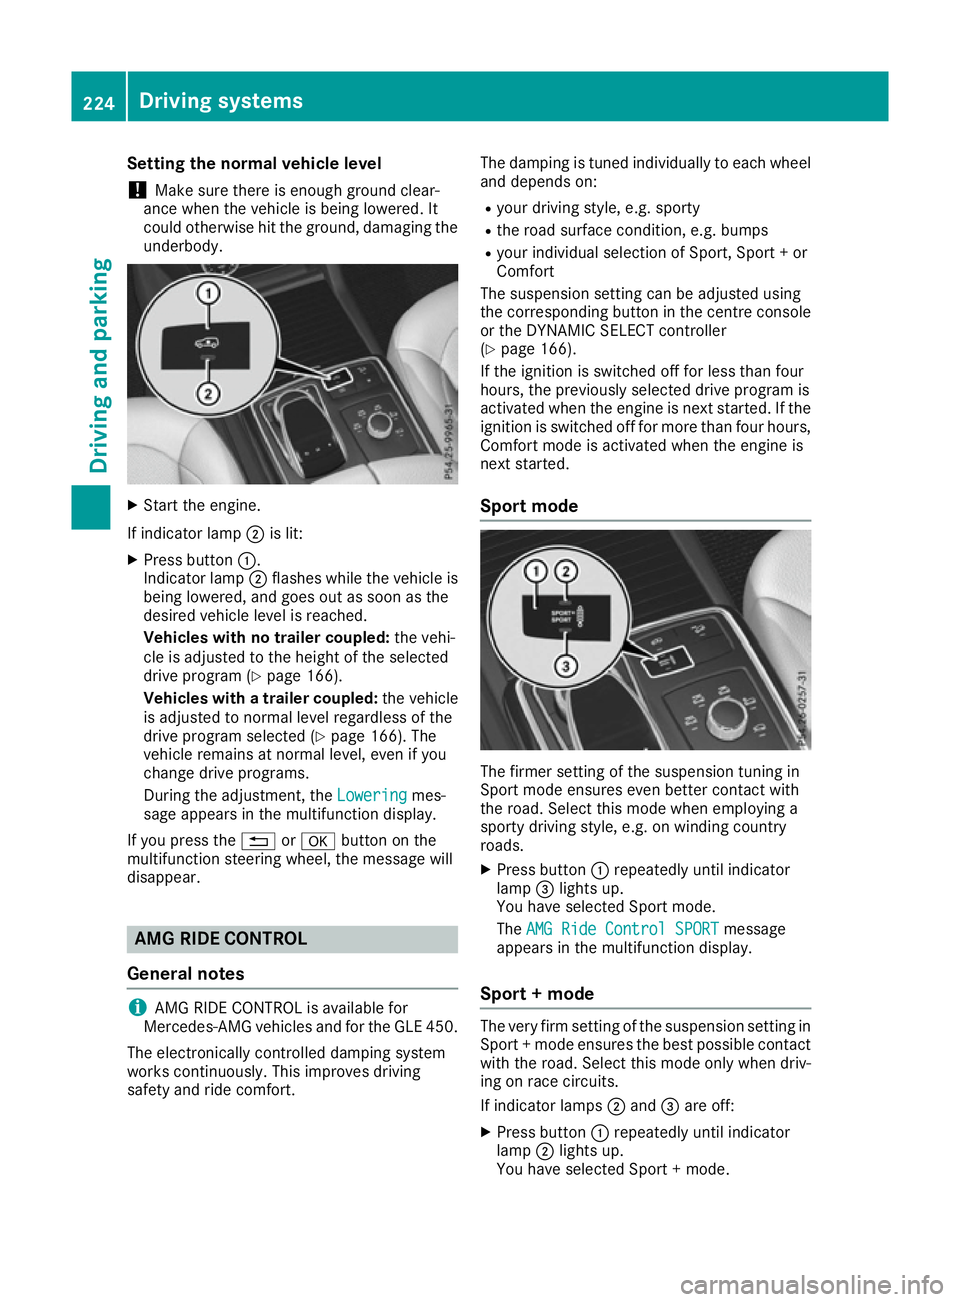
Start the engine.
If indicator lamp ;is lit:
X Press button :.
Indicator lamp ;flashes while the vehicle is
being lowered, and goes out as soon as the
desired vehicle level is reached.
Vehicles with no trailer coupled: the vehi-
cle is adjusted to the height of the selected
drive program (Y page 166).
Vehicles with a trailer coupled: the vehicle
is adjusted to normal level regardless of the
drive program selected (Y page 166). The
vehicle remains at normal level, even if you
change drive programs.
During the adjustment, the Lowering Loweringmes-
sage appears in the multifunction display.
If you press the %ora button on the
multifunction steering wheel, the message will
disappear. AMG RIDE CONTROL
General notes i
AMG RIDE CONTROL is available for
Mercedes-AMG vehicles and for the GLE 450.
The electronically controlled damping system
works continuously. This improves driving
safety and ride comfort. The damping is tuned individually to each wheel
and depends on:
R your driving style, e.g. sporty
R the road surface condition, e.g. bumps
R your individual selection of Sport, Sport + or
Comfort
The suspension setting can be adjusted using
the corresponding button in the centre console
or the DYNAMIC SELECT controller
(Y page 166).
If the ignition is switched off for less than four
hours, the previously selected drive program is
activated when the engine is next started. If the ignition is switched off for more than four hours,
Comfort mode is activated when the engine is
next started.
Sport mode The firmer setting of the suspension tuning in
Sport mode ensures even better contact with
the road. Select this mode when employing a
sporty driving style, e.g. on winding country
roads.
X Press button :repeatedly until indicator
lamp =lights up.
You have selected Sport mode.
The AMG Ride Control SPORT AMG Ride Control SPORT message
appears in the multifunction display.
Sport + mode The very firm setting of the suspension setting in
Sport + mode ensures the best possible contact
with the road. Select this mode only when driv-
ing on race circuits.
If indicator lamps ;and =are off:
X Press button :repeatedly until indicator
lamp ;lights up.
You have selected Sport + mode. 224
Driving systemsDriving and parking
Page 229 of 453
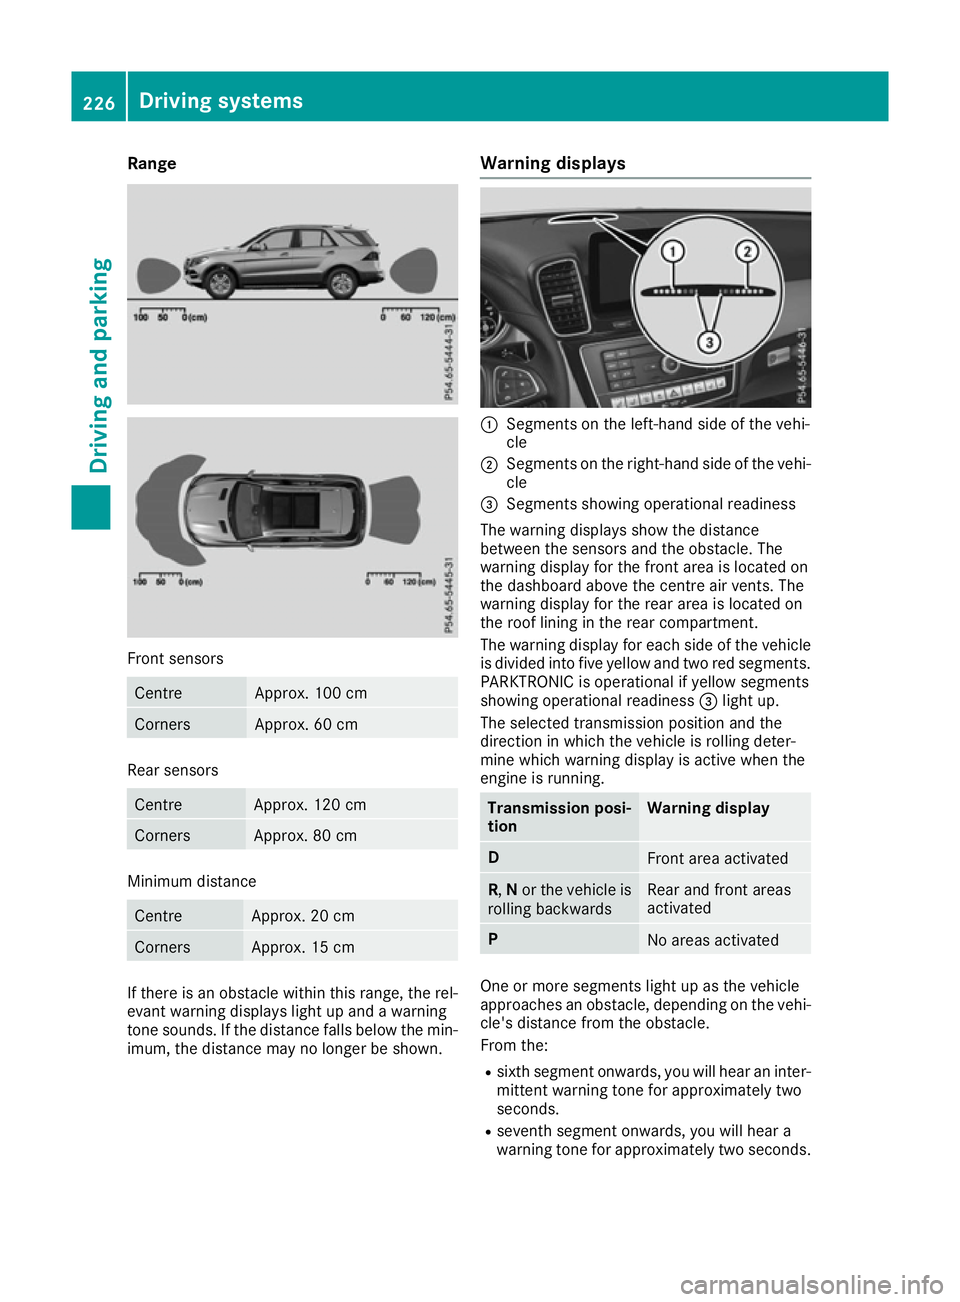
Range
Front sensors
Centre Approx. 100 cm
Corners Approx. 60 cm
Rear sensors
Centre Approx. 120 cm
Corners Approx. 80 cm
Minimum distance
Centre Approx. 20 cm
Corners Approx. 15 cm
If there is an obstacle within this range, the rel-
evant warning displays light up and a warning
tone sounds. If the distance falls below the min- imum, the distance may no longer be shown. Warning displays
:
Segments on the left-hand side of the vehi-
cle
; Segments on the right-hand side of the vehi-
cle
= Segments showing operational readiness
The warning displays show the distance
between the sensors and the obstacle. The
warning display for the front area is located on
the dashboard above the centre air vents. The
warning display for the rear area is located on
the roof lining in the rear compartment.
The warning display for each side of the vehicle
is divided into five yellow and two red segments.
PARKTRONIC is operational if yellow segments
showing operational readiness =light up.
The selected transmission position and the
direction in which the vehicle is rolling deter-
mine which warning display is active when the
engine is running. Transmission posi-
tion Warning display
D
Front area activated
R,
Nor the vehicle is
rolling backwards Rear and front areas
activated
P
No areas activated
One or more segments light up as the vehicle
approaches an obstacle, depending on the vehi-
cle's distance from the obstacle.
From the:
R sixth segment onwards, you will hear an inter-
mittent warning tone for approximately two
seconds.
R seventh segment onwards, you will hear a
warning tone for approximately two seconds. 226
Driving systemsDriving and parking
Page 230 of 453
This indicates that you have now reached the
minimum distance.
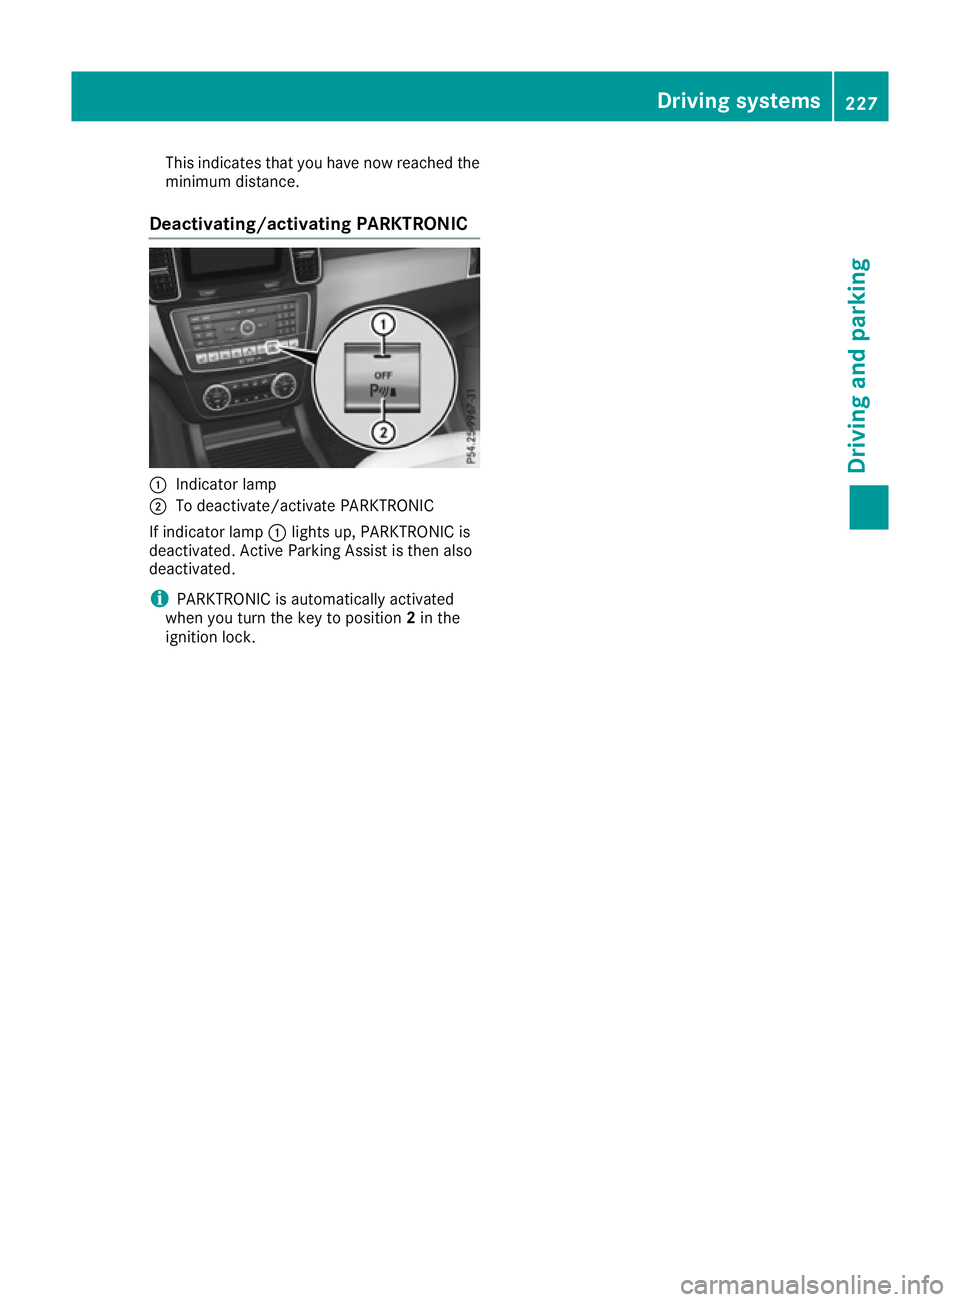
Deactivating/activating PARKTRONIC :
Indicator lamp
; To deactivate/activate PARKTRONIC
If indicator lamp :lights up, PARKTRONIC is
deactivated. Active Parking Assist is then also
deactivated.
i PARKTRONIC is automatically activated
when you turn the key to position 2in the
ignition lock. Driving systems
227Driving and parking Z