2015 MERCEDES-BENZ GLE SUV trip computer
[x] Cancel search: trip computerPage 18 of 453
Mercedes-Benz Service Centre
see Qualified specialist workshop
Message memory (on-board com-
puter) .................................................. 300
Mirrors
see Exterior mirrors
see Rear-view mirror
see Vanity mirror (in sun visor)
Mobile phone
Frequencies ................................... 433
Installation ..................................... 433
Menu (on-board computer) ............ 288
Notes/placing in the bracket ......... 366
Transmission output (maximum) .... 433
Modifying the programming (key) ..... 86
MOExtended tyres ............................. 388
Motorway mode ................................ 125
MP3
Operating ....................................... 287
see Separate operating instructions
Multifunction display
Function/notes ............................. 283
Permanent display ......................... 293
Multifunction steering wheel
Operating the on-board computer .. 282
Overview .......................................... 35
Multimedia system
see Separate operating instructions N
Navigation Menu (on-board computer) ............ 286
see separate operating instructions
Notes on running in a new vehicle .. 157O
Occupant safety Airbags ............................................ 48
Automatic front-passenger front
airbag deactivation ......................... .51
Automatic measures after an acci-
dent ................................................. 58
Children in the vehicle ..................... 58
Important safety note s.................... 43
PASSENGER AIRBAG indicator
lamp ................................................. 44 Pets in the vehicle ........................... 70
PRE-SAFE
®
(anticipatory occu-
pant protection) ............................... 57
PRE-SAFE ®
PLUS (anticipatory
occupant protection PLUS) .............. 57
Restraint system introduction .......... 43
Restraint system warning lamp ........ 44
Odometer
see Total distance recorder
see Trip meter
Off-road driving
Approach/departure angle ............ 445
Checklist after driving off-road ...... 200
Checklist before driving off-road .... 200
Fording depth ................................ 444
General information ....................... 199
Important safety notes .................. 199
Maximum gradient climbing abil-
ity .................................................. 445
Travelling uphill .............................. 202
Off-road lights .................................... 125
Off-Road program (vehicles with-
out Off-Road Engineering package)
Function/note s............................. 254
Off-road programs (vehicles with
Off-Road Engineering package)
Function/note s............................. 254
Off-road drive program .................. 254
Offroad Plus drive progra m............ 255
Off-road programs (vehicles with
the Off-Road Engineering package)
Displays in the COMAND display ... 258
Off-road system
4MATIC .......................................... 252
DSR ............................................... 252
LOW RANGE off-road gear ............. 255
Off-road 4ETS .................................. 76
Off-road ABS .................................... 71
Off-road ESP ®
.................................. 77
Off-Road program (vehicles with-
out Off-Road Engineering pack-
age) ............................................... 254
Off-road programs (vehicles with
Off-Road Engineering package) ...... 254
Oil
see Engine oil Index
15
Page 19 of 453
On and Offroad menu (on-board
computer)
.......................................... 297
On-board computer
AMG menu .....................................2 97
Assistance menu ........................... 289
Audio menu ................................... 287
Convenience submenu .................. 296
Display messages .......................... 300
Displaying a service message ....... .378
DISTRONIC PLUS ........................... 213
Factory setting submenu .............. .297
Heating submenu ........................... 295
HYBRID menu ................................ 292
Important safety notes .................. 281
Instrument cluster submenu .......... 293
Light submenu ............................... 293
Menu overview .............................. 284
Message memory .......................... 300
Navigation menu ............................ 286
On and Offroad menu .................... 297
Operating the TV ............................ 288
Operating video DVD ..................... 288
Operation ....................................... 282
RACETIMER ................................... 298
Service menu ................................. 291
Settings menu ............................... 292
Standard displa y............................ 284
Telephone menu ............................ 288
Trip menu ...................................... 284
Vehicle submenu ........................... 294
Operating instructions
Vehicle equipment ........................... 26
Operating safety
Declaration of conformity ................ 27
Important safety note ...................... 26
Operating system
see On-board computer
Outside temperature display ........... 282
Overhead control panel ...................... 39
Override feature
Rear side window s........................... 69 P
Paint code .......................................... 434
Paintwork (cleaning instructions) ... 380
Panic alarm .......................................... 43 Panorama sliding sunroof
Important safety information ......... 101
Opening/closing the roller sun-
blind ............................................... 104
Operating ....................................... 103
Operating the roller sunblinds for
the sliding sunroof ......................... 103
Problem (malfunction) ................... 106
Rain closing feature ....................... 103
Reversing feature ........................... 102
Parking
Important safety notes .................. 191
Parking brake ................................ 192
Position of exterior mirror, front-
passenger side ............................... 119
Reversing camera .......................... 232
see PARKTRONIC
Parking aid
Active Parking Assist ..................... 228
see 360° camera
see Exterior mirrors
see PARKTRONIC
Parking assistance
see PARKTRONIC
Parking brake
Display message ............................ 304
Electric parking brake .................... 192
Warning lamp ................................. 346
Parking lamps
Display message ............................ 314
Switching on/of f........................... 122
PARKTRONIC
Deactivating/activating ................. 227
Driving system ............................... 225
Function/note s............................. 225
Important safety notes .................. 225
Problem (fault) ............................... 228
Sensor rang e................................. 225
Trailer towing ................................. 225
Warning display ............................. 226
PASSENGER AIR BAG
Display message ............................ 311
Indicator lamps ................................ 44
Problems (malfunctions) ................ 311
Pets in the vehicle ............................... 70
Plastic trim (cleaning instruc-
tions) .................................................. 384 16
Index
Page 25 of 453
With both axles on the ground .......4
01
Towing eye ......................................... 387
Traffic Sign Assist
Activating/deactivating the warn-ing function ................................... .290
Display message ............................ 325
Function/notes ............................ .242
Important safety notes .................. 242
Instrument cluster display ............. 243
Trailer coupling
see Towing a trailer
Trailer towing
7-pin connector ............................ .278
Blind Spot Assist ............................ 246
Cleaning the trailer tow hitch ......... 383
Coupling up a trailer ..................... .275
Decoupling a trailer ....................... 276
Driving tips ................................... .273
Important safety notes .................. 272
Lights display message .................. 313
Mounting dimensions .................... 446
Parktronic ...................................... 225
Power supply ................................. 277
Problem (fault) ............................... 279
Trailer loads ................................... 447
Transmission
see Automatic transmission
Transmission position display ......... 168
Transmission position display
(DIRECT SELECT lever) ......................168
Transporting the vehicle .................. 401
Travelling uphill
Brow of hill ..................................... 202
Driving downhill ............................ .202
Maximum gradient-climbing capa-
bility ............................................... 202
Trim pieces (cleaning instruc-
tions) ................................................. .384
Trip computer (on-board com-
puter) ................................................. .284
Trip meter
Calling up ....................................... 284
Resetting (on-board computer) ...... 285
Turn signals
Changing bulbs (front) ................... 130
Switching on/off ........................... 123 TV
Operating (on-board computer) ..... 288
see Separate operating instructions
Two-way radio
Frequencies ................................... 433
Installation ..................................... 433
Transmission output (maximum ).... 433
Type identification plate
see Vehicle identification plate
Tyre inflation compressor
see TIREFIT kit
Tyre pressure
Calling up (on-board computer) ..... 411
Display message ............................ 330
Not reached (TIREFIT) .................... 391
Reached (TIREFIT) .......................... 391
Recommended ............................... 408
Tyre pressure loss warning
General notes ................................ 410
Important safety notes .................. 410
Restarting ...................................... 410
Tyre pressure monitor
Checking the tyre pressure elec-
tronically ........................................ 411
Function/note s............................. 411
General notes ................................ 411
Important safety notes .................. 411
Radio type approval for the tyre
pressure monitor ........................... 413
Restarting ...................................... 412
Warning lamp ................................. 350
Warning message .......................... 412
Tyres
Changing a whee l.......................... 413
Checking ........................................ 406
Direction of rotation ...................... 414
Display message ............................ 330
General notes ................................ 418
Important safety notes .................. 405
Information on driving .................... 405
M+S tyres ...................................... 407
MOExtended tyre s......................... 407
Replacing ....................................... 413
Service life ..................................... 406
Storing ........................................... 414
Tyre size (data ).............................. 418
Tyre tread ...................................... 406
Wheel and tyre combinations ........ 419 22
Index
Page 190 of 453
!
If the charge current is too high, the fuse
could be tripped or the external mains supply could overheat. Check if the external mains
supply is equipped to handle the programmed charge current. If necessary, reduce the pro-
grammed charge current or use a different
mains socket.
Before starting the charging process at a power
socket, check the maximum permissible charge current for the relevant power socket or the
building.
You can set the maximum permissible charge
current
R on the charging cable controls (only charging
cable variant 1)
R in the Settings Settings menu of the on-board com-
puter (Y page 292).
The lower value of the two charge current set-
tings – on the charge cable controls and in the
on-board computer – determines the maximum
charge current. If you cannot set the precise
maximum permitted charge current, select the
next lowest available value.
Only set the maximum permitted charge current
in the on-board computer menu if:
R it is not possible to set the charge current on
the charging cable
R the precise maximum permitted charge cur-
rent can only be set via the on-board com-
puter.
Setting the maximum permitted charge current on the charging cable of variant 1 is described
below.
X To adjust the setting: press button?
repeatedly until the desired setting is selec-
ted in display =.
R Two LEDs are flashing: minimum setting
R All LEDs are flashing: maximum setting
If, after the charging process, the charging cable is:
R left connected to the power socket, the cur-
rently selected values will be used for the next
charging process.
R removed from the power socket, the values
will be reset to the minimum setting for the
next charging process. You may then need to
reset the values of the maximum charge cur-
rent.
i If the vehicle requires more time than usual
when charging, check the maximum charge current settings using the controls on the
charging cable or in the on-board computer's
menu.
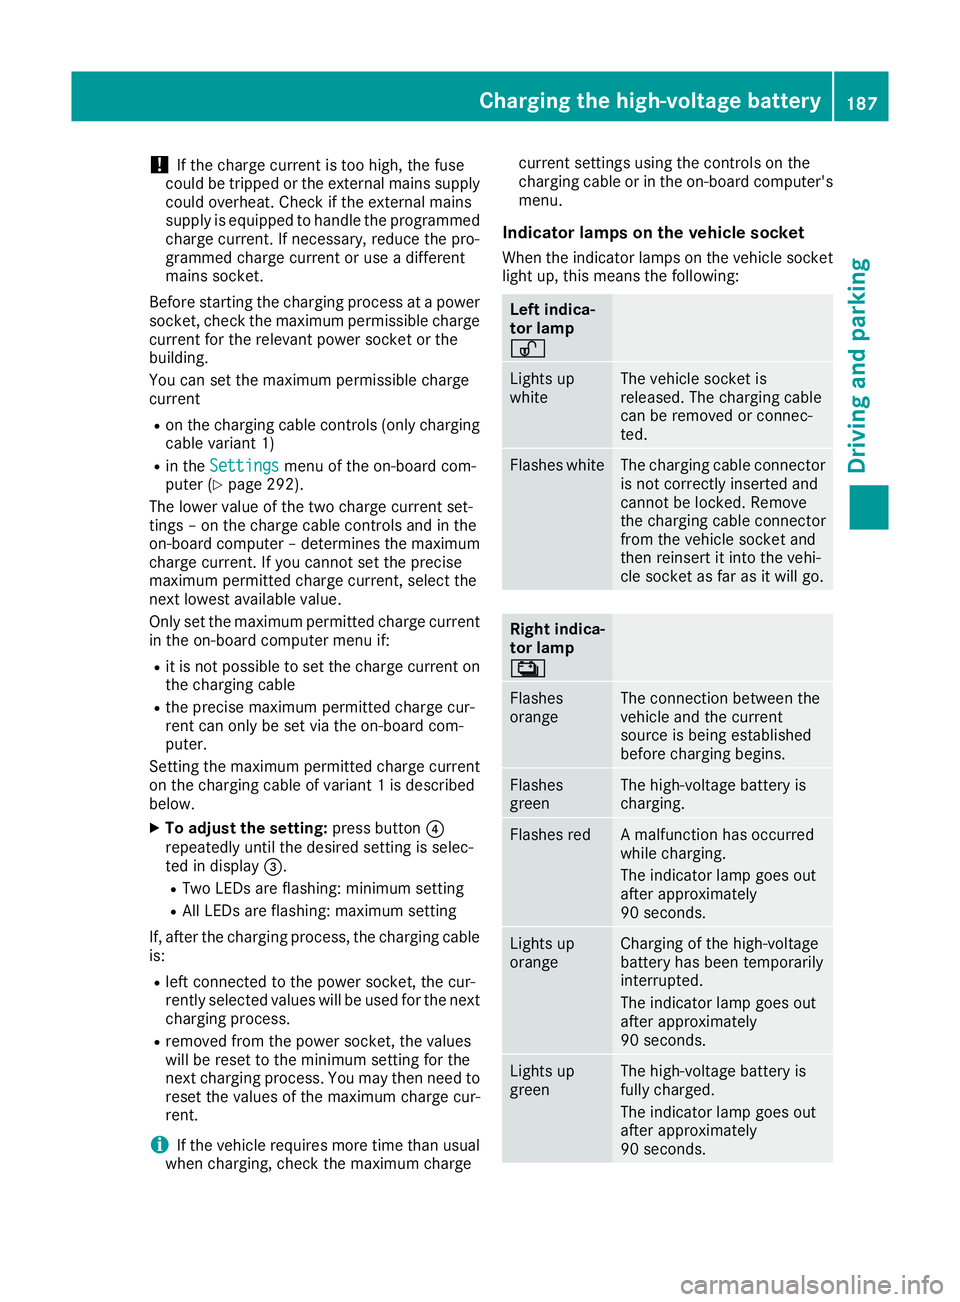
Indicator lamps on the vehicle socket
When the indicator lamps on the vehicle socket
light up, this means the following: Left indica-
tor lamp
Ì Ì
Lights up
white The vehicle socket is
released. The charging cable
can be removed or connec-
ted.
Flashes white The charging cable connector
is not correctly inserted and
cannot be locked. Remove
the charging cable connector
from the vehicle socket and
then reinsert it into the vehi-
cle socket as far as it will go. Right indica-
tor lamp
Ý Ý
Flashes
orange The connection between the
vehicle and the current
source is being established
before charging begins.
Flashes
green The high-voltage battery is
charging.
Flashes red A malfunction has occurred
while charging.
The indicator lamp goes out
after approximately
90 seconds.
Lights up
orange Charging of the high-voltage
battery has been temporarily
interrupted.
The indicator lamp goes out
after approximately
90 seconds.
Lights up
green The high-voltage battery is
fully charged.
The indicator lamp goes out
after approximately
90 seconds.Charging the high-voltage battery
187Driving and parking Z
Page 266 of 453
If manual gearshifting is deactivated, the auto-
matic transmission shifts:
R into the drive program that was last selected,
and
R into the driving mode that was last selected
If you change the drive program, the operating
mode that was last selected is stored for approx-
imately 60 seconds. After this time, the HYBRID
operating mode is automatically activated.
Operating the on-board computer You can display the current operating condition
of the hybrid drive system in the multifunction
display and the multimedia system in the form of
an energy flow display (Y page 263).
In the display of the multimedia system, you can
also call up a graphic display of the fuel con-
sumption and generated electricity
(Y page 266). Menus and submenus
Selecting displays in the display of the
multimedia system X
Press the Øbutton on the multimedia sys-
tem.
The vehicle menu appears.
X To select Energy flow
Energy flow: turn and press the
controller.
The energy flow is displayed.
or X To select Consumption
Consumption: turn and press the
controller.
Fuel consumption and the electric energy
generated are displayed.
X To exit the display: press the %button on
the controller.
Selecting the energy flow display in the multifunction display X
Press the =or; button on the steering
wheel to select the Trip Tripmenu.
X Use : or9 to select Energy flow
Energy flow.
X Confirm by pressing aon the steering
wheel.
The active components of the hybrid drive
system are highlighted in the energy flow dis-
play. Energy flow display Overview
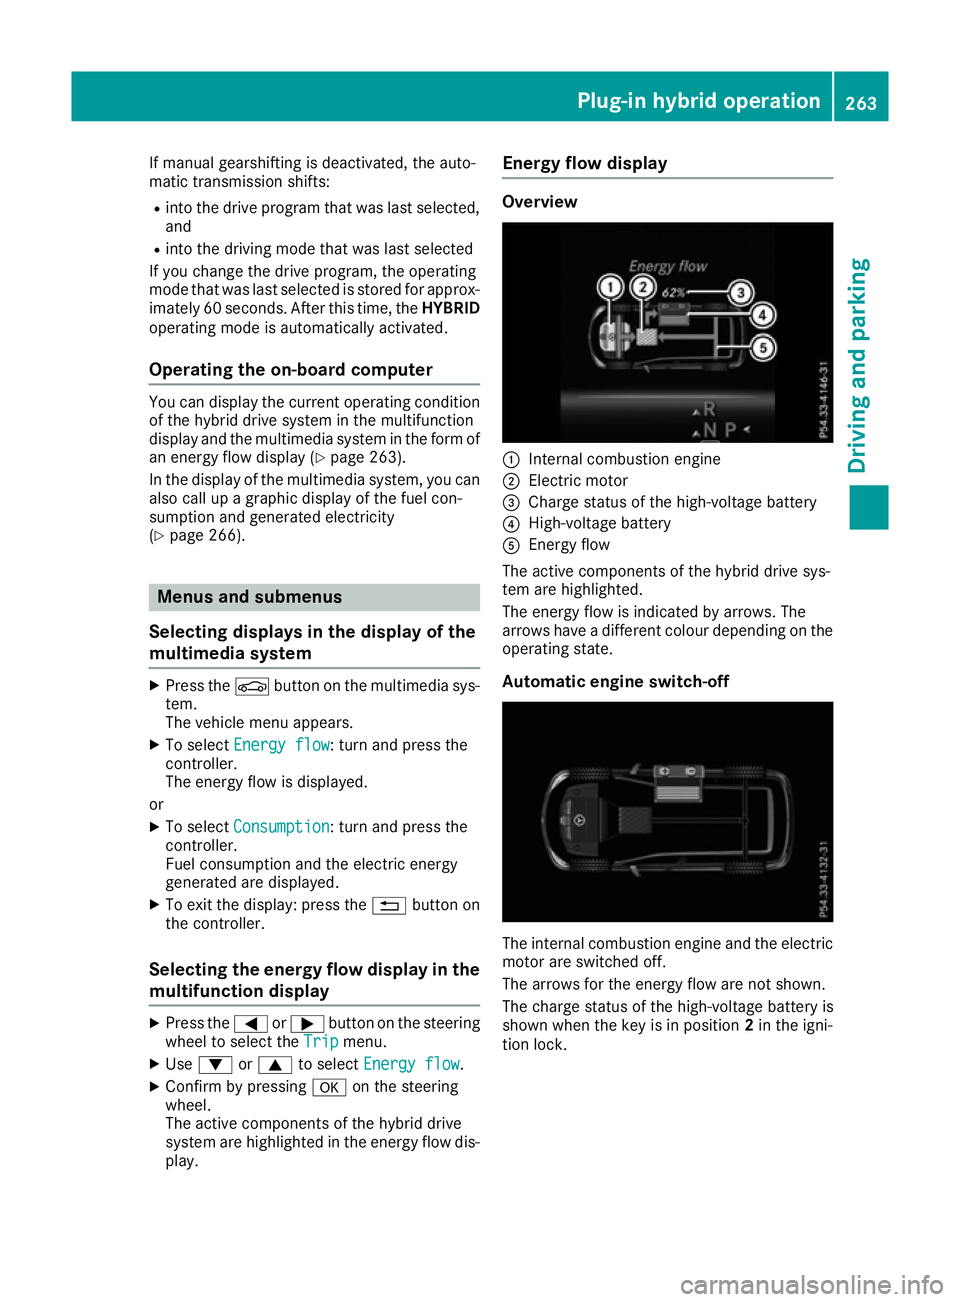
:
Internal combustion engine
; Electric motor
= Charge status of the high-voltage battery
? High-voltage battery
A Energy flow
The active components of the hybrid drive sys-
tem are highlighted.
The energy flow is indicated by arrows. The
arrows have a different colour depending on the operating state.
Automatic engine switch-off The internal combustion engine and the electric
motor are switched off.
The arrows for the energy flow are not shown.
The charge status of the high-voltage battery is
shown when the key is in position 2in the igni-
tion lock. Plug-in hybrid operation
263Driving and parking Z
Page 269 of 453
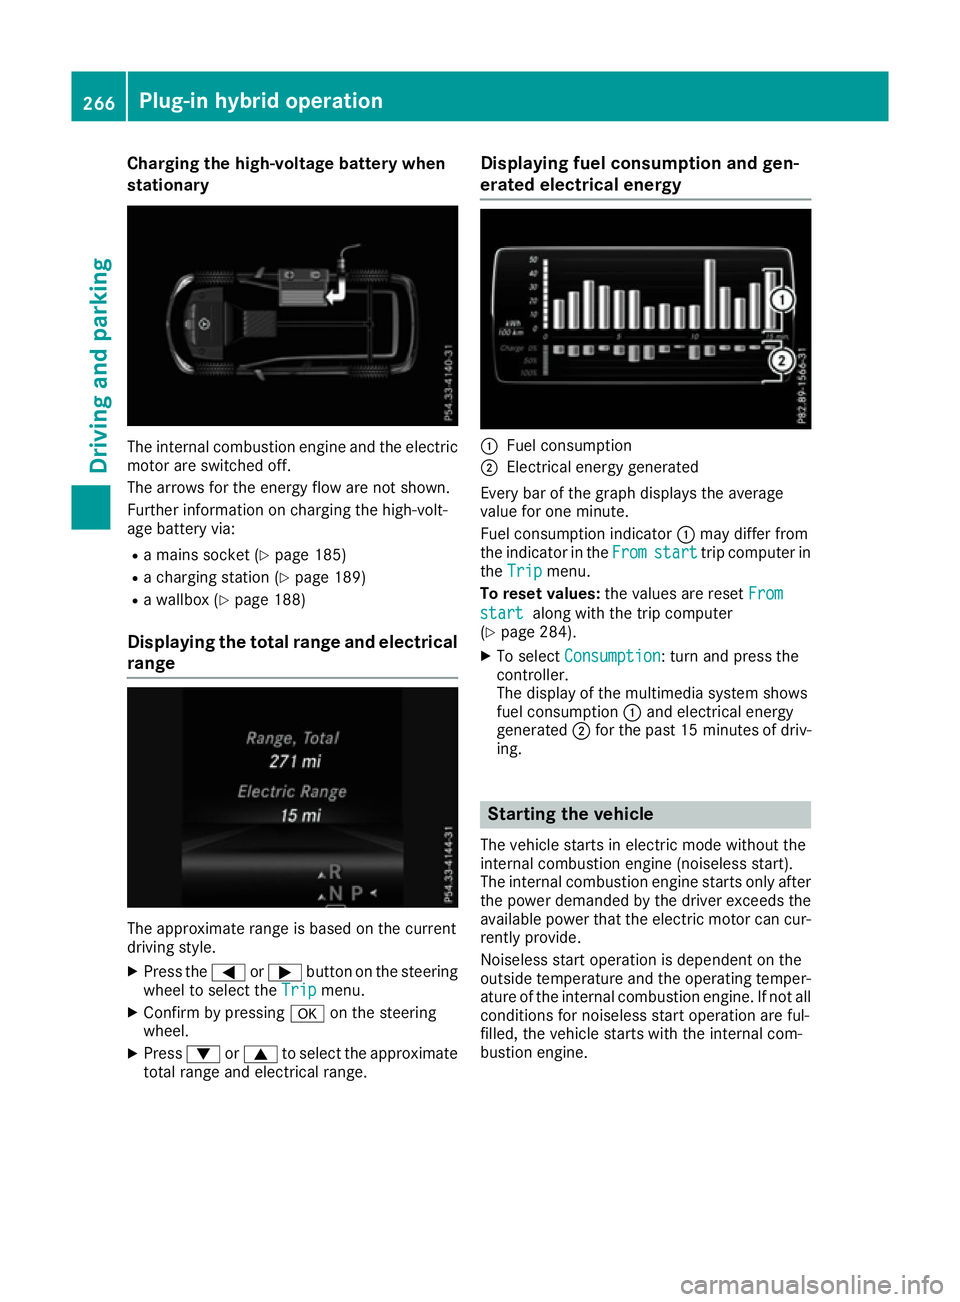
Charging the high-voltage battery when
stationary The internal combustion engine and the electric
motor are switched off.
The arrows for the energy flow are not shown.
Further information on charging the high-volt-
age battery via:
R a mains socket (Y page 185)
R a charging station (Y page 189)
R a wallbox (Y page 188)
Displaying the total range and electrical range The approximate range is based on the current
driving style.
X Press the =or; button on the steering
wheel to select the Trip
Trip menu.
X Confirm by pressing aon the steering
wheel.
X Press :or9 to select the approximate
total range and electrical range. Displaying fuel consumption and gen-
erated electrical energy :
Fuel consumption
; Electrical energy generated
Every bar of the graph displays the average
value for one minute.
Fuel consumption indicator :may differ from
the indicator in the From
From start start trip computer in
the Trip
Trip menu.
To reset values: the values are reset From
From
start start along with the trip computer
(Y page 284).
X To select Consumption Consumption: turn and press the
controller.
The display of the multimedia system shows
fuel consumption :and electrical energy
generated ;for the past 15 minute sof driv-
ing. Starting the vehicle
The vehicle starts in electric mode without the
internal combustion engine (noiseless start).
The internal combustion engine starts only after
the power demanded by the driver exceeds the
available power that the electric motor can cur- rently provide.
Noiseless start operation is dependent on the
outside temperature and the operating temper-
ature of the internal combustion engine. If not all
conditions for noiseless start operation are ful-
filled, the vehicle starts with the internal com-
bustion engine. 266
Plug-in hybrid operationDriving and parking
Page 286 of 453
Left control panel
=
; R
Calls up the menu and menu bar 9
: Press briefly:
R Scrolls through lists
R Selects a submenu or function
R In the Audio Audio menu: selects the
previous or next station, when the preset list or station list is active,
or an audio track or video scene
R In the Tel
Tel(telephone) menu:
switches to the phone book and
selects a name or telephone num-
ber 9
: Press and hold:
R
In the Audio Audio menu: selects a pre-
set list or a station list in the
desired frequency range, or
selects an audio track or video
scene using rapid scrolling
R In the Tel
Tel (Telephone) menu:
starts rapid scrolling if the phone
book is open a R
Confirms the selection or display
message
R In the Tel Tel(Telephone) menu:
switches to the telephone book
and starts dialling the selected
number % Press briefly:
R Back
R Switches off voice-operated navi-
gation or LINGUATRONIC
R Hides display messages or calls up
the last Trip Tripmenu function used
R Exits the telephone book/redial
memory % Press and hold:
R
Calls up the standard display in the
Trip Trip menu Right control panel
~ R
Rejects or ends a call
R Exits the telephone book/redial
memory 6 R
Makes or accepts a call
R Switches to the redial memory W
X R
Adjusts the volume 8 R
Mute ? R
Switches on voice-operated navi-
gation or LINGUATRONIC Multifunction display
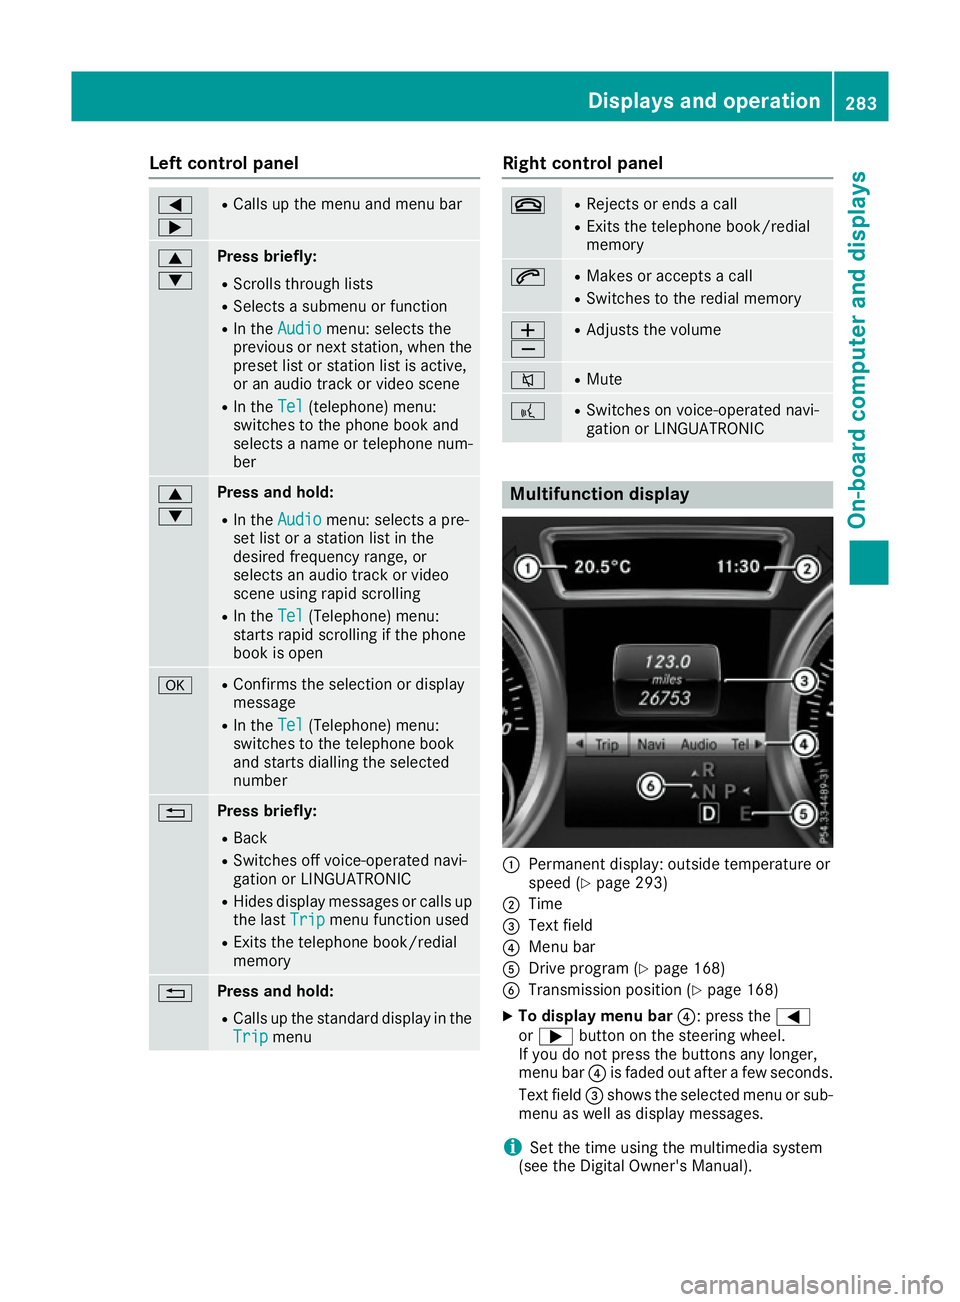
:
Permanent display: outside temperature or
speed (Y page 293)
; Time
= Text field
? Menu bar
A Drive program (Y page 168)
B Transmission position (Y page 168)
X To display menu bar ?: press the=
or ; button on the steering wheel.
If you do not press the buttons any longer,
menu bar ?is faded out after a few seconds.
Text field =shows the selected menu or sub-
menu as well as display messages.
i Set the time using the multimedia system
(see the Digital Owner's Manual). Displays and operation
283On-board computer and displays Z
Page 287 of 453
Possible displays in the multifunction dis-
play:
R ZGearshift recommendation, when shifting
manually (Y page 172)
R j Active Parking Assist (Y page 228)
R ¯ Cruise control (Y page 203)
R LIM
LIM SPEEDTRONIC (Y page 205)
R READY
READY PLUG-IN HYBRID operation activated
(PLUG-IN HYBRID vehicles) (Y page 266)
R HYBRID
HYBRID operating mode, additional operating
mode displays (PLUG-IN HYBRID vehicles)
(Y page 261)
R è Electric range (PLUG-IN HYBRID vehi-
cles) (Y page 261)
R LOW RANGE
LOW RANGE LOW RANGE off-road gear
(Y page 255)
R _ Adaptive Highbeam Assist Plus
(Y page 126)
R è ECO start/stop function (Y page 161)
R ë HOLD function (Y page 219)
R a DISTRONIC PLUS Steering Assist and
Stop&Go Pilot (Y page 214)
R 120 km/h!
120 km/h! Maximum permissible speed
exceeded (only for certain countries)
R DSR
DSR Downhill Speed Regulation
(Y page 252) Menus and submenus
Menu overview
Press the =or; button on the steering
wheel to call up the menu bar and select a menu.
Operating the on-board computer (Y page 282).
Depending on the equipment fitted in the vehi-
cle, you can call up the following menus:
R Trip
Trip menu (Y page 284)
R Navi Navi menu (navigation instructions)
(Y page 286)
R Audio
Audio menu (Y page 287)
R Tel
Tel menu (telephone) (Y page 288)
R Assist.
Assist. menu (assistance) (Y page 289)
R Serv.
Serv. menu (Y page 291)
R Settings
Settings menu (settings) (Y page 292)
R ON&OFFROAD
ON&OFFROAD menu (Ypage 297)
R AMG AMG menu (Mercedes-AMG vehicles)
(Y page 297) Trip menu
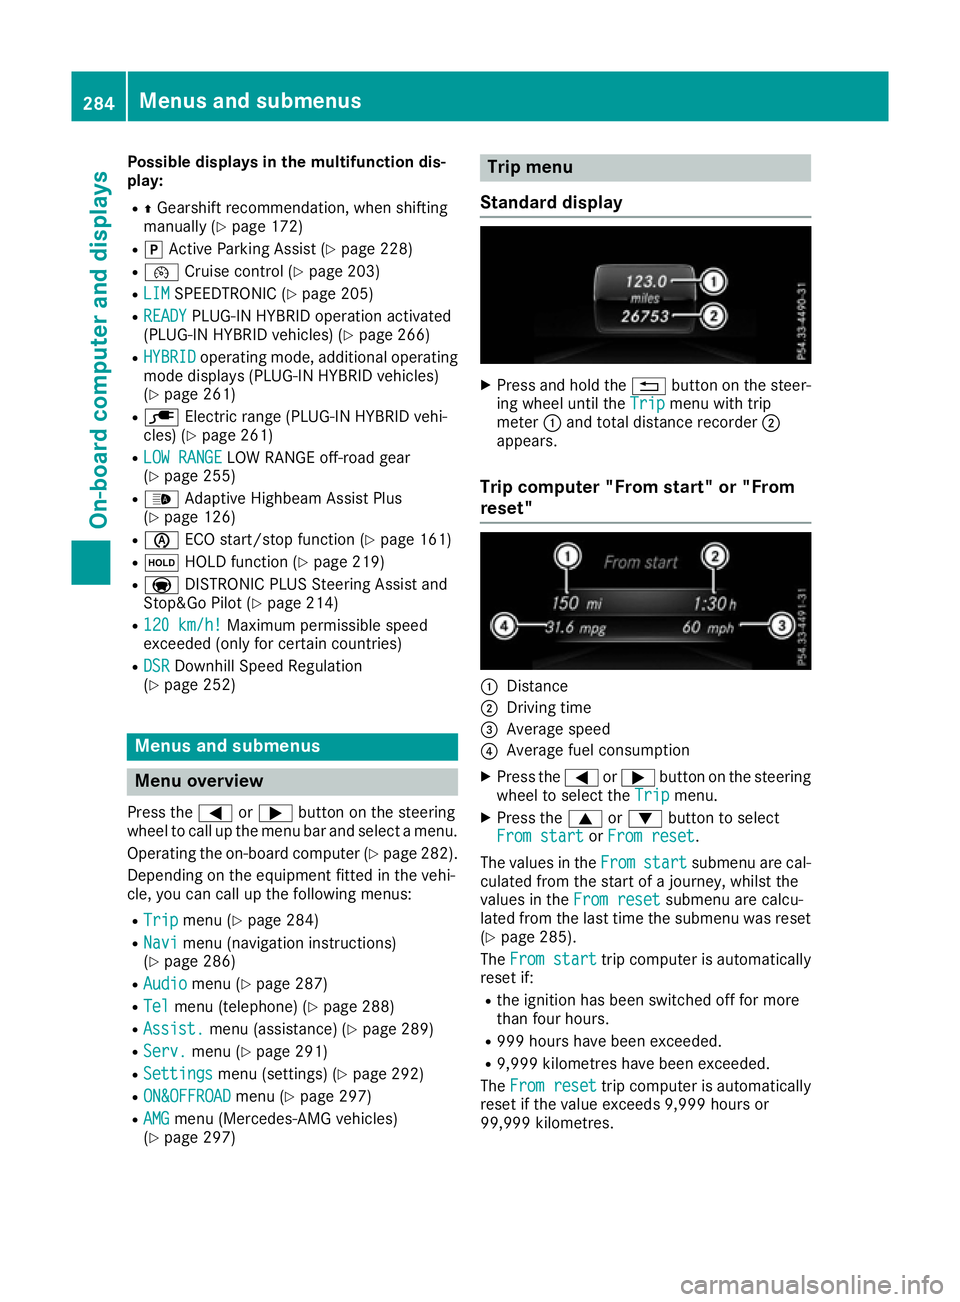
Standard display X
Press and hold the %button on the steer-
ing wheel until the Trip Tripmenu with trip
meter :and total distance recorder ;
appears.
Trip computer "From start" or "From
reset" :
Distance
; Driving time
= Average speed
? Average fuel consumption
X Press the =or; button on the steering
wheel to select the Trip Tripmenu.
X Press the 9or: button to select
From start
From start orFrom reset
From reset.
The values in the From
Fromstart
start submenu are cal-
culated from the start of a journey, whilst the
values in the From reset
From resetsubmenu are calcu-
lated from the last time the submenu was reset
(Y page 285).
The From start
From start trip computer is automatically
reset if:
R the ignition has been switched off for more
than four hours.
R 999 hours have been exceeded.
R 9,999 kilometres have been exceeded.
The From reset From reset trip computer is automatically
reset if the value exceeds 9,999 hours or
99,999 kilometres. 284
Menus and submenusOn-board computer and displays