2015 MERCEDES-BENZ GLE SUV interior lights
[x] Cancel search: interior lightsPage 16 of 453
Instrument cluster lighting
.............. 281
Intelligent Light System
Activating/deactivating ................ .294
Display message ............................ 314
Overview ........................................ 124
Setting the dipped-beam head-
lamps for driving on the right/left .. 294
Interior lighting
Automatic control system .............. 127
Emergency lighting ........................ 128
Manual control ............................... 127
Overview ........................................ 127
Reading lamp ................................. 127
Interior motion sensor
Deactivating ..................................... 83
Function .......................................... .82
Priming ............................................ 82
Switching off .................................... 82
ISOFIX child seat securing system ....60J
Jack Storage location ............................3 87
Using ............................................. 415
Jump starting (engine) ......................397 K
Key Changing the battery ....................... 87
Checking the battery ....................... 87
Convenience closing feature .......... 100
Convenience opening feature .......... 99
Display message ............................ 336
Door central locking/unlocking ....... 85
Emergency key element ................... 86
Important safety notes .................... 84
KEYLESS-GO start function .............. 86
Loss ................................................. 89
Modifying the programming ............. 86
Overview .......................................... 84
Positions (ignition lock) ................. 158
Problem (malfunction) ..................... 89
Starting the engine ........................ 160
Key positions
Key ................................................ 158
KEYLESS GO .................................. 158 KEYLESS-GO
Convenience closing ..................... .100
Deactivation ..................................... 85
Display message ............................ 336
Locking ............................................ 85
Removing the Start/Stop button ... 159
Start function ................................... 86
Start/Stop button .......................... 158
Starting the engine ........................ 160
Unlocking ......................................... 85
Kickdown
Driving tips ................................... .170
Manual gearshifting ....................... 174
Kneebag ............................................... 50 L
Lamps see Warning and indicator lamps
Lane detection (automatic)
see Lane Keeping Assist
Lane Keeping Assist
Activating/deactivating ................. 291
Display message ............................ 325
Function/informatio n.................... 246
see Active Lane Keeping Assist
Lap time (RACETIMER) ...................... 298
Lashing eyelets ................................. 355
Level control (display message) ...... 322
Level control (vehicle with the Off- Road Engineering package)
Basic settings ................................ 217
Function/note s............................. 216
Important safety notes .................. 216
Licence plate lamp (display mes-
sage) ................................................... 314
Light sensor (display message) ....... 315
Lighting
see Lights
Lights
Activating/deactivating the Intel-
ligent Light System ........................ 294
Active light function ....................... 124
Adaptive Highbeam Assist PLUS .... 126
Automatic headlamp mode ............ 122
Cornering light function ................. 124
Dipped-beam headlamp s............... 122
Driving abroad ............................... 121 Index
13
Page 17 of 453
Foglamps (extended range) ........... 125
Hazard warning lamps ................... 124
Headlamp flashe r........................... 124
Headlamp range ............................ 123
Light switch ................................... 121
Main-beam headlamp s................... 123
Motorway mode ............................. 125
Off-road lights ................................ 125
Parking lamps ................................ 122
Rear foglamp ................................. 122
Side lamps ..................................... 122
Switching the daytime driving
lights on/off (on-board com-
puter) ............................................. 293
Turn signals ................................... 123
see Interior lighting
LIM indicator lamp
Cruise control ................................ 203
DISTRONIC PLUS ........................... 208
Variable SPEEDTRONIC ................. 205
Limiting the speed
see SPEEDTRONIC
Loading guidelines ............................ 351
Locking
see Central locking
Locking (doors)
Automatic ........................................ 92
Emergency locking ........................... 93
From inside (central locking but-
ton) .................................................. 91
Locking centrally
see Central locking
Locking verification signal (on-
board computer) ............................... 295
LOW RANGE
Display message ............................ 324
Off-road gear ................................. 255
LOW RANGE off-road gear ................ 255
Luggage compartment cover
Notes/function .............................. 356
Luggage compartment enlarge-
ment
Important safety notes .................. 354
Luggage compartment floor
Important safety notes .................. 359
opening/closing ............................ 359
stowage well, under ....................... 359 Lumbar support
Adjusting (on the seat) .................. 112
Luxury head restraint ....................... 110 M
M+S tyres ........................................... 407
Main-beam headlamps
Adaptive Highbeam Assist PLUS .... 126
Changing bulb s.............................. 129
Display message ............................ 314
Switching on/of f........................... 123
Maintenance
see ASSYST PLUS
Matt finish (cleaning instructions) .. 381
Maximum charge current
Setting (charging cable) ................. 186
Setting (on-board computer) .......... 292
Media Interface
USB port in the armrest of the
centre console ............................... 352
see Separate operating instructions
Memory card (audio) ......................... 287
Memory function ............................... 120
Mercedes-Benz Contact
Display message ............................ 306
Mercedes-Benz emergency call
system
Switch in the overhead control
panel .............................................. 365
Mercedes-Benz Intelligent Drive
360°camera .................................. 236
Active Blind Spot Assist ................. 247
Active Lane Keeping Assist ............ 250
Active Parking Assist ..................... 228
ATTENTION ASSIST ........................ 240
Blind Spot Assist ............................ 244
DISTRONIC PLUS ........................... 207
DISTRONIC PLUS with Steering
Assist and Stop&Go Pilot ............... 214
General notes ................................ 203
Lane Keeping Assist ...................... 246
PARKTRONIC ................................. 225
PRE-SAFE ®
PLUS (anticipatory
occupant protection PLUS) .............. 57
Reversing camera .......................... 232
Traffic Sign Assist .......................... 242 14
Index
Page 55 of 453
The indicator lamps inform you whether the
front-passenger front airbag is disabled or ena-
bled.
X Press the Start/Stop button once or twice, or
turn the key to position 1or 2in the ignition
lock.
The system carries out a self-diagnosis.
The PASSENGER AIR BAG OFF and PASSENGER
AIR BAG ON indicator lamps must light up simul- taneously for approximately six seconds.
The indicator lamps display the status of the
front-passenger front airbag:
R PASSENGER AIR BAG ON lights up: the front-
passenger front airbag is enabled. If, in the
event of an accident, all deployment criteria
are met, the front-passenger front airbag is
deployed.
R PASSENGER AIR BAG OFF lights up: the front-
passenger front airbag is disabled. It will then
not be deployed in the event of an accident.
If the status of the front-passenger front airbag
changes while the vehicle is in motion, an airbag display message appears in the instrument clus-
ter (Y page 311). When the front-passenger
seat is occupied, always pay attention to the
PASSENGER AIR BAG ON and PASSENGER AIR
BAG OFF indicator lamps. Be aware of the status of the front-passenger front airbag both before
and during the journey.
If a person sits in the passenger seat, they must
be:
R seated with the seat belt fastened correctly
R in an almost upright position with their back
against the seat backrest
R with their feet resting on the floor, if possible
If the front passenger does not observe these
conditions, the automatic front-passenger front
airbag deactivation system may be influenced,
e.g. because the front passenger:
R transfers their weight by supporting them-
selves on a vehicle armrest
R sits in such a way that their weight is raised
from the seat cushion
The front-passenger front airbag may be disa-
bled by mistake as a result of these or similar
actions. In this case, the PASSENGER AIR BAG
OFF indicator lamp lights up permanently. The
front-passenger front airbag does not then
deploy during an accident. G
WARNING
If the PASSENGER AIRBAG OFF indicator lamp is lit, the front-passenger front airbag is disa-
bled. It will not be deployed in the event of an
accident and cannot perform its intended pro-
tective function. A person in the front-
passenger seat could then, for example, come
into contact with the vehicle's interior, espe-
cially if the person is sitting too close to the
dashboard. This poses an increased risk of
injury or even fatal injury.
When the front-passenger seat is occupied,
always make sure that:
R the classification of the person in the front-
passenger seat is correct and that the front-
passenger front airbag is enabled or disa-
bled in accordance with the person in the
front-passenger seat.
R the front-passenger seat has been moved
back as far back as possible.
R the person is seated correctly.
Make sure, both before and during the jour-
ney, that the status of the front-passenger
front airbag is correct. G
WARNING
If you secure a child on the co-driver's seat in a rearward-facing child restraint system and
the PASSENGER AIR BAG ON indicator lamp
lights up, the co-driver's airbag could be
deployed in the event of an accident. The child could be struck by the airbag. There is an
increased risk of injury, possibly even fatal.
In this case, always ensure that the co-driver's
airbag is disabled. The PASSENGER AIRBAG
OFF indicator lamp must light up.
If the PASSENGER AIR BAG OFF indicator lamp
remains off and/or the PASSENGER AIR BAG
ON indicator lamp lights up, do not install a rear- ward-facing child restraint system on the front-
passenger seat. Further information can be
found under "Problems with the automatic front-
passenger front airbag deactivation system"
(Y page 55). 52
Occupant safetySafety
Page 85 of 453
Tow-away protection
Function An audible and visual alarm is triggered if your
vehicle's angle of inclination is altered while
tow-away protection is primed. This can occur if
the vehicle is jacked up on one side, for exam-
ple.
Priming X
Make sure that:
R the doors are closed
R the tailgate is closed
Only then is tow-away protection primed.
X Lock the vehicle with the key or KEYLESS-GO.
Tow-away protection is primed after approx-
imately 60 second s.
Switching off X
Unlo ck the vehicle with the key or KEYLESS-
GO.
or X Insert the key into the ignition lock.
Tow-away protection is switched off automat-
ically.
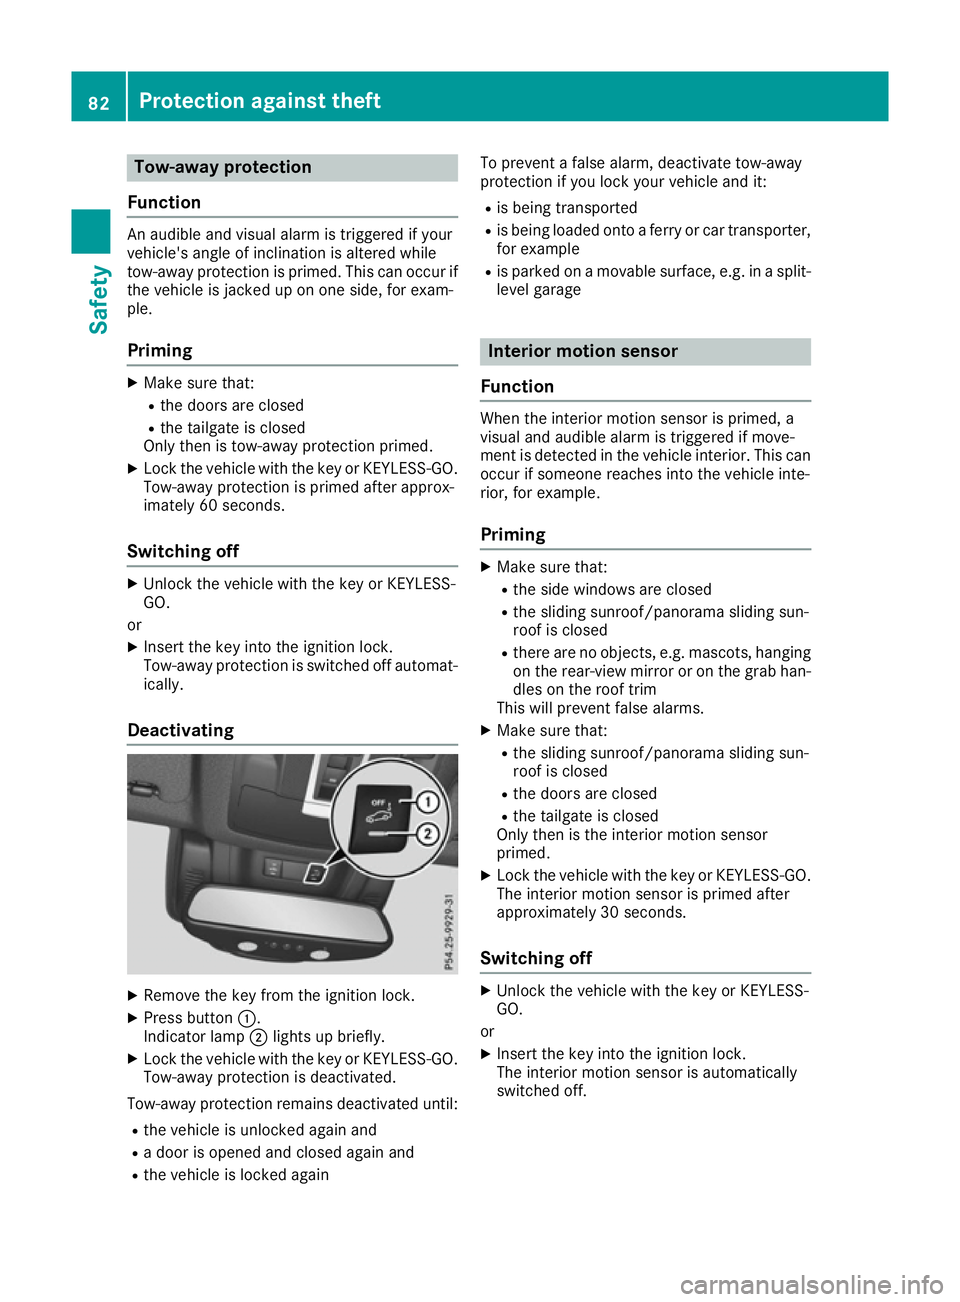
Deactivating X
Remove the key from the ignition lock.
X Press button :.
Indicator lamp ;lights up briefly.
X Lock the vehicle with the key or KEYLESS-GO.
Tow-away protection is deactivated.
Tow-away protection remains deactivated until:
R the vehicle is unlocked again and
R a door is opened and closed again and
R the vehicle is locked again To prevent a false alarm, deactivate tow-away
protection if you lock your vehicle and it:
R is being transported
R is being loaded onto a ferry or car transporter,
for example
R is parked on a movable surface, e.g. in a split-
level garage Interior motion sensor
Function When the interior motion sensor is primed, a
visual and audible alarm is triggered if move-
ment is detected in the vehicle interior. This can
occur if someone reaches into the vehicle inte-
rior, for example.
Priming X
Make sure that:
R the side windows are closed
R the sliding sunroof/panorama sliding sun-
roof is closed
R there are no objects, e.g. mascots, hanging
on the rear-view mirror or on the grab han-dles on the roof trim
This will prevent false alarms.
X Make sure that:
R the sliding sunroof/panorama sliding sun-
roof is closed
R the doors are closed
R the tailgate is closed
Only then is the interior motion sensor
primed.
X Lock the vehicle with the key or KEYLESS-GO.
The interior motion sensor is primed after
approximately 30 seconds.
Switching off X
Unlock the vehicle with the key or KEYLESS-
GO.
or X Insert the key into the ignition lock.
The interior motion sensor is automatically
switched off. 82
Protection against theftSafety
Page 130 of 453
At speeds above approx. 30 km/h:
R If no other road users are detected, the
main-beam headlamps are automatically
switched on.
R If other road users are detected, the partial
main-beam headlamps are automatically
switched on.
The K indicator lamp in the instrument
cluster also lights up.
At speeds below approx. 25 km/h or
when there is sufficient street lighting:
R The partial main-beam headlamps are
switched off automatically.
R The main-beam headlamps are switched off
automatically.
The K indicator lamp in the instrument
cluster goes out. The _indicator lamp in
the multifunction display remains lit.
X To switch off: move the combination switch
back to its normal position or move the light
switch to another position.
The _ indicator lamp in the multifunction
display goes out. Headlamps misted up on the inside
Under certain climatic and physical conditions,
moisture may form in the headlamp. This mois-
ture will not impair the function of the headlamp. Interior lighting
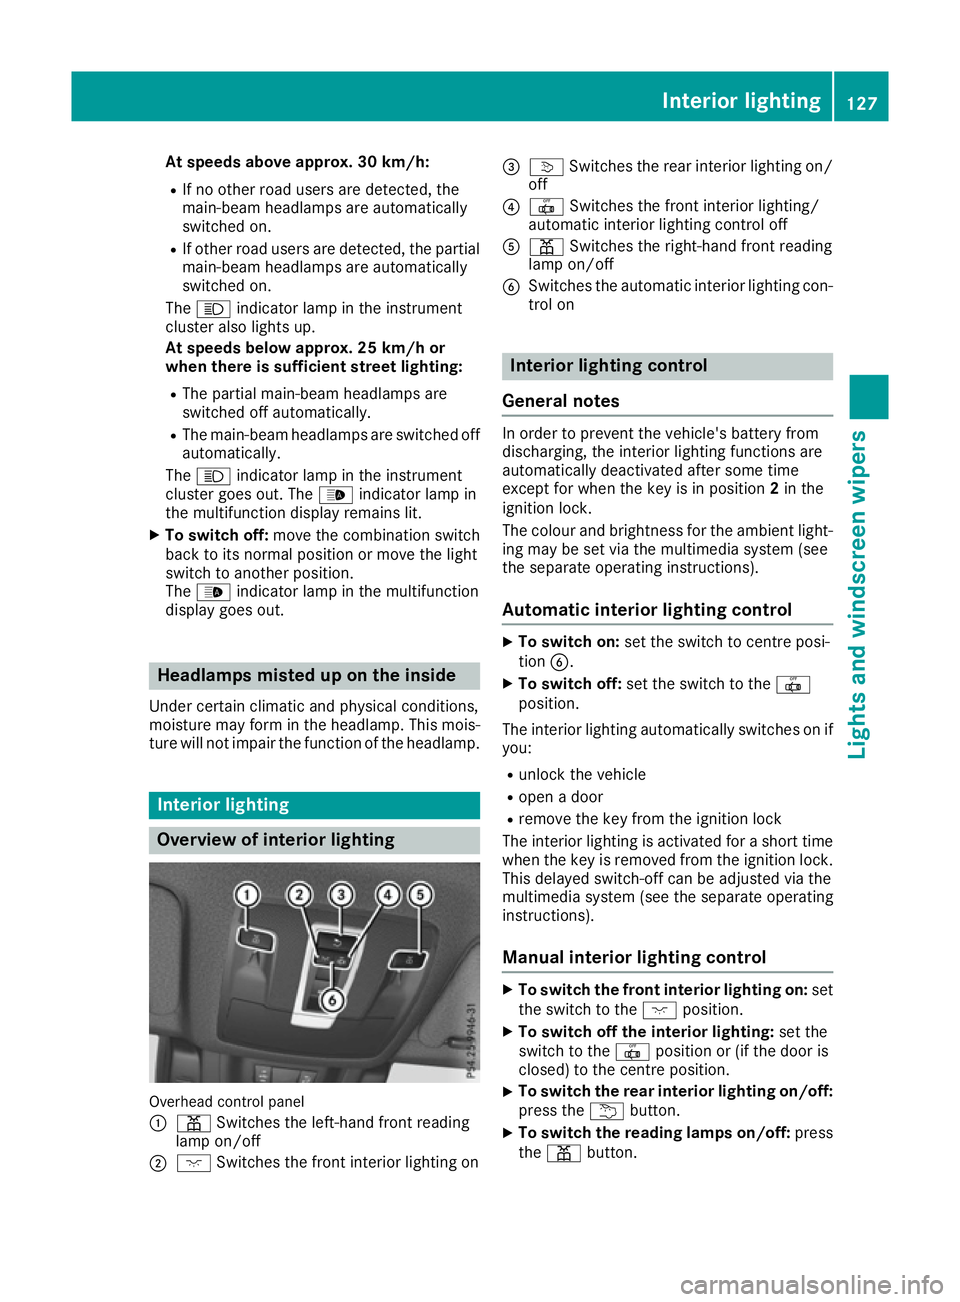
Overview of interior lighting
Overhead control panel
: p Switches the left-hand front reading
lamp on/off
; c Switches the front interior lighting on =
v Switches the rear interior lighting on/
off
? | Switches the front interior lighting/
automatic interior lighting control off
A p Switches the right-hand front reading
lamp on/off
B Switches the automatic interior lighting con-
trol on Interior lighting control
General notes In order to prevent the vehicle's battery from
discharging, the interior lighting functions are
automatically deactivated after some time
except for when the key is in position
2in the
ignition lock.
The colour and brightness for the ambient light-
ing may be set via the multimedia system (see
the separate operating instructions).
Automatic interior lighting control X
To switch on: set the switch to centre posi-
tion B.
X To switch off: set the switch to the |
position.
The interior lighting automatically switches on if you:
R unlock the vehicle
R open a door
R remove the key from the ignition lock
The interior lighting is activated for a short time
when the key is removed from the ignition lock.
This delayed switch-off can be adjusted via the
multimedia system (see the separate operating
instructions).
Manual interior lighting control X
To switch the front interior lighting on: set
the switch to the cposition.
X To switch off the interior lighting: set the
switch to the |position or (if the door is
closed) to the centre position.
X To switch the rear interior lighting on/off:
press the ubutton.
X To switch the reading lamps on/off: press
the p button. Interior lighting
127Lights and windscreen wipers Z
Page 131 of 453
Crash-responsive emergency lighting
The interior lighting is activated automatically if
the vehicle is involved in an accident.
X To switch off the crash-responsive emer-
gency lighting: press the hazard warning
lamp button.
or X Lock and then unlock the vehicle using the
key. Replacing bulbs (vehicles with LED
headlamps)
The front and rear light clusters of your vehicle
are equipped with LED light bulbs. Do not
replace the bulbs yourself. Contact a qualified
specialist workshop which has the necessary
specialist knowledge and tools to carry out the
work required.
Lamps are an important aspect of vehicle safety.
You must therefore make sure that these func-
tion correctly at all times. Have the headlamp
setting checked regularly. Replacing bulbs (vehicles with halo-
gen headlamps) Important safety notes
G
WARNING
Bulbs, lamps and plug connectors can
become very hot during use. When replacing a bulb, you could burn yourself on these com-
ponents. There is a risk of injury.
Allow these components to cool down before replacing the bulb.
Do not use a bulb that has been dropped or if its glass tube has been scratched.
The bulb may explode if:
R you touch it
R it is hot
R you drop it
R you scratch it
Only operate bulbs in enclosed lamps designed
for that purpose. Only fit spare bulbs of the same
type and the specified voltage. Marks on the glass tube reduce the service life
of the bulbs. Do not touch the glass tube with
your bare hands. If necessary, clean the glass
tube when cold with alcohol or spirit and rub it
off with a lint-free cloth.
Protect bulbs from moisture during operation.
Do not allow bulbs to come into contact with
liquids.
Only replace the bulbs listed (Y page 128).
Have the bulbs that you cannot replace yourself
replaced at a qualified specialist workshop.
If you require assistance replacing bulbs, con-
sult a qualified specialist workshop.
If the new bulb still does not light up, consult a
qualified specialist workshop.
Headlamps and lights are an important aspect of
vehicle safety. You must therefore make sure
that these function correctly at all times. Have
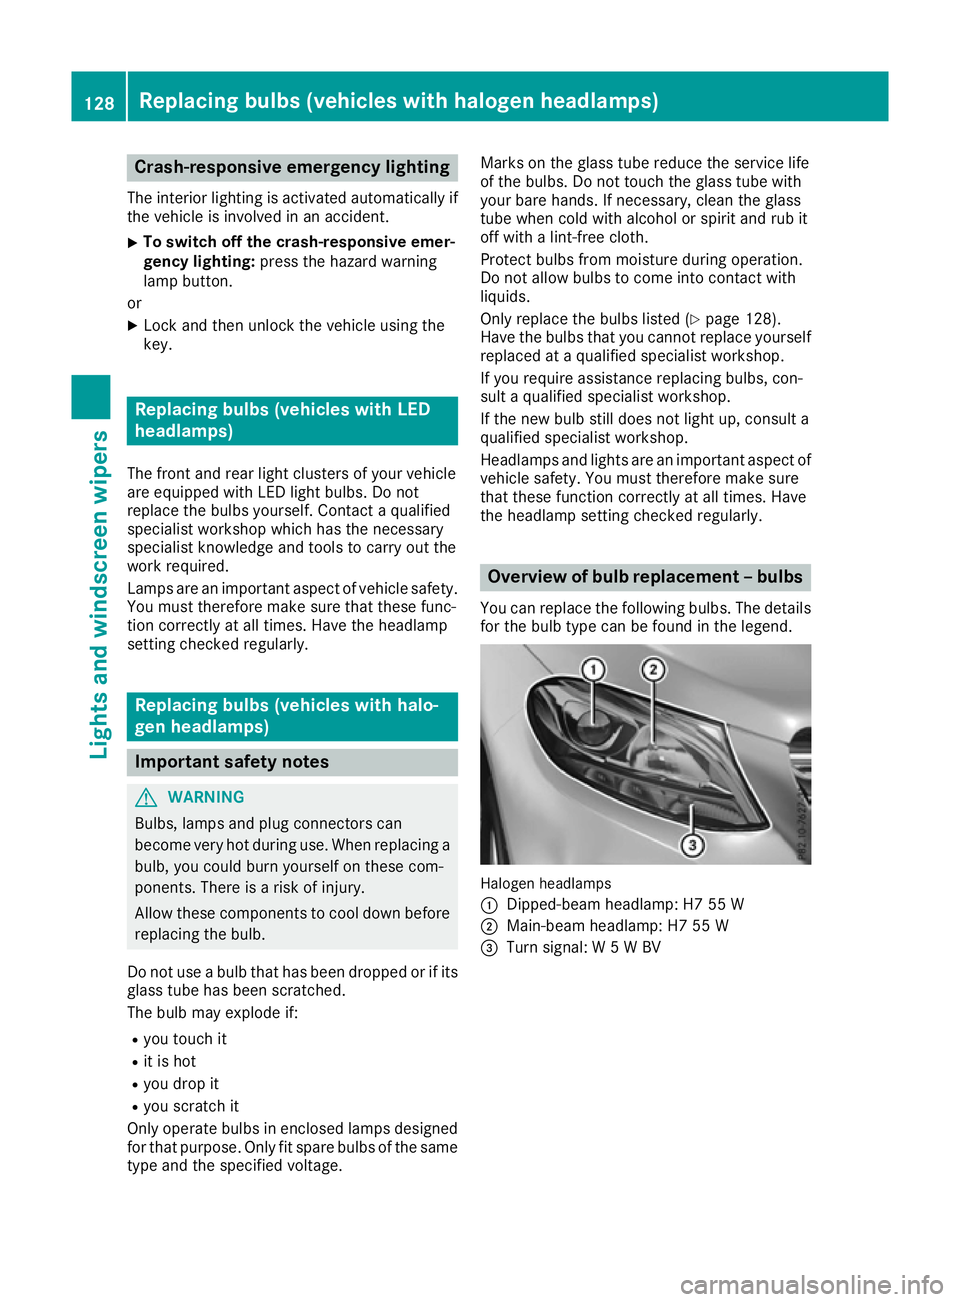
the headlamp setting checked regularly. Overview of bulb replacement – bulbs
You can replace the following bulbs. The details
for the bulb type can be found in the legend. Halogen headlamps
:
Dipped-beam headlamp: H7 55 W
; Main-beam headlamp: H7 55 W
= Turn signal: W 5 W BV 128
Replacing bulbs (vehicles with halogen headlamps)Lights and windscreen wipers
Page 142 of 453
Information on using THERMOTRONIC
automatic climate control
The following contains instructions and recom-
mendations to enable you to get the most out of your THERMOTRONIC automatic climate con-
trol.
R Activate climate control using the Ãand
¿ buttons. The indicator lamps above the
à and¿ buttons light up.
R In automatic mode, you can also use the ñ
button to set a climate mode (FOCUS/
MEDIUM/DIFFUSE). The MEDIUM level is
recommended.
R Set the temperature to 22 †.
R Only use the "Windscreen demisting" function
briefly until the windscreen is clear again.
R Only use air-recirculation mode briefly, e.g. if
there are unpleasant outside odours or when
in a tunnel. The windows could otherwise mist up as no fresh air is drawn into the vehicle inair-recirculation mode.
R Use the ZONE function to adopt the temper-
ature settings on the driver's side for the
front-passenger side and the rear compart-
ment as well. The indicator lamp above the
á button goes out.
R Use the residual heat function if you want to
heat or ventilate the vehicle interior when the
ignition is switched off. The residual heat
function can only be activated or deactivated with the ignition switched off.
R If you change the settings of the climate con-
trol system, the climate status display
appears for approximately three seconds at
the bottom of the screen in the multimedia
system display. You will see the current set-
tings of the various climate control functions.
During automatic engine switch-off, the climate
control only operates at a reduced capacity. If
you require the full climate control output, you
can switch off the ECO start/stop function by
pressing the ECO button (Y page 163). Operating the climate control system
Switching the climate control on/off
General notes When the climate control is switched off, the air
supply and air circulation are also switched off.
The windows could mist up. Therefore, only
switch off climate control briefly.
i Switch on climate control primarily using
the à button (Y page 141).
In the rear-compartment, you can also switch
climate control on/off using the Ãand^
buttons.
Activating/deactivating X
Turn the key to position 2in the ignition lock
(Y page 158).
X To activate: press theÃbutton.
The indicator lamp in the Ãbutton lights
up. Airflow and air distribution are set to auto-
matic mode.
or X Press the ^button.
The indicator lamp in the ^button goes
out. The previous settings are reactivated.
X To deactivate: press the^button.
The indicator lamp in the ^button lights
up. Activating/deactivating cooling with
air dehumidification
General notes If you deactivate the "Cooling with air dehumid-
ification" function, the air inside the vehicle will
not be cooled. The air inside the vehicle will also
not be dehumidified. The windows can mist up
more quickly. Therefore, only deactivate the
"Cooling with air dehumidification" function
briefly.
The "Cooling with air dehumidification" function
is only available when the engine is running. The air inside the vehicle is cooled and dehumidified
according to the temperature selected.
Condensation may drip from the underside of
the vehicle when cooling mode is active. This is
normal and not a sign that there is a malfunc-
tion. Operating the climate control system
139Climate control
Page 148 of 453
Problems with the rear window heating
Problem
Possible causes/consequences and
M
MSolutions The rear window heating
has switched off prema-
turely or cannot be
switched on. The battery has not been sufficiently charged.
X Switch off any consumers that are not required, e.g. reading lamps,
interior lighting or the seat heating.
When the battery is sufficiently charged, the rear window heating
can be switched on again. Switching air-recirculation mode
on/off
General notes You can deactivate the flow of fresh air tempo-
rarily if unpleasant odours are entering the vehi-
cle from outside. The air already inside the vehi- cle will then be recirculated.
If you switch on air-recirculation mode, the win-
dows can mist up more quickly, in particular at
low temperatures. Only use air-recirculation
mode briefly to prevent the windows from mist- ing up.
Switching on/off X
Turn the key to position 2in the ignition lock
(Y page 158).
X To activate: press thedbutton.
The indicator lamp in the dbutton lights
up.
i In the event of high pollution levels
(THERMOTRONIC automatic climate control
only) or at high outside temperatures, air-
recirculation mode is automatically activated.
When air-recirculation mode is activated
automatically, the indicator lamp in the d
button is not lit.
Outside air is added after about 30 minutes.
X To deactivate: press thedbutton.
The indicator lamp in the dbutton goes
out.
i Air-recirculation mode is deactivated auto-
matically:
R after approximately five minutes at outside
temperatures below approximately 5 †
R after approximately five minutes if cooling
with air dehumidification is deactivated
R after approximately 30 minutes at outside
temperatures above approximately 5 † if the "Cooling with air dehumidification"
function is activated Convenience opening/closing using
the air-recirculation button
G
WARNING
When the convenience closing feature is oper- ating, parts of the body could become trapped
in the closing area of the side window and the
sliding sunroof. There is a risk of injury.
Observe the complete closing procedure
when the convenience closing feature is oper-
ating. When closing make sure that no parts of the body are in the closing area. G
WARNING
During convenience opening parts of the body could be drawn in or become trapped
between the side window and window frame.
There is a risk of injury.
When opening, make sure that nobody is
touching the side window. If someone
becomes trapped, immediately press
the W switch in the door to stop the move-
ment of the side windows. To continue closing
the side window, pull on the Wswitch.
X Convenience closing feature (vehicles
with sliding sunroof or panorama sliding
sunroof):
press and hold the dbutton
until the side windows and the panorama slid- ing sunroof are closed.
The indicator lamp in the dbutton lights
up. Air-recirculation mode is activated.
X Convenience closing feature (vehicles
without sliding sunroof or panorama slid- Operating the climate control system
145Climate control Z