2015 MERCEDES-BENZ GLE SUV interior lights
[x] Cancel search: interior lightsPage 149 of 453
:
press and hold the dbutton
until the side windows are closed.
The indicator lamp in the dbutton lights
up. Air-recirculation mode is activated.
If parts of the body are in the closing ar")
ing sunroof):
press and hold the dbutton
until the side windows are closed.
The indicator lamp in the dbutton lights
up. Air-recirculation mode is activated.
If parts of the body are in the closing area during convenience closing, proceed as follows:
X Press the Wbutton to stop the side win-
dows.
The side windows stop.
X To then open the side windows, press the
W button again.
or X Press and hold the dbutton again for at
least two seconds.
The side windows move in the opposite direc-
tion.
X Only vehicles with sliding sunroof or pan-
orama sliding sunroof: press the2
switch to stop the sliding sunroof or pano-
rama sliding sunroof.
The sliding sunroof or panorama sliding sun-
roof stops.
X To then open the sliding sunroof or panorama
sliding sunroof, pull back on the 2switch.
i If the sliding sunroof is raised and closes,
press the 2switch, to stop the sliding
sunroof. Do not pull back on the 2switch
afterwards. The sliding sunroof closes before
it opens.
i Notes on the automatic reversing feature
for:
R the side windows (Y page 98)
R the panorama sliding sunroof
(Y page 102)
R the sliding sunroof (Y page 102)
X Convenience opening feature (vehicles
with sliding sunroof or panorama sliding
sunroof): press and hold the dbutton
until the side windows and the panorama slid- ing sunroof are open. The side windows and
the sliding sunroof or panorama sliding sun-
roof move back to their original position.
The indicator lamp in the dbutton goes
out. Air-recirculation mode is deactivated.
X Convenience opening feature (vehicles
without sliding sunroof or panorama slid-
ing sunroof): press and hold the dbutton
until the side windows are open. The side win-
dows move back to their original positions.
The indicator lamp in the dbutton goes
out. Air-recirculation mode is deactivated. i
If you open the side windows or the sliding
sunroof or the panorama sliding sunroof man-
ually after closing them with the convenience closing feature, they will remain in this posi-
tion when opened using the convenience
opening feature. Switching the residual heat on/off
General notes It is possible to make use of the residual heat of
the engine to continue heating the stationary
vehicle for up to 30 minutesafter the engine has been switched off. The heating time depends on
the set interior temperature.
Switching on/off X
To switch on: press theÌorÁ button.
The indicator lamp in the ÌorÁ button
lights up.
i The blower will run at a low speed regardless
of the airflow setting.
i If you activate the residual heat function at
high temperatures, only the ventilation will be
activated. The blower runs at medium speed.
X To switch off: press theÌorÁ but-
ton.
The indicator lamp in the ÌorÁ button
goes out.
Residual heat is deactivated automatically:
R after approximately 30 minutes
R when the ignition is switched on
R if the battery voltage drops
R when the auxiliary heating is switched on Ionisation
Ionisation is used to purify and freshen the air in
the vehicle interior, which is conducive to a
pleasant climate.
The ionisation of the interior air is odourless and cannot, directly, be perceived in the vehicle inte-
rior.
You can switch ionisation on and off via the mul- timedia system (see the separate operating
instructions). 146
Operating the climate control systemClimate control
Page 152 of 453
Setting the departure time
You can set the departure time using the on-
board computer or via the Mercedes connect
me web App. The activation of the "Pre-entry
climate control at departure time" function can
be linked to this departure time. Your vehicle will then be cooled or heated until the desired tem-perature is reached in time for the set departure
time. "Pre-entry climate control at departure
time" will be activated a maximum of 55 minutes before departure. If the departure is delayed,
the vehicle will be heated or cooled for a further five minutes.
X To set the departure time: set the departure
time using the on-board computer
(Y page 292). Set the departure time using
the Mercedes connect me web App: http://
www.mercedes.me.
X To activate or deactivate "Pre-entry cli-
mate control at departure time": activate
or deactivate "Pre-entry climate control at
departure time" using the on-board com-
puter. Activate or deactivate "Pre-entry cli-
mate control at departure time" using the
Mercedes connect me web App: http://
www.mercedes.me.
The "Pre-entry climate control at departure
time" function is automatically deactivated
when the vehicle is started. The following func-
tions remain active:
R Seat heating
R Seat ventilation
R Ionisation
To deactivate "Pre-entry climate control at
departure time": the activated "Pre-entry cli-
mate control at departure time" can be deacti-
vated using the button (Y page 149).
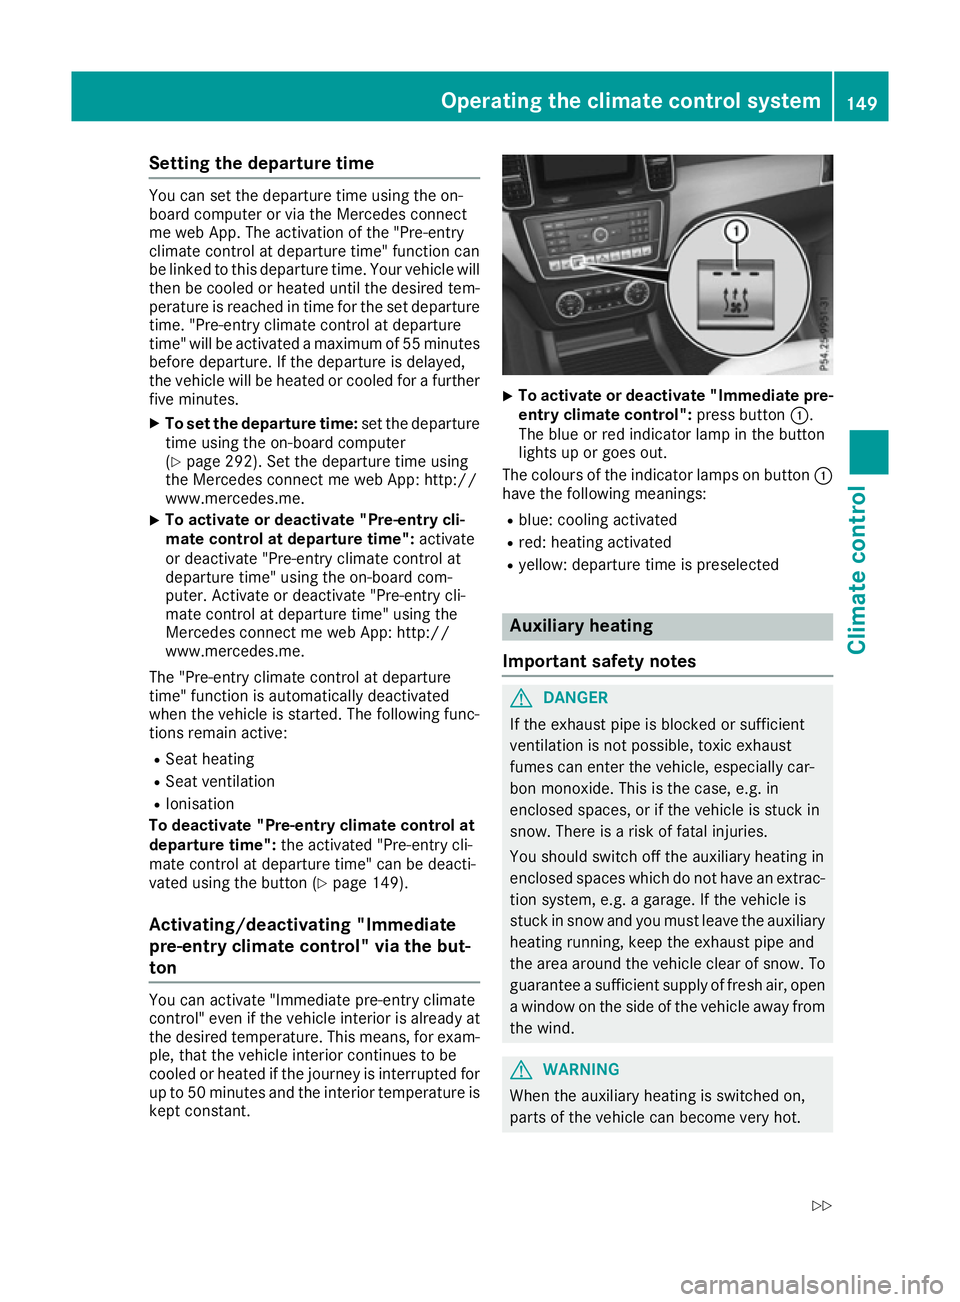
Activating/deactivating "Immediate
pre-entry climate control" via the but-
ton You can activate "Immediate pre-entry climate
control" even if the vehicle interior is already at
the desired temperature. This means, for exam- ple, that the vehicle interior continues to be
cooled or heated if the journey is interrupted for
up to 50 minutes and the interior temperature is kept constant. X
To activate or deactivate "Immediate pre-
entry climate control": press button:.
The blue or red indicator lamp in the button
lights up or goes out.
The colours of the indicator lamps on button :
have the following meanings:
R blue: cooling activated
R red: heating activated
R yellow: departure time is preselected Auxiliary heating
Important safety notes G
DANGER
If the exhaust pipe is blocked or sufficient
ventilation is not possible, toxic exhaust
fumes can enter the vehicle, especially car-
bon monoxide. This is the case, e.g. in
enclosed spaces, or if the vehicle is stuck in
snow. There is a risk of fatal injuries.
You should switch off the auxiliary heating in
enclosed spaces which do not have an extrac- tion system, e.g. a garage. If the vehicle is
stuck in snow and you must leave the auxiliary
heating running, keep the exhaust pipe and
the area around the vehicle clear of snow. To guarantee a sufficient supply of fresh air, open
a window on the side of the vehicle away from the wind. G
WARNING
When the auxiliary heating is switched on,
parts of the vehicle can become very hot. Operating the climate control system
149Climate control
Z
Page 153 of 453

Flammable materials such as leaves, grass or
twigs may ignite if they come into contact
with:
R hot parts of the exhaust system
R the exhaust gas itself
There is a risk of fire.
When the auxiliary heating is switched on,
make sure that:
R no flammable materials come into contact
with hot vehicle components
R the exhaust gas can escape from the
exhaust pipe unhindered
R the exhaust gas does not come into contact
with flammable materials.
The auxiliary heating is fitted under the front
wing on the left-hand side of the vehicle. The
emissions outlet is found behind the left front
wheel. ! Operating the auxiliary heating/ventilation
draws on the vehicle battery. After you have
heated or ventilated the vehicle a maximum of two times, drive for a longer distance.
Switch the auxiliary heating on regularly once a month for about ten minutes.
The auxiliary heating heats the air in the vehicle
interior to the set temperature. This occurs with- out using the heat of the running engine. The
auxiliary heating is operated directly using the
vehicle's fuel. For this reason, the tank content
must be at least at reserve fuel level to ensure
that the auxiliary heating functions.
The auxiliary heating or auxiliary ventilation
automatically adjusts to changes in tempera-
ture and weather conditions. For this reason,
the auxiliary heating could switch from ventila-
tion mode to heating mode or from heating
mode to ventilation mode.
The auxiliary heating switches off when the
engine is switched off. The auxiliary ventilation
switches off when you turn the key to position 2
(Y page 158).
The auxiliary heating switches off automatically after 50 minutes. This time limit can be altered.
To do this, visit a qualified specialist workshop.
You cannot use the auxiliary ventilation to cool
the vehicle interior to a temperature lower than
the outside temperature. Before switching on X
Turn the key to position 2in the ignition lock
(Y page 158).
X Set the desired temperature.
The auxiliary heating/ventilation can be activa-
ted even when climate control is set to manual.
Optimum comfort can be attained when the sys-
tem is set to automatic mode. Set the temper-
ature to 22 †.
The auxiliary heating or auxiliary ventilation can
be switched on/off using the button on the
centre console or the remote control.
The on-board computer can be used to specify
up to three departure times, one of which may
be preselected (Y page 295).
Switching the auxiliary heating/venti-
lation on or off using the button on the
centre console General notes
The colours of the indicator lamps in button
:
mean the following:
R blue: auxiliary ventilation is switched on
R red: auxiliary heating is activated
R yellow: departure time is preselected
(Y page 295).
Switching on/off X To switch on the auxiliary heating or aux-
iliary ventilation:
press button:.
The red or blue indicator lamp in button :
lights up.
X To switch off the auxiliary heating or aux-
iliary ventilation: press button:.
The red or blue indicator lamp in button :
goes out. 150
Operating the climate control systemClimate control
Page 166 of 453

R you activate")
R
you depress the accelerator pedal
R you engage reverse gear R
R you move the transmission out of position P
R you switch to the Sport PlusorSport drive
program (Mercedes-AMG vehicles)
R you activate manual gearshifting (Mercedes-
AMG vehicles)
R you switch to the Offroaddrive program
(vehicles without Off-Road Engineering pack- age)
R you switch to the OffroadorOffroad Plus
drive program (vehicles with Off-Road Engi-
neering package)
R you unfasten your seat belt or open the driv-
er's door
R the vehicle starts to roll
R the brake system requires this
R the temperature in the vehicle interior devi-
ates from the set range
R the system detects moisture on the wind-
screen when the air-conditioning system is
switched on
R the battery's charge status is too low
Shifting the transmission to position Pdoes not
start the engine.
If you shift the transmission from Rto D, the
ECO start/stop function is available again once
the è ECO symbol reappears in green in the
multifunction display.
Switching the ECO start/stop function
off/on All vehicles (except Mercedes-AMG vehi-
cles) X
To switch off: press ECO button :.
Indicator lamp ;and the èECO symbol
in the multifunction display go out. X
To switch on: press ECO button :.
Indicator lamp ;lights up. If all conditions
for automatic engine switch-off (Y page 162)
are fulfilled, the èECO symbol is shown in
green in the multifunction display.
If the conditions for automatic engine switch-
off (Y page 162) are not all fulfilled, the è
ECO symbol is shown in yellow in the multi-
function display. If this is the case, the ECO
start/stop function is not available.
If indicator lamp ;is off, the ECO start/stop
function has been deactivated manually or as
the result of a malfunction. The engine will then
not be switched off automatically when the vehi-
cle stops.
Mercedes-AMG vehicles X
To switch off: in theComfort drive program,
press ECO button :.
or X Activate manual gearshifting (Y page 172).
or X Switch to the Sport PlusorSport drive pro-
gram (Y page 166).
Indicator lamp ;and the èECO symbol
in the multifunction display go out.
X To switch on: press ECO button :.
Indicator lamp ;lights up. When the
Sport Plus orSport drive program is activa-
ted, the automatic transmission switches to
the Comfort drive program.
If all conditions for automatic engine switch-
off (Y page 162) are fulfilled, the èECO
symbol is shown in green in the multifunction display.
If not all conditions for automatic engine
switch-off (Y page 162) are fulfilled, the è
ECO symbol is shown in yellow. If this is the Driving
163Driving and pa rking Z