2015 MERCEDES-BENZ GLE SUV ad blue
[x] Cancel search: ad bluePage 6 of 453
 see ETS/4ETS (Electronic Trac-
tion System)
4MATIC (permanent four-wheel
drive) .................................................. 252
12 V socket
see Soc")
1, 2, 3 ...
4ETS (Electronic Traction System) see ETS/4ETS (Electronic Trac-
tion System)
4MATIC (permanent four-wheel
drive) .................................................. 252
12 V socket
see Sockets
360° camera
Cleaning .........................................3 83
Display in the multimedia system .. 238
Function/notes ............................ .236 A
ABS (Anti-lock Braking System) Display message ............................ 301
Function/notes ................................ 70
Important safety notes .................... 70
Warning lamp ................................. 341
Accident
Automatic measures after an acci-
dent ................................................. 58
Activating/deactivating air-recir-
culation mode ................................... .145
Activating/deactivating cooling
with air dehumidification ................. 139
Active Blind Spot Assist
Activating/deactivating (on-
board computer) ............................ 291
Display message ............................ 326
Function/notes ............................ .247
Towing a trailer .............................. 249
Active Curve System
Display message ............................ 323
Function/notes ............................ .222
Active Driving Assistance package .. 247
Active Lane Keeping Assist
Activating/deactivating (on-
board computer) ............................ 291
Display message ............................ 325
Function/notes ............................ .250
Towing a trailer .............................. 252
Active light function ......................... 124
Active Parking Assist
Display message ............................ 326
Exiting a parking space .................. 231 Function/notes ............................
.228
Important safety notes .................. 228
Parking .......................................... 230
ADAPTIVE BRAKE ................................. 78
Adaptive Brake Assist
Function/notes ................................ 74
Adaptive brake lights .......................... 75
Adaptive Damping System
Function/notes ............................ .224
Adaptive Highbeam Assist Plus
Display message ............................ 315
Function/notes ............................ .126
Switching on/off ........................... 126
AdBlue ®
Display message ............................ 318
Filling capacity ............................... 439
Important safety notes .................. 439
Topping up ..................................... 180
Additives (engine oil) ........................ 440
Adjusting the headlamp range ......... 123
ADS (Adaptive Damping System)
Function/notes ............................ .221
Air conditioning
General notes ................................ 135
Air filter (white display message) .... 318
AIR FLOW .......................................... .141
Air pressure
see Tyre pressure
Air vents
Glove compartment ....................... 155
Important safety notes .................. 154
Rear ............................................... 155
Setting .......................................... .154
Setting the centre air vents ........... 155
Setting the side air vents .............. .155
Air-conditioning system
see Climate control
Airbag
Automatic front-passenger front
airbag deactivatio n .......................... 51
Introduction ..................................... 48
PASSENGER AIR BAG indicator
lamps ............................................... 44
Airbags
Display message ............................ 311
Front airbag (driver, front
passenger) ....................................... 49 Index
3
Page 8 of 453

Automatic transmission emer-
gency running mode
.........................175
Auxiliary heating
Setting .......................................... .295
Auxiliary heating/ventilation
Display message ............................ 335
Important safety notes .................. 149
Problem (display message) ............ 154
Remote control .............................. 151
Setting the departure time ............. 152
Switching on/off (on the centre
console) ......................................... 150
Axle load, permissible (trailer tow-
ing) ...................................................... 447 B
Bag hook ............................................ 356
Ball coupling
Swinging in ................................... .276
Swinging out .................................. 274
BAS (Brake Assist System) ................. 71
BAS PLUS with Cross-Traffic Assist (Brake Assist PLUS with Cross-
Traffic Assist)
Function/notes ................................ 71
Important safety notes .................... 72
Battery (high-voltage)
see High-voltage battery
Battery (key)
Checking .......................................... 87
Important safety notes .................... 87
Replacing ......................................... 87
Battery (vehicle)
Charging ........................................ 395
Display message ............................ 317
Important safety notes .................. 392
Jump starting ................................. 397
Overview ........................................ 392
Belt
see Seat belts
Belt tensioner
Activation ......................................... 55
Blind Spot Assist
Activating/deactivating ................. 291
Display message ............................ 326
Notes/function .............................. 244
Trailer towing ................................. 246 see Active Blind Spot Assist
BlueTEC
Topping up AdBlue ®
....................... 180
BlueTEC (AdBlue ®
) ............................ .439
Bonnet
Active bonnet (pedestrian protec-tion) ............................................... 373
Closing .......................................... .374
Display message ............................ 334
Important safety notes .................. 373
Opening ......................................... 374
Boot
see Tailgate
Brake Assist
see BAS (Brake Assist System)
Brake fluid
Display message ............................ 306
Notes ............................................. 441
Brake force distribution
see EBD (electronic brake force
distribution)
Brake lamps
Adaptive .......................................... .75
Display message ............................ 314
Brake pedal
Pedal resistance/pedal travel .......... 43
Brakes
ABS .................................................. 70
Adaptive Brake Assist ...................... 74
BAS .................................................. 71
BAS PLUS with Cross-Traffic
Assist ............................................... 71
Brake fluid (notes) ........................ .441
Display message ............................ 301
Driving tips ................................... .196
High-performance brake system .... 197
Important safety notes .................. 196
Parking brake ................................ 192
RBS warning lamp .......................... 340
Recuperative Brake System ............. 43
Warning lamp ................................. 339
Breakdown
Where will I find...? ........................ 386
see Flat tyre
see Towing away
Brightness control (instrument
cluster lighting) ................................... 32 Index
5
Page 22 of 453

Switching on/of
f........................... 233
Reversing feature
Panorama sliding sunroof .............. 102
Roller sunblind s............................. 104
Side windows ................................... 98
Sliding sunroof ............................... 102
Tailgate ............................................ 94
Reversing lamp (display message) .. 314
Roller sunblind
Panorama sliding sunroof .............. 103
Roof carrier ........................................ 360
Roof lining and carpets (cleaning
instructions) ...................................... 385
Roof load (maximum) ........................ 442
Route (navigation)
see Route guidance (navigation)
Route guidance (navigation) ............ 286S
Safety Children in the vehicle ..................... 58
Hybrid drive system ......................... 41
see Occupant safety
Safety net
Attaching ....................................... 358
Important safety information ......... 358
Safety notes
Hybrid vehicles ................................ 41
Safety system
see Driving safety systems
SD memory card
Selecting ........................................ 287
Seat belt
Correct usage .................................. 46
Switching belt adjustment on/off
(on-board computer) ...................... 296
Seat belts
Adjusting the driver's and front-
passenger seat belt ......................... 47
Adjusting the height ......................... 47
Cleaning ......................................... 385
Display message ............................ 308
Fastening ......................................... 47
Important safety guidelines ............. 45
Introduction ..................................... 45
Rear seat belt status indicator ......... 48
Releasing ......................................... 47 Warning lamp ................................. 337
Warning lamp (function) ................... 48
Seats
Adjusting (electrically) ................... 109
Adjusting the head restraint .......... 109
Cleaning the cover ......................... 385
Correct driver's seat position ........ 107
Folding the rear bench seat for-
wards/back ................................... 354
Important safety notes .................. 108
Overview ........................................ 108
Seat heating problem .................... 113
Seat ventilation problem ................ 114
Storing settings (memory func-
tion) ............................................... 120
Switching seat heating on/of f....... 112
Switching the seat ventilation on/ off .................................................. 113
Section
Sliding sunroof ............................... 101
Securing hooks .................................. 356
Selector lever
Cleaning ......................................... 384
Sensors (cleaning instructions) ....... 382
Service
see ASSYST PLUS
Service Centre
see Qualified specialist workshop
Service menu (on-board com-
puter) .................................................. 291
Service message
see ASSYST PLUS
Service products
AdBlue ®
special additive s.............. 439
Brake fluid ..................................... 441
Coolant (engine) ............................ 441
Engine oil ....................................... 439
Fuel ................................................ 436
Important safety notes .................. 435
Washer fluid ................................... 442
Setting the air distribution ............... 142
Setting the airflow ............................ 142
Setting the charge current (on-
board computer) ............................... 292
Setting the departure time (on-
board computer) ............................... 292 Index
19
Page 116 of 453

Problems with the seat heating
Problem
Possible causes/consequences and
M
MSolutions The seat heating has
switched off prematurely
or cannot be switched
on. The on-board voltage is too low because too many electrical consum-
ers are switched on.
X Switch off electrical consumers that you do not need, such as the
rear window heating or interior lighting.
Once the battery is sufficiently charged, the seat heating will switch back on automatically. Switching the seat ventilation on/off
Switching on/off The three blue indicator lamps in the buttons
indicate the ventilation level you have selected.
X Turn the key to position 1or 2in the ignition
lock (Y page 158).
X To switch on: press button:repeatedly
until the desired ventilation level is set.
X To switch off: press button:repeatedly
until all the indicator lamps go out.
i If the battery voltage is too low, the seat
ventilation may switch off.
i You can open the side windows and the slid-
ing sunroof using the "Convenience opening" feature (Y page 99). The seat ventilation of
the driver's seat automatically switches to the
highest level. Seats
113Seats, steering wheel and mirrors Z
Page 126 of 453
 or X(right-hand side of the
vehi")
X
To switch on the parking lamps: the key
should not be in the ignition lock or it should
be in position 0.
X Turn the light switch to W(left-hand side of
the vehicle) or X(right-hand side of the
vehicle).
Adjusting the headlamp range (halogen headlamps) g
Driver's seat and front-passenger seat
occupied
1 Driver's seat, front-passenger seat and rear
seats occupied
2 Driver's seat, front-passenger seat and rear
seats occupied and maximum permissible
rear axle load utilised when the vehicle is
laden
3 Driver's seat occupied and maximum per-
missible rear axle load utilised when the
vehicle is laden
The headlamp range control allows you to adjust
the cone of light from the headlamps to suit the
vehicle load.
X Start the engine.
X Turn the headlamp range control to the posi-
tion which corresponds to the load in your
vehicle. Combination switch
Turn signals :
Main-beam headlamps
; Turn signal, right
= Headlamp flasher
? Turn signal, left
X To indicate briefly: press the combination
switch briefly to the pressure point in the
direction of arrow ;or?.
The corresponding turn signal flashes three
times.
X To indicate: press the combination switch
beyond the pressure point in the direction of
arrow ;or?.
Main-beam headlamps X
To switch on manually: turn the key to posi-
tion 2in the ignition lock or start the engine.
X Vehicles without Adaptive Highbeam Assist
Plus: turn the light switch to LorÃ.
X Vehicles with Adaptive Highbeam Assist Plus:
turn the light switch to L.
X Press the combination switch beyond the
pressure point in the direction of arrow :.
In the Ãposition, the main-beam head-
lamps are only switched on when it is dark and
the engine is running.
The blue Kindicator lamp in the instru-
ment cluster lights up when the main-beam
headlamps are switched on.
X To switch off: move the combination switch
back to its normal position.
The blue Kindicator lamp in the instru-
ment cluster goes out.
Vehicles with Adaptive Highbeam Assist
Plus: if Adaptive Highbeam Assist Plus is acti-
vated, it automatically controls activation and Exterior lighting
123Lights andwindscreen wipers Z
Page 152 of 453
Setting the departure time
You can set the departure time using the on-
board computer or via the Mercedes connect
me web App. The activation of the "Pre-entry
climate control at departure time" function can
be linked to this departure time. Your vehicle will then be cooled or heated until the desired tem-perature is reached in time for the set departure
time. "Pre-entry climate control at departure
time" will be activated a maximum of 55 minutes before departure. If the departure is delayed,
the vehicle will be heated or cooled for a further five minutes.
X To set the departure time: set the departure
time using the on-board computer
(Y page 292). Set the departure time using
the Mercedes connect me web App: http://
www.mercedes.me.
X To activate or deactivate "Pre-entry cli-
mate control at departure time": activate
or deactivate "Pre-entry climate control at
departure time" using the on-board com-
puter. Activate or deactivate "Pre-entry cli-
mate control at departure time" using the
Mercedes connect me web App: http://
www.mercedes.me.
The "Pre-entry climate control at departure
time" function is automatically deactivated
when the vehicle is started. The following func-
tions remain active:
R Seat heating
R Seat ventilation
R Ionisation
To deactivate "Pre-entry climate control at
departure time": the activated "Pre-entry cli-
mate control at departure time" can be deacti-
vated using the button (Y page 149).
Activating/deactivating "Immediate
pre-entry climate control" via the but-
ton You can activate "Immediate pre-entry climate
control" even if the vehicle interior is already at
the desired temperature. This means, for exam- ple, that the vehicle interior continues to be
cooled or heated if the journey is interrupted for
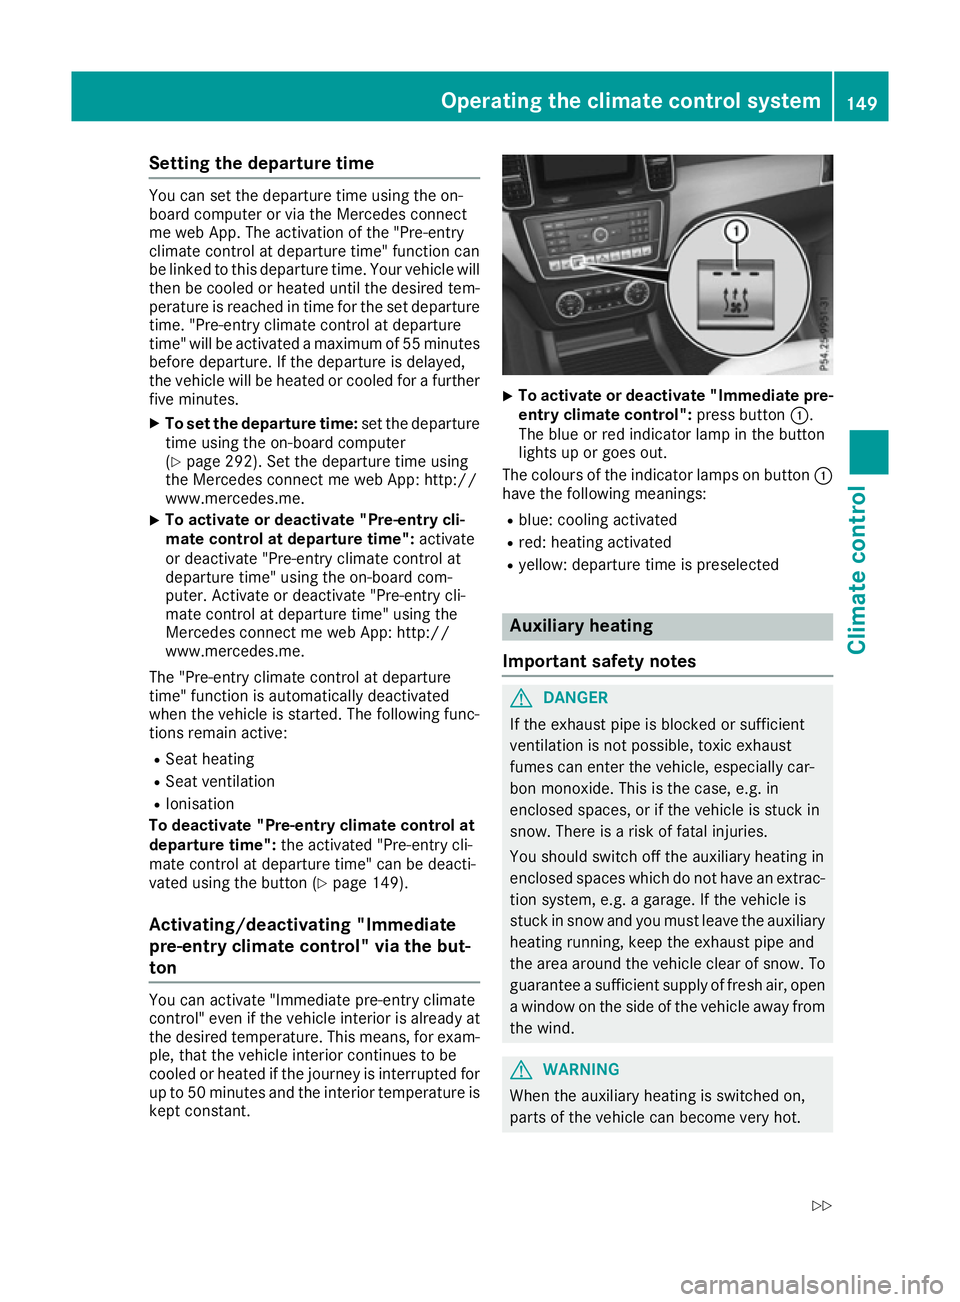
up to 50 minutes and the interior temperature is kept constant. X
To activate or deactivate "Immediate pre-
entry climate control": press button:.
The blue or red indicator lamp in the button
lights up or goes out.
The colours of the indicator lamps on button :
have the following meanings:
R blue: cooling activated
R red: heating activated
R yellow: departure time is preselected Auxiliary heating
Important safety notes G
DANGER
If the exhaust pipe is blocked or sufficient
ventilation is not possible, toxic exhaust
fumes can enter the vehicle, especially car-
bon monoxide. This is the case, e.g. in
enclosed spaces, or if the vehicle is stuck in
snow. There is a risk of fatal injuries.
You should switch off the auxiliary heating in
enclosed spaces which do not have an extrac- tion system, e.g. a garage. If the vehicle is
stuck in snow and you must leave the auxiliary
heating running, keep the exhaust pipe and
the area around the vehicle clear of snow. To guarantee a sufficient supply of fresh air, open
a window on the side of the vehicle away from the wind. G
WARNING
When the auxiliary heating is switched on,
parts of the vehicle can become very hot. Operating the climate control system
149Climate control
Z
Page 153 of 453

Flammable materials such as leaves, grass or
twigs may ignite if they come into contact
with:
R hot parts of the exhaust system
R the exhaust gas itself
There is a risk of fire.
When the auxiliary heating is switched on,
make sure that:
R no flammable materials come into contact
with hot vehicle components
R the exhaust gas can escape from the
exhaust pipe unhindered
R the exhaust gas does not come into contact
with flammable materials.
The auxiliary heating is fitted under the front
wing on the left-hand side of the vehicle. The
emissions outlet is found behind the left front
wheel. ! Operating the auxiliary heating/ventilation
draws on the vehicle battery. After you have
heated or ventilated the vehicle a maximum of two times, drive for a longer distance.
Switch the auxiliary heating on regularly once a month for about ten minutes.
The auxiliary heating heats the air in the vehicle
interior to the set temperature. This occurs with- out using the heat of the running engine. The
auxiliary heating is operated directly using the
vehicle's fuel. For this reason, the tank content
must be at least at reserve fuel level to ensure
that the auxiliary heating functions.
The auxiliary heating or auxiliary ventilation
automatically adjusts to changes in tempera-
ture and weather conditions. For this reason,
the auxiliary heating could switch from ventila-
tion mode to heating mode or from heating
mode to ventilation mode.
The auxiliary heating switches off when the
engine is switched off. The auxiliary ventilation
switches off when you turn the key to position 2
(Y page 158).
The auxiliary heating switches off automatically after 50 minutes. This time limit can be altered.
To do this, visit a qualified specialist workshop.
You cannot use the auxiliary ventilation to cool
the vehicle interior to a temperature lower than
the outside temperature. Before switching on X
Turn the key to position 2in the ignition lock
(Y page 158).
X Set the desired temperature.
The auxiliary heating/ventilation can be activa-
ted even when climate control is set to manual.
Optimum comfort can be attained when the sys-
tem is set to automatic mode. Set the temper-
ature to 22 †.
The auxiliary heating or auxiliary ventilation can
be switched on/off using the button on the
centre console or the remote control.
The on-board computer can be used to specify
up to three departure times, one of which may
be preselected (Y page 295).
Switching the auxiliary heating/venti-
lation on or off using the button on the
centre console General notes
The colours of the indicator lamps in button
:
mean the following:
R blue: auxiliary ventilation is switched on
R red: auxiliary heating is activated
R yellow: departure time is preselected
(Y page 295).
Switching on/off X To switch on the auxiliary heating or aux-
iliary ventilation:
press button:.
The red or blue indicator lamp in button :
lights up.
X To switch off the auxiliary heating or aux-
iliary ventilation: press button:.
The red or blue indicator lamp in button :
goes out. 150
Operating the climate control systemClimate control
Page 183 of 453

General notes To function properly, BlueTEC exhaust gas after-
treatment must be operated with the reducing
agent AdBlue ®
. Topping up AdBlue ®
is part of
the main")
AdBlue
®
(BlueTEC vehicles only)
General notes To function properly, BlueTEC exhaust gas after-
treatment must be operated with the reducing
agent AdBlue ®
. Topping up AdBlue ®
is part of
the maintenance work. Under normal operating
conditions, a full tank of AdBlue ®
should last
until the next service due date.
When the supply of AdBlue ®
is down to approx-
imately 3.8 l, the Refill AdBlue See Own‐
Refill AdBlue See Own‐
er's Manual er's Manual message is shown in the multi-
function display.
X Add at least 3.8 l of AdBlue ®
.
X Switch on the ignition for at least 60 seconds.
X Start the engine.
i You can also have the AdBlue ®
tank refilled
at a qualified specialist workshop.
Before driving your vehicle outside Europe, have
the AdBlue ®
supply checked at a qualified spe-
cialist workshop.
Further information about BlueTEC exhaust gas
aftertreatment and about AdBlue ®
can
be obtained from any Mercedes-Benz Service
Centre.
Important safety notes AdBlue
®
is a water-soluble fluid for the exhaust
gas aftertreatment of diesel engines. It is:
R non-toxic
R colourless and odourless
R non-flammable
If you open the AdBlue ®
tank, small amounts of
ammonia vapour may be released.
Ammonia vapours have a pungent odour and are
particularly irritating to the skin, to mucous
membranes and to the eyes. You may experi-
ence a burning sensation in your eyes, nose and throat. You may also experience coughing and
watery eyes.
Do not inhale any ammonia vapours that may be
released. Only fill the AdBlue ®
tank in well-ven-
tilated areas.
Do not swallow AdBlue ®
or let it come into con-
tact with skin, eyes or clothing. Keep AdBlue ®
away from children. If you or others come into contact with AdBlue
®
,
observe the following:
R immediately rinse AdBlue ®
off your skin with
soap and water.
R if AdBlue ®
comes into contact with your eyes,
immediately rinse them thoroughly with clean water. Seek medical attention immediately.
R if AdBlue ®
is swallowed, immediately rinse
your mouth out thoroughly. Drink plenty of
water. Seek medical attention immediately.
R change immediately out of clothing that has
come into contact with AdBlue ®
.
! Only use AdBlue ®
in accordance with
ISO 22241. Do not mix any additives with
AdBlue ®
, and do not dilute AdBlue ®
with
water. This may destroy the BlueTEC exhaust
gas aftertreatment system.
! In order to fill the AdBlue ®
tank, the vehicle
must be parked on a level surface. The
AdBlue ®
tank can only be filled as intended
with the vehicle parked on a level surface.
Fluctuations in capacity will thus be avoided.
Filling a vehicle standing on an uneven sur-
face is not permitted. There is a danger of
overfilling, which can cause damage to Blue-
TEC exhaust gas aftertreatment components.
! Surfaces which have come into contact with
AdBlue ®
while refilling should be rinsed
immediately with water, or remove AdBlue ®
with a moist cloth and cold water. If AdBlue ®
has already crystallised, use a sponge and
cold water to clean the area. AdBlue ®
residue
crystallises after a certain amount of time and soils the affected surfaces.
! AdBlue ®
is not a fuel additive and must not
be added to the fuel tank. If AdBlue ®
is added
to the fuel tank, this can lead to engine dam-
age.
Have the AdBlue ®
tank refilled at a qualified
specialist workshop. However, you can also top
up the AdBlue ®
tank:
R at a filling station with an AdBlue ®
filling pump
R with AdBlue ®
refill bottles
R with an AdBlue ®
refill canister
When the pump nozzle switches off automati-
cally during filling at a filling pump, the AdBlue ®
tank has been completely filled. Do not fill the 180
RefuellingDriving and pa
rking