2015 MERCEDES-BENZ GLE SUV open bonnet
[x] Cancel search: open bonnetPage 8 of 453
Automatic transmission emer-
gency running mode
.........................175
Auxiliary heating
Setting .......................................... .295
Auxiliary heating/ventilation
Display message ............................ 335
Important safety notes .................. 149
Problem (display message) ............ 154
Remote control .............................. 151
Setting the departure time ............. 152
Switching on/off (on the centre
console) ......................................... 150
Axle load, permissible (trailer tow-
ing) ...................................................... 447 B
Bag hook ............................................ 356
Ball coupling
Swinging in ................................... .276
Swinging out .................................. 274
BAS (Brake Assist System) ................. 71
BAS PLUS with Cross-Traffic Assist (Brake Assist PLUS with Cross-
Traffic Assist)
Function/notes ................................ 71
Important safety notes .................... 72
Battery (high-voltage)
see High-voltage battery
Battery (key)
Checking .......................................... 87
Important safety notes .................... 87
Replacing ......................................... 87
Battery (vehicle)
Charging ........................................ 395
Display message ............................ 317
Important safety notes .................. 392
Jump starting ................................. 397
Overview ........................................ 392
Belt
see Seat belts
Belt tensioner
Activation ......................................... 55
Blind Spot Assist
Activating/deactivating ................. 291
Display message ............................ 326
Notes/function .............................. 244
Trailer towing ................................. 246 see Active Blind Spot Assist
BlueTEC
Topping up AdBlue ®
....................... 180
BlueTEC (AdBlue ®
) ............................ .439
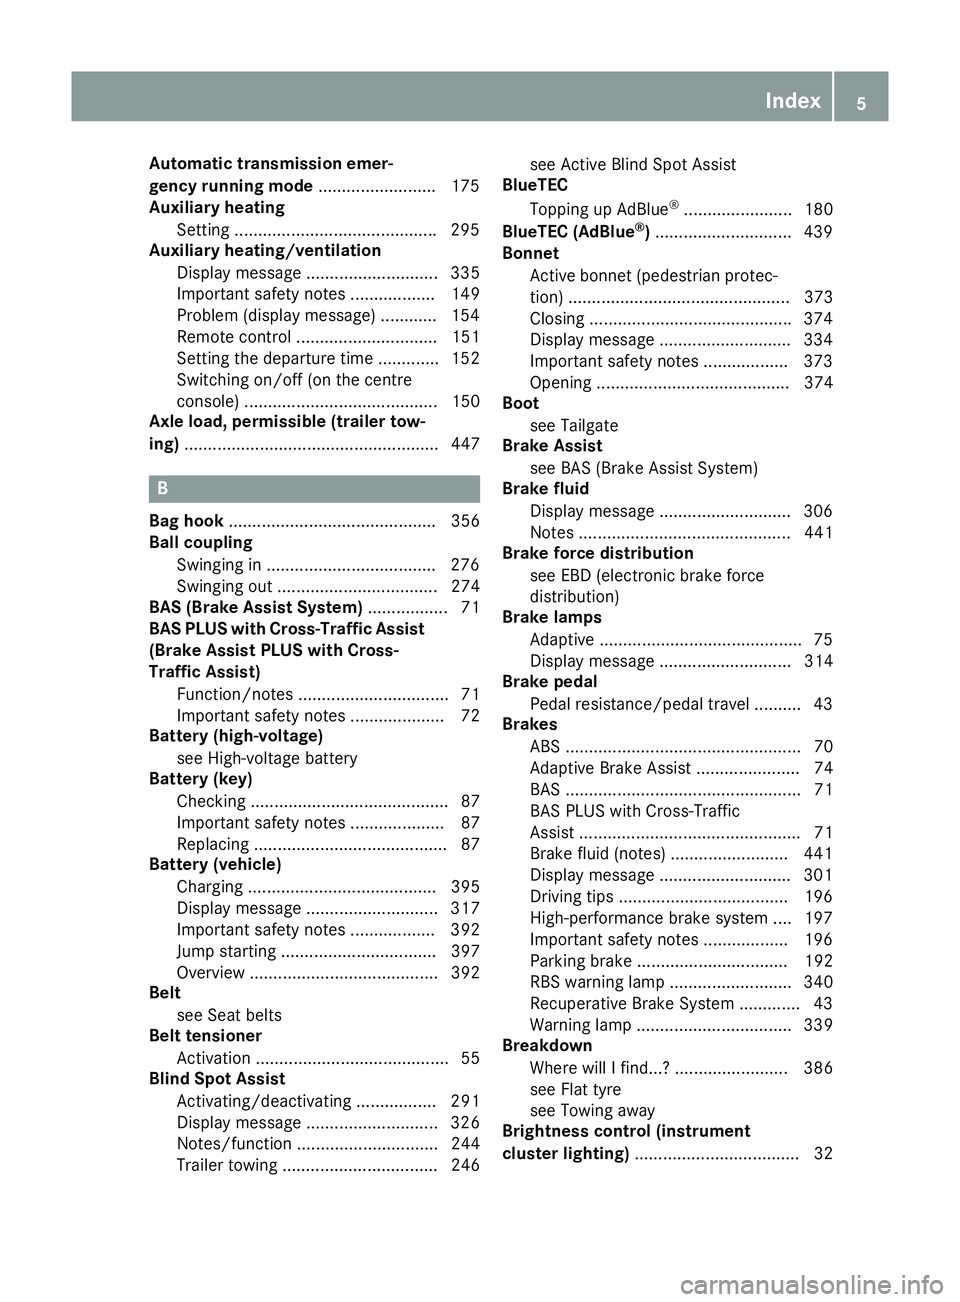
Bonnet
Active bonnet (pedestrian protec-tion) ............................................... 373
Closing .......................................... .374
Display message ............................ 334
Important safety notes .................. 373
Opening ......................................... 374
Boot
see Tailgate
Brake Assist
see BAS (Brake Assist System)
Brake fluid
Display message ............................ 306
Notes ............................................. 441
Brake force distribution
see EBD (electronic brake force
distribution)
Brake lamps
Adaptive .......................................... .75
Display message ............................ 314
Brake pedal
Pedal resistance/pedal travel .......... 43
Brakes
ABS .................................................. 70
Adaptive Brake Assist ...................... 74
BAS .................................................. 71
BAS PLUS with Cross-Traffic
Assist ............................................... 71
Brake fluid (notes) ........................ .441
Display message ............................ 301
Driving tips ................................... .196
High-performance brake system .... 197
Important safety notes .................. 196
Parking brake ................................ 192
RBS warning lamp .......................... 340
Recuperative Brake System ............. 43
Warning lamp ................................. 339
Breakdown
Where will I find...? ........................ 386
see Flat tyre
see Towing away
Brightness control (instrument
cluster lighting) ................................... 32 Index
5
Page 15 of 453
Fuse box under rear bench sea
t.... 403
Important safety notes .................. 402 G
Garage door opener Clearing the memory ..................... 369
Frequencies ................................... 369
General notes ................................ 367
Important safety notes .................. 367
Opening/closing the garage doo r..3 68
Programming (button in the rear-
view mirror) ................................... 367
Synchronising the rolling code ....... 368
Gear indicator (on-board com-
puter, Mercedes-AMG vehicles) ....... 297
Gearshift paddles
see Steering wheel gearshift paddles
Gearshift program
SETUP (on-board computer) .......... 298
Genuine Mercedes-Benz parts ........... 25
Glove compartment .......................... 352H
Hazard warning lamps ......................124
Head restraints
Adjusting ....................................... 109
Adjusting (electrically) ................... 110
Adjusting (manually) ..................... .110
Adjusting (rear) .............................. 110
Fitting/removing (rear) .................. 111
Luxury ............................................ 110
Headlamp
Cleaning system (notes) ................ 442
Headlamps
Misting up ...................................... 127
see Automatic headlamp mode
Heating
see Climate control
High-pressure cleaners .................... 380
High-voltage battery
Battery care ................................... 184
Charging ........................................ 396
Charging (charging station) ............ 189
Charging (mains socket) ................ 185
Charging (wallbox) ......................... 188
Charging cable heating up ............. 185 Energy consumption .....................
.184
General notes .................................. 42
Method of operation ..................... .183
Outside temperatures .................... 184
Problems during charging .............. 190
Protective device ........................... 185
Range ............................................ 184
Terms of use .................................. 184
Vehicle fire ....................................... 42
Hill start assist .................................. 161
HOLD function
Deactivating ................................... 220
Display message ............................ 325
Function/notes ............................ .219
Horn ...................................................... 30
Hybrid drive system
Automatic switch off ........................ 41
Danger of electric shock .................. 41
Display message ............................ 320
General notes .................................. 41
High-voltage battery ........................ 42
Important safety notes .................... 41
Manual switch off ............................ 41
Opening the bonnet ......................... 42
Warning lamp ................................. 340
Hybrid vehicles
Important safety notes .................... 41 I
Ignition lock see Key positions
Immobiliser .......................................... 81
Indicator and warning lamp
Restraint system ............................ 346
Indicator and warning lamps
Coolant .......................................... 347
DISTRONIC PLUS ........................... 349
Engine diagnostics ......................... 347
Indicator lamps
Display message ............................ 313
see Warning and indicator lamps
Indicators
see Turn signals
Insect protection on the radiator .... 374
Instrument cluster
Overview .......................................... 32
Warning and indicator lamps ........... 34 12
Index
Page 33 of 453
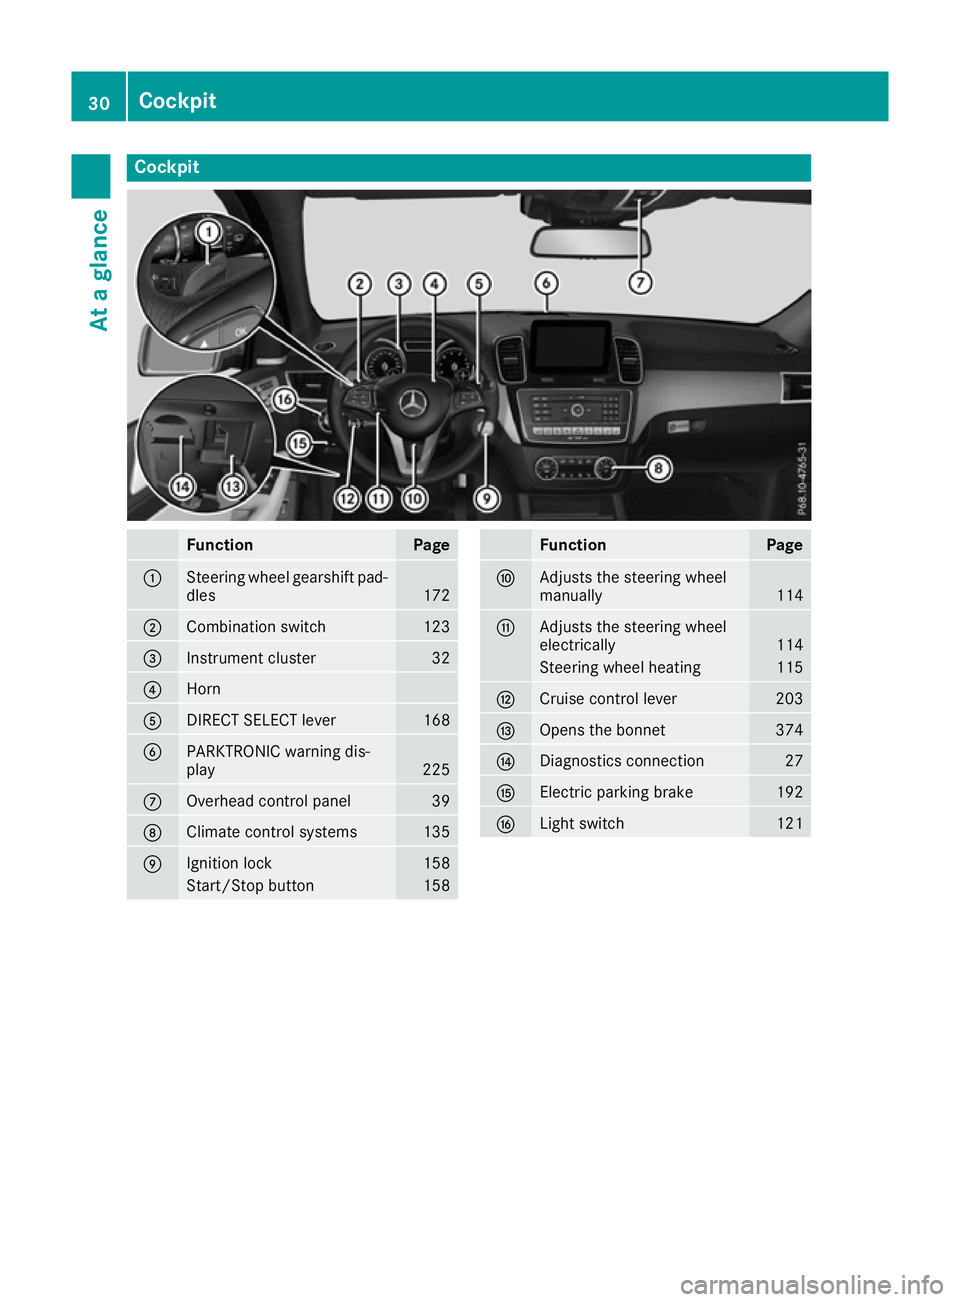
Cockpit
Function Page
:
Steering wheel gearshift pad-
dles 172
;
Combination switch 123
=
Instrument cluster 32
?
Horn
A
DIRECT SELECT lever 168
B
PARKTRONIC warning dis-
play
225
C
Overhead control panel 39
D
Climate control systems 135
E
Ignition lock 158
Start/Stop button 158 Function Page
F
Adjusts the steering wheel
manually
114
G
Adjusts the steering wheel
electrically
114
Steering wheel heating 115
H
Cruise control lever 203
I
Opens the bonnet 374
J
Diagnostics connection 27
K
Electric parking brake 192
L
Light switch 12130
CockpitAt a glance
Page 34 of 453
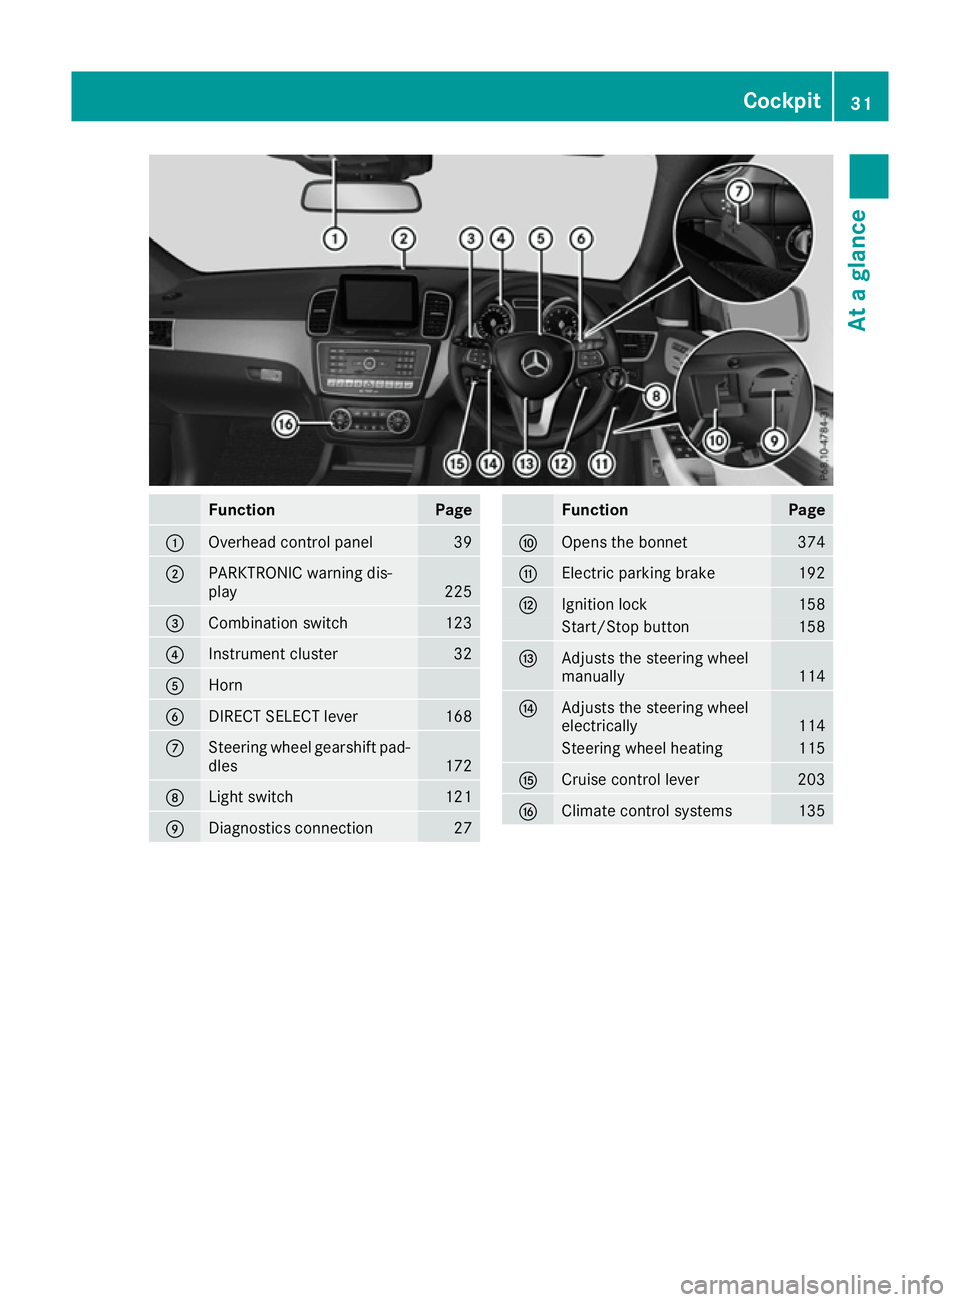
Function Page
:
Overhead control panel 39
;
PARKTRONIC warning dis-
play
225
=
Combination switch 123
?
Instrument cluster 32
A
Horn
B
DIRECT SELECT lever 168
C
Steering wheel gearshift pad-
dles 172
D
Light switch 121
E
Diagnostics connection 27 Function Page
F
Opens the bonnet 374
G
Electric parking brake 192
H
Ignition lock 158
Start/Stop button 158
I
Adjusts the steering wheel
manually
114
J
Adjusts the steering wheel
electrically
114
Steering wheel heating 115
K
Cruise control lever 203
L
Climate control systems 135Cockpit
31At a glance
Page 45 of 453
Deactivate the hybrid system manually if:
R the 6 restraint system warning lamp in the
instrument cluster lights up after an accident
R the vehicle is badly damaged, e.g. after an
accident, and the restraint system compo-
nents were not activated
R the vehicle is badly damaged and has to be
towed or transported
X If possible, move the vehicle out of the
danger zone:
shift the automatic transmis-
sion into position N.
X Release the electric parking brake.
X Roll the vehicle to a safe place and park it
safely.
Get assistance from others if necessary.
The vehicle is locked automatically when the
ignition is switched on and the wheels are turn-
ing. There is therefore a risk of being locked out
if the vehicle is being pushed or tested on a
dynamometer.
X Switch the ignition off.
X Shift the automatic transmission to park posi-
tion P.
Apply the electric parking brake
(Y page 192).
Secure the vehicle against rolling away
(Y page 414).
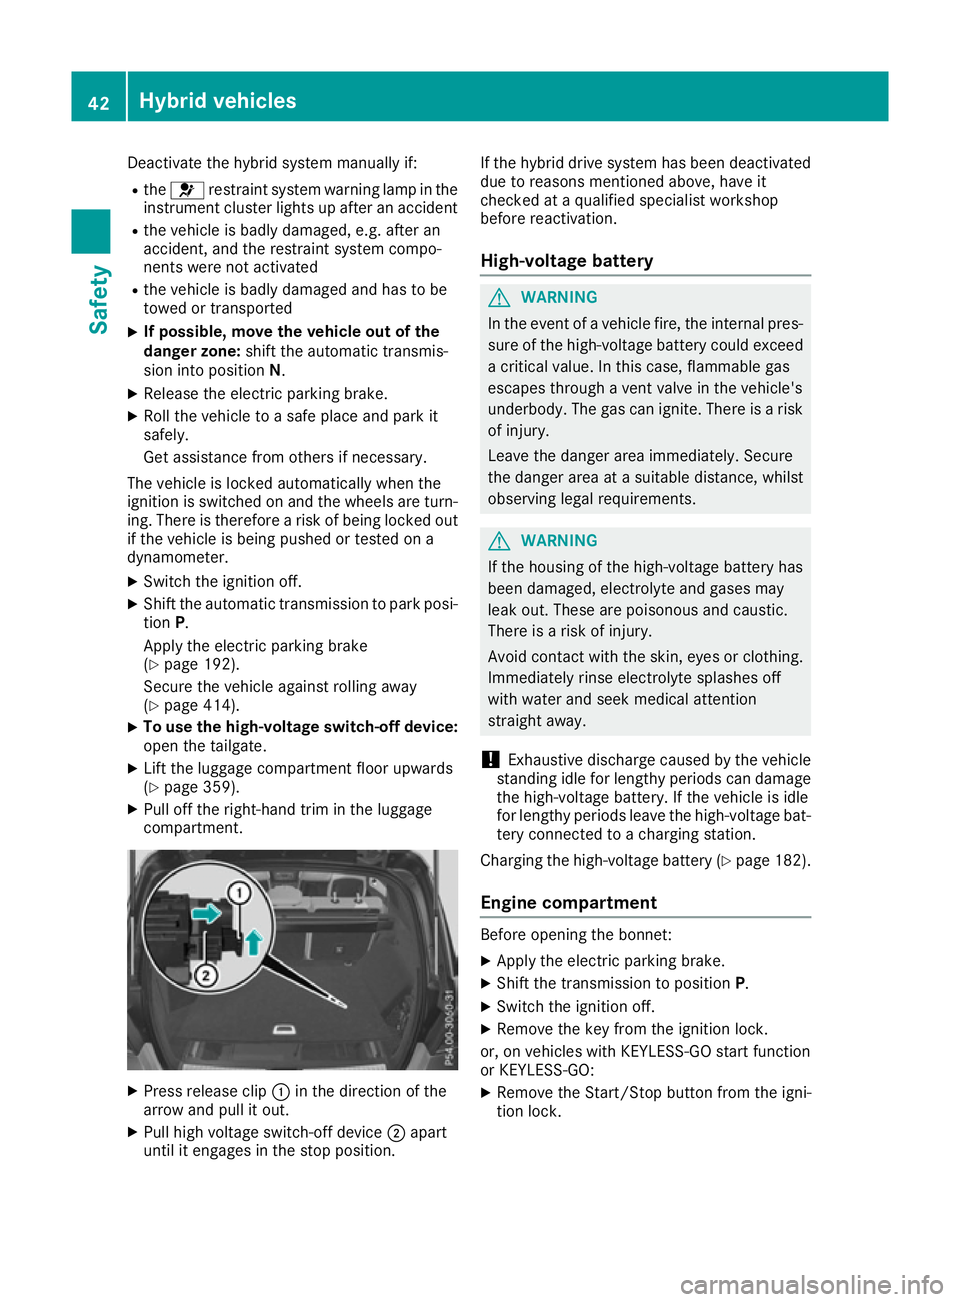
X To use the high-voltage switch-off device:
open the tailgate.
X Lift the luggage compartment floor upwards
(Y page 359).
X Pull off the right-hand trim in the luggage
compartment. X
Press release clip :in the direction of the
arrow and pull it out.
X Pull high voltage switch-off device ;apart
until it engages in the stop position. If the hybrid drive system has been deactivated
due to reasons mentioned above, have it
checked at a qualified specialist workshop
before reactivation.
High-voltage battery G
WARNING
In the event of a vehicle fire, the internal pres- sure of the high-voltage battery could exceeda critical value. In this case, flammable gas
escapes through a vent valve in the vehicle's
underbody. The gas can ignite. There is a risk
of injury.
Leave the danger area immediately. Secure
the danger area at a suitable distance, whilst
observing legal requirements. G
WARNING
If the housing of the high-voltage battery has
been damaged, electrolyte and gases may
leak out. These are poisonous and caustic.
There is a risk of injury.
Avoid contact with the skin, eyes or clothing. Immediately rinse electrolyte splashes off
with water and seek medical attention
straight away.
! Exhaustive discharge caused by the vehicle
standing idle for lengthy periods can damage
the high-voltage battery. If the vehicle is idle
for lengthy periods leave the high-voltage bat- tery connected to a charging station.
Charging the high-voltage battery (Y page 182).
Engine compartment Before opening the bonnet:
X Apply the electric parking brake.
X Shift the transmission to position P.
X Switch the ignition off.
X Remove the key from the ignition lock.
or, on vehicles with KEYLESS-GO start function
or KEYLESS ‑GO:
X Remove the Start/Stop button from the igni-
tion lock. 42
Hybrid vehiclesSafety
Page 84 of 453
Important safety notes
i
Observe the "Important safety notes" sec-
tion (Y page 70).
No steering support is provided from STEER
CONTROL, if: R ESP ®
is deactivated
R ESP ®
is malfunctioning
R the steering is faulty
If ESP ®
is malfunctioning, you will be assisted
further by the electrical power steering. Protection against theft
Immobiliser
X To activate with the key: remove the key
from the ignition lock.
X To activate with KEYLESS-GO: switch the
ignition off and open the driver's door.
X To deactivate: switch on the ignition.
The immobiliser prevents your vehicle from
being started without the correct key.
When leaving the vehicle, always take the key
with you and lock the vehicle. Anyone can start
the engine if a valid key has been left inside the vehicle.
i The immobiliser is always deactivated when
you start the engine. ATA (Anti-Theft Alarm system) X
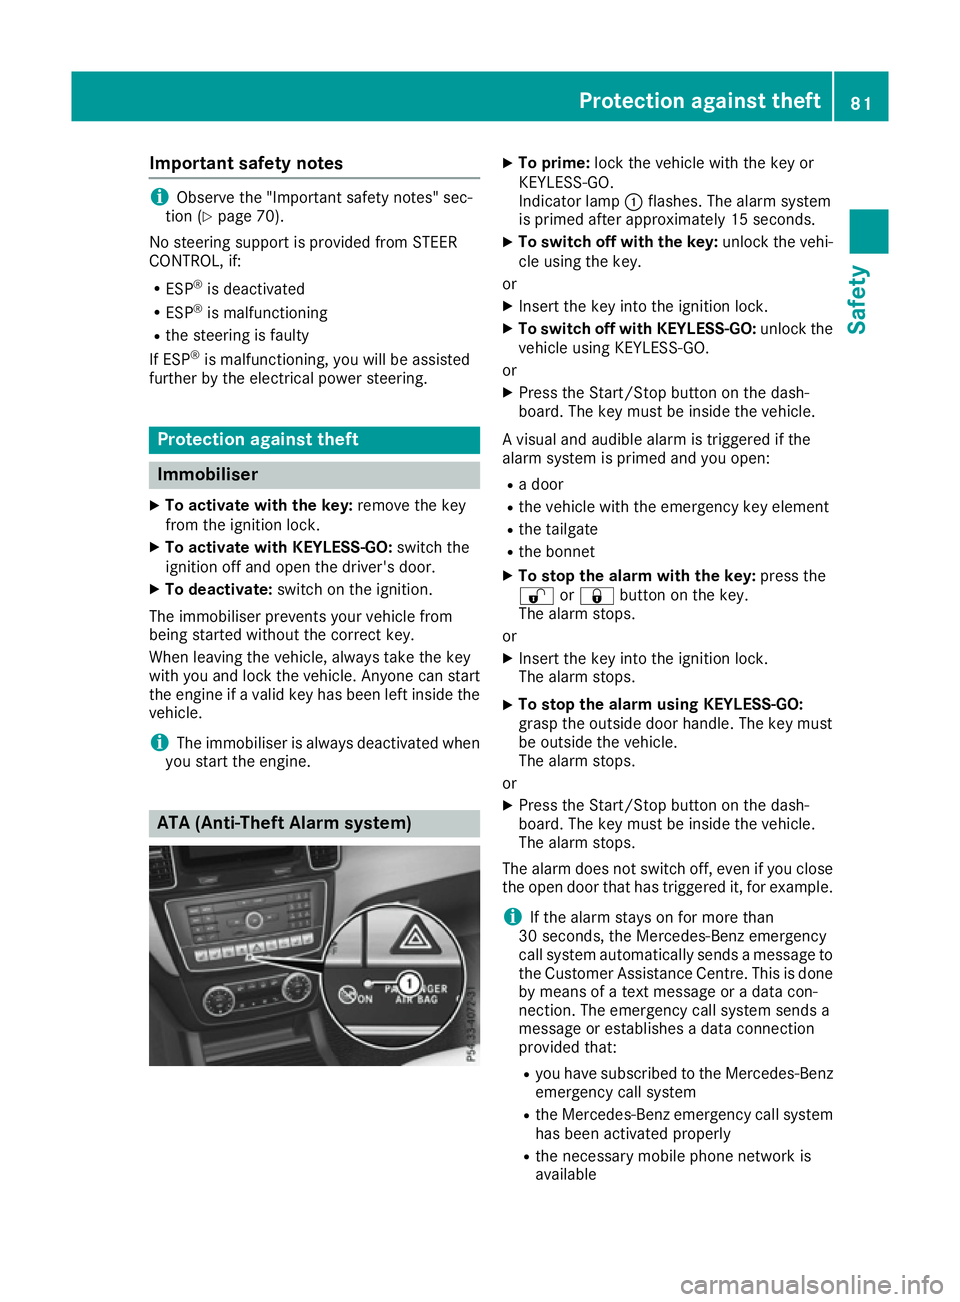
To prime: lock the vehicle with the key or
KEYLESS-GO.
Indicator lamp :flashes. The alarm system
is primed after approximately 15 seconds.
X To switch off with the key: unlock the vehi-
cle using the key.
or X Insert the key into the ignition lock.
X To switch off with KEYLESS-GO: unlock the
vehicle using KEYLESS-GO.
or
X Press the Start/Stop button on the dash-
board. The key must be inside the vehicle.
A visual and audible alarm is triggered if the
alarm system is primed and you open:
R a door
R the vehicle with the emergency key element
R the tailgate
R the bonnet
X To stop the alarm with the key: press the
% or& button on the key.
The alarm stops.
or X Insert the key into the ignition lock.
The alarm stops.
X To stop the alarm using KEYLESS-GO:
grasp the outside door handle. The key must
be outside the vehicle.
The alarm stops.
or X Press the Start/Stop button on the dash-
board. The key must be inside the vehicle.
The alarm stops.
The alarm does not switch off, even if you close the open door that has triggered it, for example.
i If the alarm stays on for more than
30 seconds, the Mercedes‑ Benz emergency
call system automatically sends a message to
the Customer Assistance Centre. This is done by means of a text message or a data con-
nection. The emergency call system sends a
message or establishes a data connection
provided that:
R you have subscribed to the Mercedes ‑Benz
emergency call system
R the Mercedes‑Benz emergency call system
has been activated properly
R the necessary mobile phone network is
available Protection against theft
81Safety Z
Page 132 of 453
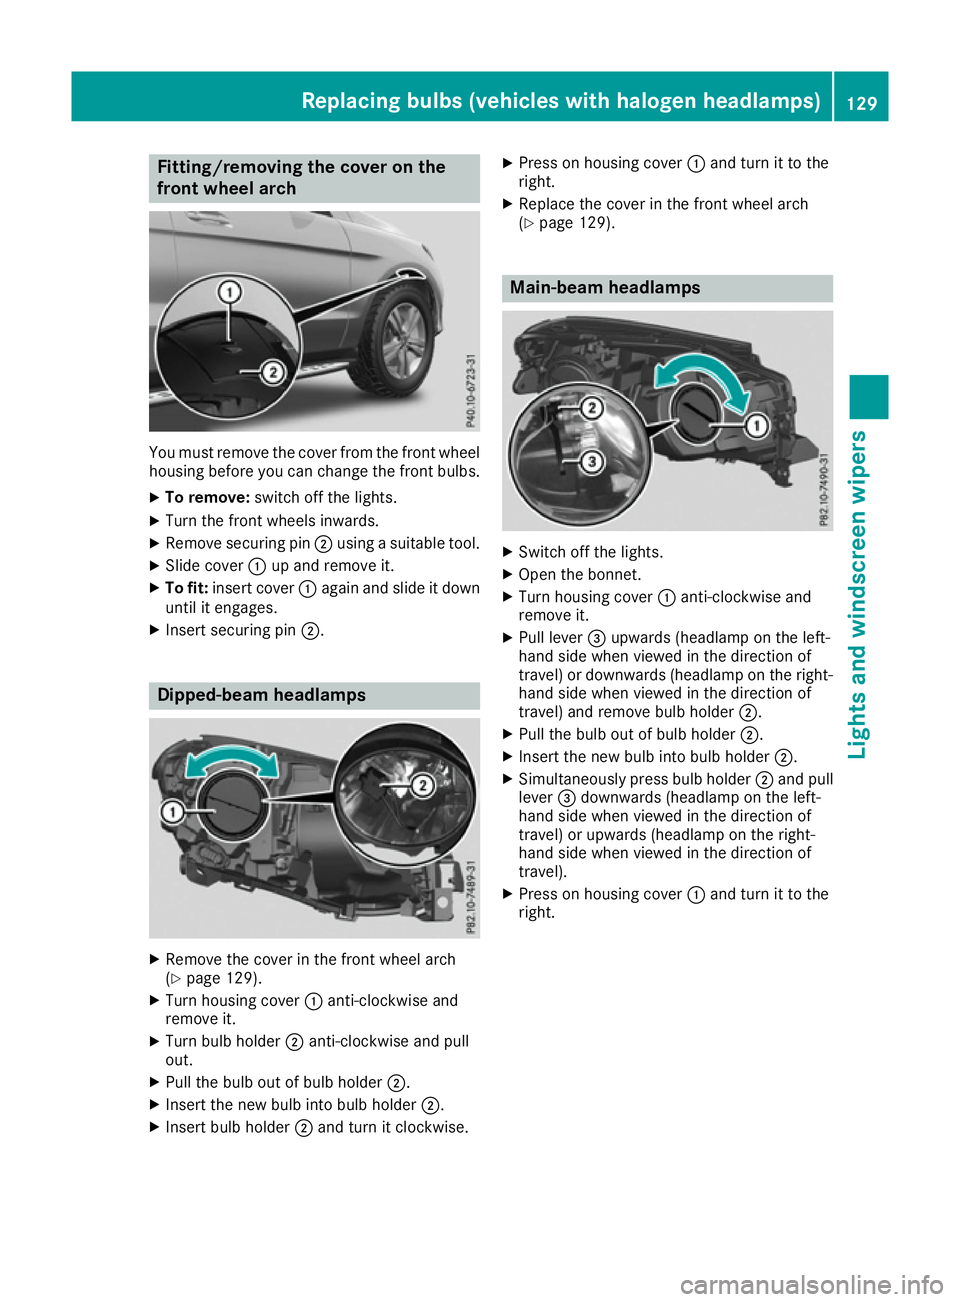
Fitting/removing the cover on the
front wheel arch You must remove the cover from the front wheel
housing before you can change the front bulbs.
X To remove: switch off the lights.
X Turn the front wheels inwards.
X Remove securing pin ;using a suitable tool.
X Slide cover :up and remove it.
X To fit: insert cover :again and slide it down
until it engages.
X Insert securing pin ;. Dipped-beam headlamps
X
Remove the cover in the front wheel arch
(Y page 129).
X Turn housing cover :anti-clockwise and
remove it.
X Turn bulb holder ;anti-clockwise and pull
out.
X Pull the bulb out of bulb holder ;.
X Insert the new bulb into bulb holder ;.
X Insert bulb holder ;and turn it clockwise. X
Press on housing cover :and turn it to the
right.
X Replace the cover in the front wheel arch
(Y page 129). Main-beam headlamps
X
Switch off the lights.
X Open the bonnet.
X Turn housing cover :anti-clockwise and
remove it.
X Pull lever =upwards (headlamp on the left-
hand side when viewed in the direction of
travel) or downwards (headlamp on the right-
hand side when viewed in the direction of
travel) and remove bulb holder ;.
X Pull the bulb out of bulb holder ;.
X Insert the new bulb into bulb holder ;.
X Simultaneously press bulb holder ;and pull
lever =downwards (headlamp on the left-
hand side when viewed in the direction of
travel) or upwards (headlamp on the right-
hand side when viewed in the direction of
travel).
X Press on housing cover :and turn it to the
right. Replacing bulbs (vehicles with halogen headlamps)
129Lights and windscreen wipers Z
Page 133 of 453
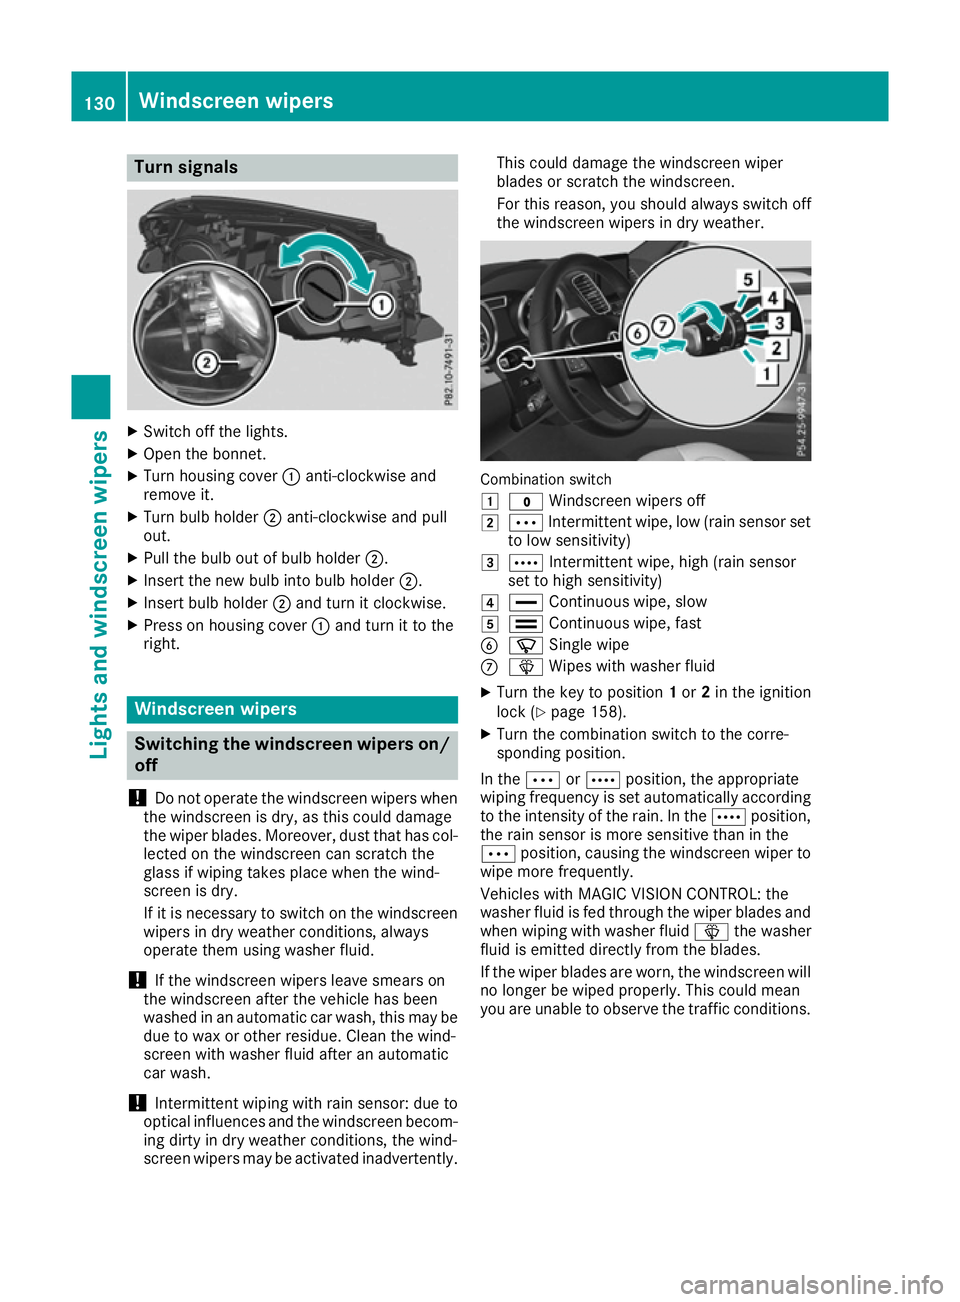
Turn signals
X
Switch off the lights.
X Open the bonnet.
X Turn housing cover :anti-clockwise and
remove it.
X Turn bulb holder ;anti-clockwise and pull
out.
X Pull the bulb out of bulb holder ;.
X Insert the new bulb into bulb holder ;.
X Insert bulb holder ;and turn it clockwise.
X Press on housing cover :and turn it to the
right. Windscreen wipers
Switching the windscreen wipers on/
off
! Do not operate the windscreen wipers when
the windscreen is dry, as this could damage
the wiper blades. Moreover, dust that has col-
lected on the windscreen can scratch the
glass if wiping takes place when the wind-
screen is dry.
If it is necessary to switch on the windscreen wipers in dry weather conditions, always
operate them using washer fluid.
! If the windscreen wipers leave smears on
the windscreen after the vehicle has been
washed in an automatic car wash, this may be
due to wax or other residue. Clean the wind-
screen with washer fluid after an automatic
car wash.
! Intermittent wiping with rain sensor: due to
optical influences and the windscreen becom-
ing dirty in dry weather conditions, the wind-
screen wipers may be activated inadvertently. This could damage the windscreen wiper
blades or scratch the windscreen.
For this reason, you should always switch off
the windscreen wipers in dry weather. Combination switch
1
$ Windscreen wipers off
2 Ä Intermittent wipe, low (rain sensor set
to low sensitivity)
3 Å Intermittent wipe, high (rain sensor
set to high sensitivity)
4 ° Continuous wipe, slow
5 ¯ Continuous wipe, fast
B í Single wipe
C î Wipes with washer fluid
X Turn the key to position 1or 2in the ignition
lock (Y page 158).
X Turn the combination switch to the corre-
sponding position.
In the ÄorÅ position, the appropriate
wiping frequency is set automatically according to the intensity of the rain. In the Åposition,
the rain sensor is more sensitive than in the
Ä position, causing the windscreen wiper to
wipe more frequently.
Vehicles with MAGIC VISION CONTROL: the
washer fluid is fed through the wiper blades and when wiping with washer fluid îthe washer
fluid is emitted directly from the blades.
If the wiper blades are worn, the windscreen will
no longer be wiped properly. This could mean
you are unable to observe the traffic conditions. 130
Windscreen
wipersLights and windscreen wipers