Page 89 of 248

Transporting and practical equipment
Useful equipment
Introduction
This chapter contains information on the following subjects:
Car park ticket holder
86
Storage compartment on the dash panel
87
stowage compartments in the doors
87
Storage compartment in the front centre console
87
Cup holders
88
Cigarette lighter
89
Ashtray
89
12-Volt power outlet
90
Waste container
91
Storage compartment under the front arm rest
92
storage net in the front centre console
92
Glasses compartment
92
Storage compartment on the front passenger side
93
Storage compartment under the passenger seat
93
Clothes hook
94
Storage pockets on the front seats
94
Storage compartment in the rear centre console
94
Folding table on front seat backrest
95
folding table at the centre backrest
95
Removable through-loading bag
95WARNING■ Do not place anything on the dash panel. These objects might slide or fall
down when driving (when accelerating or cornering) and may distract you
from concentrating on the traffic – risk of accident!■
When driving, ensure that no objects from the centre console or from oth-
er storage compartments can get into the driver's footwell. You would not
be able to brake, operate the clutch pedal or accelerate - danger of causing
an accident!
WARNING (Continued)■ No objects should be placed in the storage compartments nor in the
drinks holders; the vehicle occupants could be endangered if there is sud-
den braking or the vehicle collides with something.■
Ash, cigarettes, cigars and the like. may only be placed in the ashtray!
Car park ticket holder
Fig. 74
Parking ticket holder
Read and observe on page 86 first.
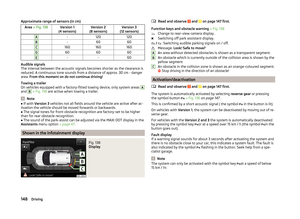
The parking ticket holder » Fig. 74 is designed e.g. for securing car park tickets.
WARNINGThe attached note has to always be removed before starting off in order
not to restrict the driver's vision.86Using the system
Page 90 of 248

Storage compartment on the dash panelFig. 75
Opening the storage compart-
ment
Read and observe on page 86 first.
Opening
›
Press the button » Fig. 75.
The cover folds in the arrow direction.
Closing
›
Fold back the storage compartment lid in the opposite direction to that of
the arrow » Fig. 75 until it clicks.
Certain models do not have a storage compartment lid.
WARNING■ The storage compartment is not a substitute for the ashtray and must al-
so not be used for such purposes – risk of fire!■
The storage compartment must always be closed when driving for safety
reasons.
■
Do not put any highly inflammable objects or objects which are sensitive
to heat (e.g. lighters, sprays, spectacles, carbonated drinks) in the storage
compartment.
stowage compartments in the doorsFig. 76
Storage compartment: in the front door/in the rear door
Read and observe
on page 86 first.
Storage compartments » Fig. 76
Storage compartment in the front doors
Bottle holder with max. 1 liter capacity in the front doors
Storage compartment in the rear doors
Bottle compartment, max. capacity 0.5 l in the rear doors
WARNINGDo not use the storage compartment A » Fig. 76 to store projecting ob-
jects. These could impair the effectiveness of the side airbag.
Storage compartment in the front centre console
Fig. 77
Non-lockable compartment
Read and observe on page 86 first.
The storage compartment » Fig. 77can be used to store small items.
ABCD87Transporting and practical equipment
Page 91 of 248

Above the storage compartment the input marked with the text
MDI » page 127 input.WARNINGThe storage compartment is not a substitute for the ashtray and must also
not be used for such purposes – risk of fire!
Cup holders
Fig. 78
Cup holders: in the center console, front / on the folding table in
the center backrest
Fig. 79
Open cup holder in the central console / adjust holder size
Read and observe
on page 86 first.
Cup holders » Fig. 78 and » Fig. 79
Cup holder in front centre console
Cup holder on the folding table
Location for opening
ABCCup holder in rear centre console
Fuse plate
Open holder in the rear center console›
Press in the cup holder in area
C
» Fig. 79 .
The holder slides out.
›
Pull the holder until it stops in the arrow direction
1
.
›
Adjust the bracket by sliding the locking plate
E
in the direction of arrow
2
.
Close holder in the rear center console
›
Remove the waste container in the opposite direction to the arrow
1
» Fig. 79 .
WARNING■
Do not use any cups or beakers which are made of brittle material (e.g.
glass, porcelain). This could lead to injuries in the event of an accident.■
Never put hot beverage containers in the cup holder. If the vehicle moves,
they may spill – risk of scalding!
CAUTION
■ Do not leave open beverage containers in the cup holder during the journey.
There is a risk of spilling e.g. when braking which may cause damage to the
electrical components or seat upholstery.■
Before folding the rear center seat cup holder
D
» Fig. 79 must be closed -
there is risk of damage.
Note
A 1.5 litre bottle (max. capacity) can be stored in the drinks holder D » Fig. 79 .DE88Using the system
Page 92 of 248

Cigarette lighterFig. 80
Cigarette lighter
Read and observe on page 86 first.
Using the system
›
Press in the button in the cigarette lighter » Fig. 80.
›
Wait until the button pops forward.
›
Remove the cigarette lighter immediately and use.
›
Place the cigarette lighter back into the socket.
The cigarette lighter also operates when the ignition is switched off or the ig-
nition key withdrawn »
.
WARNING■
When leaving the vehicle, never leave people who are not completely in-
dependent, such as children, unattended in the vehicle. These could oper-
ate the lighter and get burned, start a fire or damage the interior.■
Take care when using the cigarette lighter! Improper usage can case
burns.
Note
The cigarette lighter socket can also be used as a 12- volt socket for electrical
appliances » page 90, 12-Volt power outlet .AshtrayFig. 81
Low centre console: Remove front ashtray / open rear ashtray /
remove rear ashtray
Fig. 82
High centre console: Open rear ashtray / Removing rear ashtray
insert
Read and observe
on page 86 first.
The ashtray can be used for discarding ash, cigarettes, cigars and the like » .
Removing/inserting the front ash tray
›
Remove the ashtray in the direction of the arrow
1
» Fig. 81 .
Insertion takes place in reverse order.
Opening the ashtray on the low centre console
›
Grasp the ashtray cover at the lower edge
A
and fold it open in the direction
of arrow
2
» Fig. 81 .
89Transporting and practical equipment
Page 93 of 248

Remove the ashtray from the low centre console›Open the ashtray .›
Grasp the ashtray at the handle
B
and remove in direction of arrow
3
» Fig. 81 .
Removing the ashtray from the low centre console
›
Place the ashtray insert into the console and press it in.
Opening the ashtray on the high centre console
›
Press in the cup holder in area
C
» Fig. 82 .
The ashtray opens out in the direction of the arrow
4
.
Removing the ashtray from the high centre console
›
Open the ashtray .
›
Press the cover carefully to the stop in the direction of arrow
4
» Fig. 82 .
›
Grasp the ashtray insert in the area of arrow and remove it in the direction of
arrow
5
.
Inserting the ashtray into the high centre console
›
Place the ashtray insert into the receiver opposite the direction of arrow
5
and press.
WARNINGNever place flammable objects in the ashtray – risk of fire!
CAUTION
■ When removing do not hold the ashtray at the cover on the front – risk of
breakage.■
The ashtray in the rear part of the central console must be closed (otherwise
it could get damaged) before folding forward the rear middle seat.
12-Volt power outletFig. 83
12-Volt power outlet in the front centre console / in the boot
Read and observe
on page 86 first.
Overview of the 12-volt power socket » Fig. 83
In the front centre console
In the luggage compartment
Use
›
Remove the cover on the power socket » Fig. 83 -
or open the cover on
the power socket as appropriate » Fig. 83 -
.
›
Connect the plug for the electrical appliance to the socket.
The power socket and any connected appliances can also be operated when
the ignition is switched off or the ignition key is withdrawn »
.
WARNING■
Improper use of the power sockets and the electrical accessories can
cause fires, burns and other serious injuries. Therefore, when leaving the
vehicle, never leave people who are not completely independent, such as
children, unattended in the vehicle.■
If the connected electric device becomes too hot, switch it off and discon-
nect it from the power supply immediately.
CAUTION
■ The power socket can only be used for connecting approved electrical acces-
sories with a total power uptake of up to 120 watt.■
Never exceed the maximum power consumption, otherwise the vehicle's
electrical system can be damaged.
90Using the system
Page 94 of 248

■Connecting appliances when the engine is not running will drain the battery
of the vehicle!■
Only use matching plugs to avoid damaging the power sockets.
■
Only use accessories that have been tested for electromagnetic compatibility
in accordance with the applicable directives.
■
Switch off the devices connected to the power sockets before you switch
the ignition on or off and before starting the engine, to avoid damage from
voltage fluctuations.
■
Observe the operating instructions for the connected devices!
Waste container
Fig. 84
Waste container: insert and push / open / replace bag
Read and observe
on page 86 first.
The waste container can be inserted into the slots in the doors » page 87.
Insert waste container
›
Position the waste container at the front edge of the slot.
›
Push the waste container to the back in the direction of the arrow
1
» Fig. 84 .
›Push the waste container as required in the direction of arrow 2.
Remove the waste container
›
Remove the waste container in the opposite direction to the arrow
1
» Fig. 84 .
Open/close waste container
›
Open the waste container in the direction of the arrow
3
» Fig. 84 .
Closing takes place in reverse order.
Replace bags
›
Remove the waste container from the slot.
›
Push the two catches of the inner frame out of the container body in the di-
rection of the arrow
4
» Fig. 84 .
›
Pull the bag together with the inner frame down in the direction of arrow
5
.
›
Remove the bag from the inside frame.
›
Pull the new bag through the frame and pull it over the frame in the direction
of arrow
6
.
›
Insert the bag with the frame in the direction of arrow
7
into the container
body.
The two catches of the inner frame must click into place.
WARNINGNever use the waste container as an ashtray - risk of fire!
Note
We recommend that you use 20x30 cm bags.91Transporting and practical equipment
Page 95 of 248

Storage compartment under the front arm restFig. 85
Open storage compartment / open air supply
Read and observe
on page 86 first.
Opening the storage compartment
›
Lift the armrest in the direction of arrow
A
» Fig. 85 .
Closing storage compartment
›
Open the armrest to the stop, only then can it be folded downwards and against the direction of the arrow
A
» Fig. 85 .
Open the air supply
›
Pull the handle in the direction of the arrow
B
» Fig. 85 .
Close air supply
›
Push the shutter against the arrow
B
to the stop » Fig. 85.
When the air inlet is opened, the air flows into the storage compartment with
a temperature corresponding to the control dial settings on the A/C unit, de-
pending on the outer climate conditions.
The air inlet in the storage compartment is connected to position through
adjustment of the control dial for air distribution. This setting causes the maxi-
mum amount of air to flow into the storage compartment (depending on the
rotary regulator position for the fan).
Note
If not using the air feed in the storage compartment we recommend that you
leave the air supply closed.storage net in the front centre consoleFig. 86
Storage net
Read and observe on page 86 first.
The storage net » Fig. 86 can be used for storage of e.g. maps, magazines etc.
WARNINGOnly store soft objects with a total weight of 0.5 kg in the storage net.
Heavy objects are not secured sufficiently – risk of injury!
CAUTION
Do not place any sharp objects into the net – risk of net damage.
Glasses compartment
Fig. 87
Opening the glasses storage box
Read and observe on page 86 first.
Opening
›
Press the button » Fig. 87.
The box folds in the direction of the arrow.
92Using the system
Page 96 of 248

Closing›Swivel the lid on the storage box against the direction of the arrow» Fig. 87
until it is heard to lock.WARNINGThe compartment must only be opened when removing or inserting the
spectacles. Otherwise it must be kept closed.
CAUTION
■ Do not place any heat-sensitive objects in the eyeglasses - risk of damage.■The box must be closed before leaving and locking the vehicle – risk of im-
pairment to the functions of the anti-theft alarm system!
Storage compartment on the front passenger side
Fig. 88
Open storage compartment / open air supply
Read and observe
on page 86 first.
Opening
›
Press the button » Fig. 88 -
.
The cover folds in the arrow direction.
Closing
›
Lift the lid upwards until it clicks into place.
Air supply into the storage compartment
›
Open the air supply by pulling the lever to the stop in the direction of the ar-
row » Fig. 88 -
.
›
The air supply is closed by the lever being pushed to the stop against the di-
rection of the arrow.
Opening the air supply when the air conditioning system is switched on allows
cooled air to flow into the storage compartment.
Opening the air supply when the air conditioning system is switched on allows
cooled air to flow into the storage compartment.WARNINGThe storage compartment must always be closed when driving for safety
reasons.
Note
■ If not using the air feed in the storage compartment we recommend that you
leave the air supply closed.■
A pen holder is provided in the stowage compartment.
Storage compartment under the passenger seat
Fig. 89
Opening the storage compart-
ment
Read and observe on page 86 first.
Opening
›
Pull the handle to position
1
» Fig. 89 in the direction of the arrow.
›
Remove the wiper blade in the direction of the arrow
2
.
Closing
›
Close compartment (opposite to arrow direction)
2
» Fig. 89 until you hear it
click.
WARNINGThe storage compartment must always be closed when driving for safety
reasons. 93Transporting and practical equipment