Page 129 of 248

The GSM II universal telephone installation kit allows music played back via the
hands-free system to be controlled via voice command » page 124, Voice com-
mands - GSM II .NoteThe device being connected must support the Bluetooth ®
A2DP profile; refer
to the operating instructions for the relevant device being connected.
Operating the radio and audio sources from the multifunction steering wheel
The following information applies only for vehicles with Blues and Swing.radios.
Fig. 120
Multifunction steering wheel: control buttons
The multifunction steering wheel has buttons/dials for operating the basic
functions of factory-fitted radio » Fig. 120.
The radio can of course still be operated on the device. Operating instructions can be found in the manual of the Blues
or Swing
» Fig. 116 on
page 113 radios
If the side lights are switched on, the buttons on the multifunction steering
wheel are illuminated.
The buttons / dials control the functions for the prevailing operating mode of
the telephone.
The following functions can be completed by pressing or turning the buttons.Button / di-
al » Fig. 120ActionRadioAudio sources1Presschanging the audio source2PressSwitch sound on/off (MUTE )2Turn upwardsIncrease volume2Turn downwardsDecrease volume3Press brieflySkip to next channelSkip to next trackStop traffic report3Press and hold buttonWithout functionFast forward4Press brieflySwitch to previous channelSwitch to start of track a)Stop traffic report4Press and hold buttonWithout functionFast rewind5Turn upwardsSwitch to previous channel and display list of stored / acces-
sible channelsSkip to next track 126Using the system
Page 130 of 248
6Press brieflyCall up the main")
Button / di-
al » Fig. 120ActionRadioAudio sources5Turn downwardsSwitch to previous channel and display list of stored / acces-
sible channelsSwitch to start of tracka)6Press brieflyCall up the main menua)
To go to the previous track, press the adjustment wheel twice or rotate it by two positions.
AUX, USB and MDI inputsFig. 121
AUX input under the armrest
Fig. 122
AUX, USB and MDI inputs
Depending on the equipment, your vehicle may have AUX- USB- or MDI inputs
for connecting external sources.
The inputs are used to connect external devices (e.g. iPod, MP3 player, etc.)
and for music playback from these devices via the factory-fitted radio.
Extension cables to connect external sources are available from ŠKODA Origi- nal Accessories.
For operating instructions, refer to the relevant operating manuals for the ra-
dio or navigation system.
AUX input
For vehicles with AUX input they can be found at one of the following loca-
tions, depending on the vehicle equipment.
› Under the armrest
» Fig. 121.
› Above the storage box of the front centre console
» Fig. 122 –
.
The AUX input is labelled with the text
.
Audio devices can be connected at the input via the standard 3.5 mm jack
(Stereo Jack).
USB input
If vehicles are equipped with the USB input, this will be located above the stor-
age compartment in the front centre console » Fig. 122 -
.
The USB input is marked with
and the symbol
.
USB devices (such as memory sources) can be connected to the input. The
connection of Apple devices is also supported.
Multi-Device Interface (MDI) input
If vehicles are equipped with a MDI input, this will be located above the stor-
age compartment in the front centre console » Fig. 122 -
.
The MDI input cover is marked
.
Apple devices can be connected at the input.127Communication and multimedia
Page 131 of 248

CD change
The following information applies only for vehicles with Blues and Swing.ra-
dios.Fig. 123
The CD changer
The CD changer for the radio is located in the left side trim panel of the boot.
Inserting the CD
›
Touch the button
C
» Fig. 123 and guide the CD (compact disc) into the CD-
case
B
. The CD is automatically loaded onto the lowest free position in the
CD changer. The indicator light in the corresponding button
D
stops flash-
ing.
Filling the CD changer with CDs
›
Press and hold the button
C
» Fig. 123 for longer than 2 seconds and guide
the CDs one after the other (maximum 6 CDs) into the CD case
B
. The indi-
cator lights in the buttons
D
stop flashing.
Inserting a CD at a specific position
›
Press the button
C
» Fig. 123 . The indicator lights in the buttons
D
illumi-
nate the memory spaces that are already assigned and flash in the case of
free memory spaces.
›
Touch the desired button
D
and guide the CD into the CD-case
B
.
Ejecting a CD
›
Press button
A
» Fig. 123 . For assigned memory spaces, the indicator lights
now illuminate in the buttons
D
.
›
Press the corresponding button
D
. The CD is ejected.
Ejecting all CDs
›
Press and hold the button
A
» Fig. 123 for more than 2 seconds. All CDs in
the CD-changer are ejected consecutively.
Note■ Insert a CD, with the labelled side facing up, into the CD slot B » Fig. 123
until it is automatically drawn in. The play function will start automatically.■
After loading a CD into the CD changer, wait until the indicator light of the
corresponding button
D
is illuminated. Then the CD slot
B
is free to load the
next CD.
■
If a position is selected, on which a CD is already located, this CD is ejected.
Remove the ejected CD and load the desired CD.
DVD-preinstallation
Fig. 124
DVD preparation in the front seat backrest
Description of DVD installation kit » Fig. 124
Openings for attachment of DVD player holder
Audio/video input
Connection input, DVD player
Only one DVD pre-installation is factory-installed in the seat backrest of the
front seat.
The DVD player holder and DVD player can be purchased from ŠKODA original
accessories. For a description of the use, refer to the operating instructions for
these devices and equipment.
ABC128Using the system
Page 132 of 248
 - risk of injury!■
The inclination of the holder can be adjust")
WARNING■If there are passengers on both of the rear seats, the DVD player holder
must not be used on its own (without the DVD player) - risk of injury!■
The inclination of the holder can be adjusted to three preset positions. Be
careful not to injure fingers between the holder and the backrest when
changes to the position of the DVD player holder are made.
■
The DVD player holder must not be used when the rear seat backrest or
the rear seat is folded forward or has been removed completely.
Note
Follow the instructions given in the operating instructions of the DVD player
holder/DVD player.
SmartGate
Introduction
This chapter contains information on the following subjects:
Connection with SmartGate
129
Smart Gate website
130
Password Management
130
SmartGate is a system which transmits vehicle data via Wi-Fi.
The ŠKODA applications installed in a connected communications device (e.g.
phone, tablet, notebook) 1)
offer the possibility to further process the received
data.
Available applications and further information can be found on the ŠKODA
website..
WARNING■ The national legal regulations for using mobile communication devices in
a vehicle must be observed.■
Do not fit the equipment or mounts to be connected to airbag covers or
within the immediate deployment range of the airbags.
■
Never leave a connected device in the deployment area of an airbag, on a
seat, on the dash panel or any another area, from which it can be thrown
during a sudden braking manoeuvre, an accident or a collision - risk of in-
jury.
Note
The Wi-Fi range is limited to the interior of the vehicle.
Connection with SmartGate
Read and observe
on page 129 first.
For a successful connection the following conditions must be met. Wi-Fi is turned on in the device to be connected.
The ignition is switched on.
Connect
›
Can enable the connected device to search for available Wi-Fi networks (see
operating instructions for the connected device).
›
In the found networks menu, select the connection to the
“SmartGate_ ... ”network 2)
.
›
Enter the password (the password is preset at the factory to the complete
Vehicle Identification Number - enter capital letters).
Disconnecting the connection
The connection to SmartGate can be ended in the following ways.
›
By disconnecting the connected device from SmartGate.
›
By turning off the Wi-Fi in the connected device.
›
By switching off the ignition and removing the key for more than 5 s (for ve-
hicles with starter button - by turning off the engine and opening the driver's
door).
1)
The applications support communications devices with the Android operating system version 4.0.x and
later and iOS 7.xx and higher.
2)
The last six symbols of the VIN vehicle identification number of your vehicle are displayed at position ....
129Communication and multimedia
Page 133 of 248

Automatic connection
The connection to SmartGate is automatically restored under the following
conditions.
Wi-Fi is turned on in the device to be connected.
The ignition is switched on.
The device to be connected stores the password required for the connec-
tion check.
Connection problems
If the connection fails, check the following points.
› Are the conditions for a successful connection fulfilled?
› Is SmartGate available in the list of available Wi-Fi networks?
› Has the password required for the connection check been entered?
› Is the password is required for the connection check correct?
› Is the device to be connected still connected to another Wi-Fi network?
If the above items are ok but the connection still fails, contact a ŠKODA part-
ner.
Note
Up to four devices can be connected to SmartGate at a time.
Smart Gate website
Read and observe
on page 129 first.
There is a special website for the SmartGate system.
The following address must be entered in the web browser of the connected
device.
HTTP://192.168.123.1
This website contains information about the vehicle, the Wi-Fi connection and
SmartGate.
In the Configuration area the Wi-Fi connection settings can be adjusted.
Save the setting changes
The setting changes are only applied after performing the following steps.
› The changes are saved by pressing the “Save” button.
› SmartGate is restarted by pressing the “Reboot ”button.
Password Management
Read and observe
on page 129 first.
Passwords can be managed in the connected device on the SmartGate web-site » page 130 , Smart Gate website .
The changes are applied after saving and restarting SmartGate » page 130,
Save the setting changes .
Change password
›
Enter a new password in the Configuration area in menu option WPA / WPA2 key.
The password must be 8-17 characters without diaktritica or special characters
(for example, -, / , etc.).
Connection option without entering a password
›
In the Configuration area set the value Open in the menu item Security .
Forgot password
If you have forgotten your password, SmartGate must be reset to factory set-
tings in a specialized workshop.
130Using the system
Page 134 of 248

Driving
Starting-off and Driving
Starting and stopping the engine using the key
Introduction
This chapter contains information on the following subjects:
Electronic immobilizer
131
Lock steering lock / unlock
131
Turn ignition on / off and start the engine
132
Stopping the engine
132
With the key in the ignition, the ignition can be switched on and off and the
engine can be started / stopped.
WARNING■ While driving with the engine stopped, the ignition must always be
switched on » page 132, Turn ignition on / off and start the engine .
■ With the ignition off, the steering may lock » page 131 - danger of an
accident!■
Do not withdraw the ignition key from the ignition lock until the vehicle
has come to a stop » page 137, Parking . Otherwise, the steering could be
blocked – risk of accident!
■
Never leave the key in the vehicle when you exit the vehicle. Unauthor-
ized persons, such as children, for example, could lock the car, turn on the
ignition or start the engine - there is a danger of injury and accidents!
■
Never leave the vehicle unattended with the engine running - there is
risk of accident, damage or theft!
■
Never switch off the engine before the vehicle is stationary – risk of acci-
dent!
WARNING■ Never (e.g. in garages) run the engine in a closed place - there is the dan-
ger of poisoning and death!■
Do not leave any items (e.g. cloths or tools) in the engine compartment.
This presents a fire hazard and the risk of engine damage.
■
Never cover the engine with additional insulation material (e.g. with a
cover) – risk of fire!
CAUTION■ Only start the engine when the engine and the vehicle are stationary - there
is a danger of starter and engine damage!■
Do not push-start the engine – risk of damaging the engine and the catalytic
converter. The battery from another vehicle can be used as a jump-start
aid » page 206 .
Note
Do not warm up the engine while the vehicle is stationary. If possible, start
your journey as soon as the engine has started. Through this, the engine rea-
ches its operating temperature faster.
Electronic immobilizer
Read and observe
and on page 131 first.
The electronic immobilizer makes a possible attempted theft or unauthorized
use of your vehicle more difficult.
An electronic chip is integrated in the head of the key. The immobiliser is deac-
tivated with the aid of this chip when the key is inserted in the ignition lock.
The electronic immobiliser is automatically activated when the ignition key is
withdrawn from the lock.
The engine will not start if a non-authorized ignition key is used.
The following message is shown in the information cluster display. Immobilizer active.
IMMOBILIZER
Lock steering lock / unlock
Read and observe
and on page 131 first.
The steering lock (steering lock) deters any attempted theft of your vehicle.
Locking
›
Withdraw the ignition key.
›
Turn the steering wheel to the left or right until the steering lock clicks into
place.
Unlocking
›
Insert the key into the ignition lock.
›
Switch on the ignition » page 132.
131Starting-off and Driving
Page 135 of 248

The vehicle is unlocked.
If the ignition switch cannot be turned on, then turn the steering wheel back
and forth slightly and thereby unlock the steering lock.
Turn ignition on / off and start the engine
Fig. 125
Positions of the vehicle key in the ignition lock
Read and observe and on page 131 first.
Positions of the vehicle key in the ignition lock » Fig. 125
Ignition switched off, engine switched off
Ignition switched on
Starting engine
Switching ignition on/off
›
Turn key to position
2
.
The ignition is switched on.
›
Turn key to position
1
.
The ignition is switched off.
Starting the engine
›
Firmly apply the handbrake.
›
For vehicles with manual transmission , shift gear stick to neutral, depress
the clutch pedal and hold it there until the engine starts.
›
On vehicles with automatic transmission , place the selector lever in position
P or N and depress the brake pedal until the engine starts.
›
Turn the key into position
3
to the stop and release immediately after the
engine has been started – do not apply the accelerator.
After letting go, the vehicle key will return to position
2
.
On vehicles with diesel engines the glow plug warning light
goes on during
starting. The engine can be started after the indicator light goes out.
123If the engine does not start within 10 seconds, turn the key to position 1. Re-
peat the start-up process after approx. half a minute.
Vehicles with manual transmission
The engine will not start if the clutch pedal is not depressed.
The following message is shown in the information cluster display. Depress clutch to start!
CLUTCH
Vehicles with the START STOP system and automatic gearbox
The engine will not start if the brake pedal is not depressed.
The following message is shown in the information cluster display. Depress brake to start.
BRAKE
Note
■ The engine running noises may louder at first be louder for a short time after
starting the cold engine. This is quite normal and is not an operating problem.■
You should not switch on any major electrical components during the heat-
ing period otherwise the vehicle battery will be drained unnecessarily.
Stopping the engine
Read and observe
and on page 131 first.
›
Stop the vehicle » page 137, Parking .
›
Turn key to position
1
» Fig. 125 on page 132 .
The engine and the ignition are switched off simultaneously.
For vehicles with automatic transmission, the ignition key can only be removed
if the selector lever is in position P .
CAUTION
Do not switch the engine off immediately at the end of your journey after the
engine has been operated over a prolonged period at high loads but leave it to
run at an idling speed for about 1 minute. This prevents any possible accumula-
tion of heat when the engine is switched off.
Note
After switching off the ignition, the radiator fan may intermittently continue to
operate for approx. 10 minutes.132Driving
Page 136 of 248

This chapter contains information on the following subjects:")
Start or stop the engine by pressing button
Introduction
Fig. 126
Starter button (
)
This chapter contains information on the following subjects:
Lock / unlock the steering lock
133
Switch ignition on / off
134
Starting the engine
134
Switching off the engine
134
Problems starting the engine
135
The ignition can be switched on and off and the engine can be started / stop-
ped with the starter button » Fig. 126.
The key must be in the vehicle to unlock the steering wheel, start the vehicle
and drive.
WARNING■ Never leave the key in the vehicle when you exit the vehicle. Unauthor-
ized persons, such as children, for example, could lock the car, turn on the
ignition or start the engine - there is a danger of injury and accidents!■
Never leave the vehicle unattended with the engine running - there is a
risk of theft etc!
■
Never switch off the engine before the vehicle is stationary – risk of acci-
dent!
WARNINGNever (e.g. in garages) run the engine in a closed place - there is the danger
of poisoning and death!CAUTION■ The system can recognize the valid key, even if it has been accidentally left
on the vehicle roof - there is danger of loss or damage to the key!■
Only start the engine when the engine and the vehicle are stationary - there
is a danger of starter and engine damage!
■
Do not push-start the engine – risk of damaging the engine and the catalytic
converter. The battery from another vehicle can be used as a jump-start
aid » page 206 .
Note
■
Do not warm up the engine while the vehicle is stationary. If possible, start
your journey as soon as the engine has started. Through this, the engine rea-
ches its operating temperature faster.■
The system is protected against inadvertently switching off the engine while
driving, this means that the engine can only be switched off in an emergen-
cy » page 134 .
Lock / unlock the steering lock
Read and observe
and on page 133 first.
The steering lock (steering lock) deters any attempted theft of your vehicle.
Locking
›
Switch off the engine.
›
Open the driver door.
The steering lock is locked automatically.
If the driver's door is opened and the ignition is switched off afterwards, the
steering is only locked after the vehicle has been locked.
Unlocking
›
Open the driver's door and get into the vehicle.
›
Close the driver's door.
The steering is locked automatically.
Under certain circumstances (e.g. after switching off the ignition and opening
the driver's door), the steering is enabled only when the ignition is switched on
or the engine is started.
133Starting-off and Driving
 1
1 2
2 3
3 4
4 5
5 6
6 7
7 8
8 9
9 10
10 11
11 12
12 13
13 14
14 15
15 16
16 17
17 18
18 19
19 20
20 21
21 22
22 23
23 24
24 25
25 26
26 27
27 28
28 29
29 30
30 31
31 32
32 33
33 34
34 35
35 36
36 37
37 38
38 39
39 40
40 41
41 42
42 43
43 44
44 45
45 46
46 47
47 48
48 49
49 50
50 51
51 52
52 53
53 54
54 55
55 56
56 57
57 58
58 59
59 60
60 61
61 62
62 63
63 64
64 65
65 66
66 67
67 68
68 69
69 70
70 71
71 72
72 73
73 74
74 75
75 76
76 77
77 78
78 79
79 80
80 81
81 82
82 83
83 84
84 85
85 86
86 87
87 88
88 89
89 90
90 91
91 92
92 93
93 94
94 95
95 96
96 97
97 98
98 99
99 100
100 101
101 102
102 103
103 104
104 105
105 106
106 107
107 108
108 109
109 110
110 111
111 112
112 113
113 114
114 115
115 116
116 117
117 118
118 119
119 120
120 121
121 122
122 123
123 124
124 125
125 126
126 127
127 128
128 129
129 130
130 131
131 132
132 133
133 134
134 135
135 136
136 137
137 138
138 139
139 140
140 141
141 142
142 143
143 144
144 145
145 146
146 147
147 148
148 149
149 150
150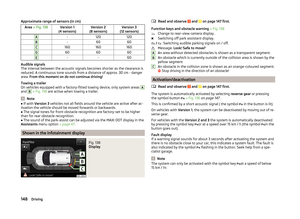 151
151 152
152 153
153 154
154 155
155 156
156 157
157 158
158 159
159 160
160 161
161 162
162 163
163 164
164 165
165 166
166 167
167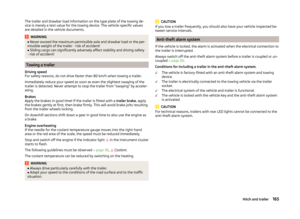 168
168 169
169 170
170 171
171 172
172 173
173 174
174 175
175 176
176 177
177 178
178 179
179 180
180 181
181 182
182 183
183 184
184 185
185 186
186 187
187 188
188 189
189 190
190 191
191 192
192 193
193 194
194 195
195 196
196 197
197 198
198 199
199 200
200 201
201 202
202 203
203 204
204 205
205 206
206 207
207 208
208 209
209 210
210 211
211 212
212 213
213 214
214 215
215 216
216 217
217 218
218 219
219 220
220 221
221 222
222 223
223 224
224 225
225 226
226 227
227 228
228 229
229 230
230 231
231 232
232 233
233 234
234 235
235 236
236 237
237 238
238 239
239 240
240 241
241 242
242 243
243 244
244 245
245 246
246 247
247