Page 81 of 248

Note■After a certain time, play can develop within the adjustment mechanism of
the backrest angle.■
For safety reasons, it is not possible to store the seat position in the electric
seat memory and remote control key memory if the inclination angle of the
seat backrest is more than 102° in relation to the seat cushion.
■
Each time you store the position of the electrically adjustable driver's seat
and exterior mirrors, the existing setting is deleted.
Manually adjusting seats
Fig. 59
Control elements at the seat
Read and observe on page 77 first.
Control elements at the seat » Fig. 59
Adjusting a seat in a forward/back direction
Adjusting height of seat
Adjusting the angle of the seat backrest
Adjusting lumbar support
Adjusting a seat in a forward/back direction
›
Pull the lever
A
» Fig. 59 in the direction of the arrow and push the seat in
the required direction.
The lock must click into place after you release the lever.
Adjusting height of seat
›
Again push or pull the lever
B
» Fig. 59 in the direction of one of the arrows.
Adjusting the angle of the seat backrest
›
The seat back release (do not lean on).
›
Push the lever
C
» Fig. 59 in the direction of one of the arrows.
ABCDAdjusting lumbar support›The lever D » Fig. 59 in direction of arrow.
Adjusting the front seats electronically
Fig. 60
Control elements at the seat
Read and observe
on page 77 first.
Control elements at the seat » Fig. 60
seat adjustment
Adjusting the angle of the seat backrest
Adjusting lumbar support
Adjusting a seat in a forward/back direction
›
Push the switch
A
in the direction of one of the arrows 1 » Fig. 60 .
Adjust the angle of the seat cushion
›
Push the switch
A
in the direction of one of the arrows 2 » Fig. 60 .
Set the height of the seat cushion
›
Push the switch
A
in the direction of one of the arrows 3 » Fig. 60 .
Adjusting the angle of the seat backrest
›
Push the switch
B
in the direction of one of the arrows 4 » Fig. 60 .
Raising or lowering the curvature of the lumbar support
›
Push the switch
C
in the region of one of the arrows 5 » Fig. 60 .
Reducing or increasing the curvature of the lumbar support
›
Push the switch
C
in the region of one of the arrows 6 » Fig. 60 .
The adjusted driver's seat position can be set in the memory of the
seat » page 79 or the remote control key » page 79.
ABC78Using the system
Page 82 of 248

NoteIf the setting procedure is interrupted, you will need to press the button again.
Memory Function of the electrically adjustable seat
Fig. 61
Memory buttons and SET button
Read and observe on page 77 first.
The memory function for the driver's seat provides the option to store the po-
sitions of the driver's seat and the external mirrors. Each of the three memory
buttons
B
» Fig. 61 can be assigned a set position.
Storing seat and exterior mirror settings for driving forward
›
Switch on the ignition.
›
Adjust the seat to the desired position.
›
Adjust both of the exterior mirrors » page 76.
›
Press the SET button
A
» Fig. 61
.
›
Within 10 seconds after pressing the SET button, press the desired memory
button
B
.
An acknowledgement sound confirms the storage.
Saving front passenger mirror settings when reversing
Above the MAXI DOT display in the menu item Mirror down The lowering func-
tion for the mirror on the passenger side when reversing must be ena-
bled » page 47 .
›
Switch on the ignition.
›
Press the required memory button
B
» Fig. 61 .
›
Adjust the rotary knob for the mirrors to the position
or in right-hand drive
to the position
» page 76 .
›
Engage reverse gear.
›
Adjust the front passenger's mirror to the desired position » page 76.
›
Disengage reverse gear.
The set position of the exterior mirror is stored.
Retrieving the saved setting
The retrieval is possible when turned the ignition is switched on and the vehi-
cle speed is less than 5 km/h or when the ignition key is inserted in the igni-
tion lock.›
Press and hold the desired memory button
B
» Fig. 61 for a short while.
Stopping the ongoing adjustment
›
Press any button on the driver's seat.
Or
›
Press the button on the remote control key.
Note
Each time you save the seat- and exterior mirror settings for forward travel
you also have to re-save the setting of the exterior mirror on the passenger
side for reversing.
Memory function of the remote control key
Read and observe
on page 77 first.
The automatic storage of the driver's seat and exterior mirror positions when
locking the vehicle can be turned on in the memory of the remote control key
(afterwards only as function of automatic storage).
Enable automatic storage
›
Unlock the vehicle with the remote control key.
›
Press and hold any memory button
B
» Fig. 61 on page 79 . After the seat
has assumed the position stored under this button, at the same time press
the button
on the remote control key within 10 seconds.
The successful activation of the automatic storage function for each key is
confirmed by an acoustic signal.
Storing seat and exterior mirror settings for driving forward
›
Enable automatic storage.
79Seats and head restraints
Page 83 of 248

When automatic storage is activated, the current positions of the driver's seat
and the external mirrors are saved in the memory of the remote control key
each time the vehicle is locked. When the vehicle is next unlocked using the
same key, the driver's seat and the external mirrors assume the positions stor-
ed in the memory of this key 1)
.
Saving front passenger mirror settings when reversing
Above the MAXI DOT display in the menu item Mirror down The lowering func-
tion for the mirror on the passenger side when reversing must be ena-
bled » page 47 .›
Unlock the vehicle with the remote control key.
›
Switch on the ignition.
›
Adjust the rotary knob for the mirrors to the position
or in right-hand drive
to the position
» page 76 .
›
Engage reverse gear.
›
Adjust the front passenger's mirror to the desired position » page 76.
›
Disengage reverse gear.
The adjusted position of the exterior mirror is stored in the remote control key
memory.
Disable the function of automatic storage
›
Unlock the vehicle with the remote control key.
›
Press and hold the SET button
A
» Fig. 61 on page 79 . At the same time,
press the button on the remote control key within 10 seconds.
The successful deactivation of the automatic storage function for each key is confirmed by an acoustic signal.
Stopping the ongoing adjustment
›
Press any button on the driver's seat.
Or
›
Press the button on the remote control key.
Front seat functions
Introduction
This chapter contains information on the following subjects:
Front seat heating
80
Front armrest
81
Folding front passenger seat
81
Front seat heating
Fig. 62
Buttons for heating the front
seats
The seat backrests and seats can be heated electrically.
The seat heating can only be switched on when the engine is running.
Buttons for the seat heater » Fig. 62
Left seat heating
Right seat heating
Switching on
›
Press the corresponding symbol button or
» Fig. 62 .
Pressing once switches the seat heating on at its maximum level.
With repeated pressing of the switch, the intensity of the heating is reduced
until it is switched off.
The level of the seat heating is indicated by the number of illuminated warning
lights in the switch.
1)
The vehicle must be locked and unlocked with the same key to save the seat and exterior mirror position
to the key.
80Using the system
Page 84 of 248
, we recommend you do not use seat")
WARNINGIf, as a passenger, you have a subdued pain and/or temperature sensitivity,
e.g. through medication, paralysis or because of chronic illness (e.g. diabe-
tes), we recommend you do not use seat heating on the driver's or front
passenger seat. This can lead to burns on the back, the posterior and the
legs which are difficult to heal. If the seat heating is used, we recommend
to make regular breaks in your journey when driving long distances, so that
the body can recuperate from the stress of the journey. Please consult your
doctor, who can evaluate your specific condition.
CAUTION
■ Do not kneel on the seats or otherwise apply concentrated pressure to them.■The seat heating in the following cases will not turn on - there is a risk of
damaging the seat covers and seat heating. ■The seats are not occupied by people.
■ Items are fastened or stored items on the seats, such as a child seat, a bag
and the like.
■ Additional seat covers or protective covers are fixed to the seats.■
Clean the seat covers » page 176.
Note
If the on-board voltage drops, the heater switches off automatically, in order
to provide sufficient electrical energy for the engine control » page 190, Auto-
matic load deactivation .
Front armrest
Fig. 63
Adjust armrest
The armrest is adjustable for height and length.
Setting the height›First of all, fold the armrest downwards and then lift it in the direction of the
arrow A
» Fig. 63 to one of the 4 rest positions.
Move
›
Move the cover into the desired position in the direction of the arrow
B
» Fig. 63 .
The armrest includes a storage compartment underneath » page 92.
Note
Push the armrest cover all the way back to the stop before applying the hand-
brake.
Folding front passenger seat
Fig. 64
Folding the front passenger seat
forward
The front passenger seat can be folded forward into a horizontal position.
Folding forward
›
Place the lever in position
1
» Fig. 64 .
›
Remove the cover in the direction of the arrow
2
.
The locking mechanism must audibly snap into place.
Folding backwards
›
Place the lever in position
1
» Fig. 64 .
›
Fold the seat backrest in the opposite direction of the arrow
2
.
The locking mechanism must audibly snap into place.
81Seats and head restraints
Page 85 of 248

WARNING■The front passenger airbag should be switched off when transporting ob-
jects on the seat which was folded forwards » page 22, Deactivating the
front passenger airbag .■
Adjust the seat backrest only when the vehicle is stationary.
■
When moving the seat backrest, make sure the seat backrest has been
properly secured – check by pulling on the seat backrest.
■
If the seat backrest is folded, passengers may only be transported on the
outer seat behind the driver.
■
When moving the seat backrest, keep limbs out of the area between the
seat and seat backrest – risk of injury!
■
Never transport the following items on the seat backrest when folded
forwards. ■ Objects that could restrict the driver's view.
■ Objects which make it impossible for the driver to control the vehicle,
e.g. if they roll under the pedals, or could protrude into the driver's zone.
■ Objects which could lead to injury to passengers due to a change of di-
rection or braking manoeuvre when accelerating sharply.
Head restraints
Introduction
This chapter contains information on the following subjects:
Adjusting, installing and removing the headrests.
82
Rear centre head restraints
83
The head restraints and the front seats must be adjusted to match the body
size at all times and the seat belt must always be fastened properly to provide
the most effective levels of protection to the passengers » page 9, Correct and
safe seated position .
Best protection is achieved if the top edge of the head rest is at the same level
as the upper part of your head.
WARNING■ With seats occupied, the respective head rests must be correctly set (may
not be in the bottom position) - risk of fatal injury!■
With seats occupied, the respective head rests must be installed and ad-
justed correctly - risk of fatal injury!
NoteThe position of the front and rear outer head restraints is adjustable in height.
The middle rear head restraint is only adjustable in two positions.
Adjusting, installing and removing the headrests.
Fig. 65
Head restraint: Move up / move down
Read and observe
on page 82 first.
Setting the height
›
Grasp the restraint and move upwards in the direction of
1
» Fig. 65 .
›
To move the restraint down, press the securing button
A
in the direction of
arrow
2
and hold while at the same time pressing the restraint in the direc-
tion of arrow
3
.
Removing/installing
›
Pull the head restraint out of the seat backrest as far as the stop.
›
Press the locking button
A
in the direction of the arrow
2
» Fig. 65 and pull
the head restraint out.
›
To re-insert the head restraint, push it far enough down into the seat back-
rest until the locking button clicks into place.
82Using the system
Page 86 of 248

Rear centre head restraintsFig. 66
Rear center head restraint: remove / Install
Read and observe
on page 82 first.
Applies to vehicles using the TOP TETHER system.
Removing/installing
›
Pull the head restraint out of the seat backrest as far as the stop.
›
Press the locking button
A
in the direction of arrow
1
» Fig. 66 , while at
the same time using a flat screwdriver with a max. width of 5 mm to press
the securing button in opening
B
in the direction of arrow
2
.
›
Remove the restraint in the direction of arrow
3
.
›
To re-insert the head restraint, push it far enough down in the direction of
arrow
4
into the seat backrest until the locking button clicks into place.
Rear seats
Introduction
This chapter contains information on the following subjects:
Setting theSetting the seats in the longitudinal direction
83
inclination of the seat backrest
83
Fold seat backrest forwards and fold down seat completely
84
Unlocking and removing seats
84
Setting outer seat in the transverse direction
85
Folding rear seats back into the initial position
85Setting theSetting the seats in the longitudinal directionFig. 67
Adjusting seats in forward/back
direction
›
Pull lever
A
in the direction of arrow
1
and move the seat to the desired po-
sition in the direction of arrow
2
» Fig. 67 .
inclination of the seat backrest
Fig. 68
Adjusting the seat backrest
›
Pull lever
A
on the lower portion in the direction of arrow
1
» Fig. 68 .
›
Adjust the desired inclination of the seat back in the direction of arrow
2.WARNINGCheck for yourself that the seat backrest is engaged by pulling on it.83Seats and head restraints
Page 87 of 248

Fold seat backrest forwards and fold down seat completelyFig. 69
Safety position of seat belt / folding the seat completely forward
Fig. 70
Lock forward folded seats
Folding the seat backrest forwards
›
Insert the seat belt buckle
A
» Fig. 69 in the hole in the side panel - security
position.
›
Remove the head restraint from the rear middle seat » page 83.
›
Push the outer rear seats towards the rear as far as they will go
» page 83,
Setting theSetting the seats in the longitudinal direction .
›
Pull the lever
A
» Fig. 68 on page 83 and fold the seat backrests of the out-
er rear seats onto the seat cushion as far as the stop.
›
Fold the middle rear seat backrest forwards in the same way, then pull once
more on the lever
A
» Fig. 68 on page 83 and press the seat backrest down-
wards until it is heard to lock into a lower position.
Folding seats fully forwards and locking them
›
If the outer rear seat is fully folded forward, push it towards the rear as far as
it can go.
›
Pull the lever
B
» Fig. 69 in the direction of the arrow
1
and push the seat
completely forward in the direction of arrow
2
.
› Secure the folded forward seat with the aid of the fixing belt B to a guide rod
of the head restraint in the front seat » Fig. 70.WARNING■
Immediately lock the folded forward seat to a guide rod on the front head
restraint using the fixing belt - risk of injury.■
The following guidelines must be observed » page 9, Correct seated posi-
tion for the driver .
CAUTION
■
Before folding the rear middle seat forward, make sure that the storage com-
partment, the ashtray and the cup holder in the rear part of the centre console
are closed - risk of damage.■
Only keep the seats in the folded forward position for as long as necessary to
transport cargo - there is a risk of damaging the front seat backrests. The
seats must be folded back once the cargo has been transported.
■
If the outer seat is not in the rear end position when folding forward, damage
can occur to the locking bolts when unlocking the seat.
Unlocking and removing seats
Fig. 71
Unlocking the folded forward
seat and carrying handles on the
seat surface
›
Fold the seat forward » page 84, Fold seat backrest forwards and fold down
seat completely .
›
Unlock the folded seat by pressing seat locks
A
in the direction of ar-
row » Fig. 71 .
›
Remove the seat using the carrying handles
B
or
C
.
WARNINGThe following guidelines must be observed » page 11, Correct seated posi-
tion for the passengers in the rear seats .84Using the system
Page 88 of 248

NoteThe outer seats are not mutually interchangeable. In the rear area the left seat
is marked with the letter L and the right seat with the letter R.
Setting outer seat in the transverse direction
Fig. 72
Locking seats
›
Remove the middle seat » page 84, Unlocking and removing seats .
›
Fold the outer seat forwards » page 84 and unlock » Fig. 71 on page 84 .
›
Move the folded forward and unlocked seat on the guide towards the middle
of the vehicle up to the stop.
›
Lock the folded forward seat by pressing the seat locks
A
in the direction of
arrow » Fig. 72 .
Folding back into the starting position is accomplished in the reverse order.
Folding rear seats back into the initial position
Fig. 73
Folding the seat backrest back
into position
›
If the seat has been removed, first position it on the guide and lock it in place
using seat locking
A
» Fig. 72 on page 85 .
›
Pull the seat upwards to ensure that the seat is locked correctly.
›
Fold the seat in the horizontal position until it can be heard to click.
›
Check for yourself that the seat can no longer be lifted by pulling it up.
›Press the lever in direction of arrow 1
» Fig. 73 and fold back the seat back-
rest to its original position in the direction of arrow 2.›
Check for yourself that the seat backrest is engaged by pulling on it.
›
Remove the tongue of the lock from the safety position.
WARNING■ The belt locks must be in their original position after folding back the seat
cushions and backrests - they must be ready to use.■
The seat backrests must be securely engaged so that objects from the
boot cannot slip into the passenger compartment on sudden braking – risk
of injury!
■
When folding the seat backrest always make sure that it has safely
locked into position, this is confirmed by the position and a visible marking
on the cover of the lever.
85Seats and head restraints
 1
1 2
2 3
3 4
4 5
5 6
6 7
7 8
8 9
9 10
10 11
11 12
12 13
13 14
14 15
15 16
16 17
17 18
18 19
19 20
20 21
21 22
22 23
23 24
24 25
25 26
26 27
27 28
28 29
29 30
30 31
31 32
32 33
33 34
34 35
35 36
36 37
37 38
38 39
39 40
40 41
41 42
42 43
43 44
44 45
45 46
46 47
47 48
48 49
49 50
50 51
51 52
52 53
53 54
54 55
55 56
56 57
57 58
58 59
59 60
60 61
61 62
62 63
63 64
64 65
65 66
66 67
67 68
68 69
69 70
70 71
71 72
72 73
73 74
74 75
75 76
76 77
77 78
78 79
79 80
80 81
81 82
82 83
83 84
84 85
85 86
86 87
87 88
88 89
89 90
90 91
91 92
92 93
93 94
94 95
95 96
96 97
97 98
98 99
99 100
100 101
101 102
102 103
103 104
104 105
105 106
106 107
107 108
108 109
109 110
110 111
111 112
112 113
113 114
114 115
115 116
116 117
117 118
118 119
119 120
120 121
121 122
122 123
123 124
124 125
125 126
126 127
127 128
128 129
129 130
130 131
131 132
132 133
133 134
134 135
135 136
136 137
137 138
138 139
139 140
140 141
141 142
142 143
143 144
144 145
145 146
146 147
147 148
148 149
149 150
150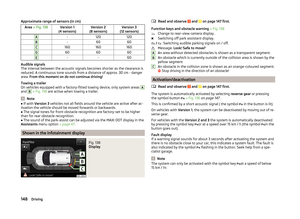 151
151 152
152 153
153 154
154 155
155 156
156 157
157 158
158 159
159 160
160 161
161 162
162 163
163 164
164 165
165 166
166 167
167 168
168 169
169 170
170 171
171 172
172 173
173 174
174 175
175 176
176 177
177 178
178 179
179 180
180 181
181 182
182 183
183 184
184 185
185 186
186 187
187 188
188 189
189 190
190 191
191 192
192 193
193 194
194 195
195 196
196 197
197 198
198 199
199 200
200 201
201 202
202 203
203 204
204 205
205 206
206 207
207 208
208 209
209 210
210 211
211 212
212 213
213 214
214 215
215 216
216 217
217 218
218 219
219 220
220 221
221 222
222 223
223 224
224 225
225 226
226 227
227 228
228 229
229 230
230 231
231 232
232 233
233 234
234 235
235 236
236 237
237 238
238 239
239 240
240 241
241 242
242 243
243 244
244 245
245 246
246 247
247