Page 97 of 248

CAUTIONThe storage compartment is designed for storing small objects of up to 1.5 kg.
in weight.
Clothes hook
Read and observe
on page 86 first.
The clothes hooks are located on the middle door pillars of the vehicle and onthe handle of the headliner above each of the rear doors.
WARNING■ Only hang light items of clothing on the hooks. Never leave any heavy or
sharp-edged objects in the pockets of the items of clothing.■
Do not use clothes hangers for hanging up items of clothing otherwise
this may reduce the effectiveness of head airbags.
■
Ensure that any clothes hanging from the hooks do not impair your vision
to the rear.
CAUTION
The maximum permissible load of the hooks is 2 kg.
Storage pockets on the front seats
Fig. 90
Map pockets
Read and observe on page 86 first.
The storage pockets » Fig. 90 are intended for the storage of maps, maga-
zines, etc.
WARNINGNever put heavy items in the map pockets – risk of injury!CAUTIONNever put large objects into the map pockets, e.g. bottles or objects with sharp
edges - risk of damaging the pockets and seat coverings.
Storage compartment in the rear centre console
Fig. 91
Opening the storage compart-
ment
Read and observe on page 86 first.
Open/close
›
Pull the top edge and open the compartment in the arrow direction » Fig. 91.
Closing takes place in reverse order.
WARNINGThe storage compartment is not a substitute for the ashtray and must also
not be used for such purposes – risk of fire!
CAUTION
Before folding forward, the rear center seat storage compartment must be
closed - there is a risk of damage to the storage compartment.94Using the system
Page 98 of 248

Folding table on front seat backrestFig. 92
Fold down the folding table
Read and observe on page 86 first.
Folding up/folding down
›
Fold the table into the horizontal position by pulling in the direction of ar-
row » Fig. 92 .
›
Pushing against the direction of the arrow folds the table back into the verti-
cal position.
WARNING■ The folding table must not be in the horizontal position while driving -
risk of injury.■
Do not put any hot drinks in the cup holder in the folding table - risk of
scalding!
■
Do not use any vessels made of brittle materials (e.g. glass, porcelain) -
risk of injury.
CAUTION
The folding table on the seat backrest of the front passenger seats is designed
to hold smaller objects up to a maximum total weight of 10 kg.folding table at the centre backrestFig. 93
Middle seat backrest already fol-
ded forward
Read and observe on page 86 first.
The centre seat back can be used after folding forwards » page 84, Fold seat
backrest forwards and fold down seat completely as an armrest or ta-
ble » Fig. 93 with cup holders by folding it forwards » Fig. 78 on page 88 .
CAUTION
If the middle rear seat backrest should be folded forward for lengthy periods,
then make sure that the belt locks are not located below it - this can warp the
upholstery or fabric.
Removable through-loading bag
Fig. 94
Securing the removable through-
loading bag
Read and observe on page 86 first.
The removable through-loading bag (hereinafter referred to only as a through- loading bag) is used exclusively for transporting skis.
Stowing through-loading bag and skis
›
Open a rear side door of the vehicle.
›
Fold the middle seat backrest forward » page 83, Rear seats .
95Transporting and practical equipment
Page 99 of 248

›Place the empty through-loading bag in the gap between the front and rear
seats in such a way that the end of the bag with the zip lies in the boot.›
Open the tailgate.
›
Push the skis into the through-loading bag from the boot » .
›
Close the through-loading bag.
Securing through-loading bag and skis
›
Pull the securing belt with both lock tongues out of the pocket of the
through-loading bag.
›
Insert the lock tongues
A
» Fig. 94 in the belt locks of the rear middle seat
belt
C
, first on the one side and then on the other side.
›
Place the securing belt in the middle of the skis between the heel and the tip
of the bindings and pull the securing belt tight at the free end of the belt
B
.
WARNING■ After placing the skis into the through-loading bag, you must secure the
through-loading bag with the securing belt.■
The securing belt must hold the skis tight.
■
Ensure that the securing belt for skis grasps the middle between the tip
and the heel element of the binding (see also marking on the through-load-
ing bag).
■
The total weight of the skis which are transported must not exceed 10 kg.
CAUTION
■ Never fold and stow the through-loading bag wet - risk of damaging the
through-loading bag.■
The through-loading bag is designed to hold max. two pairs of skis.
■
Place the skis and sticks in the through-loading bag with the tips facing to
the rear.
Luggage compartment
Introduction
This chapter contains information on the following subjects:
Fastening elements
97
Fixing nets
97
Foldable hook
98
Fastening bar with sliding hook
98
Flexible storage compartment
98
Floor covering on both sides
99Luggage compartment cover99Net partition100
Storage compartments
100
Removable storage box
101
Removable light
101
Class N1 vehicles
102
Please observe the following for the purpose of maintaining good handling
characteristics of your vehicle:
›
Distribute loads as evenly as possible.
›
Place heavy objects as far forward as possible.
›
Attach the items of luggage to the lashing eyes or by using the fixing
nets » page 97 .
In the event of an accident, even small and light objects gain so much kinetic
energy that they can cause severe injuries.
The magnitude of the kinetic energy is dependent on the speed at which the
vehicle is travelling and the weight of the object.
Example: In the event of a frontal collision at a speed of 50 km/h, an object
with a weight of 4.5 kg produces an energy, which corresponds to 20 times its
own weight. This means that it results in a weight of approx. 90 kg “ ”.
WARNING■ Always store transported objects in the boot and attach them to the lash-
ing eyes.■
Loose objects can be thrown forward during a sudden manoeuvre or in
case of an accident and can injure the occupants or other road users.
■
Loose objects could hit a deployed airbag and injure occupants – danger
of death!
■
Please note that transporting heavy objects alters the handling proper-
ties of the vehicle due to the displacement of the centre of gravity – risk of
accident! The speed and style of driving must be adjusted accordingly.
■
If the items of luggage or objects are attached to the lashing eyes with
unsuitable or damaged lashing straps, injuries can occur in the event of
braking manoeuvres or accidents. To prevent items of luggage from moving
around, always use suitable lashing straps which must be firmly attached
to the lashing eyes.
96Using the system
Page 100 of 248
■The transported items must be stowed in such a way that no objects are
able to slip forward on sudden driving or braking manoeuvres – risk of in-
jury!■
When transporting obj")
WARNING (Continued)■The transported items must be stowed in such a way that no objects are
able to slip forward on sudden driving or braking manoeuvres – risk of in-
jury!■
When transporting objects in the luggage compartment that has been en-
larged by folding the rear seats forward, ensure the safety of the passen-
gers transported on the other rear seats » page 11, Correct seated position
for the passengers in the rear seats .
■
If the rear seat next to the folded forward seat is occupied, ensure maxi-
mum safety, e.g. by placing the goods to be transported in such a way that
the seat is prevented from folding back in case of a rear collision.
■
Do not drive with the luggage compartment lid fully opened or slightly
ajar otherwise exhaust gases may get into the interior of the vehicle – risk
of poisoning!
■
Do not exceed the permissible axle loads and permissible gross weight of
the vehicle – risk of accident!
■
Do not transport people in the boot!
CAUTION
■ Please ensure that the heating elements for the rear window heater are not
damaged as a result of abrasive objects.■
Tyre pressure must be adjusted to the load » page 191.
Fastening elements
Fig. 95
Fasteners: Version 1/version 2
Read and observe and on page 96 first.
Overview of the fasteners » Fig. 95
Lashing eyes for fastening items of luggage and fixing nets
Fastening elements only for fastening fixing nets
Mounting bar with integrated hooks only for fixing mounting networks.
CAUTION
The maximum permissible static load of the individual lashing eyes A is 3.5 kN
(350 kg).
Fixing nets
Fig. 96
Fastening examples for nets
Read and observe
and on page 96 first.
Fastening examples for nets » Fig. 96
Horizontal pocket
Floor net
Vertical pocket
WARNINGDo not exceed the maximum permissible load of the fixing nets. Heavy ob-
jects are not secured sufficiently – risk of injury!
CAUTION
■ The maximum permissible load of the fixing nets is 1.5 kg.■Do not place any sharp objects in the nets – risk of net damage.ABCABC97Transporting and practical equipment
Page 101 of 248

Foldable hookFig. 97
Fold down hooks
Read and observe and on page 96 first.
Foldable hooks for attaching small items of luggage, such as bags etc., are pro-
vided for each on both sides of the luggage compartment.
›
Press on the lower portion of the hook
A
and then fold it in direction of the
arrow » Fig. 97 .
CAUTION
The maximum permissible load of the hook is 7.5 kg.
Fastening bar with sliding hook
Fig. 98
Sliding hook on the mounting bar / removing hook
Read and observe
and on page 96 first.
A fastening bar is located on both sides of the luggage compartment with two moveable hooks each, in order to attach small items of luggage, such as bags,
etc. .
Moving the hook›Fold up the hook in direction of arrow 1 » Fig. 98 until an angle of approx.
45° is reached.›
Move the hook in the direction of the arrow
2
into the desired position and
fold down the hook as far as the stop in direction of arrow
3
.
Removing the hook
The hook can be removed only in the rear region of the attachment bar.
›
Fold the hook in the direction of the arrow
4
» Fig. 98 until it slackens.
›
Remove the hook in the direction of the arrow
5
.
Installing the hook
›
Position the hook on the fastening strip in a vertical position in direction of
arrow
5
» Fig. 98 and lightly press it on.
›
Fold the hook down in the opposite direction of the arrow
4
until it locks
fully.
CAUTION
The maximum permissible load of each hook is 7.5 kg.
Flexible storage compartment
Fig. 99
Flexible storage compartment
Read and observe and on page 96 first.
The flexible storage compartment can be installed on the right-hand side of the boot » Fig. 99.
Fitting
›
Place both ends of the storage compartment into the openings on the right
side panel of the luggage compartment.
›
Push the storage compartment down to lock it.
98Using the system
Page 102 of 248

Removing›Grasp the storage compartment on the two upper corners.›
Press the upper corners inwards and release the storage compartment by
pulling upwards.
›
Remove the storage compartment by pulling towards you.
CAUTION
The storage compartment is designed for storing small objects with a maxi-
mum total weight of 8 kg.
Note
The flexible storage compartment cannot be installed on vehicles with the var-
iable loading floor » page 102.
Floor covering on both sides
Read and observe
and on page 96 first.
You can fit a double-sided floor covering in the luggage compartment.
One side of the double-sided floor covering is made of fabric, the other side is
washable (easy to maintain).
The washable side is used to transport wet or dirty items.
Note
For easier turning of the covering, use the loop attached.
Luggage compartment cover
Fig. 100
Secure luggage compartment cover
Read and observe and on page 96 first.
The boot cover can be removed if you want to transport bulky goods.
Removing
›
Fold the seat backrests a little forward to make it easier to remove the lug-
gage compartment cover » page 83, inclination of the seat backrest .
›
Unhook the support straps
A
» Fig. 100 from the luggage compartment.
›
Place the cover in the horizontal position.
›
Pull the luggage compartment cover to the rear from the bolts
C
or pat on
the bottom of the cover in the area of the
C
bolts.
›
Fold the slackened front part of the boot cover over the head restraints of
the rear seats.
›
Slightly tilt the boot cover and remove it to the rear.
Fitting
›
Place the cover on the contact surfaces of the side trim panel.
›
Position the mounts on the cover
B
» Fig. 100 onto the side trim panel via
bolts
C
.
›
Interlock the cover by lightly knocking on the top side of the cover in the
area between the bolts.
›
Hook the support straps
A
onto the tailgate.
WARNINGDo not place objects on the boot cover, the vehicle occupants could be en-
dangered if there is sudden braking or a vehicle collision.
CAUTION
After removing the luggage compartment cover, store it in such a way that it
cannot be damaged or soiled.
Note
If the support straps A » Fig. 100 are attached to the boot, then the boot cov-
er will rise as well when the luggage compartment is opened.99Transporting and practical equipment
Page 103 of 248

Net partitionFig. 101
Using the net partition behind the rear seats
Read and observe
and on page 96 first.
The net partition can either be installed behind the rear seats or behind the front seats.
Install behind the rear seats
›
Remove the boot cover » page 99, Luggage compartment cover .
›
Remove the net partition from the bag.
›
Unfold both parts of the cross rod until they are heard to engage.
›
First insert the rod into the mount
B
» Fig. 101 on one side and push it for-
wards. In the same way, insert the cross rod into the mount
B
on the other
side of the vehicle.
›
Hang the carabines
C
at the ends of the strap into the lashing eyes behind
the rear seats.
›
Pull the belts through the tensioning clasp.
Remove from behind the rear seats
›
Undo the belts on both sides and unhook the carabiners
C
» Fig. 101 .
›
Push the cross rod first of all on the one side and then on the other side to-
wards the rear.
›
Remove the cross rod from the mounts
B
.
Merge
›
Press the red button on hinge
A
» Fig. 101 - the hinge breaks.
›
Put the net partition folded together in the bag and close it.
›Attach the bag with the aid of the plastic carabines to the eyes on the left
and right boot trim panel.
Installing and removing the net partition behind the rear seats with variable
loading floor is carried out in the same way as behind the rear seats without
variable loading floor. Use the lower fixing eyes on the carrier rails in order to
attach the carabines.
Installing and removing the net partition behind the rear seats is carried out
in the same way as behind the rear seats. Use the lower fixing eyes on the car-
rier rails in order to attach the carabines. To enlarge the boot, the rear seats
can be removed » page 84.
The opening D
» Fig. 101 in the net partition is designed to pass the three-
point seat belt » page 15 through.
Storage compartments
Fig. 102
Storage compartment on the left / right
Read and observe
and on page 96 first.
The cover for the storage compartment
A
» Fig. 102 can be removed, thus en-
larging the boot.
›
Grasp the top part of the cover
A
and carefully remove it in the direction of
the arrow.
CAUTION
■ The removable storage compartment A » Fig. 102 on the left side is suitable
for stowing small objects weighing up to 1.5 kg.■
The storage compartment
B
is designed for storing small objects of up to
0.5 kg. in weight in total.
100Using the system
Page 104 of 248

Removable storage boxFig. 103
Storage box
Read and observe and on page 96 first.
The storage box » Fig. 103 is placed under the variable loading floor and can be
taken out.
There is a storage space for the vehicle tool kit under the storage
box » page 198 , Vehicle tool kit .
WARNINGThe removable storage box must be located under the variable loading
floor for the safe use of the variable loading floor.
Removable light
Fig. 104
Light operation / removal
Read and observe
and on page 96 first.
The removable light is located on the right side of the luggage compartment. If the light is in the holder, then part
B
» Fig. 104 is lit.
If the light is outside the holder, then the part A is lit.
The lamp is fitted with magnets. Therefore it is possible to attach the lamp, for
example on the vehicle body, after removing it.
Remove the light from the holder›
Grasp the lamp in the areas of the arrow
D
» Fig. 104 and swivel it in the
direction of the arrow
1
.
Use of removed light
›
If you press button
C
» Fig. 104 , the lamp lights up with 100 % light intensi-
ty.
›
If you press button
C
again, the lamp lights up with 50 % light intensity.
›
Press
C
button once again - the light goes out.
Reinserting the lamp the holder
›
Switch off the ignition » .
›
First of all, place the deactivated light in the holder on the side facing the
boot lid and then press on the light from the other side until it is clicks into
place.
The lamp is supplied by three rechargeable type AAA batteries. The rechargea-
ble batteries are constantly charged when the engine is running. It takes ap-
prox. 3 hours to fully charge the rechargeable batteries.
Replace batteries » page 211.
Luggage compartment light
If the light is in the holder, it is automatically switched on when the boot lid is
opened.
If the lamp is in the holder, it is automatically switched off when the boot lid is
closed.
CAUTION
■ If the lamp is not switched off and it is correctly inserted in the holder, the
bulbs in the front part A » Fig. 104 of the lamp are automatically switched off.■
If the lamp is not correctly inserted into the holder, it does not light up when
the boot lid is opened and the rechargeable batteries are not charged.
■
The removable lamp is not watertight and must therefore be protected
against moisture.
101Transporting and practical equipment
 1
1 2
2 3
3 4
4 5
5 6
6 7
7 8
8 9
9 10
10 11
11 12
12 13
13 14
14 15
15 16
16 17
17 18
18 19
19 20
20 21
21 22
22 23
23 24
24 25
25 26
26 27
27 28
28 29
29 30
30 31
31 32
32 33
33 34
34 35
35 36
36 37
37 38
38 39
39 40
40 41
41 42
42 43
43 44
44 45
45 46
46 47
47 48
48 49
49 50
50 51
51 52
52 53
53 54
54 55
55 56
56 57
57 58
58 59
59 60
60 61
61 62
62 63
63 64
64 65
65 66
66 67
67 68
68 69
69 70
70 71
71 72
72 73
73 74
74 75
75 76
76 77
77 78
78 79
79 80
80 81
81 82
82 83
83 84
84 85
85 86
86 87
87 88
88 89
89 90
90 91
91 92
92 93
93 94
94 95
95 96
96 97
97 98
98 99
99 100
100 101
101 102
102 103
103 104
104 105
105 106
106 107
107 108
108 109
109 110
110 111
111 112
112 113
113 114
114 115
115 116
116 117
117 118
118 119
119 120
120 121
121 122
122 123
123 124
124 125
125 126
126 127
127 128
128 129
129 130
130 131
131 132
132 133
133 134
134 135
135 136
136 137
137 138
138 139
139 140
140 141
141 142
142 143
143 144
144 145
145 146
146 147
147 148
148 149
149 150
150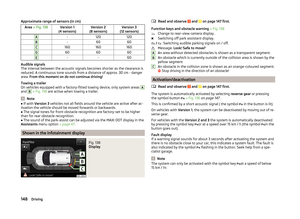 151
151 152
152 153
153 154
154 155
155 156
156 157
157 158
158 159
159 160
160 161
161 162
162 163
163 164
164 165
165 166
166 167
167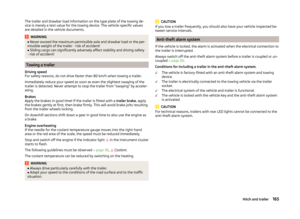 168
168 169
169 170
170 171
171 172
172 173
173 174
174 175
175 176
176 177
177 178
178 179
179 180
180 181
181 182
182 183
183 184
184 185
185 186
186 187
187 188
188 189
189 190
190 191
191 192
192 193
193 194
194 195
195 196
196 197
197 198
198 199
199 200
200 201
201 202
202 203
203 204
204 205
205 206
206 207
207 208
208 209
209 210
210 211
211 212
212 213
213 214
214 215
215 216
216 217
217 218
218 219
219 220
220 221
221 222
222 223
223 224
224 225
225 226
226 227
227 228
228 229
229 230
230 231
231 232
232 233
233 234
234 235
235 236
236 237
237 238
238 239
239 240
240 241
241 242
242 243
243 244
244 245
245 246
246 247
247