Page 73 of 216

Interior mirrorFig. 52
Interior mirror: manual dimming/auto-dimming/light sensor
Read and observe
on page 69 first.
Mirror with manual dimming » Fig. 52
Basic position of the mirror
Mirror dimming
Mirror with automatic dimming » Fig. 52
Light sensor
Light sensor on the back of the mirror
Mirror with automatic dimming
When the engine is switched off the mirror dims automatically depending on
the light falling on the sensors.
When the interior lights are switched on or the reverse gear is engaged, the
mirror always moves back into the basic position (not dimmed).
Do not attach external navigation devices on to the windscreen or in the vicini-
ty of the automatic dimming interior mirror »
.
WARNINGThe illuminated display of an external navigation unit can lead to opera-
tional faults to the automatic dimming interior mirror – risk of accident.12ABWARNINGThe mirrors with automatic dimming contain an electrolyte liquid which can
escape if mirror glass is broken.■
The leaking electrolytic fluid can irritate the skin, eyes and respiratory
system. Immediately seek out fresh air and leave the vehicle. If this is not
possible, at least open the window.
■
If you swallow electrolytic fluid, seek medical assistance immediately.
■
If your eyes or skin come into contact with the electrolytic fluid, immedi-
ately wash the affected area for several minutes plenty of water. Then con-
sult a doctor immediately.
CAUTION
Automatic mirror dimming operates only properly if the light striking the sen-
sors is not affected by other objects.
Exterior mirrors
Fig. 53
Exterior mirror operation: mechanical / electrical
Read and observe
on page 69 first.
Adjust the position
The mirror can be adjusted to the desired position by moving the knob in the
direction of the arrow » Fig. 53.
The movement of the mirror surface follows the movement of the rotary knob.
Electrically-adjustable mirrors
The knob can be moved into the following positions » Fig. 53 - .
Adjust the left mirror
Adjust the right mirror
70Operation
Page 74 of 216

Switch off mirror control
Mirror heater
Folding in the exterior mirrors
The whole exterior mirror can be manually folded towards the side windows.
To restore it to its original position, fold back from the side window until it au-
dibly clicks into place.WARNINGDo not touch the exterior mirror surfaces if the exterior mirror heater is
switched on - risk of burns.
Note
■ The mirror heater only operates when the engine is running and up to an
outside temperature of +35 ℃.■
If the electrical mirror setting fails at any time, the mirrors can be adjusted by
hand by pressing on the edge of the mirror surface.
Seats and headrests
Seats and headrests
Introduction
This chapter contains information on the following subjects:
Adjusting the front seats
72
Headrests - adjusting height
72
Headrests - removing and installing
73
The driver's seat should be adjusted in such a way that the pedals can be fully
pressed to the floor with slightly bent legs.
The seat backrest on the driver's seat should be adjusted in such a way that the upper point of the steering wheel can be easily reached with slightly bent
arms.
Correct adjustment of the seats is particularly important for the following rea-
sons.
› Reaching the controls safely and quickly.
› A relaxed and fatigue-free body position.
› Achieving the maximum protection offered by the seat belts and the airbag
system.
WARNING■ Only adjust the driver's seat when the vehicle is stationary – risk of acci-
dent.■
Caution when adjusting the seat! You may suffer crushing injuries as a re-
sult of adjusting the seat without paying proper attention.
■
Never carry more people than the number of seats in the vehicle.
■
Do not transport any objects on the front passenger seat other than ob-
jects intended for this purpose (e.g. child safety seat) – risk of accident.
Note
After a certain time, play can develop within the adjustment mechanism for
the backrest angle.71Seats and headrests
Page 75 of 216

Adjusting the front seatsFig. 54
Control elements on the seat
Read and observe on page 71 first.
Control elements on the seat » Fig. 54
Adjusting a seat fore and aft
Adjusting height of seat
Adjusting the angle of the seat backrest
Adjusting a seat fore and aft
›
Pull the lever
A
» Fig. 54 in the direction of the arrow and push the seat in
the required direction.
The lock must click into place after you release the lever.
Adjusting height of seat
›
Again push or pull the lever
B
» Fig. 54 in the direction of one of the arrows.
Adjusting the angle of the seat backrest
›
Release the seat back (do not lean on).
›
Turn the dial
C
» Fig. 54 in the direction of one of the arrows.
ABCHeadrests - adjusting heightFig. 55
Head rests: move up / move down
Read and observe
on page 71 first.
Adjustment of the head rest heights is the same in the front and rear.
Best protection is achieved if the top edge of the head rest is at the same level
as the upper part of your head.
Shift upwards
›
Push the headrest in the direction of arrow
1
» Fig. 55 .
Move down
›
Press the locking button
A
in the direction of the arrow
2
and hold
» Fig. 55 .
›
Push the headrest in the direction of arrow
3
.
WARNINGWith seats occupied, the respective head rests must be correctly set (may
not be in the bottom position) - there is a risk of fatal injury!
Note
■ The middle rear headrest is only adjustable in two positions.■For the sports seats, the headrests are integrated into the front seat backr-
ests. This headrest cannot be adjusted in height.72Operation
Page 76 of 216

Headrests - removing and installingFig. 56
Headrests: removing/installing
Read and observe
on page 71 first.
The removal and installation of headrests is the same in the front and rear.
Before removal and installation of the headrests, fold the respective seat
backrest forward slightly.
›
Pull the headrest out of the seat backrest as far as the stop.
›
Press the locking button
A
in the direction of arrow
1,
and pull out the
headrest in the direction of arrow
2
» Fig. 56 .
›
To re-insert the headrest, push it far enough down in the direction of arrow
3
into the seat backrest until the locking button clicks into place.
WARNINGWith seats occupied, the respective head rests must be installed and adjus-
ted correctly - there is a risk of fatal injury!
Note
For the sports seats, the headrests are integrated into the front seat backr-
ests. These headrests cannot be removed.
Seat features
Introduction
This chapter contains information on the following subjects:
Front seat heater
73
Armrest
74Seat backrests74Rear seat75
Front seat heater
Fig. 57
Buttons for front seat heater
The seat backrests and seats can be heated electrically.
The heat output can be adjusted with the ignition on.
The heater is turned on after the engine has started.
Buttons for the seat heater » Fig. 57
Left seat heater
Right seat heater
Switching on
›
Press the corresponding symbol button or
» Fig. 57 .
Pressing once switches the seat heater on at its maximum level - Level 2.
Press repeatedly to reduce the intensity of the heater until it is switched off.
The level of the seat heater is indicated by the number of illuminated warning
lights in the switch.
WARNINGIf you or a passenger suffer from limited perception of pain and/or temper-
ature, e.g. through medication, injury or chronic illness (e.g. diabetes), we
recommend you do not use seat heater on the driver or front passenger
seat. This can lead to burns on the back, the posterior and the legs which
are difficult to heal. If the seat heater is used, we recommend to make reg-
ular breaks in your journey when driving long distances, so that the body
can recuperate from the stress of the journey. Please consult your doctor,
who can evaluate your specific condition. 73Seats and headrests
Page 77 of 216

CAUTION■Do not kneel on the seats or otherwise apply concentrated pressure to them.■The seat heater in the following cases will not turn on - there is a risk of
damaging the seat covers and seat heater. ■The seats are not occupied.
■ Items are fastened to or stored on the seats e.g. child seat, bags etc.
■ Additional seat covers or protective covers are fixed to the seats.■
Clean the seat covers » page 147.
Note
■
If the heaters for the rear seats are set to their highest intensity - level 2,
they are automatically switched down to level 1 after 15 minutes.■
If the on-board voltage drops, the heater switches off automatically in order
to provide sufficient electrical power for the engine control » page 160, Auto-
matic load deactivation .
Armrest
Fig. 58
Adjusting armrest
Setting the height
›
Lift the armrest fully upwards in the direction of the arrow » Fig. 58 and then
move it back down completely.
›
Move the armrest into one of the 5 locking positions.
The armrest includes a storage compartment » page 81.
Seat backrestsFig. 59
Fold seat backrest forwards / standby position of the seat belt
The luggage compartment can be increased in size by folding the seat backr-
ests forward. The seat backrests can also be folded forward individually on ve-
hicles with divided rear seats.
Before folding the seat backrests forwards, adjust the position of the front
seats in such a way that they are not damaged by the folded seat backrests.
Folding the seat backrest forwards
›
Push the head rest into the seat backrest until it clicks into position.
›
Pull the outer seat belt to the side panel in the direction of arrow
1
» Fig. 59 .
›
Press the release lever
A
in the direction of arrow
2
.
›
Fold the backrest in the direction of the arrow
3
.
In the undivided seat back, press the release handles on both sides of the seat
back at the same time.
Folding the seat backrest back into position
›
Pull the outer seat belt to the side panel in the direction of arrow
1
» Fig. 59 .
›
Then push the seat backrest back into the upright position until the securing
knob
A
clicks into place – check by pulling on the seat backrest » .
›
Make sure that the red pin
B
is hidden.
In the undivided seat back, pull the two outer belts to the side panel. The re-
lease handles
A
must be locked audibly on both sides of the seat backrest.
The red pen
B
should not be visible on any of the two sides of the seat back.
74Operation
Page 78 of 216

WARNING■The seat belts and the belt locks must be in their original position after
folding back the seat backrests – they must be ready to use.■
The seat backrests must be securely latched in position so that no ob-
jects from the luggage compartment can slip into the passenger compart-
ment under sudden braking – risk of injury.
■
In occupied rear seats make sure that the respective seat backrests are
properly engaged.
CAUTION
Ensure that the seat belts are not damaged when operating the seat backr-
ests. Under no circumstances must the seat belts be jammed by the folded
back seat backrests.
Note
The buckle latch of the outer seat belts C » Fig. 59 can be inserted into the
side panel.
Rear seat
Fig. 60
Fold rear seat forward / remove split rear bench seat
Fig. 61
Fold the rear seat back
The luggage space can be increased by folding the rear seat forward and re-
moving it.
For vehicles with split rear seats, the parts of the rear seat can be folded for-
ward individually and removed.
Folding forward
›
Fold the rear seat in the direction of arrow
1
» Fig. 60 .
›
Fold the rear seat in the direction of arrow
2
.
Removing
›
Fold the rear seat forward.
›
Press the wire clips in the direction of arrow
3
» Fig. 60 , so that they be-
come detached from the holders.
›
Remove the rear seat.
Inserting
›
Insert the wire clips in the direction of arrow
3
» Fig. 60 and insert into the
brackets.
Folding backwards
›
Fold the backrest in the direction of the arrow
4
» Fig. 61 .
›
Place the rear seat on the eyelets
A
, so that the eyelets
A
engage in the
recesses in the plastic caps for
B
» .
WARNINGThe rear seat must not be pulled in under the eyelets A when folding for-
wards - this would mean the rear seat could not be secured correctly.
CAUTION
The rear seat must not be pulled in under the eyelets A when being folded
back - there is a risk of damaging the rear seat.75Seats and headrests
Page 79 of 216

Transporting and practical equipment
Useful equipment
Introduction
This chapter contains information on the following subjects:
Car park ticket holder
76
Storage compartments in the doors
77
Storage compartment on the side of front seat
77
Storage compartment in the front centre console
77
Coin and credit card holder
77
Storage compartment on the dash panel
78
Cup holders
78
Cigarette lighter
78
Ashtray
79
12-volt power outlet
79
Waste container
80
Multimedia holder
80
Storage compartment in the front arm rest
81
Glasses compartment
81
storage compartment on the front passenger side
82
Storage compartment under the front seat
82
Clothes hook
82
Storage pockets on the front seats
83
Net pockets on the front seat rest
83
Storage compartment in the rear centre console
84WARNING■ Do not place anything on the dash panel. These objects might slide or fall
down while you are driving (under acceleration or when cornering) and
could distract you from the traffic - risk of accident.■
Make sure that no objects from the centre console or from other storage
compartments can get into the driver's footwell while you are driving. You
would not be able to brake, operate the clutch pedal or accelerate - danger
of causing an accident!
WARNING (Continued)■ No objects should be placed in the storage compartments nor in the
drinks holders; the vehicle occupants could be endangered if there is sud-
den braking or the vehicle collides with something.■
Ash, cigarettes, cigars and the like. may only be placed in the ashtray!
Car park ticket holder
Fig. 62
Parking permit holder
Read and observe on page 76 first.
The parking permit holder » Fig. 62 is designed e.g. for attaching car parking
permit.
WARNINGAlways remove permit/ticket before starting off in order not to restrict the
driver's vision.76Operation
Page 80 of 216

Storage compartments in the doorsFig. 63
Storage compartment: in the front door/in the rear door
Read and observe
on page 76 first.
Storage compartments » Fig. 63
Storage compartment in the front doors
Bottle holder with a capacity of max. 1.5 liters in the front doors
Storage compartment in the rear doors
Bottle compartment, max. capacity 0.5 l in the rear doors
The reflective vest can be stowed in the storage compartments in the
door » page 167 .
WARNINGDo not use the storage compartment A » Fig. 63 of the door pocket to
store protruding objects. Otherwise, this could impair the effectiveness of
the side airbag.
Storage compartment on the side of front seat
Fig. 64
Storage compartment
ABCDRead and observe on page 76 first.
The storage compartment
A
» Fig. 64 is located on the side of the front seat.
Storage compartment in the front centre console
Fig. 65
Storage compartment
Read and observe on page 76 first.
The open storage compartment is in the front of the centre console » Fig. 65.
Coin and credit card holder
Fig. 66
Coin and credit card holder
Read and observe on page 76 first.
Holder in the front center console » Fig. 66
For coins
For credit cards and other cards
AB77Transporting and practical equipment
 1
1 2
2 3
3 4
4 5
5 6
6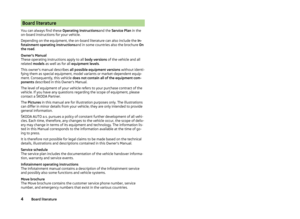 7
7 8
8 9
9 10
10 11
11 12
12 13
13 14
14 15
15 16
16 17
17 18
18 19
19 20
20 21
21 22
22 23
23 24
24 25
25 26
26 27
27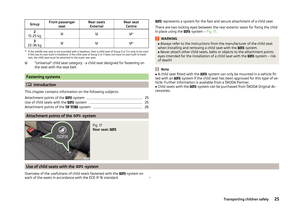 28
28 29
29 30
30 31
31 32
32 33
33 34
34 35
35 36
36 37
37 38
38 39
39 40
40 41
41 42
42 43
43 44
44 45
45 46
46 47
47 48
48 49
49 50
50 51
51 52
52 53
53 54
54 55
55 56
56 57
57 58
58 59
59 60
60 61
61 62
62 63
63 64
64 65
65 66
66 67
67 68
68 69
69 70
70 71
71 72
72 73
73 74
74 75
75 76
76 77
77 78
78 79
79 80
80 81
81 82
82 83
83 84
84 85
85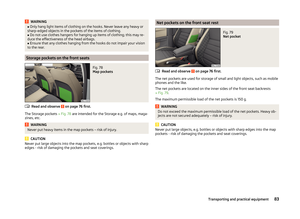 86
86 87
87 88
88 89
89 90
90 91
91 92
92 93
93 94
94 95
95 96
96 97
97 98
98 99
99 100
100 101
101 102
102 103
103 104
104 105
105 106
106 107
107 108
108 109
109 110
110 111
111 112
112 113
113 114
114 115
115 116
116 117
117 118
118 119
119 120
120 121
121 122
122 123
123 124
124 125
125 126
126 127
127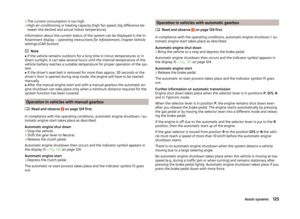 128
128 129
129 130
130 131
131 132
132 133
133 134
134 135
135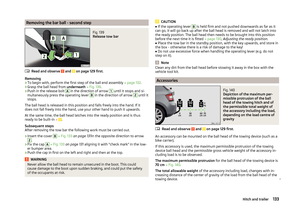 136
136 137
137 138
138 139
139 140
140 141
141 142
142 143
143 144
144 145
145 146
146 147
147 148
148 149
149 150
150 151
151 152
152 153
153 154
154 155
155 156
156 157
157 158
158 159
159 160
160 161
161 162
162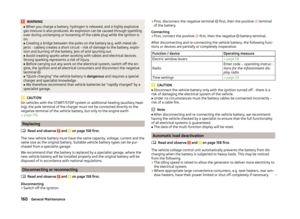 163
163 164
164 165
165 166
166 167
167 168
168 169
169 170
170 171
171 172
172 173
173 174
174 175
175 176
176 177
177 178
178 179
179 180
180 181
181 182
182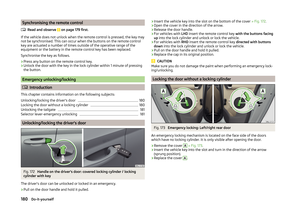 183
183 184
184 185
185 186
186 187
187 188
188 189
189 190
190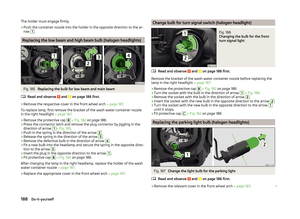 191
191 192
192 193
193 194
194 195
195 196
196 197
197 198
198 199
199 200
200 201
201 202
202 203
203 204
204 205
205 206
206 207
207 208
208 209
209 210
210 211
211 212
212 213
213 214
214 215
215